First Year Learning Community

Author: Jenna (Page 1 of 2)

Classwork Pickup

image of pickup truck

Students from Fall 2016 can pickup their classwork from my office N1127 on Thursdays at 2PM.

IMPORTANT: Please let me know if you plan to stop by. If you don’t confirm, I may not be in my office.

Please contact me to CONFIRM.

Hope you are having a wonderful semester!

Download PDF

COMD Class 30 | Final Critique

December 19, 2016

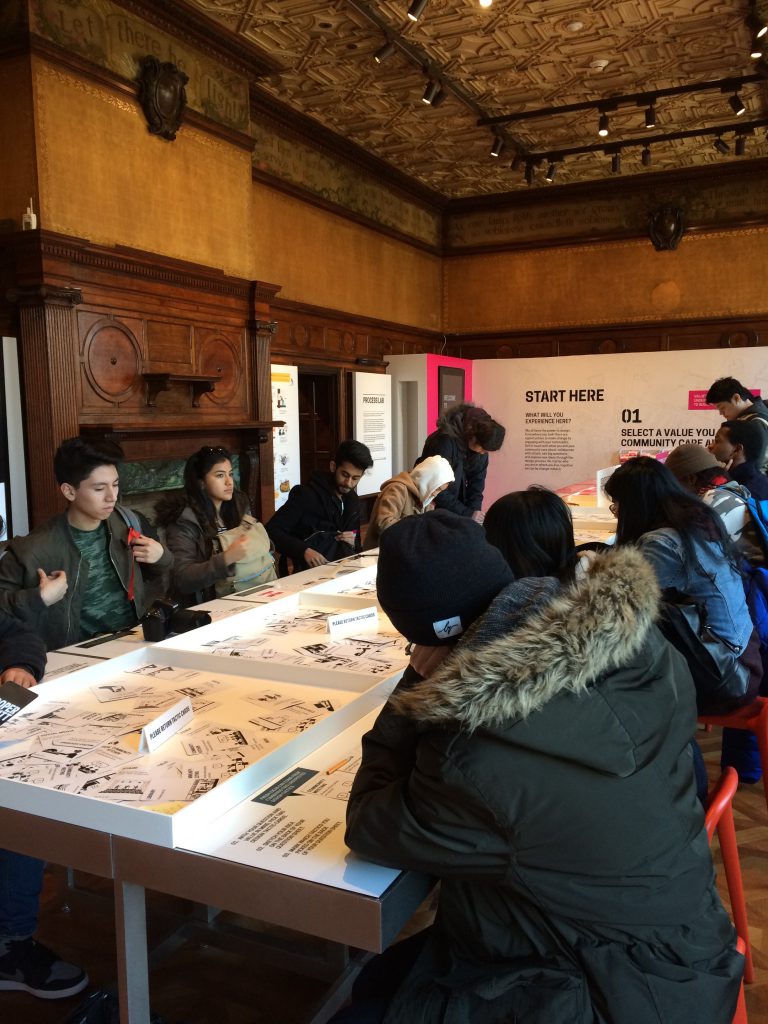
Cooper Hewitt Field Trip

COMD1100 / ENG1101 at the Cooper Hewitt.

LAST DAY! All work is due!

  1. PROJECT #6
    • Phase 1-4 (posted to the Class Blog)
    • Bring Proportional Color Inventory and Final Freestudy (to turn in)
  2. Review the class outlines for Class 1-29, Vocabulary, all six Project guidelines, and Understanding Your Grade.
  3. Materials Needed:
    • a portfolio to take your work home.

Discussion / Critique

Grades

  • Turn in all work that has not been graded including all parts of Project #6 and any make up/reworked projects.
  • Make sure your blog posts have all required content from Projects 1-6.
  • Grades will be posted by December 28th.

Work Pickup

  • Collect your previously graded work today.
  • Check this website and your City Tech email to find out when to pickup Projects #5 and #6.

Homework

  • Take a field trip once a week and PLAY & CREATE everyday.
  • Please keep in touch!

Download PDF

COMD Class 29 | Field Trip + Color Inventory

December 14, 2016

FIELD TRIP!

WHERE: Cooper Hewitt Design Museum
2 East 91st Street
(between 5th and Madison Avenues)
New York, New York 10128

HOW: Take the 4, 5, 6 to 86th Street and walk 4 blocks North and West, toward the park.

WHEN: Meet outside the Musuem entrance at 10:30am SHARP.

  • PLAN AHEAD: Check Google map directions for transportation times
  • You will be back at school by 2pm.

What’s DUE?

Lab/Field Trip

COOPER HEWITT DESIGN MUSUEM FIELD TRIP

At the Museum:

  • Using the interactive pen, “collect” objects from the museum collection and save them as sources for your Proportional Color Inventory.
  • Find a reference that has the following elements:
    1. Dominant color, Sub-Dominant color, and Accent color.
    2. A tint or shade

After the Museum:

  • Visit your custom Museum collection page (as described by the Museum postcard)
    At home or on your mobile device visit cooperhewitt.org/you and enter the code printed on your ticket—everything you collected and created will be waiting for you!
  • OR… Find your objects in the online collection
  • OR.. Try searching by color
  • Right/Control-click on the image to save it for placement in your Proportional Color Inventory.

IMPORTANT: Review PROJECT #6 guidelines very closely and complete:

  1. Phase 2: Proportional Color Inventory
  2. Phase 3: Final Freestudy (directly based on the Proportional Color Inventory)

Questions?

Homework

LAST DAY! All work is due!

  1. PROJECT #6
    • Phase 1-4 (posted to the Class Blog)
    • Bring Proportional Color Inventory and Final Freestudy (to turn in)
  2. Review the class outlines for Class 1-29, Vocabulary, all six Project guidelines, and Understanding Your Grade.
  3. This is your last chance to complete or rework your projects to improve your grade. You will not have time in class.
  4. Materials Needed:
    • a portfolio to take your work home.

Download PDF

COMD Class 21 | Field Trip

Field Trip!

What’s Due?

ALL Saturation Studies! 

Post to the class blog. See Project #4: Phase 2 Define.

  • Chromatic Gray Studies #1 & #2
  • Muted Color Studies #1 & #2
  • Prismatic Color Studies #1 & #2

If you haven’t posted your color wheel freestudy (Phase 1 Discover), do that as well.

Comment and give feedback on your peer’s hard work and effort.

Grades and Feedback

  • Project #2 grades have been posted. If you didn’t receive a grade comment on your Phase 4 post, see me.
  • Project #3 grades will be posted shortly. Please make sure you have created a Phase 4 post so I can give you a grade and feedback on your work.

Student Show

  • The Student Show opens on Thursday and will be up for a week.
  • Be sure to stop by the Grace Gallery to view work from first and second year COMD students – including your own!

Download PDF

COMD Class 15 | Painting Lab

October 26, 2016

What’s Due?

  • Broad and Narrow Value Collages finished. See Project #3: Phase 2 Define for details.
  • Create a new blog post called Value-Added Portraits: Phase 2.
    • Add an image of your 2 collages. Don’t forget to caption them Broad Range and Narrow Range (high-key or low-key).
    • Include the hours that you worked on this part of the project.
    • Don’t forget to comment on at least 3 other student’s posts.
  • Come prepared to work on Painting.

Materials needed: 

Painting Supplies:

  • white and black gouache paints
  • sable-type watercolor brushes (do not buy brushes for acrylic or oil)
    • FLAT:  1/2″ angle, #4
    • ROUND: #1, #5
  • two water containers (yogurt cups, soda bottles with tops cut off, soup cans)
  • palette (round 10-well)
  • cotton rags (old white t-shirts or scraps)

Show and Tell

  • Anyone have any interesting design-related ideas, objects, or events to share?

Demo:

  • See Painting Demo in Class 14 for details

Work Time / Meetings with Professor

  • Work on your paintings using the technique demonstrated.
  • Discuss grades and any questions about coursework.

Homework

  • Complete your Broad-Range Painting. NOTE: Do not glue! We will mount your finished collages and paintings in class together.
  • If you have a laptop computer with Photoshop (any version), please bring it.

Materials TO ORDER or Pickup (don’t delay!):

  • mini color wheel
  • primary colors gouache set – Utrecht Designer Gouache (Recommended)
    Set of 8 – Primaries includes:

    • black
    • white
    • rose tyrien or primary magenta
    • turquoise blue or primary cyan
    • brilliant yellow or primary yellow
    • flame red or primary red
    • ultramarine blue or primary blue

Download PDF

COMD Class 14 | Collage Crit & Painting

October 24, 2016

What’s Due?

  1. Complete VALUE RANGE RESEARCH:
  2. Complete (1) Narrow Value Range Collage (either high-key or low-key) using your portrait printouts, refer to Project #3: Phase 2. Come ready to work on your paintings.

Materials Needed:

  • white and black gouache paints
  • sable-type watercolor brushes (do not buy brushes for acrylic or oil)
    • FLAT:  1/2″ angle, #4
    • ROUND: #1, #5
  • two water containers (yogurt cups, soda bottles with tops cut off, soup cans)
  • palette (round 10-well)
  • cotton rags (old white t-shirts or scraps)
  • Sketchbook, pencils, eraser, knife/scissors, ruler/T-square, drafting tape

Critique

Students will present completed (1 of 2) 6″x6″ collages to the class.

  • (1) Narrow Value Range: either high-key or low-key

HOW TO GIVE AND RECEIVE A GOOD DESIGN CRITIQUE:

Do the compositions presented follow the guidelines?

  • Is there a sense of MOVEMENT / COMPOSITIONAL FLOW to direct the viewer to a clear FOCAL POINT emphasized through the use of CONTRAST and changes in VALUE?
  • Are the compositions 6×6″ squares?
  • Do you observe new shapes and lines created from the original portrait?
  • Is the value range, narrow (high or low) and does it convey a certain mood?
  • Is the work clean, neat, and thoughtfully presented?

Lab

Continue work in class on Project #3: Phase 2 & Phase 3

Demo

Painting Prep:

  • Take a photo of  your finished and approved collage, just for future reference.
  • Use a small piece of tape on the back of each square to adhere them to a piece paper in your sketchbook.
  • Create a viewfinder frame, so that you only see one square at a time while you are working.
  • Keep everything clean and neat.

Once collage compositions are critiqued and approved, work on recreating your Broad Value composition in paint.

Broad-Range Painting:

  1. Recreate your broad-range collage in paint.
  2. Using your collage pieces as a visual reference, you will be using a viewfinder and grid and painting each area in isolation (independently) from its neighbor. This is VERY important.
  3. Create a viewfinder frame, so that you only see one area of your composition at a time while you are working. Draw grid lines around the edges of your collage (NOT ON TOP) to keep track of your progress.
  4. On a piece of clean, 9×12″ bristol trace or measure the dimensions of your collage squares from the exercise above.
  5. Using your Value Scale as a guide, recreate (in gouache paint) each area of your composition using a range of black, white, and gray values- achieving continuous tone in areas where highlight and shadow blend together.
  6. Painting Tips:
    • Do not worry about accurately rendering an eye, nose or ear, see/think only in terms of value and the boundaries of each value relationship.
    • Notice how some values crossover shape boundaries into adjoining areas (open-value), while others are limited by the edges of the shape (closed-value).
    • Remember to work on each square independently and protect your finished painting with tracing paper as you work. Gouache is very delicate and can easily pick up the dirt and oils from your hands.
    • Mix a very small amount of water thoroughly into the paint, for each value you create. The consistency should be like whole milk or cream. Before you apply paint to paper make sure it’s completely mixed in the palette to produce a flat consistent appearance. We want flat, blocks of paint with few streaks or brush marks.
    • Wash your brush after each value is mixed and applied. Keep two containers of water, use 1 for washing your brushes and 1 for adding water to paint.
    • Use a paper towel or rag to get excess paint and water off the brush before mixing a new value.
  7. When you have completed your composition carefully protect all elements with a piece of clean tracing paper and cardboard.
  8. We will cut and mount the painting with the original collage together in class.

Homework

For next class:

  • Broad and Narrow Value Collages finished.
  • Come prepared to continue to work on Painting.
  • Same materials as today.

Download PDF

COMD Class 13 | Project 3 – Added Value

October 19, 2016

What’s DUE?

Finish Phase 3 and Phase 4 feedback/documentation posts for Project #2. And thoughtfully critique at least 3 other students’ animations. If you don’t post Phase 4: Deliver, you will not receive a grade for the project.

Materials needed:

  • Download and PRINTOUT 5 laser prints of your portrait ((DOWNLOAD HERE))
    • IMPORTANT NOTE: IF you missed the last class and didn’t get your photograph taken, contact the professor BEFORE Wednesday.
  • Sketchbook, 9×12″ Bristol, pencils, eraser, knife/scissors, ruler/T-square, drafting tape.

Lecture

Review Vocabulary From Last Class

  • Elements: Value
  • Principles: Emphasis, Focal Point, Contrast
  • PLUS: Compositional Flow, Open and Closed Value and Scale
    • Compositional Flow: Flow is about movement and direction, and leading the eye from one part of a composition to another in the direction you want it to move. Starting with your dominant element, which should be the entry point into your composition, you then provide directional cues for the eye to follow throughout your composition.
    • Closed-Value: Values are limited by the boundaries of shapes and clearly isolate individual parts of the composition. This type of composition could create dramatic mood through contrasting values.
    • Open-Value: Values cross shape boundaries, integrating parts with adjoining areas and unifying the composition. This type of composition could create a mysterious fog or haze using closely related values.
    • Proportion: Relationship between parts of a whole or related units.
      • Scale: Associations of size, related to a constant size, unit of measure, relative whole (such as a the human body, or picture plane)

LAB 1 – Project #3 Discover

Class 12 Lab

  • Value Range Research
  • Value Scale

LAB 2  – Project #3 Define

Collages

Goal: Create two 6″ collage compositions that use COMPOSITIONAL FLOW to direct the viewer to a clear FOCAL POINT through the use of CONTRAST and changes in VALUE. (past student examples)

  • Using the printouts of the portraits taken last class, cut apart your portrait into a variety of squares or rectangles.
  • Rearrange and experiment with your portrait pieces until your develop (2) unified, but ABSTRACT, 6″x6″ compositions as follows:
    • (1) Narrow Value Range: either high-key or low-key
    • (1) Broad Value Range
  • In each composition:
    • Create a focal point wherein one area or element is emphasized through contrast in scale and value.
    • Use Movement / Compositional Flow to clearly direct the viewer’s eye to the focal point.
    • Use Value steps to support transitions from one compositional element to another.
    • Avoid reconfiguring your compositions using recognizable facial features (eyes, nose, mouth).
    • Examine the lines and shapes that make up your portrait and create new shapes and lines that convey a certain mood.
  • DO NOT GLUE THEM DOWN YET!

NEXT

  • Take a photo of  your finished and approved collages, just for future reference.
  • Make sure each piece of your composition is properly marked on the back, indicating the TOP and numbered from left to right, top to bottom.
  • Position each piece in your collage composition on a piece of paper. Use a small bit of tape on the back to adhere your pieces to the paper.
  • Keep everything clean and neat.

Homework

  1. Complete VALUE RANGE RESEARCH:
  2. Complete Project #3: Phase 2. Come ready to work on your paintings.

Materials Needed:

  • white and black gouache paints
  • sable-type watercolor brushes (do not buy brushes for acrylic or oil)
  • FLAT:  1/2″ angle, #4
  • ROUND: #1, #5
  • two water containers (yogurt cups, soda bottles with tops cut off, soup cans)
  • palette (round 10-well)
  • cotton rags (old white t-shirts or scraps)

Download PDF

COMD Class 11: Animated Mashup

October 5, 2016

What’s needed for this class:

  1. Animated Mashup Prep
    • Find your scanned hi-res file for animation in this Dropbox folder.
    • Save to Dropbox and/or bring in on a drive.
  2. We will prep, animate and add audio to your digital mashup file. Come prepared to work.
  3. NOTE: If you didn’t finish your inked mashup, please see/contact me ASAP!

Lab: Animating and Adding Sound in Photoshop

PREP in Photoshop:

  • Open your scan file in Photoshop, rename and save it FirstInitalLastNameMashupPrep.psd. Make the following adjustments:
    • Image size: 72 dpi, 1028 wide x768 high
    • Color Mode: RGB
  • SAVE AGAIN.
  • Using the rectangle marquee tool, cut (Command + X) and paste in place (Command + Shift + V) each pattern square on a new layer for use in your animation.

Add Sound and Animate:

  • We will be importing two pieces of music, one with staccato rhythm and one with legato rhythm: Summertime and Another One Bites the Dust. Download these files to your working folder or desktop.
  • Review the guidelines: Creating Timeline Animations
  • Follow the demo presented in class.
  • Save your file(s) to Dropbox, GDrive or flash

Homework

  1. Bring your completed Animation Mashup to the next class.
  2. We will export and upload to the class blog for critique.

Download PDF

COMD Class 10 | Crit & Mashup Animation Prep

October 5, 2016

What’s due for this class?

  1. DUE: Final inked version of your Pattern Mashup on a piece of 9″x12″ bristol board, based on your finalized preparatory compositions. Come prepared to present your work!
  2. Post to the blog.
    • Create a new blog post called Sound Visualizations: Phase 2.
    • Take photos of your finished Inked Pattern Mashup and add them to the post (make sure it is well-lit and in focus.)
    • Include the hours that you worked on this part of the project.
    • Don’t forget to comment on at least 3 other student’s posts.
  3. Materials needed: Flash/jump drive.

Grades

  • If you turned in your work on the date due you will find a comment and a grade in your post: Urban Artifacts: Phase 4.
  • If you turned in your work late, please confirm that you have posted your final blog post Urban Artifacts: Phase 4. Your grade will be posted shortly.
  • If you did not complete your final blog post Urban Artifacts: Phase 4, your project is incomplete and you will receive an F grade. Please see me.
  • Refer to the Project Rubric and grading policy “Understanding Your Grade.”
  • You have until Midterm to rework Project #1 and improve your grade.
  • If you have any concerns or questions, ask!

Critique

Present your finished inked mashups to the class.

  • Present and analyze your finished work in terms of concept, craft, what you learned, and the design process.
  • State your name, your understanding of the project goals (ie: what is the point?), which parts are successful and which parts need more work.
  • Your peers and the professor will provide feedback. You will have an opportunity to revise your work based on the feedback and improve your grade.
  • When critiquing other student’s work, clearly describe what works and what doesn’t work using the project vocabulary: Line, Rhythm, Repetition, Variety, Pattern, Unity, Grid, Rule of Thirds, Economy

Discussion

Examples:

Careers in Communication Design:

Lab: Scanning and preparing digital files

SCAN:

  • Create a folder on your drive called FirstInitalLastNameMashup
  • Scan your finished inked Pattern Mashup (300dpi, grayscale, jpg).
  • Save this hi-res file as FirstInitalLastNameMashupHIRES.jpg to the folder you just created.
  • Open your file in Photoshop, rename and save it FirstInitalLastNameMashupPrep.jpg and save it to the same folder. Make the following adjustments:
    • Image size: 72 dpi
    • Uncheck Resample
    • Color Mode: RGB
  • SAVE AGAIN.

PREP in Photoshop:

  • Using the rectangle marquee tool, cut and paste each pattern square on a new layer for use in your animation.
  • We will do this together in class.
  • Save your files to your FirstInitalLastNameMashup folder.

Homework

  1. Complete Animated Mashup Prep
    • Find your scanned hi-res file for animation in this Dropbox folder.
    • Complete PREP in Photoshop. Save to Dropbox and/or drive.
  2. We will animate and add audio to your digital mashup file next class. Come prepared to work.
  3. NOTE: If you didn’t finish your inked mashup, please see/contact me ASAP!

Download PDF

COMD Class 9 | Pattern Mashups

September 28, 2016

What’s needed for this class?

  1. Project #2: Phase 1
  2. Completed Project #2: Phase 2 > Staccato / Legato Pattern Mashup Prep
  3. Materials: Sketchbook and variety of pencils — plus inking pens, 9×12″ bristol.

Peer Critique

  • Divide into groups of three
  • Present your refined Staccato / Legato Pattern drawings
  • When critiquing your peer’s work, remember to identify which patterns are successful AND WHY THEY ARE SUCCESSFUL and which patterns are not successful AND WHY THEY ARE NOT SUCCESSFUL.
  • The goal is to help your peers successfully realize this part of the project and “solve” the design problems presented.
  • Try to use of the vocabulary: Line, Rhythm, Repetition, Variety, Pattern, Organic, Geometric and Movement

Lecture

  • Review Elements and Principles
  • Discuss examples of Repetition in web design from Design Meltdown
  • How are pattern and rhythm used?
    • Regular pattern repeats elements in timed or predictable intervals.
    • Progressive pattern repeats elements, but changes in size or color to create progressive steps.
    • Flowing patterns are organic or natural feeling patterns that create movement

Lab

Pattern Mashup Work

Once you have created at least 4 strong pattern squares (2 Staccato and 2 Legato) move on to the next step in Phase 2: Define > Inked Mashup.

Before the end of class

  • Review Phase 2: Define > Inked Mashup guidelines.
  • Complete at least 3 drawings in your sketchbook to explore how you will arrange your final inked Pattern Mashup. These are NOT thumbnails. These are preparatory drawings that you will use to complete your final inked compositions.
  • Ask the Professor to review your work. If the work is approved, you may begin work on your final inked Mashup on 9″x12″ bristol board.

Homework

  1. DUE: Phase 2: Define > Inked Mashup 
    • Final inked version of your Pattern Mashup on 9″x12″ bristol board. Come prepared to present your work!
  2. DUE: Documentation and Feedback
    • Create a new blog post called Sound Visualizations: Phase 2.
    • Take a photo of your finished Inked Pattern Mashup and add it to the post (make sure it is well-lit and in focus.)
    • Include the hours that you worked on this part of the project.
    • Don’t forget to comment on at least 3 other student’s posts.
  3. Materials needed: Flash/jump drive.
  4. Contact me with questions.

Download PDF

« Older posts