Category Archives: Classes

Class 29

Class Info

  • Class Date: Tues. Dec. 15
  • Class Time: 8:30AM-10:00AM

Topic

  • Prepare for submissions Project 3. DUE next class. LAST CLASS

Objectives

  • Further develop presentation, communication and critique skills

Activities

In class presentation Found Alphabet

To-Do After Class

FINAL Project 3 Posters

  • Place all pages into one documen
    • Page 1
      Poster 11 x 17 Grid poster Pet Peeve
      Page 2
      Poster 11 x 17 Hierarchy Poster Pet Peeve/
      Page 3
      Poster 11 x 17 Color Texture Poster Pet Peeve/
    • Export PDF Lastname First name Project Final 3.pdf
    • Create a new post Lastname first name Project 3 Finalgive it categoires “student post” and “project 3”
    • UPLOAD your multipage PDF

Please refer to PDF with how to package and combine pages from different documents in InDesign

Class 28

Class Info

  • Class Date: Tues. Dec. 8
  • Class Time: 8:30AM-10:00AM

Topic

Objectives

  • Further develop presentation and critique skills.

Activities

Type challenge Color

To-Do After Class


NOT DUE NEXT CLASS DUE LAST CLASS Dec 17

FINAL Project 3 Posters

  • Place all pages into one document, See PDF
    • Page 1
      Poster 11 x 17 Grid poster Pet Peeve
      Page 2
      Poster 11 x 17 Hierarchy Poster Pet Peeve/
      Page 3
      Poster 11 x 17 Color Texture Poster Pet Peeve/

    • If we get to it Page with 4 square social media posts

Please refer to PDF with how to package and combine pages from different documents in InDesign

Class 27

Class Info

  • Class Date: Thurs. Dec. 3
  • Class Time: 8:30AM-10:00AM

Topic

  • Color texture poster

Objectives

Continue to develop presentation skills
Color
Poster 3 Color

Activities

Color texture placement Drop box files to place for classwork

To-Do After Class

  • Initial layout Project 3 color texture poster upload jpg

NOT DUE NEXT CLASS

  • Place all pages into one document, See PDF
    • Page 1
      Poster 11 x 17 Grid poster Pet Peeve
      Page 2
      Poster 11 x 17 Hierarchy Poster Pet Peeve/
      Page 3
      Poster 11 x 17 Color Texture Poster Pet Peeve/

    • If we get to it Page with 4 square social media posts

Please refer to PDF with how to package and combine pages from different documents in InDesign

Class 26

Class Info

  • Class Date: Tues. Dec. 1
  • Class Time: 8:30AM-10:00AM

Topic

Objectives

Understanding text wrap (or runaround) and the relationship of between image, text, space and distance

  • Use the same grid as the previous two posters
  • Content:
    • The words: My Pet Peeve Exhibit
    • Title of your Pet Peeve (different for everybody)
  • Specs:
    • Use a grid as the previous two posters
    • include a shape
    • must use text wrap
    • Type CONSIDERATIONS as per previous lectures,

Activities

To-Do After Class

Graphic Assignment

Complete layout of Poster 3 with Visual Hierarchy (pt. size, SCALE, Placement, Alignment, Variations, Compositions)

Class 25

Class Info

  • Class Date: Tues. Nov. 24
  • Class Time: 8:30AM-10:00AM
  • Continue Posters.
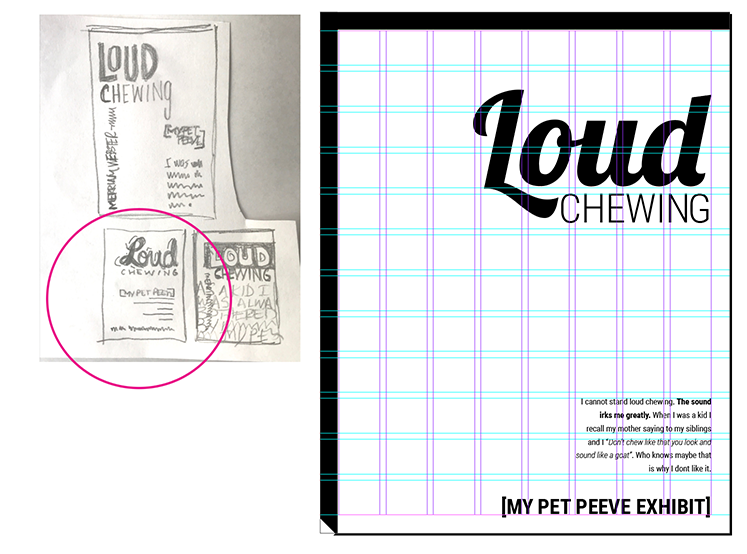
  • Look at sketches and determine which are the best solutions.
  • Translate our sketches to actual designs.

Objectives

  • Learn to translate sketches to actual designs (typeface selection, use of grid, visual hierarchy).

Activities

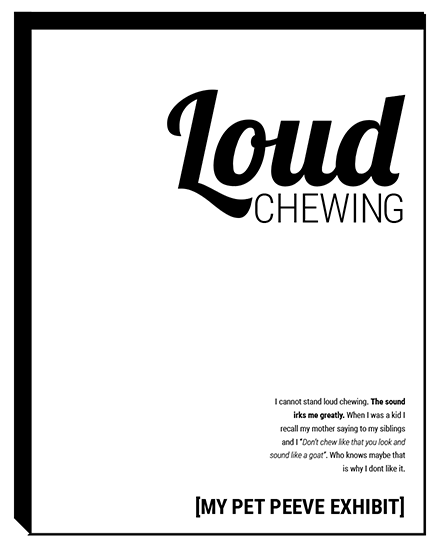
Now that we have the grid and content of your poster, it is time to design

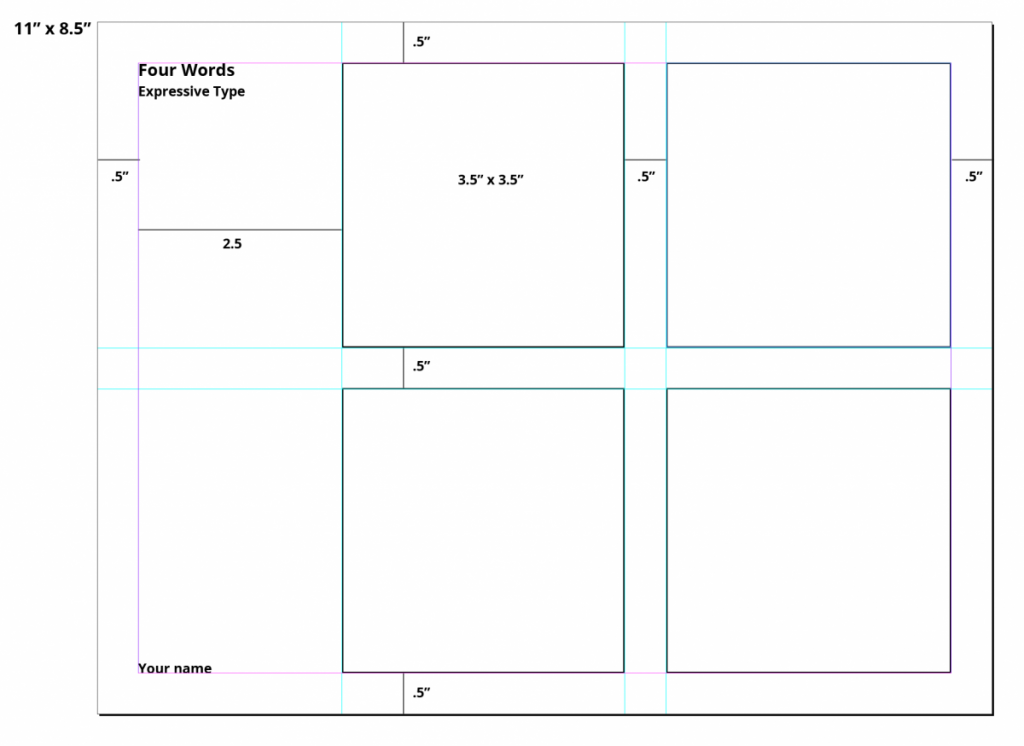
  • Create NEW Document:
    • 2-page document
    • size 11 x 17 inches
    • 3 pica margin all around
    • 8 columns / 1 pica gutter
    • 12 horizontal rows / 1 pica gutter
      • GO to LAYOUT>CREATE GUIDES>ADD the rows and gutter> OPTIONS>from margin
  • Specs:
    • Create 2 different designs (2 layouts following the same grid)
    • Use type only 
    • TWO typefaces max. (but with extensive families ok)
    • Black and White
    • Follow the grid
    • Emphasize your visual hierarchy
      • Emphasize contrast with scale (something must be BIG, something must be small)
    • Must consider and apply what was previously covered in class: Type selection and variations, alignment, word and letter spacing, line height, expression, etc.
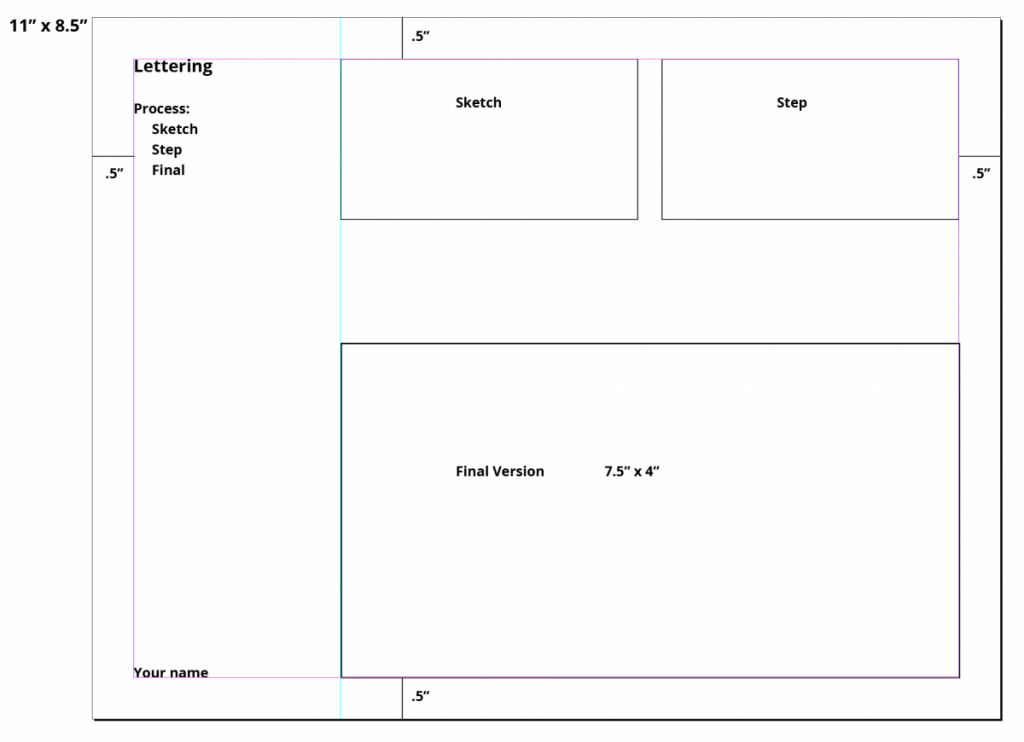
  • Look at sample below with complete process:
Slider image

Project 3 process

Slider image
Slider image

To-Do After Class

Graphic Assignment
  • DUE Next class:
    • Complete two different layouts in InDesign
      These will have the same grid and the same contents, but completely different layouts
    • Once completed take save your InDesign files. Take screenshot of your solutions. These screen shots must show the guides.
    • name your files:
      lastname_name_poster1
      lastname_name_poster2

Class 24

Class Info

  • Class Date: Thurs. Nov. 19
  • Class Time: 8:30AM-10:00AM

Topic

  • Intro to project 3
  • Visual Hierarchy: Giving levels of importance to the difference elements that are part of a design.
  • Examine this PDF with Visual Hierarchy Progression. Every page uses the exact same text, but the hierarchy changes once we start applying different principles (For example a basic change in type size can make a difference in the way the viewer looks at the design)

Objectives

  • Learn about visual hierarchy and how these design principles can improve or change the way we see and read.
    • space
    • type size
    • spacial zones
    • color/reverse
    • alignment
    • added elements (lines)
    • variations in type (bold)
    • dynamic compositions (diagonals)
    • others

Activities

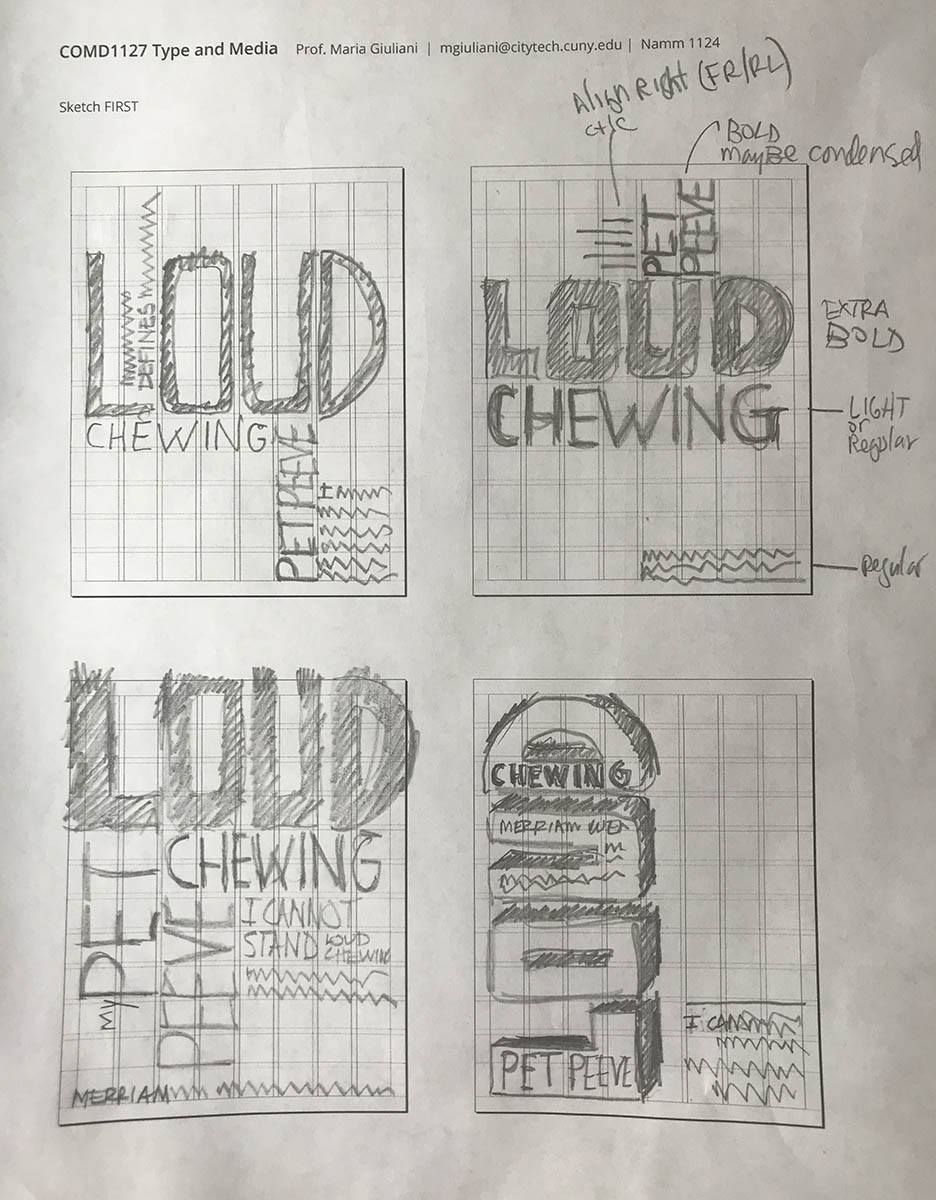
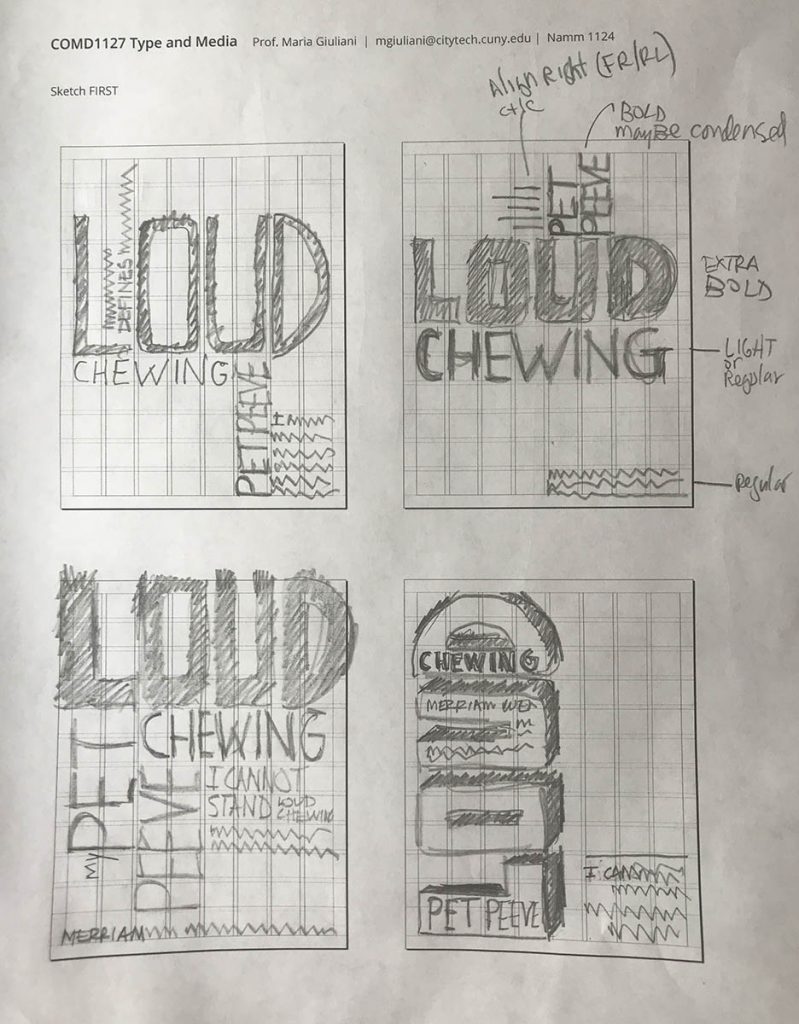
  • Sketch> When sketching consider the following:
    • Use type only 
    • TWO typefaces max. (but with extensive families ok)
    • Black and White
    • Follow the grid
    • Emphasize your visual hierarchy
      • Emphasize contrast with scale (something must be BIG, something must be small)
    • Must consider and apply what was previously covered in class: Type selection and variations, alignment, word and letter spacing, line height, expression, etc.
  • Look at sample below
    • Content:
      • The words: Pet Peeve
      • Definition of the word Peeve
      • Title of your Pet Peeve (different for everybody)
      • Your personal text: One to Three sentences explaining your pet peeve
This example shows sketching on the actual grid. Might be helpful to keep proportion and to think of exact grid placement of elements

To-Do After Class

  • PART 1
  • Complete sketches started during class – upload hierarchy sketches to media library as jpegs
  • Sketch. Here is a PDF with the printed grid. It will help you to determine where and how to place content. As well as to start thinking about typographical style.
  • See Example
  • PART 2
  • Refine you Grid layout upload jpg with visible grids and guides showing

Class 23

Class Info

  • Class Date: Tues. Nov. 17
  • Class Time: 8:30AM-10:00AM

Topic

Project 3

  • The typographical grid.
    • A grid is a system of vertical and horizontal guides used for the organization of a layout. Grids are used in graphic and web design.
  • Quick Reference PDF: The Grid

The Typographical Grid Resources

Google Drive Grid

Objectives

  • Understanding the parts of grid:
    • Margins
    • Columns and rows
    • gutters (vertical and horizontal)
    • modules and spacial zones
  • Students develop understanding of organization in design

Activities

To-Do After Class

The Posters:

  • The Typographical Grid poster 1 initial layout with your text
    • 11×17
    • utilizing the grid

Posters must be 11×17 and include the following text:

• Pet Peeve

• Merriam-Webster.com definition- a pet peeve as a frequent subject of complaint

• Title of your Pet Peeve •

Your paragraph explaining your pet peeve

Class 22

Class Info

  • Class Date: Thurs. Nov. 12
  • Class Time: 8:30AM-10:00AM

Topic

  • Project 2 Due today
    • Final File Submissions due today
    • Presentations Project 2 today

Activities

To-Do After Class

1. Post one dynamic typographic poster design image to media library take examples from this site
https://www.typographicposters.com/posters

2. Project 3 Posters Series and Social Media Posts

In preparation to our next assignments (a series of posters and social media material), we will need to collect some text

Posters must include the following text:

• Pet Peeve

• Merriam-Webster.com definition- a pet peeve as a frequent subject of complaint

• Title of your Pet Peeve •

Your paragraph explaining your pet peeve

  • Do not design anything at this point. We are just collecting text,

FYI: What is a pet-peeve?

  • dictionary.com: a particular and often continual annoyance merriam-webster.com: a frequent subject of complaint vocabulary.com: a peeve is an annoyance, and a pet peeve is an annoyance that’s nurtured like a pet — it’s something someone can never resist complaining about. There are all kinds of pet peeves, like littering, misusing punctuation, driving slowly in the fast lane, or talking during movies. If something like that drives you crazy and you have to yap about it, it’s a pet peeve.

This example shows sketching on the actual grid. Might be helpful to keep proportion and to think of exact grid placement of elements

Class 21

Class Info

  • Class Date: Tues. Nov. 10
  • Class Time: 8:30AM-10:00AM

Topic

Final Project 2

Activities

Type Challenge – Grid

Type Talk Discussion – Type Talk Anja Kaiser

To-Do After Class

Project 2 – Part 1,2 – FINAL Deliverables

  • Make all corrections and edits
  • Final presentation. due NEXT CLASS
    • 8.5 x 11 Indesign Document
    • .5 margins all around (see below for additional measurements
    • final versions of the four words (expressive type assignment)
    • final version of the lettering assignment with images of process (sketch and process)
  • A post on OpenLab named
  • last Name_firstname Project 2 final
  • give categories, Project 2, Student Post
  • Create Indesign page in format below placed your finals into file.
  • export as Both JPG and one multipage PDF
    PDF named last Name_firstname Project 2 final
  • insert into your post
This image has an empty alt attribute; its file name is four_words_final_size-1024x746.png
This image has an empty alt attribute; its file name is lettering_final_size-1024x742.png

  • Based on sketches and ideas, students determine what is the best way to continue with their lettering project:
    • Is it best to take photographs of objects?
    • Use traditional material (paint, draw, etc) or work digitally (with application)?
  • Once you know which way you are working, then determine process to follow:
    • Capture image (via camera, scanner/ phone/ app/ copier)
    • Bring image into Illustrator/Photoshop/other apps. This depends on your solution, for example:
      • Trace or use pen tool in Illustrator
      • Clean or adjust colors in Photoshop
    • If working by hand: Use tracing paper and pencils, then marker to clean image.
    • Capture image again and repeat steps if necessary
  • Careful with spelling (you are essentially drawing so there is no automatic spell check!) and keep work editable if corrections needs to be made

Class 20

Class Info

  • Class Date: Thurs. Nov. 5
  • Class Time: 8:30AM-10:00AM

Topic

To-Do After Class

  • Refined version of your word due next class Size 7.5″ x4″
  • Bring Lettering to next step: Must show progress next class.

  • Based on sketches and ideas, students determine what is the best way to continue with their lettering project:
    • Is it best to take photographs of objects?
    • Use traditional material (paint, draw, etc) or work digitally (with application)?
  • Once you know which way you are working, then determine process to follow:
    • Capture image (via camera, scanner/ phone/ app/ copier)
    • Bring image into Illustrator/Photoshop/other apps. This depends on your solution, for example:
      • Trace or use pen tool in Illustrator
      • Clean or adjust colors in Photoshop
    • If working by hand: Use tracing paper and pencils, then marker to clean image.
    • Capture image again and repeat steps if necessary
  • Careful with spelling (you are essentially drawing so there is no automatic spell check!) and keep work editable if corrections needs to be made

This PDF shows an analysis what tools might work best within Illustrator

For this example we experimented with paper, glue and actual sprinkles to create the letters, The image needs to be cleaned in Photoshop

This image has an empty alt attribute; its file name is mg_sprinkles_food_example-1.jpg


NOT FOR NEXT CLASS

Project 2 – Part 1,2 – FINAL Deliverables

  • A post on OpenLab named
  • last Name_firstname Project 2 final
  • give categories, Project 2, Student Post
  • Create Indesign page in format below placed your finals into file.
  • export as Both JPG and one multipage PDF FPDF named last Name_firstname Project 2 final
  • insert into your post
This image has an empty alt attribute; its file name is four_words_final_size-1024x746.png
This image has an empty alt attribute; its file name is lettering_final_size-1024x742.png

Continue lettering project as per individual styles and approaches.

  • Make all corrections and edits
  • Start preparing for final presentation. due class 21
    • 8.5 x 11 InDesign Document
    • .5 margins all around (see below for additional measurements
    • final versions of the four words (expressive type assignment)
    • final version of the lettering assignment with images of process (sketch and process)

Class 19

Class Info

  • Class Date: Tues. Nov. 3
  • Class Time: 8:30AM-10:00AM

Topic

Activities

To-Do After Class

  • Refined version of your word due next class
  • Bring Lettering to next step: Must show progress next class.

Project info

  • Based on sketches and ideas, students determine what is the best way to continue with their lettering project:
    • Is it best to take photographs of objects?
    • Use traditional material (paint, draw, etc) or work digitally (with application)?
  • Once you know which way you are working, then determine process to follow:
    • Capture image (via camera, scanner/ phone/ app/ copier)
    • Bring image into Illustrator/Photoshop/other apps. This depends on your solution, for example:
      • Trace or use pen tool in Illustrator
      • Clean or adjust colors in Photoshop
    • If working by hand: Use tracing paper and pencils, then marker to clean image.
    • Capture image again and repeat steps if necessary
  • Careful with spelling (you are essentially drawing so there is no automatic spell check!) and keep work editable if corrections needs to be made

This PDF shows an analysis what tools might work best within Illustrator

For this example we experimented with paper, glue and actual sprinkles to create the letters, The image needs to be cleaned in Photoshop

This image has an empty alt attribute; its file name is mg_sprinkles_food_example-1.jpg


NOT FOR NEXT CLASS

Project 2 – Part 1,2 – FINAL Deliverables

  • A post on OpenLab named
  • last Name_firstname Project 2 final
  • give categories, Project 2, Student Post
  • Create Indesign page in fomat below placed your finals into file.
  • export as Both JPG and one multipage PDFPDF named last Name_firstname Project 2 final
  • insert into your post
This image has an empty alt attribute; its file name is four_words_final_size-1024x746.png
This image has an empty alt attribute; its file name is lettering_final_size-1024x742.png

Continue lettering project as per individual styles and approaches.

  • Make all corrections and edits
  • Start preparing for final presentation. Assignment is due class 20.
    • 8.5 x 11 InDesign Document
    • .5 margins all around (see below for additional measurements
    • final versions of the four words (expressive type assignment)
    • final version of the lettering assignment with images of process (sketch and process)

Class 18

Class Info

  • Class Date: Thurs. Oct. 29
  • Class Time: 8:30AM-10:00AM

Topic

Objectives

  • Students continue to develop their creative skills and personal styles in relationship to typography and lettering
  • Further develop software application/presentation skills.

Activities

Name That Type

Found Alphabet

Expressive lettering Filmore
https://www.typeroom.eu/
https://www.studiofeixen.ch/

To-Do After Class

  • Refined version of your word due next class
  • Bring Lettering to next step: Must show progress next class.
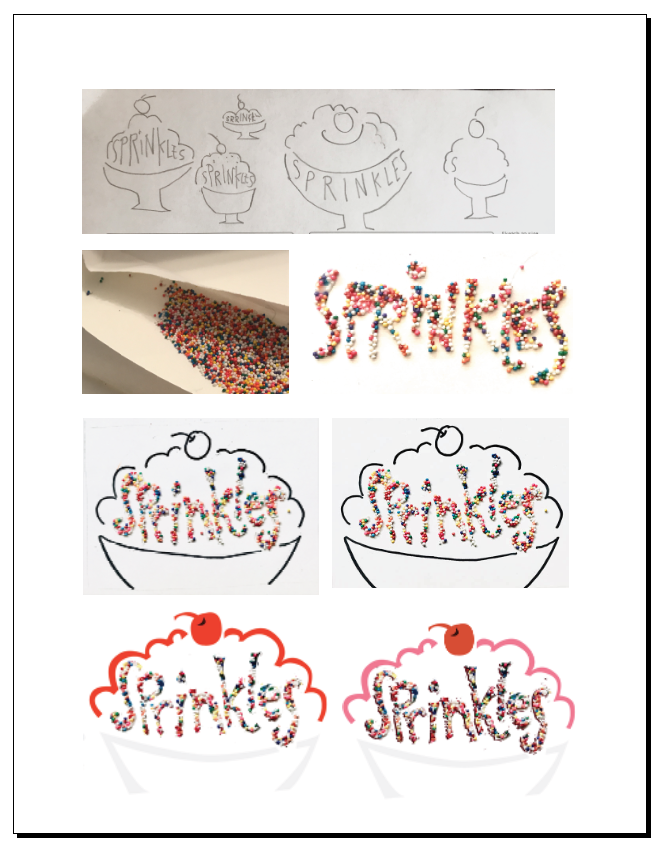
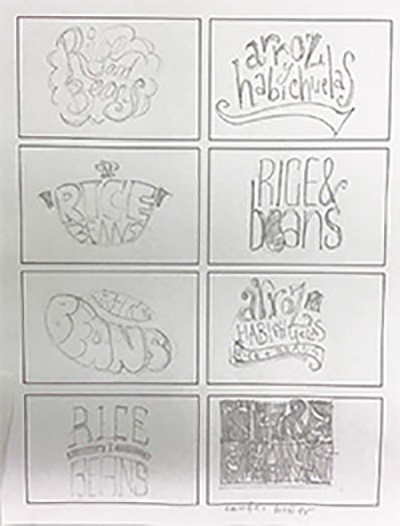
    • Notice the steps followed for this example:
      Sketched / Chose actual sprinkles/ experimented with glue / took photos /in Photoshop: cleaned the pencil marks/ In Illustrator tried a different approach.

  • Upload jpg file . Must not exceed dimensions 600×600
This image has an empty alt attribute; its file name is Screen-Shot-2020-08-07-at-4.25.46-PM.png

Class 17

Class Info

  • Class Date: Tues. Oct. 27
  • Class Time: 8:30AM-10:00AM

Topic

Project 2 Part 2 Intro Expressive Lettering


Choose your favorite food or a favorite pastime such as listening to music, watching videos, playing a sport, etc.
• General Specs: 
◦ Create a one of a kind representation (with letters) of your favorite pastime or favorite food
◦ Work area: 1980 x 1080 pixels (horizontal/rectangular)
◦ Cannot use an existing typeface.
◦ Sketch, research and write your ideas FIRST
◦ Use pencil when sketching, but keep in mind that for the next steps experimental use of material and technique ok: paper/collage, paints, photography, etc. Technique and application is up to you.
Objectives
• Understand the difference between lettering and creative typography with a typeface.
• Understand lettering as it applies to branding, packaging, logotype designs and others areas.
• Explore typographical experimentation.

Objectives

Students develop individual styles.

Activities

Found Alphabet

Type Challenge – 3D build your word

Type Challenge – Expressive Lettering

To-Do After Class

  • Project 2 Part 2 Expressive Lettering (NO TYPEFACES)
  • Sketch at least 6 different solutions.
    Please refer to the following PDF with assignment details.
    • This PDF includes a template that you can follow to sketch to proportionally correct size.
    • Example: Vary your ideas and styles when sketching:
  • Based on sketches and ideas, students determine what is the best way to continue with their lettering project:
    • Is it best to take photographs of objects?
    • Use traditional material (paint, draw, etc) or work digitally (with application)?
  • Once you know which way you are working, then determine process to follow:
    • Capture image (via camera, scanner/ phone/ app/ copier)
    • Bring image into Illustrator/Photoshop/other apps. This depends on your solution, for example:
      • Trace or use pen tool in Illustrator
      • Clean or adjust colors in Photoshop
    • If working by hand: Use tracing paper and pencils, then marker to clean image.
    • Capture image again and repeat steps if necessary
  • Careful with spelling (you are essentially drawing so there is no automatic spell check!) and keep work editable if corrections needs to be made

This PDF shows an analysis what tools might work best within Illustrator

For this example we experimented with paper, glue and actual sprinkles to create the letters, The image needs to be cleaned in Photoshop

Home work 2.


NOT FOR NEXT CLASS

Project 2 – Part 1,2 – FINAL Deliverables

  • A post on OpenLab named
  • last Name_firstname Project 2 final
  • give categories, Project 2, Student Post
  • Create Indesign page in fomat below placed your finals into file.
  • export as Both JPG and one multipage PDFPDF named last Name_firstname Project 2 final
  • insert into your post

Continue lettering project as per individual styles and approaches.

  • Make all corrections and edits
  • Start preparing for final presentation. Assignment is due class 20.
    • 8.5 x 11 InDesign Document
    • .5 margins all around (see below for additional measurements
    • final versions of the four words (expressive type assignment)
    • final version of the lettering assignment with images of process (sketch and process)

Class 16

Class Info

  • Class Date: Thurs. Oct. 22
  • Class Time: 8:30AM-10:00AM

Topic

Project 2 Part 2 Intro Expressive Lettering


Choose your favorite food or a favorite pastime such as listening to music, watching videos, playing a sport, etc.
• General Specs: 
◦ Create a one of a kind representation (with letters) of your favorite pastime or favorite food
◦ Work area: 1980 x 1080 pixels (horizontal/rectangular)
◦ Cannot use an existing typeface.
◦ Sketch, research and write your ideas FIRST
◦ Use pencil when sketching, but keep in mind that for the next steps experimental use of material and technique ok: paper/collage, paints, photography, etc. Technique and application is up to you.
Objectives
• Understand the difference between lettering and creative typography with a typeface.
• Understand lettering as it applies to branding, packaging, logotype designs and others areas.
• Explore typographical experimentation.

Activities

To-Do After Class

  • Finalize Your Project 2 Part 1 words, Upload to your Project 2 page


Class 15

Class Info

  • Class Date: Tues. Oct. 20
  • Class Time: 8:30AM-10:00AM

Topic

Activities

  • Discussions

To-Do After Class

  • Refine Project 2 part 1 Expressive Type
    • Bring ideas into the computer you can use InDesign or Illustrator
    • Upload images into your project 2 post
    • Categories Project 2, Student posts
    • Named Lastname First name Project 2
  • General Specs: 
    • 4 pages (one for each word)
    • Size: 3.5” x 3.5”  square 
    • Add a 1 pt outline (border around the square)
    • Select one Sans Serif Typeface per word (with variations ok)
    • Only use black and white.

Expressive Type Documents

Depero Futurista Expressive Type

Class 14

Class Info

  • Class Date: Thurs Oct. 15
  • Class Time: 8:30AM-10:00AM

Topic

  • Continue Project 2 – Part 1 Expressive Typography: (four words):
  • Bring Ideas into the computer
    • Now it is time to interpret your sketches and determine which actual typeface to use. For this part of assignment you can use Indesign or Illustrator
    • General Specs: 
      • 4 pages (one for each word)
      • Size: 3.5” x 3.5”  square 
      • Add a 1 pt outline (border around the square)
      • Select one Sans Serif Typeface per word (with variations ok)
      • Only use black and white.
  • Remember that you already know about typeface selection, case (U & LC) and word spacing and must apply those concepts moving forward.

You can consider scale, repetition, overlap, removal of letters or parts of it to create a visual definition of your words. Do not add illustrations.

This PDF Shows the use of the PATHFINDER/DIVIDE tool in Illustrator:

This PDF shows how the Touch Tool in Illustrator might be useful if you need to quickly tilt letters

Objectives

  • Students learn how to interpret their sketches to then make better selections of typeface and software to use once moving into digital environment.

Activities

Type Talk Discussion – Rocco Piscatello Posters

Type Challenge – Land of Punctuation.

To-Do After Class

  1. Found Alphabet post
  2. Type Talk Discussion – Rocco Piscatello Posters
  3. Expressive Type – Bring sketches into application continue to refine based on crit, at least one initial layout of each word.
    • upload those layouts into your exiting project 2 post.
    • Create a gallery

Create a Gallery In a Post
https://openlab.citytech.cuny.edu/blog/help/adding-an-image-gallery/
Edit a Gallery In a Post
https://wordpress.com/support/wordpress-editor/blocks/gallery-block/

Please refer to this PDF with assignment details.

Class 13

Class Info

  • Class Date: Tues. Oct. 13
  • Class Time: 8:30AM-10:00AM

Topic

Project 2 – Part 1 Expressive Typography:

Introduction to Project 2: We will explore the use of type as expression by working on a multi part project that will include expressive type with an existing typeface and also lettering.

  1. Please see this Quick Reference PDF with Expressive Type/Lettering Basic Info
  2. then see these examples

Part 1 Type as Expression Using a Sans Serif Typeface:

  1. Choose Four of the following words :

puzzle, focus, confused, shrinking, unbalanced, sink, tired, separate, strong, cheer
fade, drip, destroy, create, mistake, run, walk, fast, slow, grow

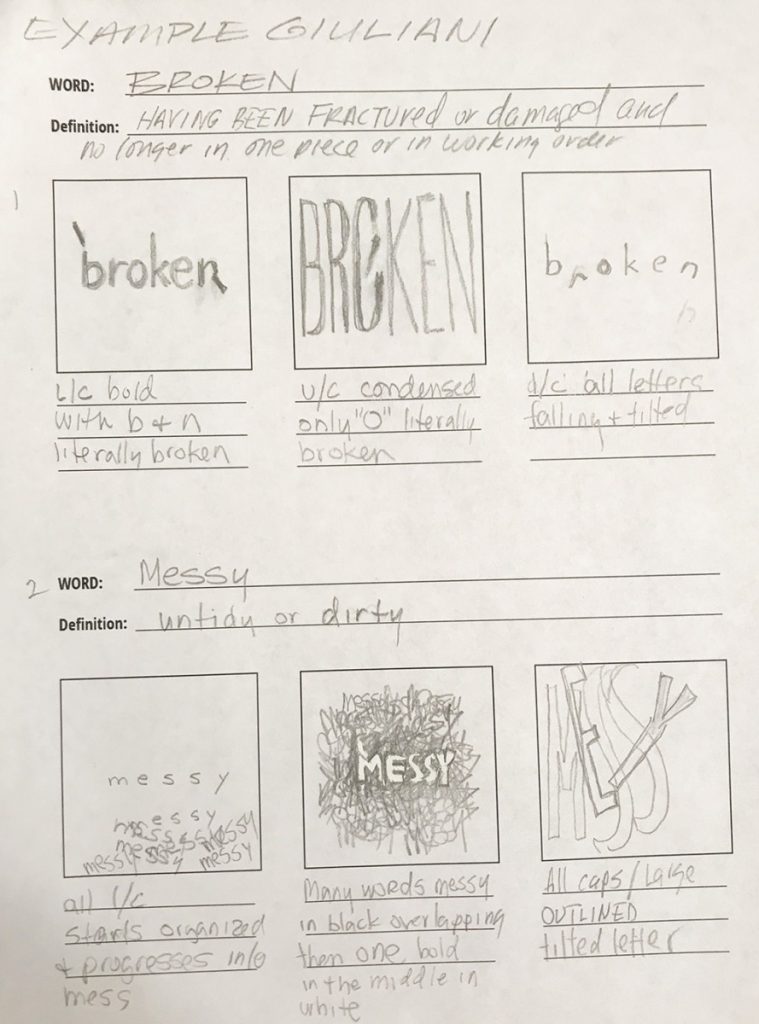
  1. Find the definition of your selected words (even if you know the meaning, researching their definition can sometimes help you generate ideas.
  2. Sketch your word in creatives way (Sans Serif typeface only). Use a square area to sketch your words. SKETCH WITH INTENTION and PURPOSE (not just placement).
    • If it is to be lower case, then sketch it that way. 
      If it is to be outlined, then sketch it that way. 
      If it is to be condensed or bold, then sketch it that way
  3. Consider:scale, repetition, overlapping, removal, uppercase, lowercase, etc. to create a visual definition of the word.
  4. Do not add illustrations.
While searching for definitions the words fractured and untidy helped me develop ideas. Notice that sketches include uppercase, lowercase, condensed word spacing, etc.

Objectives

Explore how the use of an existing classic typeface combined with traditional elements of design allow designers to convey the meaning of a word:

  • TYPEFACE (and their families & variations)
  • SIZE
  • SCALE
  • POSTURE
  • CASE
  • PLACEMENT
  • COLOR

Activities

  • “One of you words” Type Challenge initial layout one of your selected word upload today jpg to media library “lastname first name TC-ET

Expressive Type Documents

To-Do After Class

  • Sketch one concept for each of your four words uploaded into to a new post in openlab
    Named Last name first name Project 2 part 1
  • You can insert more than one option fo reach word if you would like

Sketch template