(image by JD Hancock via creative commons license)
Thought we’d take this final post of the term to revisit an old post/topic, Course Cloning. Cloning is a key feature to course management on the OpenLab, and we want to be sure as many of you know about it as possible. Our system makes it incredibly easy to “clone” a course, bringing all documents, posts and pages created by the site administrator, and most settings to a new and uniquely named site and profile. You’ll find cloning is now integrated into the OpenLab’s course creation. You can learn more about it the specifics about how to clone a course here (and below).
Cloning a course is particularly useful for a few reasons:
- for setting up multiple sections of the same course in a new semester. You can create the framework of your course, then clone it, changing the name of the url to create a new section of the course.
- for creating a new course based on an old one. When your course is over, you can clone it, creating a new course that doesn’t contain any old student work. This both saves you time and leaves the old coursework accessible to the students who took the course. Keeping student work accessible on the OpenLab is very important: they may need to build on that work in later courses or show it to a potential employer, so please don’t delete it. (If it’s vital that your new students aren’t able to see the old students’ work, you can simply change the privacy settings on the old course to make it available to members only.) Find more on managing your courses here, or contact us if you have questions.
- for sharing a course framework between teaching partners, or even entire departments. Some departments have expressed a desire to coordinate all sections of a course across the department. That can also be done via course cloning: once the department has decided on a framework, it can be cloned for each new instructor, simply by changing the administrator of the course (you can find out more about there here).
If you want to copy only certain parts of a course site, however, or to copy material created by users other than yourself, you might want to use the import/export function on our sites. You can learn more about that here. Do note that the import/export function only copies course sites: if most of your course material is on your profile page, you probably are better off using the clone feature.
Remember, for any cloning situation, we’re likely to have solutions. We’d love to discuss options with you. Email us anytime at openlab@citytech.cuny.edu.
And here are the details of how to clone, from our help section:
Cloning a course will create an exact copy of an existing course, keeping all content you created or uploaded, but student work will not be copied over. The course avatar, course settings, and site settings will all remain the same, although you can change anything as necessary.
- After logging in, click My OpenLab in the main menu. Then click My Courses in the right-hand menu. On the My Courses page, click + Create / Clone a Course at the top of the page.
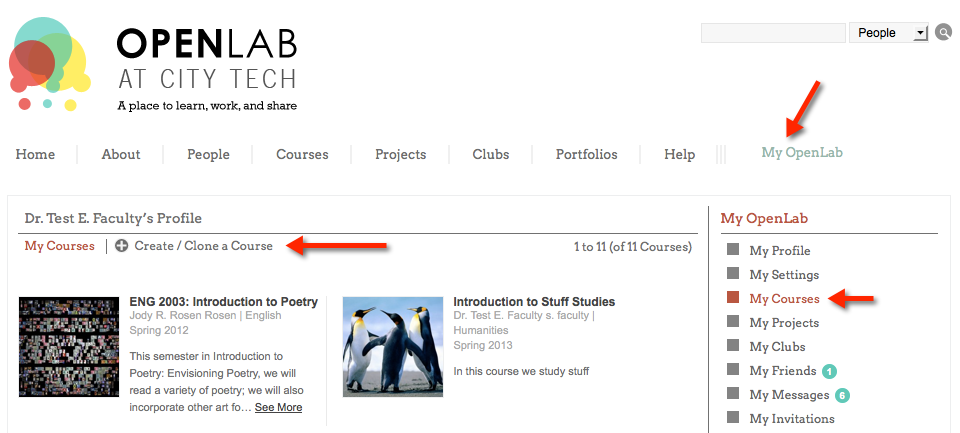
1a. You may also begin cloning a course by going to the Profile of the course you would like to clone. Choose Course Settings in the right-hand menu and then + Clone Course.
 Step One: Profile
- On the first Create/Clone a Course screen, choose Clone an Existing Course and then in the dropdown menu, select the course you would like to clone.
- Enter the Course Name.
- You’ll notice that the description is already filled in, and is the same as the course you are cloning. The School, Department, Course Code, and Section Code are also pre-populated. You can leave these as they appear or edit.
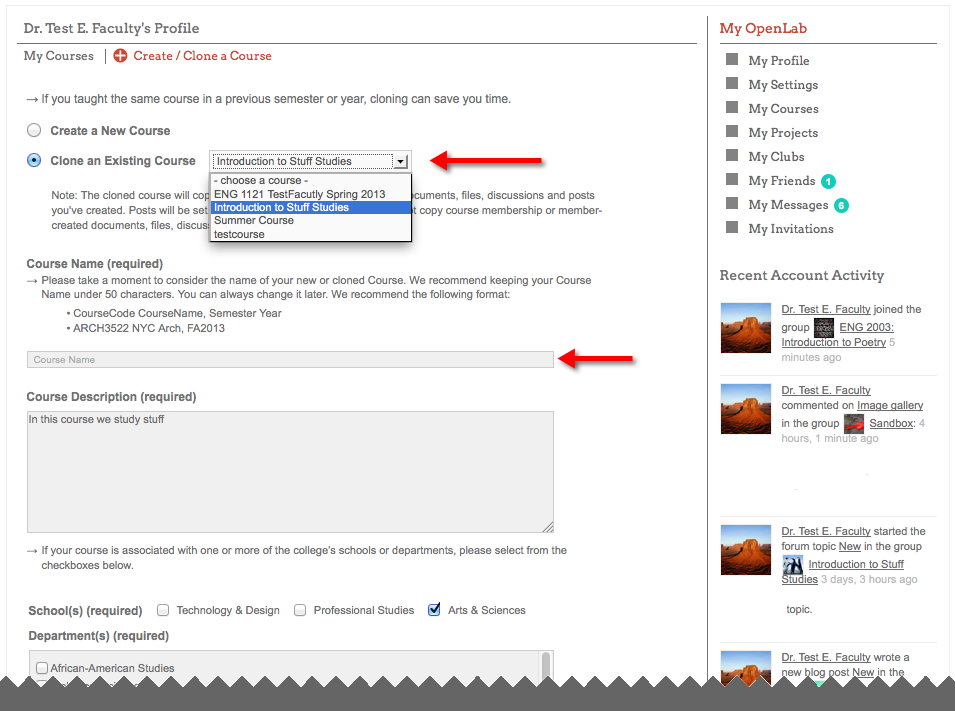
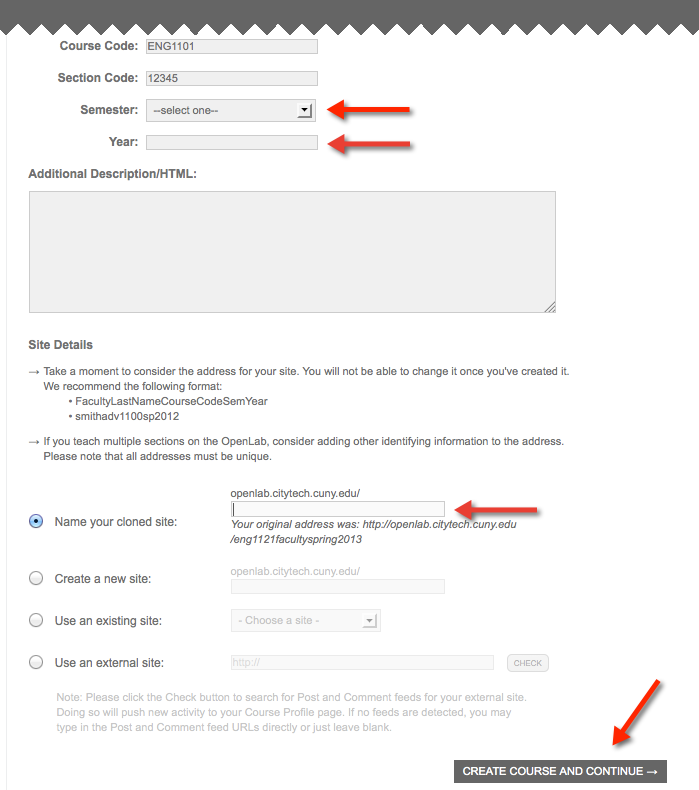
- Enter the Semester and Year.
- Choose the site details. The button for “Name your cloned site” will be pre-selected. Fill in the URL for the new site. Please note: the site address must be different from the old site, which will be displayed below. You should also only include the last part of the URL (do not include https://openlab.citytech.cuny.edu/).
- It is a good practice to add Semester and Year to differentiate between your courses from one semester to another: FacultyLastNameCourseCodeSemYear. For example: smithadv1100sp2012
- If you teach multiple sections and plan to create additional course sites on the OpenLab, consider adding other identifying information to the URL, such as the section number or days of the week (for example, MW or TuTh).
You may also choose to create a new site, use an existing site, or use an external site.
- When you are finished, click Create Course and Continue.
 Step 2: Privacy Settings
The privacy settings for the new course will be the same as the settings for the course you are cloning, but you may change them if you wish.
- Choose your Profile privacy settings. These settings control the privacy of the course profile, and are different from the course site, which you will choose next. You can change the settings at any time.
This is a public course:
- The course profile and related content and activity will be visible to the public, whether or not they are members of the OpenLab.
- The course profile will be listed in the OpenLab course directory and search results.
- Any OpenLab member may join this course.
- Even if you want your course to be private, you might want to choose this option for the first few weeks of the semester because it is easier for students to join.
This is a private course:
- The course profile and related content and activity will only be visible to members of the course.
- The course profile will be listed in the course directory and search results.
- Only OpenLab members who request membership and are accepted by the professor may join this course.
This is a hidden course:
- The course profile, related content, and activity will only be visible only to members of the course.
- The course profile will NOT be listed in the course directory and search results.
- Only OpenLab members who are invited may join this course.
- Next, choose the privacy settings for your course site.
Public:
Allow search engines to index this site:
- Anyone can visit your site without needing a password.
- Search engines will index all pages and posts, meaning your site will show up in search results on Google, Bing and others.
- Choose this option for maximum public visibility.
Ask search engines not to index this site:
- Visitors do not need a password to see your site if they know the URL or are linked from elsewhere, but Google, Bing and other search engines should not index your posts and pages. (Please note: it is up to search engines to honor your request.)
- Choose this option if you want to be able to show the blog to people who are not members of the OpenLab, but you don’t want people to stumble upon it via search engines.
Private:
I would like my site to be visible only to registered users of City Tech OpenLab:
- Anyone who is signed into the OpenLab can see this site.
- Choose this option if you’d only like the OpenLab community to be able to see the site.
I would like my site to be visible to registered users of this Course:
- Only members of your course will be able to visit the site.
- Choose this option if you only want enrolled students to be able to see the site.
Hidden:
I would like my site to be visible only to site administrators:
- No one except site admins (only the professor, unless you add others) can see the site.
- You may choose this option if you are in the process of creating your course site, but it would rarely be useful during an active course.
- When you’re done, click Next Step.

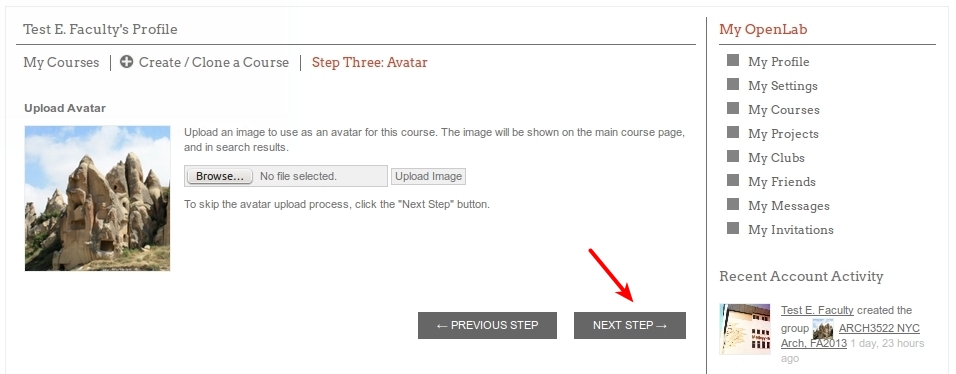
Step Three: Changing Avatar
- The avatar for the course you have cloned will appear. If you would like to keep that avatar, just click Next Step. If you would like to change it, click Browse. Select the file you want to use from your computer or flash drive and then click Upload Image.
- When you are done click Next Step.
Step Four: Inviting Members
- If you would like to invite members to your Course, start typing their display name. When a dropdown list appears, select their name from the list. Their name and avatar will appear under the heading Invites. When you’re finished, or if you do not wish to invite anyone at this time (you can always do it later!), click Finish, at the bottom of the page.
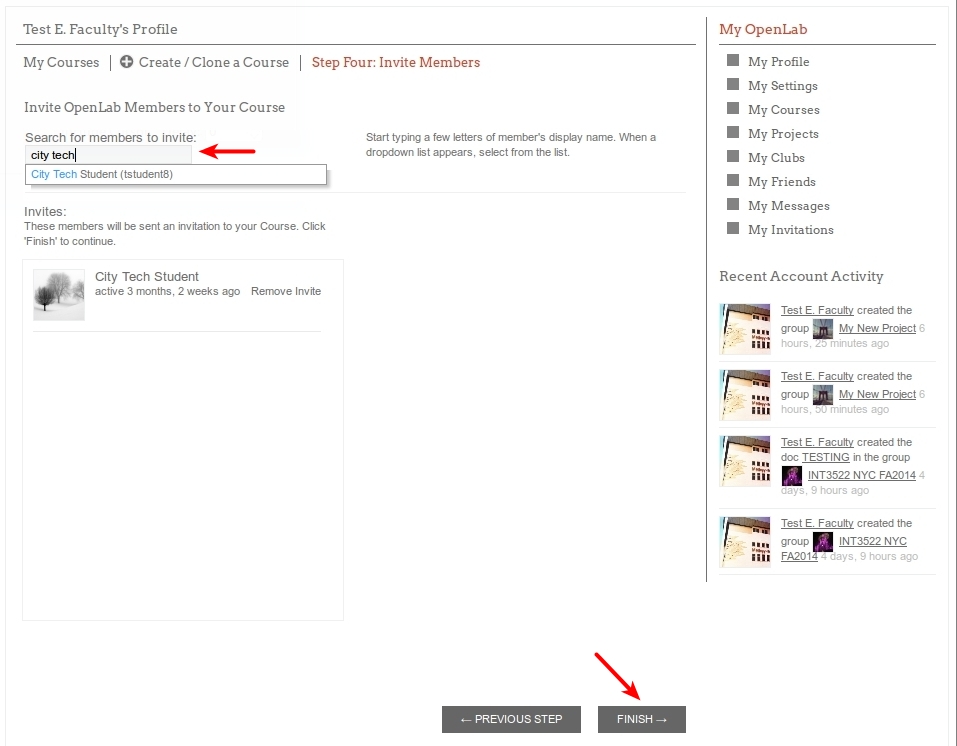
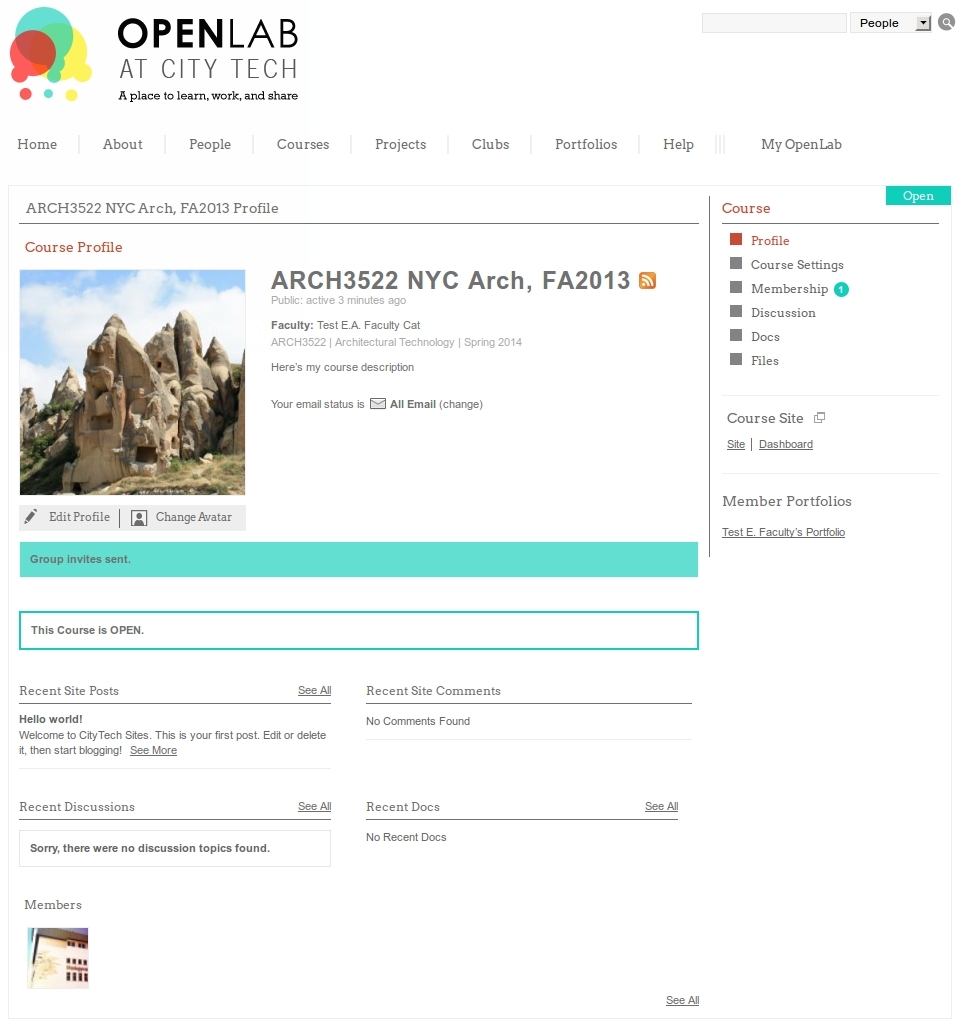
- After you click Finish your course will be cloned, and you will be on the Course Profile page of your new course! From here, you can (a) change settings such as privacy, Course description, or (b) change your avatar. From your Course Profile you can also access your (c) Course Site and Dashboard (the admin panel, where you will edit and add content to your Course Site).
- You will notice that any posts on the Discussion forum or Docs you created or Files you uploaded in the previous course will appear in the new course. You can keep or delete any as necessary.
- All your posts and pages from the previous course site will also have been cloned. However, they will be in draft form, so you will need to publish any that you would like to appear on the new site.
- The theme and header image will remain the same, although you may change these at any time. In addition, any pluginsor widgets you had activated on your old site will appear on the new site. And, if you created a custom menu it will remain the same on the new site.
Help information on course site privacy courtesy of Blogs@Baruch at Baruch College, CUNY.


