This Week in the OpenLab: September 30th Edition

Over the next few weeks we’ll be updating the plugins section of our help section which, if you’ve never been, you can find here.  The first update is on the OpenLab Grade Comments plugin, which was customized for us. Hope you find it useful, and as always contact us with any questions!

The OpenLab Grade Comments plugin is very simple to use, with far less potential confusion for users than our previous grader plugin, and it has an easy interface for privately leaving grades only the post creator and administrator can see. Once activated, you’ll see the two options appear next to any post. Easy!

  1. Activate the plugin via the left hand menu on your dashboard.Screen Shot 2015-09-29 at 1.20.52 PM
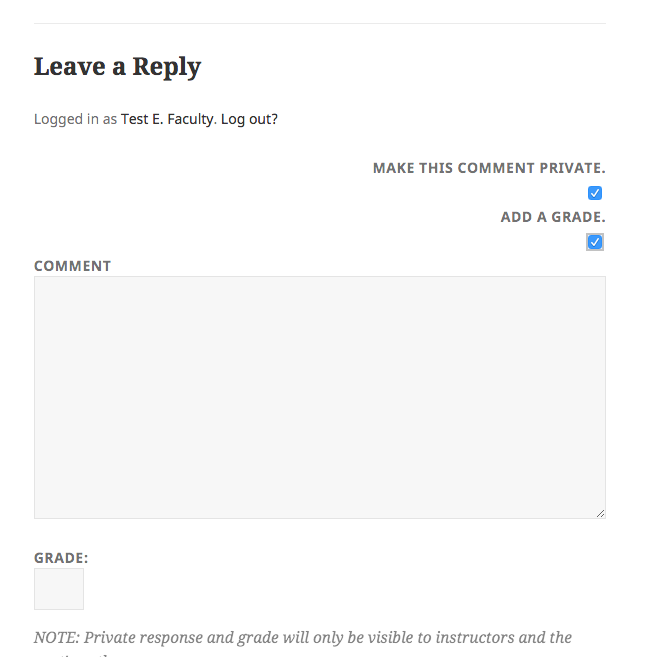
  2. Once activated, administrators will see two new options appear when replying to user comments. Clicking “Make this Comment Private” will ensure that only the user and the administrator can see the comment. Clicking “Add A Grade” will make a grade box appear. That grade is always private, even if the comment is public.Screen Shot 2015-09-29 at 1.32.04 PM
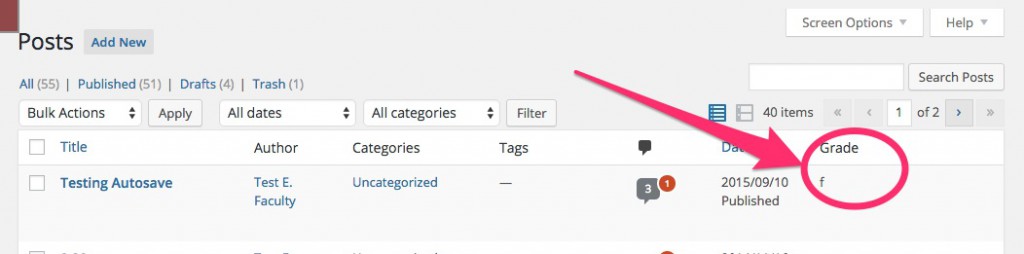
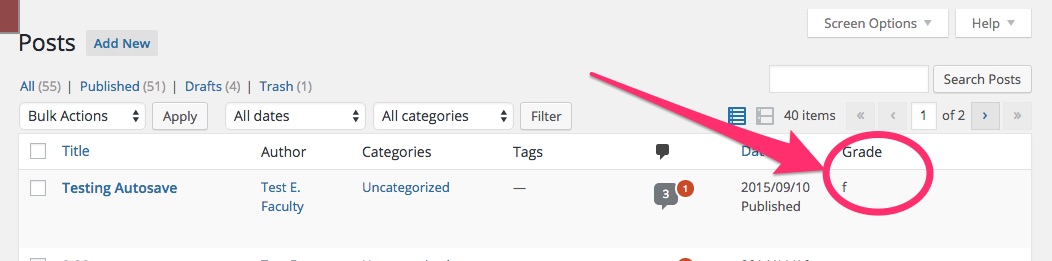
  3. If you want to see all of the grades you’ve assigned to a user, you can click the number under “posts” to the right of the user’s name (under “users” in the left hand dashboard menu)Users_‹_Best_Course_Ever_—_WordPress
  4. And then you can see the grades you’ve given that particular user in a “grades” column.Posts_‹_Best_Course_Ever_—_WordPress

Google Docs Shortcode

Google Docs Shortcode is a small plugin for WordPress that allows you to use a shortcode to easily embed a Google Doc into your blog posts or pages.

The shortcode supports the following Google Doc formats:

  • Documents
  • Presentations
  • Spreadsheets
  • Forms

This plugin was developed for the CUNY Academic Commons. Licensed under the GPLv2 or later.

The following can also be found here:

How to Use

Embedding a document, presentation or spreadsheet

  1. First, you’ll need to find the public URL of your Google Doc. Let’s start by logging in to your Google Docs. Next, find the item you want to embed.
  2. You should now have your Google Doc open. Next, navigate to File > Publish to the Web. A dialogue box should appear, similar to the one below:
    Publish to the Web dialog window
  3. Make sure that the Automatically republish when changes are made checkbox is checked. This will allow you to make changes to your Google Docs and have these changes automatically reflected on your WordPress site.
  4. Copy the Document Link highlighted in red above. If you don’t see the “Document Link” field, click on theStart publishing button and you should be able to view the field.
  5. Now navigate to your WordPress dashboard and open up the post or page where you want to embed your document. On a new line, type the following shortcode and paste in the link you copied, above:
    [gdoc link="THE LINK YOU COPIED" height="800"]

You can customize the shortcode by using some custom parameters mentioned below.

Embedding a form

  1. Follow step 1 above.
  2. Next, navigate to View > Live form. (If you don’t see this entry, this means you’re using an older version of Forms. You will also need to follow steps 2-3 above. Next, navigate to Form > Go to live form.) This should take you to the public version of the form. Copy the URL from your browser’s address bar.
  3. Follow step 5 above.

Other shortcode parameters

Here are some other custom parameters you can use with the shortcode:

  • “width” – By default, this tries to use your theme’s content width. If this doesn’t exist, the width is “100%”. Fill in this value to enter a custom width.
  • “height” – Enter in a custom height for your Google Doc if desired. Defaults to “300”. Avoid percentages.
  • “seamless” – This parameter is only applicable to Documents. If you enter “0”, this will show the Google Docs header and footer. Default value is “1”, which means that no Google Docs header or footer will be shown.
  • “size” – This parameter is only applicable to Presentations. You can enter in “small”, “medium” or “large” to use the presentation preset sizes. Dimensions for these presets are: small (480×389), medium (960×749), large (1440×1109). To set a custom width and height, use the “width” and “height” parameters listed above instead.

Thanks

  • Scott Voth – for testing and writing a version of this documentation on the CUNY Academic Commons codex.
  • Christopher Stein – for noting a bug about using older presentations with the plugin.

Social

Social is a new plug-in on the OL, taking over for the moment as our primary Twitter and Facebook broadcasting plug-in.  While Twitter Tools (which is being updated) is a more robust option, offering url shortening, category exclusion, and other options.  The benefits of Social are ease of use (Twitter Tools takes some setting up), and overall lightness.

Once Twitter Tools is updated, the two plug-ins will work together.  For now, If you’re interested in a simple way to send your posts to Twitter or Facebook, Social may just be the plug-in for you.

To get started, activate the Social plug-in in the left hand menu of your dashboard, when you do, you’ll see a couple of messages appear at the top of your plug-ins page.

Those links will take you to a page that will ask you to sign in with your twitter account.  Once you do, you’ll see the account appear in the accounts field, as below: Obviously you can follow the same process and link a Facebook page to the site. Below the account info, you’ll see several options.  Most are self-explanatory.  You can change what information gets pulled into the tweet, etc. Do note that ‘Broadcasting is on by default’ is not your last chance–it just sets the Broadcast Post radio button to ‘yes.’ You’ll still get a chance to edit the post in an upcoming screen: And once you’ve broadcast the post, if all has gone well, it’ll appear in your twitter stream: Lastly, once you’ve sent the post, you’ll also see evidence that it has been tweeted on the EDIT POST page: That’s it!  As always, contact us with any questions!

Gravity Forms (Submitting Student Work)

We’ve recently added Gravity Forms to our suite of plug-ins here at the OpenLab.  Gravity Forms can do a lot–in fact it was developed as a robust contact form plug-in, and is perfect for polling users, collecting contact information, and organizing reservations for events.

But also, some enterprising folks who are dedicated to figuring out how best to use WordPress in the classroom realized that it’s also a great way for students to easily submit work to a professor.  If used right, this can limit the need for email (which can scatter student work throughout your inbox), or third-party options like dropbox (which can work quite well, but means asking students to sign up for one more account).

To use Gravity Forms as a way to have students submit work, first activate the plug-in, and then follow these steps:

1.  Once activated, you’ll see FORMS appear in the left hand dashboard.  Click that and then NEW FORM.

2.  When you do that, you’ll see that there are a few areas to help you build your form. STANDARD FIELDS and ADVANCED FIELDS are the important ones here.  You can choose whatever you like here–clicking on any of these options will make that appear in the main left hand area.  In this case, we clicked PARAGRAPH TEXT in STANDARD FIELDS and then FILE UPLOAD in the advanced field.

3. You can edit the language as you like in the PARAGRAPH TEXT and any other field.  And you can also edit the confirmation message that will appear once your user has submitted the work.  Once you’ve got things the way you’d like, click UPDATE FORM.

4.  Now create a post or a page, and when you do, you’ll see that a new icon has appeared next to the UPLOAD MEDIA button.  Click that, choose the form you want, and it will appear in your post.

5.  Click publish, and your form should appear.  Here’s what a user will see:

6.  Ok, now what?  Where did the paper go?  On the dashboard’s left menu, under FORMS, click ENTRIES.  All the papers will appear there, for download to your computer.

That’s it!  We’ll add tutorials on Gravity Forms’ other features soon.  As always, contact us with any questions!


Anthologize

Anthologize is a wonderful tool built by CUNY’s own Boone George (and others), during the NEH-sponsored “One Week, One Tool” workshop at the Center for History and New Media.

To quote Ryan Cordell‘s article on the plug-in: “Anthologize was developed as a way for scholars to easily publish blog content—from a personal research blog, a course blog, or scholarly group blog, or the like—in a number of formats:

Anthologize is a free, open-source, plugin that transforms WordPress 3.0 into a platform for publishing electronic texts. Grab posts from your WordPress blog, import feeds from external sites, or create new content directly within Anthologize. Then outline, order, and edit your work, crafting it into a single volume for export in several formats, including—in this release—PDF, ePUB, TEI.

For teachers who build their syllabi on WordPress, however, Anthologize also offers a way to easily collect the syllabus pages—for me that’s the “Course Description,” “Course Policies,” “Assignments,” and “Schedule” pages on the course site—and create a PDF. Just follow their guide to “compiling a project”, using the syllabus as the “project” and its sections as the “parts.” Drag the pages or posts from your website that you want included in the print syllabus into the correct order and then export the project to whatever formats you want. It’s very simple.”  (read the full-text here)

Using Anthologize is very simple, and we really cannot improve on the developers own guide, which you can find here.  We’ve copied the main page below for ease of use.  As always, contact us with any questions!


Share This: Updated 11/20

Screen Shot 2015-11-17 at 12.16.55 PM

“Share This,” adds a social media bar to all posts and pages (and the site itself), allowing your followers, members or readers to easily share things across outside social platforms. You can even click the green “Share” button in the bar and then choose multiple platforms to share with simultaneously (that is, you can share on both your twitter and facebook accounts with one click). It’s incredibly easy, but there have been a few changes to the set up recently. The only thing to remember is that you do need to go through and save the settings to enable the plugin (we’ll talk more about this after step two).

Activating the Share This plug-in is about as easy as our plug-ins get.

  1. First, go to plug-ins in the left-hand column of your dashboard, search for “Share This” and click activate.
  2. Next, you’ll need to set up the plugin. Do that under  Settings>Share This in the left-hand menu of the dashboard.  When you do that, you’ll be taken through a series of pages. DO NOTE: It isn’t terribly important that you change any of the settings on the next pages, but you DO need to go through them and save the settings to enable Share This.
  3. When you click Settings>Share This you’ll be taken through several pages. You can choose where the buttons will appear, which buttons will appear, customize some features (for example, you can add a message to request twitter followers), along with a few statistics oriented pages that our users won’t be able to use. Either way, even if you change none of these settings, you’ll still need to go through every page until you see this page: 

Screen Shot 2015-11-20 at 3.10.45 PM

4. Once you click “save” Share This will be enabled!


 And that’s it!  As always, contact us with any questions.


Feed WordPress

Recently we had a request for a way to have the same material appear on multiple OpenLab sites.  This would especially be useful for faculty, who sometimes teach the same material or want to relay the same messages to more than one class, but for various reasons still want each class to have a separate site.  But of course going from site to site and posting the same message can be too labor intensive.

The answer to that problem is a plug-in called Feed WordPress, which is available on the OpenLab.  It pulls the information from other sites (using their feed), to any other.  We suggested it was good for faculty, but it can also be used to draw information from almost any site to any other.
There are a myriad of options for Feed WordPress, and if you run into any that need more explanation please contact us anytime.  In this space, we’ll run through a few of the most common options.
First activate the FeedWordPress plug-in under PLUGINS in the left hand menu of your dashboard.  Once you’ve done that, you’ll see SYNDICATION appear lower in that menu.  The first of the options is SYNDICATED SITES SETTINGS:
Remember that FeedWordPress works by pulling from another site–what we want to add here is the feed from the ‘other’ site that we will pull to this one.  Add that site address in the NEW SOURCE field.
If you’ve done that successfully, the plugin will find “feeds” from the site in question.   Many sites have more than one feed, so the next screen will ask you which one you want pulled to your site.  Usually that means the first option, but in some cases you might choose another.
As we said, there are a lot of options for FeedWordPress, and you can explore them on your own. You might, however, want to take a look at CATEGORIES & TAGS, which will help organize things, particularly if you have a custom menu that uses categories:
As always contact us with any issues/questions!

CubePoints

CubePoints is a way of awarding points (or “dollars,” if you’re feeling materialistic), to users for participating in your site–users have a great deal of control over what sorts of activities are worth points, and how many each activity is worth.  We see this plug-in as particularly useful for student clubs and other school projects which have fewer inherent incentives to participation than courses.  If you connect points to real-world prizes, or even just honorary titles, you might find your users are more active.

Many faculty around the world have come to believe that this model speaks to their students, encourages participation and enthusiasm particularly on low-stakes writing and other class work, and gets students thinking about school in different ways.  You can learn more about an attempt to study a very similar idea here.

The plug-in itself is quite simple:  it keeps track of each user’s activity, allows for a “leaderboard” on the site home-page, and gives the administrator a ton of specific options, making it very customizable.

To use it, first activate Cube points under PLUGINS in the left hand column of your dashboard.

Once activated, you’ll see CUBEPOINTS appear near the bottom of that left-hand column, along with several options for managing the plug-in.  Most of these are self-explanatory, but we might draw attention to CONFIGURE, which pulls up this screen:

There are two things here which OpenLa users might want to adjust.  The first is changing the suffix foro the display of points.  The default is “dollars,” which many users might find a little too materialistic for the college setting–you change it to anything you like.  Here we chose “points.”

Also note that you can exclude users from the point system–this is especially good if one user (usually the admin) does the vast majority of the posting on the site.

The modules page also gives quite a number of ‘modules,’ which you might think of as mini-plugins, most of which are also self-explanatory.

The only other thing you’ll want to do is give users a way to monitor their own points and have an idea of where they “rank” in terms of site activity.  You can do that by going to APPEARANCE>WIDGETS and moving the two CubePoints widgets into an active sidebar, header or footer.  As here:

That’s about it.  Let us know if you have any questions!


pageMash


How To Install & Use PageMash For WordPress by newbizblogger

PageMash makes menu manipulation easy. Use if if you want to hide pages so they don’t show up on your menu, or if you want to quickly rename the page, or if you want to create parent/child pages (an odd way of saying “I want this page to appear as a dropdown on my menu”–the way the tutorials on The Open Road appear under “Useful Tools”).  You could do all these things before, of course, but this makes it easy and intuitive in ways that new WordPress users will love.  The above tutorial is just about perfect, and so we won’t try to improve upon it. Just note, however, that it won’t affect custom menus (though these have their own, relatively similar drag-and-drop interface.).

Prezi WP