Professor Diana Schoenbrun | COMD 3313 | SP22

Author: Diana Schoenbrun (Page 6 of 17)

Sketchbook Week 8, Inked Textures

This week in your sketchbook, we will practice rendering texture and line in ink.

Begin by finding photo references for two objects.

Choose objects that are very different from one another. They do not need to relate, thematically.

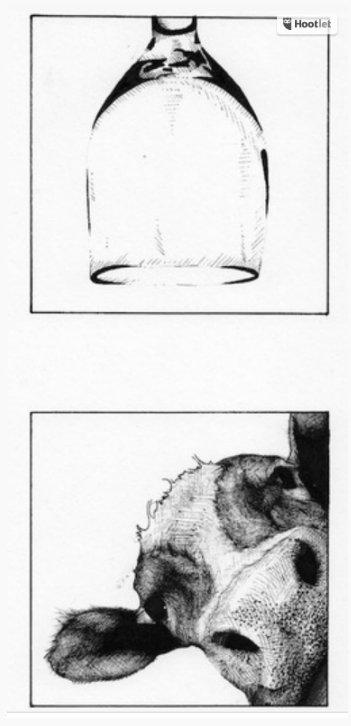
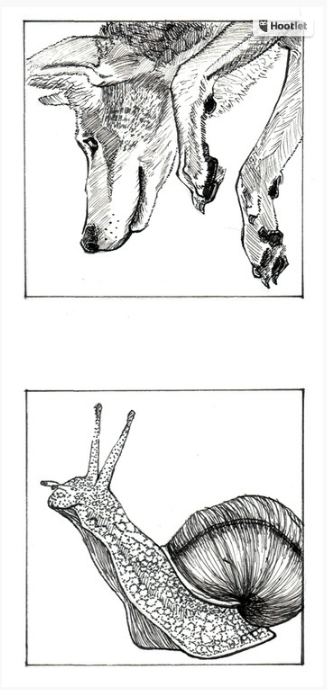
Looking at your references, ink the surfaces and details as realistically as you can with various pens. Try all the tools you have!  Rendering different textures is a good way to explore different ways of inking and becoming familiar with your pens.

You must have a minimum of five different textures total for the two objects.

Detailed Directions:

PART 1 – Use Pencil to sketch.

  1. Find a photo reference for two objects of varying texture, such as a wood-grain surface, basket, mammal, reptile, grass, flower, tree, metal surface, etc. The objects must have very dissimilar surface textures.
  2. Draw two 3×3 Squares in your sketchbook. (Hint: you can also sketch FIRST and draw the box later to crop the drawing in a way you find interesting.)
  3. Position and scale your sketches to create interesting positive and negative shapes with the 3-inch square.
  4. Using pencil and paper, sketch from the reference, focusing on its contours. Draw the majority or entirety of the object.

PART 2 – INK

  1. Before you begin to ink, preplan the strokes. Mentally organize the shapes that are to be a pattern, texture, or local color/value. You need to decide whether the stroke has a specific function, such as defining a form or creating a surface like fur or scales. No strokes should be random.
  2. Ink the two 3-inch x 3-inch squares.

Post when complete:

GO TO: CLASS SITE

DASHBOARD > POSTS > ADD NEW >

Write your post. Add a Descriptive title.

Choose CATEGORY (bottom right side): Sketchbook > Week 8 Sketches

PUBLISH

Please add your introduction by [DATE AND TIME]. It should be between [250-300 words].

Before next class, read the comments and get to know your classmates! 

For extra credit, reply to one of your classmates’ comments. Do you have something in common? Did you learn something? Be kind.

Assignment 2

EDITORIAL ILLUSTRATION

Overall Project Description:

Create an Editorial Illustration for use as a cover illustration for an article in a magazine printed or online.

Work will be judged on the clarity and cleverness of the overall concept, thoughtful utilization of composition, the use of value, and of course the skillfulness of overall technique.

The final illustration may be traditional or use a  limited palate.

Note the faster turn around time! Illustrations meant for publication in Magazines and Newspapers, digital or traditional, have very quick deadlines.

So does this project. Work efficiently.

GRADING BREAKDOWN:            

50 % project grade Submit a PDF PROCESS BOOK guiding us through the project from inception to conclusion.

  • Carefully SCAN your process work. This should include : Link to Article, Brainstorm, Thumbnails, Concept Sketches, Value Roughs, Color Roughs, Related Sketchbook Work, and Final Art.
  • Carefully Label all of your work so that your thought process is CLEAR. Be sure all of it is presented well: facing the right way, no shadows in the picture, good contrast, etc.

50 % project grade Submit a publication ready 300 DPI JPEG of Final ART

Instructions

  • The final color illustration must be created using a limited palate.
  • It should be made using a combination of traditional and digital drawing, inking and coloring skills.
  • Final art should be made to fit the real magazine’s specs if there is a print version, 8″x10″
  • Solution is image based.
  • Students will be required to present the illustration alone, as well as a digital mock up of the illustration with the Magazine Masthead.
  • Work in Progress should be posted for feedback to the OPEN LAB, (categorize as work in progress)

Due Date(s)

  • Part 1, Brainstorming and Research : Generate Ideas, find new ones through research. Come up with at least 3 concepts to discuss with your client.
  • Part 2, Thumbnails & Concept Sketches
  • Part 3, Editorial Illustration Final Art: Using any combination of Pencil, Ink and Digital techniques create your final limited palate, color editorial illustration.

Assignment 2, Part 1

BRAINSTORMING AND RESEARCH

Overall Project Description:

Create an Editorial Illustration for use as a cover illustration for an article in a magazine, printed or online.

In Part 1 of the assignment, you’ll find an article for source material for your editorial illustration. You’ll generate ideas through brainstorming, and you’ll find new ones through research.

Here are a few magazines you could look at. Feel free to use others.

https://www.theatlantic.com/magazine/backissues/

https://www.economist.com/

https://www.plansponsor.com/magazine-issue/

https://www.newyorker.com/magazine

https://www.wired.com/magazine/

https://www.science.org/toc/science/current

https://nautil.us/

You’ll come up with concepts during next week’s class.

Instructions

Research:  Find an article from a legitimate news source, online or printed, about a topic which you are passionate about or find particularly interesting, as source material for your editorial illustration. Carefully read and analyze those articles.

Brainstorm:  Using the Word Web method we’ve used for earlier assignments, write down all of the key words you can think of related to the article.  Be sure to include the actions – what is happening, not just who, what, or where.

Word Web Method using JAPAN, NEW YORK, CENTRAL PARK as key words

Write: A short blog post on open lab in response to the article.

Identify the key stakeholders.  Who does this matter to and why?  Highlight particular areas of interest to you.  Share the article (a link or scan in the first page of the article) as well as your brainstorm and any images you may consider using in the future as reference material.

Discuss: Prepare a brief presentation of your chosen article and brainstorm ideas.

« Older posts Newer posts »