Importing and Exporting Sites

If you’re a faculty member, you might be wondering what to do with your courses when we want to move them to the next term.  There’s admittedly a lot to think about when it comes to this issue, and depends on how you set up your course, whether you’re teaching the same course, how many sections of a course you teach.  Your Community Facilitation team  is always available to help you plan these things out.  But one simple solution to issues of how to best move course materials from one term to another is to create a new site for your upcoming courses, and export all the old material there.

To do so simply follow these simple steps:

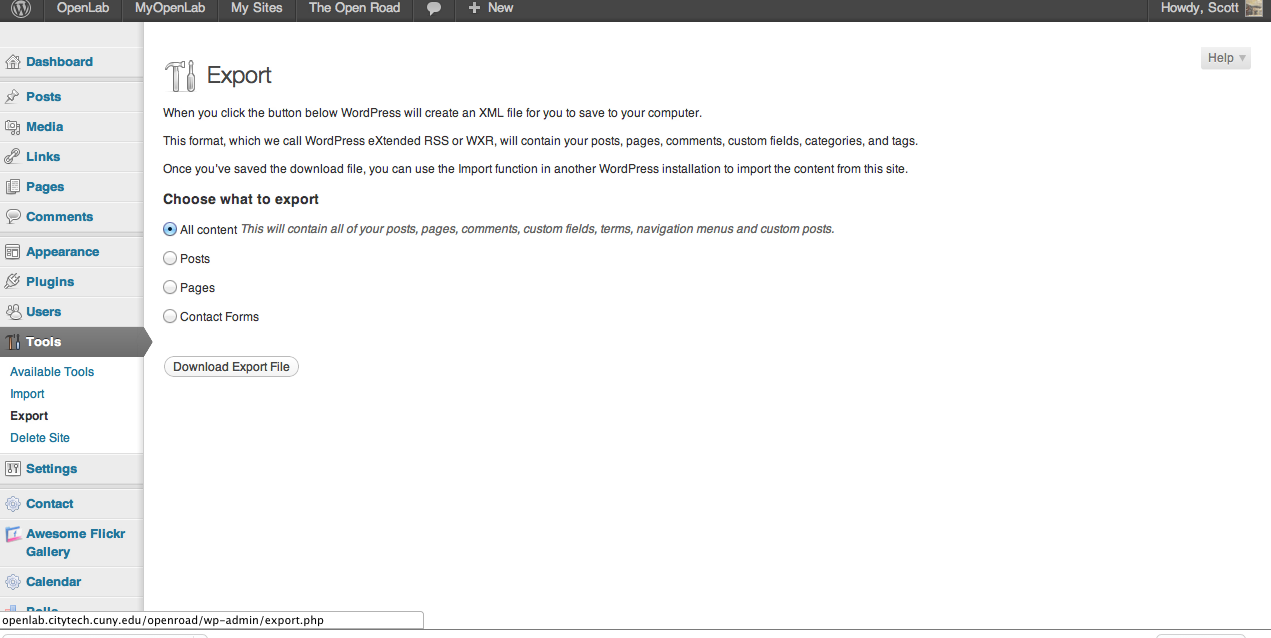
1) click “export” under “tools” in the left hand navigation bar

2) You’ll then see the Export dialogue: You can choose “All Content” or just pages and posts, you can even choose which authors to import.  Once you’ve made those decisions, click “Download Export File.”   That saves all your site’s information on your computer in an .xml format.

3)   Now once you’ve created a new course (if you need a refresher, you can find that here).

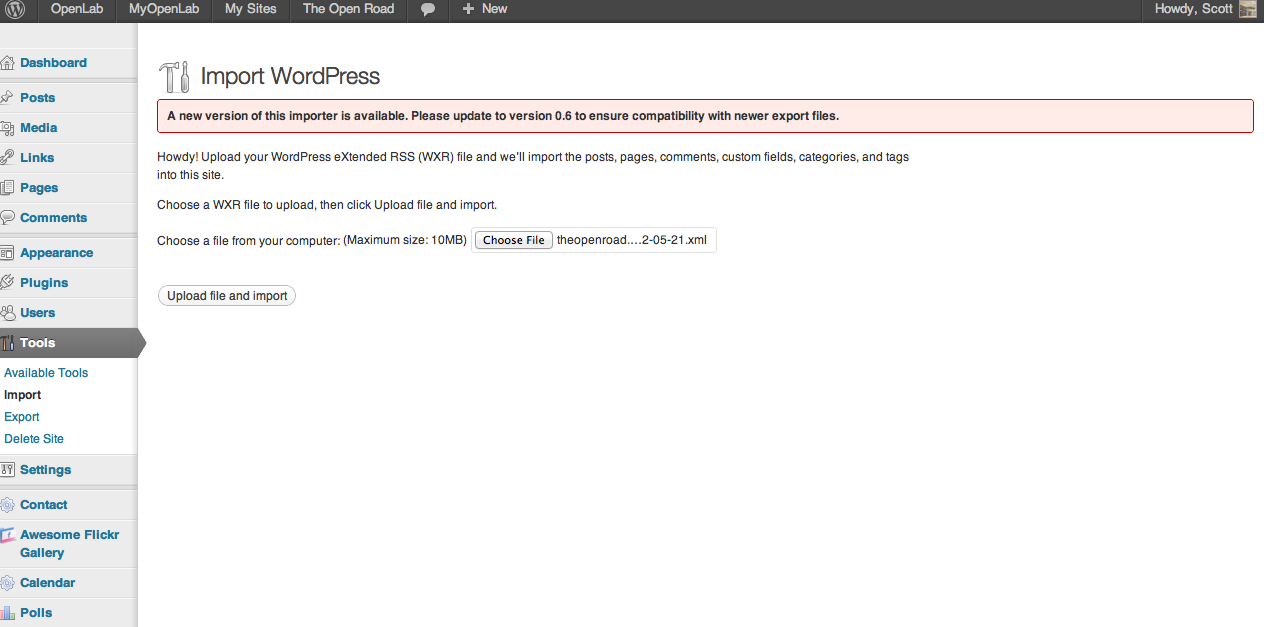
4) Once you’ve got your new, blank course, go to “Tools” on that new course dashboard and click “Import.”  On our system, you’ll be asked to choose a system.  We only have one, so click “WordPress.”

4) Choose your .xml file from wherever you saved it (on most, the default is your download folder).  Click upload file and import, and you’re done!

A few things to note:

  • not everything will look the same–images will move, formatting will change, widgets will be reset, and menus will reset to default.  But all of your pages and posts and content will move (look for them under pages and posts on the dashboard), and it won’t take long to readjust things the way you like.  This import/export process is really about content, not form.
  • exporting will not take documents from the course profile page, only the site.  Documents from the course profile page have to be moved or re-uploaded.
That’s it!  As always, please contact us with any questions.

This Week in Openlab! May 14th Edition

(photo by Wonderlane on Flickr via Creative Commons)

Today we overheard a student say ‘I was studying so hard for my first exam I didn’t see the sun for three days.’  We’re impressed, sympathetic, and hope you all get outside soon…

______________________

(image by Dimitri N. via Creative Commons)

We Need Your Help!

The OpenLab is an iterative, ongoing, community-based project, which means it’s constantly evolving, and much of the evolution involves users like you.  You have been invaluable in using and testing the system, finding best-practices, and telling us what could be done better.   With your help, we’ve been updating the system constantly, but this summer we’re planning a larger update of the OpenLab, and we want to be sure our standing offer is clear:  tell us what you think, what you would like to see, what could be done better.  Please contact us anytime, with any request, and we’ll try to accomodate all wishes and suggestions.  We love to hear what you think!

___________________

Featured Assignment:  Digital Photography

(image john blue1 via flickr)

We had a great time looking at the photographs taken by Robin Michal’s “Digital Photography 1” students–particularly the images they took on a trip to Greenwood Cemetery, one of our favorite places in the city.  You can check out pictures and reflections on the trip here.  Great stuff, but be warned:  you might get stuck spending some time!

___________________

Featured Tutorial:  Awesome Flickr Gallery

When looking through those student photographs, we remembered that Robin’s course also has a wonderful flickr page, which reminded us of a plug-in we haven’t discussed yet here on The Open Road:  The Awesome Flickr Gallery.  There’s a fine tutorial for how to use it here.  The Awesome Flickr Gallery has some steps that new users might not be familiar with so, as always, contact us with any questions, or to set up a one-on-one demonstration.


This Week in OpenLab! May 7th Edition

(image by KRO-Media via Creative Commons)

By the time we next write, Mother’s Day will have passed, and thinking about it reminded us this morning of J.M. Coezee’s banquet speech, when he won the Nobel Prize for Literature.  He pictured running home with his Nobel Prize tucked under his arm to tell his mother, “Mommy, Mommy, I won a prize!”  To which he imagined his mother saying, “That’s wonderful, my dear. Now eat your carrots before they get cold.

Happy Mother’s Day…

__________________

One Last Thing About The Launch

Maybe you’re sick of hearing about the launch, maybe you’re not, so we’ll give you the option of checking out this nice little press release from CUNY.  But we know you love pictures of your fabulous community team (+ Jim Groome), so here you go…

________________________

Featured Assignment:  Web Evaluation 3c

This week we’re featuring an interesting project undertaken by Peter Catapano’s “History of the United States to 1877,” where students are asked to do a bit of research on a particular subject (Shay’s Rebellion, Indentured Servitude, etc), and think critically about the website that’s giving the information.  He even has a rubric to help students think about a site’s contents, currency and credibility.   As we all–students and faculty–deal with more and more internet research, it’s critical to all of our departments that these sorts of projects are undertaken with younger students:  we are none of us born, it turns out, with an innate understanding of what makes a site reliable or unreliable.  It’s a critical project for all disciplines, a kind of literacy that all of us always need to be keeping sharp…

_______________________

Tutorial Update:  LaTeX

A few weeks back we created a tutorial to use the WordPress LaTeX plug-in, which allows users to use a set of commands to turn this:

 \sqrt{x^2+1}

Into this:

$latex \sqrt{x^2+1}$

Our tutorial is designed for faculty and students who already know LaTeX.  But if you’re interested, Jonas Reitz’ has developed an exercise to help students learn how to use it here.

But what if you don’t know the commands that make the equation magically appear?  What if you don’t have time to make learning the LaTeX a part of your course?  What if you use a equation creator?  We think we have a solution, and you can read more about it here.

If you know a better solution or workaround, we’d absolutely love to hear it.  Please contact us here at any time.


LaTeX update: What if I can’t write LaTex?

A few weeks back we created a tutorial to use the WordPress LaTeX plug-in, which allows users to use a set of commands to turn this:

\sqrt{x^2+1}

Into this:

$latex \sqrt{x^2+1}$


Our tutorial was designed for faculty and students who already know LaTeX.  But also, Jonas Reitz has developed an exercise to help students learn how to use it here.

But what if you don’t know the commands that make the equation magically appear?  Or if your students have usually used a LaTeX equation editor?  And what if you don’t have time to make learning the LaTeX a part of your course?  We think we have a solution.

When your students create a LaTeX equation using an equation editor, they click the superscript button, or the square root button, or the pi button, or whatever.  When they do so the equation appears below the dialogue box in pretty LaTeX form.  But also the commands appear in the meantime inside the dialogue box, as here:

Once the equation appears below the box in the way they would like, they simply need to copy the commands from the dialogue box into our website page.

BUT:  they need to add the markers (tokens) which help the wordpress page recognize that this is a LaTeX equation.  Those tokens are a dollar sign, the word latex, and another dollar sign.   So surround the commands copied from the equation editor with those tokens, like this:

 and our plug-in will re-translate those commands into the LaTex equation, so they see \sqrt{x^2+1}  on our page.
A bit of a convoluted solution, but if I can do it, with my zero mathematical knowledge, it should work for most.  That said, any better solution would be more than welcome.  Please  email us with questions of comments at anytime time.


This Week In Openlab! May 1st Edition

(Photo courtesy of Fort Lewis College Center of SouthWest Studies via creative commons)

It’s May!

Somehow, inexplicably, it’s May:  that time of the school year about which we have such complicated feelings–the term is almost over, but in front of summer break stands tests, papers, exams, grading, final projects, and work work work!  As Professor Jonas Reitz said to one of the community team members at the MetroTech Au Bon Pain, ‘It’s that time when everything happens!’  We couldn’t help but agree, and so this week we’re going to distract ourselves with gardening, and wine, and Babe Ruth.

___________________

Featured Site:  The Hospitality Garden

This week we wanted to bring your attention to the site run by the Hospitality Garden. The hospitality garden is a small plot of organic vegetables and flowers that is maintained by students and faculty from NYCity College of Technology (City Tech).  It’s located on Flatbush Ave & Willoughby Street, in the Dekalb Market and it was created in order to “provide students with an opportunity to experience the fun, work, and beauty that comes with growing plants that can be used by culinary and pastry students in the Hospitality department at City Tech.”  Go by and visit the garden anytime, but also be sure to check out the site, which features more information, a task schedule for the students, and a wonderful digital image gallery.

____________________

Featured Assignment:  Retail Wine Shop Assignment

(image by damarisr1)

Sticking with the Hospitality Management Department, where everything seems to be much more fun than one is supposed to have in college, this week we feature an assignment for Karen Goodlad’s Wine and Beverage Management course.  Here, students were asked to visit a retail wine shop and give their thoughts.   But more than that:  some students really committed to this project–painting a truly impressive picture, a long narrative, and solid writing.  We love to see how this sort of project which, like the OpenLab, is committed to relating students to the world and the world to students, can engender real and unmistakable enthusiasm.  Great work, all around.  And, of course, now  we’re all thirsty.

_______________________

Newly Digitized Images of New York

For those of you who are working in New York City oriented courses, either as faculty members or students, or if you’re just interested in the city in which we all live, you might want to check out the nearly one million images of New York and its municipal operations that have just been made public for the first time on the internet.  As The Daily Mail points out, the photo database is “culled from the Municipal Archives collection of more than 2.2 million images going back to the mid-1800s, the 870,000 photographs feature all manner of city oversight — from stately ports and bridges to grisly gangland killings.”  Surely something to interest everyone, and great for student and faculty projects and courses.

You can read more about it here (including see the aforementioned grizzly gangster images).  And you can browse the database here.

That’s it for this week.  As always, contact us anytime!


This Week In Openlab! April 26th Edition

Openlab Launch:  An Unqualified Success!

Last week was the OpenLab launch.  It was a beautiful event, really.  Many members of our community were there, and many new faces came too.  And there were balloons!

First came our wonderful opening speakers—all members of our CityTech community–including our own Maura Smale:

(twitter images via @lwaltzer)

After that, keynote speaker Jim Groom gave an engaging, accessible, and above all enthusiastic talk that combined, in no particular order, references to the 2pac Shakur ‘hologram’ at Cochella a few weeks ago, My Little Pony, Emo versus Punk, the future of 3-D printing and their effect on lost legos, vulgarity and systems of measurement, college writing and, above all, open, community-based digital platforms like our own OpenLab.

In fact, Jim says everything we could say (and includes his presentations slides) much more eloquently on his own blog, which you should follow and can check out here.

Among all of his provocative comments, the one that sticks with me the most was something like “don’t think of it as an academic project, think of it as a community project.”  A nice reminder that the OpenLab isn’t just a place for our classes, but a place to engage with our friends, our community, and the wider world.  Much much thanks again to Jim Groom for coming, and to everyone who was there.

___________________

Tutorial:  Image resizing

(Image by Inkaroad via Creative Commons)

A few weeks back we posted an image resizing tutorial here on the OpenLab.  While that was a simple solution, it came with an interesting problem:  each time an image is resized, it creates a copy of that image in the files for the site, which means that while we were hoping to avoid hitting the size limits for courses and clubs and projects, resizing actually brings one closer to it.  We’re looking into alternative solutions, but for the time being it’s surely a good idea to resize images before posting them to your site, and to do so using a third party application like Photoshop, Gimp, or one of the many simpler and easier online freeware applications like PicMonkey.  We’ve posted some information on how to do that in an addendum to our original tutorial.  You can find that here.

_______________________

And finally:  keep an eye out here for opportunities for a coming announcement for students to work with us on the OpenLab; there are workshops on Wednesday and Thursday of this week; you can find out more about that here; have a wonderful week; and contact us with any questions!


Image Resizing

The simplest way to resize an image is to use an online service like PicMonkey.com.  We don’t endorse any particular online service here at the OpenLab, and there are many online resizing free services.  But this one is solid in that it has the things most people need when resizing (a bit of color changing, a size change option, a crop feature, and a way to reduce file size).  If you don’t like PicMonkey, go ahead and search online for “free image resizing” and you’ll find more options than you can handle.  And here’s an article that looks at a few similar editors.

Most of these are pretty simple.  Just two things to keep in mind:

1) most of the time, roughly 600 pixels wide is the most you need for an image on one of our sites.

2) when it comes to file size, you don’t need a large file for most online work.  Save a large image somewhere else, and post images that are less than 60KB.  To do this with PicMonkey, move the ‘quality’ slider when you go to save the image.

Here’s an example.  The image below was originally 1440 X 1080 pixels–way larger than we need.  What we end up with is a thumbnail that’s 600 pixels wide which you can click on to see the full-size image.  It’s pretty rare that we need that second size, but it’s on the site now, and taking up an enormous amount of space.

(image by j_bary on Flickr  via Creative Commons)

So if we resize the image (I used PicMonkey here) to 600 px wide, and then lower the quality to 50KB, we end up with this:

It’s not quite as nice, but it’s going to save you a lot of space on your site, and if you don’t need the larger image, it’s a great idea to do it in advance.  Of course, if you do need the larger sizes, you should by all means post them.  The key is to think through what you need your images for, so that you can use the extra space when you need to.  Images that come straight out of your camera or phone, for example are almost always much larger than you probably need.

Of course, PicMonkey is, as we said, very simple.  Much more can be done using Photoshop or Gimp.  Here are two short tutorials on doing these simple tasks with these two much more robust applications:

Here’s a tutorial on resizing using photoshop:

And here’s a tutoria on resizing using gimp:

That’s it!  As always, contact us if you have any questions.


Using Screen Options

As I remembered just this morning as I accidentally deleted a post, WordPress has a convenient way to recover revisions and older drafts of a page or post.  In newer versions of WordPress, however, that feature is hidden in the default setting.  To access it (and several other screen options), click the ‘Screen Options’ button in the upper right of the dashboard.

When that opens, you’ll see a set of options, one of which is ‘Revisions.’  Click that, and beneath your main post or page box you’ll see a list of various drafts appear.  Clicking on any of them will allow you to view, compare, or restore that draft.

Very simple, but a bit tucked away, so easy to miss!  As always, contact us with any questions.