The WordPress Dashboard
Before sharing your Course with your students you will want set up your Course Site with your contact information, syllabus, schedule, assignments, and student post categories. This will help you to meet the recommended Course Information Best Practices. To do this, you need to go behind the scenes of your site, using the WordPress Dashboard.
The OpenLab runs on WordPress, a free, open source publishing platform that powers over 35% of sites on the internet. If you are new to WordPress the Dashboard may seem a bit intimidating at first, but you’ll soon get the hang of it!
Learn more about the Dashboard in OpenLab Help or contact the OpenLab team for guidance.
NOTE: If you’ve cloned a model course, the changes you need to make may be a little different from the steps below. Your course coordinator will provide more information.
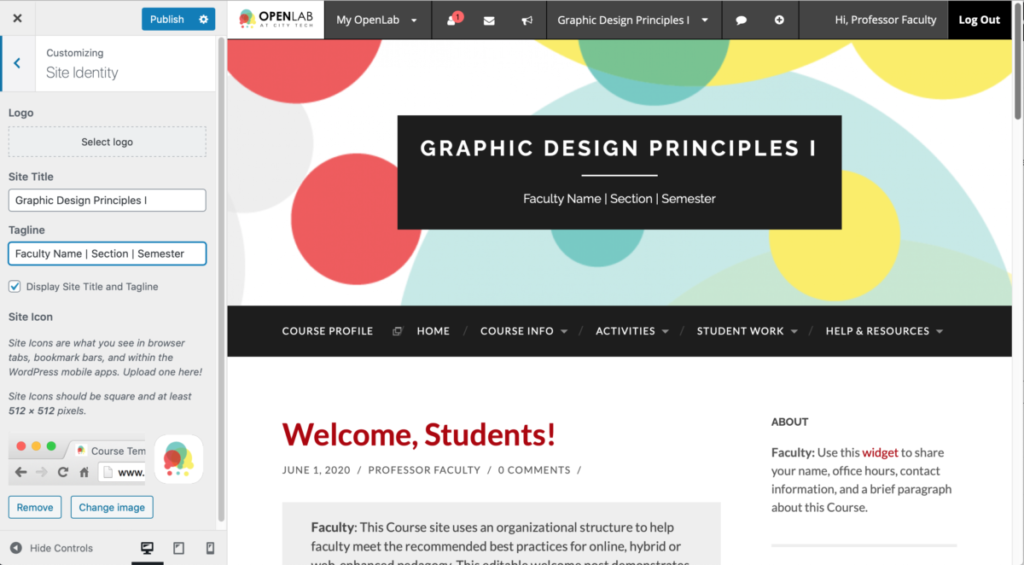
Step 1: Update the Site Header
The first step is updating the header area of your site to personalize your course site.
- Go to the Dashboard and click Appearance in the menu, then select Customize.
- Click Site Identity and adjust the Site Title and Tagline, replacing the Faculty Name, Section, and Semester with your course-specific content.
- Publish your changes when you’re done.
You can also change the header image for your site. This gives your site personality, and makes it more recognizable for your students. This could be your own image, an image with a Creative Commons license, or an image in the public domain.
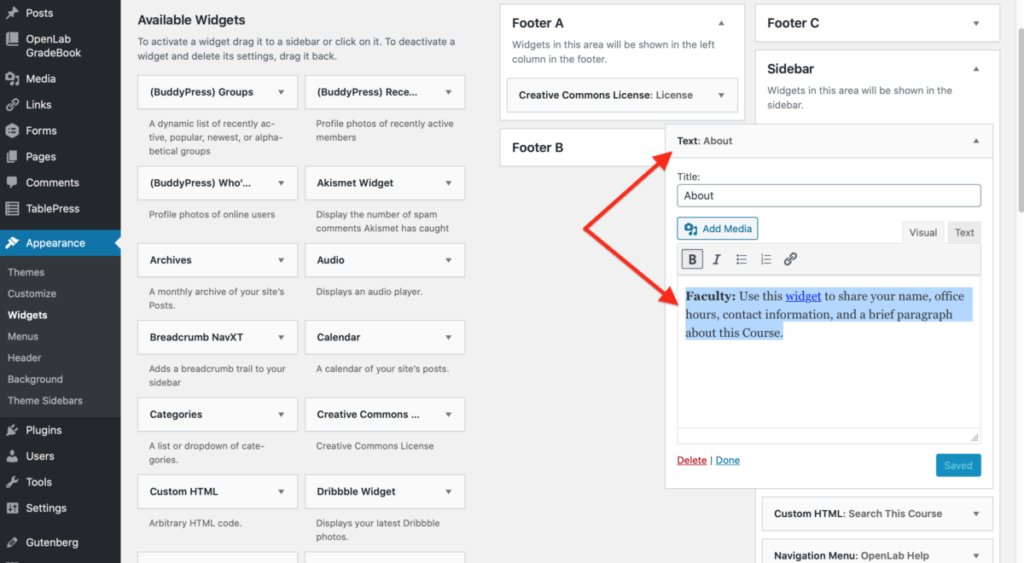
Step 2: Edit the About Widget
On the frontend of the site, in the Sidebar area, you’ll see a widget that displays information about you and your course. Let’s edit the About widget.
- In the Dashboard, go back to Appearance in the menu, then select Widgets.
- Expand the Sidebar widget, select and delete the placeholder text.
- Type in your name, office hours, contact information, and a brief paragraph about this Course. You can format the text using basic HTML tags.
- Save your changes.
Step 3: Update the Course Info
To meet distance education best practices provide your students with accurate information about the class.
Tip: You can use either the Block Editor or Classic Editor to edit your posts and pages, but WordPress will be retiring the Classic Editor in 2021, so it’s best to use the Block Editor if you can. Learn more about the Block Editor and working with blocks.
- Go to the Dashboard and click Pages in the left-hand menu. All the pages will be displayed.
- Choose Edit (Block Editor) to edit the Course Info Pages provided. In a new course on the OpenLab, these are:
- Course Info
- Syllabus
- Schedule
- Contact Info & Communications
- Edit the areas on each page that are unique to your course, and make any other changes so that these pages are accurate for your class. Remember to delete the informational block at the top of each page when you’re done.
- If the page you are working on has already been published, update the Publish date to the current date.
- Click Update, Publish, or Switch to Draft to publish later.
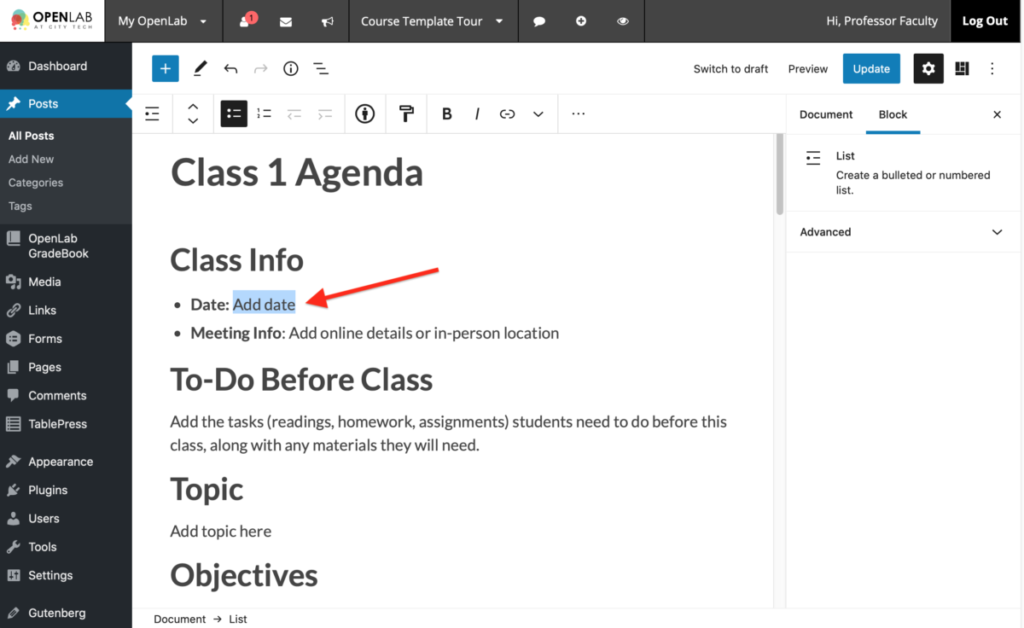
Step 4: Set up your Class Agenda posts
To meet distance education best practices provide agendas for each class or unit in your course. If you created a new course, an example Post is provided for the first class; if you are using a model course, agendas may be provided for the entire semester. Edit the areas that are unique to your class, such as meeting dates and times.
- Go to the Dashboard and click Posts in the menu. All the posts will be displayed.
- Choose Edit (Block Editor) to open the post “Class 1 Agenda (Example)“.
- Add the required information, and make any other changes you wish so your first Class Agenda is accurate. Remember to delete the informational block at the top of the post and change the title of the post to remove “(Example).”
- Reset the Publish date to the current date or Schedule the date you want the post to appear.
- Click Update, Schedule, or Switch to Draft to publish later.
Tip: You can clone your agenda posts for Class 2, Class 3, etc. by clicking on the clone or new draft button below the post in the Posts list. If you don’t see the option to clone a post or page, go to Settings > Duplicate Post > Permissions and check the box for Administrator.
Step 5: Edit the Welcome Post
Welcoming students to your course is another best practice. Now that you know how to edit Posts, you can edit the Welcome post that appears on the Home page and under Announcements.
- Go to the Dashboard and click Posts to edit the Welcome post.
- Add some text – and perhaps an image! – to welcome students to your class.
- This post is “Sticky” which means it appears at the top of the Home page. To “unstick” the Welcome post, uncheck “Stick to the top of the blog” in the post Settings.
- Again, remember to delete the informational block at the top of the post.
- Update the publish date and click Publish, Schedule, or Switch to Draft to publish later.
Tip: Your Welcome post appears under Announcements in the menu because it has the Category “Announcements” selected. You can clone this post, giving it a different title, or create a new post with the “Announcements” category each time you have something to announce to your class.
Step 6: Set your first Assignment
Now let’s edit the Assignment 1 (Example) post to set your first assignment for your class.
- A template is provided to help you effectively communicate your assignment instructions to your students. Feel free to edit as needed.
- The Assignment 1 (Example) post appears under Activities > Assignments in the menu because it has the Category “Assignment Instructions”.
- Like your Class Agendas, you can clone the post when you’re ready to create additional assignments in future.
Tip: You may want to adjust the name of the Assignment Instructions Category or add additional categories under the Activities section. Go to Posts > Categories to edit or add new categories. See the last step to learn how to add categories to the menu.
Step 7: Update the Discussion post
OpenLab courses come with a suggested community building post, Discussion: Introductions. This prompt is designed to introduce students to one another and to using the OpenLab for discussions using the Comment feature.
If your OpenLab Course Site is open, students can comment and participate in introductions and other discussions before they get signed up.
- If you wish to use this post, edit it to make any changes you wish.
- Again, remember to delete the informational block at the top of the post and update the date to Publish or Switch to Draft to publish later.
- Learn more about managing comments in OpenLab Help.
Tip: This post appears under Student Work > Discussions in the menu because it has the Category “Discussions”. If you’d like to add additional posts of this kind, remember to add the category “Discussions” to your posts so students can find and respond to it.
Step 8: Update the Student Survey Post
The OpenLab course template comes with a built-in survey to help you understand the technology and working spaces available to your students when they are off-campus.
- If you want to use the Student Survey post with your students, edit the post with a due date, and make any other changes you wish.
- Again, remember to delete the informational block at the top of the post and update the publish date to Publish, Schedule, or Switch to Draft to publish later.
- You can view students’ survey responses in your site’s Dashboard > Forms > Entries.
- For help building surveys and quizzes using the Gravity Forms Plugin, follow the instructions in OpenLab Help or contact the OpenLab Team.
Tip: This survey post appears under Activities > Surveys & Quizzes in the menu because it has the Category “Surveys & Quizzes”. If you’d like to add additional posts of this kind, remember to add the category “Surveys & Quizzes” to your posts so students can find them in this section of the menu.
Step 9: Add Resources
The OpenLab Course Template provides a Help & Resources section. You will see that a “Course Resources” page has been created for you. If you wish to use it, edit it to make any changes you wish. You can add additional posts or pages under this section by giving them the Category Help & Resources or adding them to the Menu. Like the other sections described below, you can adjust the categories and the menu to suit the needs of you course. (See the last step for details!)
Step 10: Set up Student Work Categories
The Student Work section of the site is set aside for student voices, to help create a engaging online class community. Students (as site authors) may submit their coursework by creating posts and choosing the appropriate Student Work category. Together the class can look at everyone’s work for a given assignment and add comments to provide helpful feedback. You can also privately grade student posts using the WP Grade Comments Plugin.
To make student work easily findable on your site, you may wish create additional Student Work sub-categories (e.g., Student Work > Assignment 1) and then add them to the Menu.
- Go to Posts > Categories.
- Add a new category and choose Student Work as the Parent category.
- Go to Appearance > Menu.
- In the “Add Menu Items” area expand the Categories section. Click on View All and choose the sub-categories you’d like to add. They will appear at the bottom of the Menu Structure.
- IMPORTANT: Drag each sub-category so it is indented under Student Work. You will see the pre-set sub-categories, Discussions and Assignment Posts. Feel free edit, rearrange or delete, as needed.
- Save the Menu and preview the site.
- Visit OpenLab Help to learn more about editing the Menu.
Tip: Be sure to include how-to instructions about how students should post their work in the assignment’s instructions, including the specific category you’d like them to use. Links to the basics, like posting and commenting are provided in the sidebar widget OpenLab Help.
Final Step! Schedule Your Posts
Remember to schedule the publish dates for your posts for the order in which you want them to publish. They will appear in the category archive and on the Home page in reverse chronological order with the most recent post at the top.
For example, your Class 1 Agenda should have a publish date prior to your Class 2 Agenda and so on. It’s good practice to set your class agendas to appear a day or two before the next class meeting so students can be prepared.
- To schedule a post, in the Document Settings click on the date next to Publish and choose a date from the calendar. Then click Schedule.
- Alternatively, you may want to switch all of your posts and pages to Draft until you are ready to publish them. Choose Bulk Actions > Edit to do this all at once! When you are ready to publish or schedule a post or page, remember to update the publish date by choosing Reset to set it to the current date or select a date from the calendar to Schedule.
Congratulations!
You’ve set up your Course Site! There’s much more you can do with your Course Site to facilitate student learning and collaboration. Check out the Sites on the OpenLab section in OpenLab Help if you want to keep on learning!
Continue to the next section “Teach Your Course” to find out more about best practices for preparing course materials, working with your students and more.


