Robin Michals | COMD 1340 Photography 1

Category: Lab Exercises (Page 1 of 4)

Lab 12 – Outdoor portraits with Fill

Take portraits in three ways:

  1. Start with a reflector. Have your model stand with the sun to their back. Use the reflector to reflect light back into their face. Hold the reflector higher for a more pleasing result.

2. Then with the subject still with their back to the sun, use flash to brighten the model’s face. Use the flash on camera at a relatively low setting such as 1/64. You don’t want to cast any shadows on the face just brighten it.

3. Bounce the flash off the reflector onto the subject’s face.

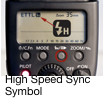
Use your widest aperture for shallow depth of field. You may need to use a fast shutter speed to compensate. When using flash, make sure to set it to High Speed Sync (HSS) in order to be able to use a shutter speed faster than the sync speed.

Make sure to photograph everyone in your group, not just one person. Put your 20 best outdoor portraits in an album on Flickr and send the best two to the class group.

Lab 11: Painting with Light

Working with a light or lights, draw an image over time in the frame. Experiment with thin and thick lines, abstraction, words, and images.

Using a speedlite or a monolight, add a person to your shot. fire the flash and then with a long exposure keep drawing into the shot. The more the subject and the light painting interact, the more successful your photos will be.

Upload a minimum of 20 images to Flickr. Send your best two to the class group.

Lab 10: Two and three light portraits

Photograph your classmates in each of the four set ups:

  • Three point lighting
  • Butterfly light
  • Wide angle distortion
  • color

Create a wide range of mood.

Post at least 20 photos to an album on Flickr with at least one of each lighting style. Send your two best to the class group.

Lab 9: One-Light Portrait Styles

Set up:

  • The subject should be at least 4 or 5 feet in front of the backdrop to avoid casting a shadow.
  • Use 65mm focal length when you are using a camera with a cropped frame sensor, 85 mm for a full-frame sensor
  • Focus on the subject’s eyes.

The key or main light is the light that casts the shadows.

Working with just the key light:

Front view:

Photograph your subject with:

  • Rembrandt light – the light is at a 45 degree angle to the subject. Look for the key triangle -a triangle of light on the darker side of the face to position the light.

    Do not place the light too high because this will cause shadows around the subject’s eye sockets.
  • Split light – the light is at a 90 degree angle to the subject. One side of the face is dark but light does fall on the other side.
  • Front light (butterfly) – Light falls on the subject from the camera position.


Three-quarter view:

  • The model’s face is turned to a 45 degree angle from the camera.

Photograph your subject with:

  • broad lighting by placing the light on the side of the visible ear. There will be a broad highlight on the subject’s hair. This works for subjects wearing glasses.
  • short lighting by placing the light on the side of the invisible ear. 

Profile:

The model turns their face at a 90 degree angle to the camera. Place light like a side light. The subject faces the light BEING VERY CAREFUL NOT TO LOOK DIRECTLY INTO THE LIGHT. 

Put your 20 best photos into an album on Flickr. Make sure to represent each one of these lighting styles. Send your 2 best to the class group.

Lab 8: Aperture, Depth of field and Perspective

Today, we will visit the Brooklyn Botanic Garden.

Look for Daffodil Hill, Magnolia Plaza, and the Shakespeare Garden (Dwarf Iris)as we head for the Steinhardt Conservatory.

https://www.bbg.org/map

On our field trip:

Take at least 10 different long shots that use perspective to depict deep space. Look up at a tree or along a path. Use either converging lines or diminishing scale or both. These photos should use extensive depth of field meaning everything from near to far should be sharp.
Using the shooting mode Av, set the aperture to f11. Use auto ISO.

Take at least 20 close up photos of individual plants that use shallow depth of field. There should be something in the foreground and something in the background. Don’t shoot from an aerial or bird’s-eye view for these photos. Sometimes the foreground should be in focus, sometimes the mid distance and sometimes the things in the far distance. Use the shooting mode Av, set the f-stop to f/4 with auto ISO. Make sure that your shutter speed is faster than 1/60 th of a second and that the blur in the photo is shallow depth of field and not motion blur.

Put your 30 photos in an album on Flickr. Send your best example of perspective and of shallow depth of field to the class group.

« Older posts

© 2024 COMD1340TueSpr24

Theme by Anders NorenUp ↑