Robin Michals | COMD 1340 Photography 1 OL89 | FAll 2020

Category: Lab Exercises (Page 4 of 6)

Week 9: Lab Exercise: Optical Shallow Depth of Field

When photographing with a camera for shallow depth of field:

  • Use Aperture Priority or Av and set the camera to the widest aperture (lowest number.)
  • Use the telephoto end of your lens (zoom in.) 
  • Get close to the subject
  • Allow some distance between the subject and the background. There must be space between the foreground and background of your composition. 

When photographing with a camera phone:

Because of its very small sensor size, it can be very difficult to get shallow depth of field with a cameraphone. However, the same general approach will work:

  • Zoom in
  • Get close to the subject
  • Allow some distance between the subject and the background. There must be actual space between the foreground and background of your composition.

Take several small objects and photograph them using shallow depth of field, once with the focus on the object closest to the camera and once with it on the object further from the camera. Put the two photos into a post with a written definition of shallow depth of field and a description of what you had to do to achieve shallow depth of field in your photos.

Category: Lab: Week 9 – Shallow DoF

Lab: Week 9 – Optical vs Digital Shallow Depth of Field

Optical Depth of Field is created by the characteristics of the camera lens.

Digital Depth of Field is created by software.

Work near a window or if you can go outside, that works too. You will need an app such as Focos.

Using three different pairs of subjects, each time with one closer to the camera and one farther from the camera, create shallow depth of field both optically and digitally and compare the two. Experiment with how much physical space is between the two subjects and how close you can get to the closer subject and still have it be in focus. You should have 6 final photos

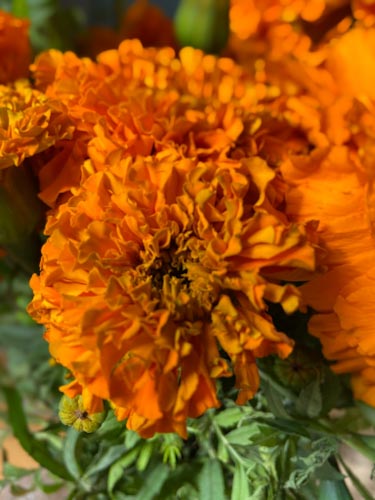
In the case of the marigolds,

  • shooting with the regular camera, there is some visible shallow depth of field in the flowers farthest from the camera.
  • shooting with the the Focos app, shallow depth of field is pronounced and maybe even a bit exaggerated.

Put your pairs of photos into a post with a description of what you did and wht you learned about how to create the effect of shallow depth of field. There will be no credit for lab exercises without explanatory text!

Category: Lab: Week 9 – Optical vs Digital Depth of Field

Lab: Week 7 – Quiz Review

The class will have a quiz next week on October 27th.

It will cover the topics discussed to date: the frame and composition, light and exposure, shutter speed, and global corrections in Lightroom.

Working with your group, write three questions for next week’s quiz. What are the most important topics covered?

Each question needs to have a part where students demonstrate understanding. Since this will be essentially open book, no question can simply allow for the test taker to cut and paste an answer.

Write one question in each of these three formats:

Define a term and then use it in a sentence.

Compare and contrast two photos (select from any used on any of the class topics pages or taken by students this semester) to discuss XYZ.

Define a term and take a photo that demonstrates that term.

Put your questions in a post with an answer key. Make sure to include the names of everyone in your group.

Category: Lab: Week 7 – Quiz Review

Lab: Week 7 – Global Corrections

Select one photo from the four selected by your group from your midterm project that you think will benefit most from adjustment in Lightroom. Using the Lightroom Workflow detailed on today’s class topics page, adjust your photo.

Make a post and include the before and after versions with a screen shot of the Lightroom settings you used and a short description of how you improved your photo.

Category: Lab: Week 6 – Global Corrections

Lab: Week 6 – Motion Blur

When working with a cameraphone, there are many apps that can help simulate the look of motion blur. These apps don’t actually allow you to use a long exposure but instead take many shots and merge them together.

If you have an iPhone, download and try:

Slow Shutter Cam $1.99 or one of the free alternatives such as Slow Shutter Fast Cam

Android: Long Exposure Camera 2

Using the motion blur capture mode, experiment with blur strength and shutter speed. Keep the ISO low.

Create an image where the background is sharp but you or someone else is moving through the shot.

In order to do this, use a tripod or prop up the camera. Use the timer.

Post your photo with a short description of what you did to achieve the effect of motion blur. Include what app you used, the settings, and ow you secured the camera.

Posts without text will not receive credit.

Category: Lab: Week 6 – Motion Blur

« Older posts Newer posts »

© 2024 Photography I

Theme by Anders NorenUp ↑