Happy Memorial Day!

Happy Memorial Day to all those who have served in the Armed Forces, or are family and friends of one, or have lost one in the service. Today, I was conflicted on what to post on such a historic day that truly marks the importance of those who have fought for our country. But I decided to write about an iconic American pastime, baseball. Although, many will camp, go to the pool or beach, enjoy time with friends and family, this sport is great to watch with fellow loved ones for this particular day.

Major League Baseball is very dedicated to the honoring the fallen veterans by holding moments of silence to show respect to the troops. Each of the players wear camouflage uniforms still embroidered with their team affiliated logo to represent the appreciation that Major League Baseball has for those serving in the Armed Forces. They happily show their support by having a reduced pricing for all veterans not only for Memorial Day but for all games. New York is luckily honored to have two Major League Baseball teams to represent the state with both the New York Yankees and the New York Mets.

Personally, I have went to plenty of baseball games with my family to Citi Field to watch the New York Mets and whether they win or lose, the most entertaining part of the game is being able to watch this exciting sport being played out while being surrounded with loved ones. The simple experience of cheering for your favorite team while simultaneously watching the game and having the chance to eat the concession stand food in this fantastic atmosphere, it is truly a great memory to last a lifetime.

I simply wanted to share a recipe for a concession stand food item that is commonly consumed at baseball stadiums by customers to have better experience while watching the game.  So if you cannot attend a MLB game this weekend and can only watch on television, this is an easy recipe to make the experience seem that much more connect to the game.

a tower of funnel cakes covered with powdered sugar

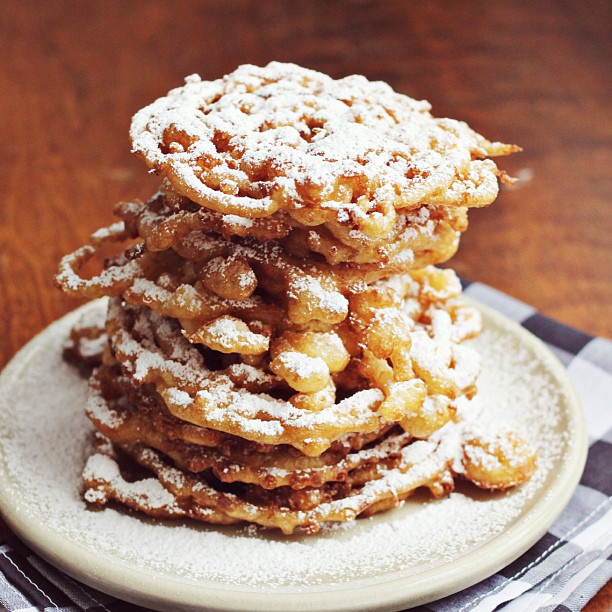
Image by: KirstyJoan

Funnel Cakes

makes 4, 12″ cakes

4 large eggs
2 2/3 cups milk
1/2 cup + 2 tablespoons granulated white sugar
5 cups AP flour
1 teaspoon salt
1 tablespoon + 1 teaspoon baking powder
Powdered Sugar for dusting

Heat oil in an electric deep fryer or cast iron pan to 375°F. You will need at least an inch and a half of oil. We chose to use the electric fryer, which recycles its heat quicker and kept the fried foods smell and heat out of the house! Line plates with paper towels, the process will go fast once you start!

Mix egg and milk together with a wire whisk or fork until combined. Stir in other ingredients until batter is smooth.

Fry Tip: If you will be frying more than 4 funnel cakes or if you wish to make the batter up to an hour in advance, increase the amount of baking powder by 1 teaspoon to help give it lift during its long wait before frying.

Fill a pastry bag fitted with a large round tip and squeeze batter in a random, yet overlapping pattern. (It’s all mainly a haphazard process, but crossing the batter back over itself will help it stick together when it’s time to flip.) Once it’s floating and golden brown (usually 60 seconds in), flip using tongs, allowing the other side to cook.

Continue cooking until desired color is achieved and remove from grease and set on a paper towel lined plate. Apply powdered sugar liberally to the top, add fruit toppings if desired and enjoy!

Note: You can use an actual funnel for this process, or even a zip top bag with one corner snipped off. Just as long as the better is able to get into the oil quickly and efficiently, that’s all that really matters.

Recipe adapted from The Kitchn 

So enjoy this Memorial Day holiday weekend kick back, relax, and enjoy a baseball game. And Major League Baseball teams, batter up!!

CUE Conference with “The Buzz”

a decorated cake made for "The Buzz" team

Image by: Brianna Vasquez

Last week was the Coordinated Undergraduate Education (CUE) Conference which is an annual event that was held at City College of New York this year. The theme of the event was used to show the catalyst for change to engage for impact within CUNY. The conference explores the innovations, collaborations, and actions in undergraduate education that will prepare global citizens for the 21st century. And I was gladly able to attend the conference on behalf of the Openlab “The Buzz” bloggers team. I was so honored to be chosen to represent the team since the conference conflicted with many of the other bloggers’ schedules; I felt a certain responsibility to the fellow bloggers as well as the Openlab team. The conference was amazing as we were able to share the benefits of having a internet based haven for all Citytech students to not only use academically but for recreational interests as well. Honestly, the Openlab has been a great asset to me to complete specific class projects and to be able to connect with my peers. Through the daily struggles of school and balancing it with all the other happenings in our lives, it truly allows us to connect to our peers who are experiencing similar collegiate lives.

an edible camera

Image by: Brianna Vasquez

Being a hospitality management major and my aspirations of becoming a pastry chef, I instantly felt a need to bring a dessert to the meeting which was used as a preparation to the conference. I continuously thought about what the best appropriate dessert to represent the Openlab’s success would be and I eventually decided on a cake. As always, I wanted the cake to have a certain complexity to it. So, after making the cake and decorating as well as crafting the other pieces with the help of my sisters, we delivered the cake on the day of the meeting, unfortunately, late. But the cake was an absolute hit and received such great feedback. Everyone was captivated by the realistic appearance of the cake with its added features and began taking numerous photographs with their mobile phones. As a pastry chef, that is one of the most fulfilling moments of making a dessert, is to simply see the reaction that it causes to all of you as I enter the room with this edible masterpiece. The cake took about three days to put together which was pretty short notice yet it came together really well. The cake truly evoked the sense of the Openlab’s “The Buzz” not just by the logo but by connecting to the bloggers with the camera to appeal to the photo-bloggers and the tablet to appeal to the other bloggers. The cup of coffee was originally a joke as my sisters and I were joking about how drinking coffee is almost an essential to our lives and it was simply added to the cake. And although it might sound crazy the whole cake and all of the side pieces were all entirely edible.

a themed cake with an edible coffee cup and tablet

Image by: Brianna Vasquez

I would just like to say thanks to Jill Belli, Jody Rosen, Andrew Mckinney, Scott Henkle and all of those from the Openlab for inviting me into the Openlab family. It was a pleasure to speak on behalf of “The Buzz” team and I am truly happy to have such an encouragement when it comes to my blogs as well as being truly understanding and attentive to not only my major but all of the other bloggers, it simply shows us how much you care about all of our work. And to the fellow bloggers, I appreciate how truly connected we are despite only meeting a few times; I look forward to reading your future posts and love when you comment on mine. We are all a part of a big family of something that is truly special and I am in awe of how far the outreach has been, I cannot wait to see what the future holds not only for us but for the Openlab after we graduate and others have their chance to begin sharing with the college on this amazing haven.

French Napoleons

Homemade Vanilla Napoleon

Photograph by Sabrina Vasquez


This past week was my mother’s birthday and although most families celebrate birthday with cakes, my family easily finds other alternative desserts to celebrate with instead of the traditional cake that is commonly served. In the past, we have hosted birthday parties with desserts such as gelato, icees, doughnuts, and cheesecake. But, for this year in particular, my mother wanted to have a French inspired dessert which was napoleons. This dessert is complex in the processes of creating each component and then assembling it together in an appetizing way. Napoleon, also named mille-feuille, vanilla slice, or custard slice are usually consists of three layers of puff pastry alternating with two layers of pastry cream. Yet, this classic French pastry can differ from a variety of countries. An Australian version uses passion-fruit icing and infuses passion-fruit into the pastry cream as well. While a Italian version is a savory napoleon which usually has spinach, cheese, and pesto. Although, the exact origin of the napoleon is still unknown, the French name for it mille-feuille literally means cake of a thousand layers which refers to the many layers in the puff pastry first while the puff pastry is being made and as it flakes in layers as it is baking in the oven.

So as my mother’s birthday was approaching, I had to figure out a way to make one of the best napoleon to top all napoleons she has ever eaten as her birthday present. My sister agreed to help me as making the dessert is not complicated just complex.  So we agreed that she would make the pastry cream and bake the puff pastry while I would assemble the dessert to its entirety.

Napoleon Recipe

First, bake the puff pastry I purchased the Pepperidge Farm brand one and it works well. Simply, thaw it out first and then unfold it onto a cookie sheet. Then, bake until golden brown.

Now, the pastry cream …..


Ingredients:

2 cups half-and-half

½ cup sugar

Pinch salt

5 large egg yolks

3 tablespoons cornstarch

4 tablespoons (½ stick) cold unsalted butter, cut into 4 pieces

1½ teaspoons vanilla extract


Directions:

  1. Heat the half-and-half, 6 tablespoons of the sugar, and the salt in a medium heavy-bottomed saucepan over medium heat until simmering, stirring occasionally to dissolve the sugar.
  2. Meanwhile, whisk the egg yolks in a medium bowl until thoroughly combined. Whisk in the remaining 2 tablespoons sugar and whisk until the sugar has begun to dissolve and the mixture is creamy, about 15 seconds. Whisk in the cornstarch until combined and the mixture is pale yellow and thick, about 20 seconds.


  1. When the half-and-half mixture reaches a full simmer, gradually whisk the simmering half-and-half into the yolk mixture to temper. Return the mixture to the saucepan, scraping the bowl with a rubber spatula; return to a simmer over medium heat, whisking constantly, until a few bubbles burst on the surface and the mixture is thickened and glossy, about 30 seconds. Off the heat, whisk in the butter and vanilla. Strain the pastry cream through a fine-mesh sieve set over a medium bowl.


Note on straining: This is key step because it will ensure that your finished pastry cream will be silky smooth with no lumps or bumps.

Press plastic wrap directly on the surface to prevent a skin from forming and refrigerate until cold and set, at least 3 hours or up to 2 days.

Recipe adapted from Brown Eyed Baker

Assembling the pastry:

Using a sharp knife or a pizza cutter, cut the pastry into thirds.

In a small bowl whisk together:

1 cup powdered sugar

2 tsp corn syrup, light

1 TBS butter, unsalted , melted

Slowly mix in:

3 TBS milk, whole

Add enough milk to keep the icing thick, but pourable.

Pour half of the icing into another bowl, and whisk in:

1 TBS cocoa powder, unsweetened

Pour chocolate icing in to a squeeze bottle.

To assemble your napoleon, place the bottom layer of baked puff pastry onto your serving dish. Spoon half of your cooled pastry cream along the center of the pastry.

Place your middle layer of baked puff pastry over the cream, gently pressing the pastry down and pushing the cream to the edges. Spoon the remainder of the cooled pastry cream along the center of the middle pastry layer.

Top with the icing-decorated top layer and gently press over the pastry cream, again, pushing the cream to the edges. And smooth out the pastry cream around the sides.

Choose one of the three cut pieces of puff pastry to be your top layer and using a soft scraper, cover with the white icing. Using the squeeze bottle containing the chocolate icing, pour horizontal chocolate stripes over the white icing. Working quickly and use the tip of a knife to drag through the chocolate stripes and mix into the white icing.

Allow to set in the refrigerator 30 minutes or up to 4 hours.

Recipe adapted from Family Spice

Beer, Beer and More Beer

When we are surrounded with sports, parties, and Oktoberfest; what is the most present beverage? Beer. It is used as a celebratory drink for these events as wine is for weddings. The precise history of alcoholic beverages is still unknown but it was most likely created as a mistake from an ancient Chinese concoction made from rice, honey, and fruit which was nine thousand years old. This was the first known alcoholic drink yet the first barley beer is widely believed to have been created in the Middle East. Beer was also the first alcoholic beverage to be established by a simple reaction of certain sugars causing fermentation with the wild yeasts to invented alcohol. This beverage was utilized for dietary purposes during food shortages, now beer has improved in quality and is widely consumed for pleasure. Despite the complicated complexity of beer, it can brewed at home from scratch with the proper ingredients.

American Pale Ale Recipe

Ingredients

  • 5 1/2 pounds dry light malt extract
  • 1/2 pound Crystal 20L malt, crushed
  • 1/2 pound American 6-row malt, crushed
  • 1/2 ounce Centennial hops—60 minutes
  • 1 ounce Cascade hops—15 minutes
  • 1 ounce Centennial hops—15 minutes
  • 1 ounce Cascade hops at flame out
  • 1/2 ounce Centennial hops at flame out
  • 6 gallons of tap water, split. If possible, place 3 gallons in the refrigerator to cool in a sanitized container.
  • 11.5 gram package Safale US-05

Procedures

  1. Tie the American 6-row malt and Crystal 20L malt in a mesh hop-bag. Heat 1 gallon of water in a large pot to 160°F and remove from heat. Add malt and let steep for 20 minutes.
  2. Raise temperature slowly to 170°F. Make sure mesh bag isn’t sitting directly on the bottom of the pot. Remove the grain bag and add water to make 3 gallons total.

  3. Bring the wort to a vigorous boil. As water is heating, slowly add malt extract, stirring constantly until completely dissolved. When boil begins, add 1/2 ounce Centennial hops in mesh bag.
  4. After 45 minutes of boiling has passed, add 1 ounce Cascade and 1 ounce Centennial in mesh bag.
  5. After total of 60 minutes of boil remove from heat, add 1 ounce Cascade and 1/2 ounce Centennial in mesh bag and cover. Warning: After wort cools below 180°F everything that touches it should be sanitary, and exposure to open air should be limited as much as possible.
  6. Cool wort by placing pot in ice bath until it is below 85°F. Transfer to sanitized fermentor (either a carboy or a fermentation bucket). Top off to 5 gallons using refrigerated water.
  7. Sanitize outside of yeast package, fermentation stopper and airlock. Carefully pour yeast into cooled wort (it should be below 70°F), and agitate vigorously. Ferment in dark place, keeping ambient temperature consistent, preferably between 62-66°F.
  8. Bottle after two to three weeks.

Recipe adapted from SeriousEats and to learn more about the carbonation process as well as bottling the beer. Visit SeriousEats

Or simply grab a can or bottle of your favorite beer instead. Afterall, it is easier as the process of making beer is very labor intensive without commercial machines.


Also, if you are interested in the styles of beers, becoming knowledgeable about specialty beers, and understanding the difference between ales and lagers; then I have heard rave reviews for Brooklyn Brewery which is located near New York City of Technology. Brooklyn Brewery hosts tours for small batch beers Monday thru Thursday at five o’clock as well as Friday thru Sunday at differing times. The tours costs ten dollars and after the tour, you can purchase tokens (each token costs five dollars) to purchase samplings of the house-made beer. Those under 21 years of age can still attend and will receive prizes such as a Brooklyn brewery shirt and craft soda instead of the beer. Honestly, I’m waiting until I turn twenty-one so I can fully enjoy it but many have told me that the tour groups come together for their personal, sentimental value of simple drinking beer. That is the best part of food and beverages that it inevitably brings everyone together.

Visit Brooklyn Brewery for more information.

National Grilled Cheese Month

sweet version of a grilled cheese sandwich

Photo via HuffingtonPost

Remember the Kraft processed cheese singles commercials that showed the cute, happy children who were eating grilled cheese sandwich and how we envied their happiness. We were so easily brainwashed that we begged our parents to buy the processed cheese singles so we could enjoy grilled cheese sandwiches just as much as those thrilled children from the commercials.  As we got older we may have begun to explore other cheeses such as American, Cheddar, and Muenster to add a new flavor element to the childhood favorite of the grilled cheese sandwich. Sometimes the grilled cheese and tomato soup meal becomes monotonous because we simply are in a food rut. But there is an alternative to this meal that still endeavors that cheesy goodness of a grilled cheese sandwich where the cheese is delightfully melted, gooey, and strung in our mouths. The month of April marks as grilled cheese month. As you have seen from my previous posts, I write about extremely unique recipes that are not usually created but are intriguing to make with variously new techniques and to taste with a variety of flavor concepts. I wanted to share a sophisticated version of grilled cheese that *fits as a great snack or dessert which is the Raspberry and Chocolate with Almonds Grilled Cheese. The cheese is paired with almond studded chocolate candy bars and fresh, sweet raspberries for a modernized twist on an American classic. It is easy to make as any other grilled cheese is and it is delicious because it offers a new definition to grilled cheese sandwiches to not only be savory but sweet as well. I simply ask that readers have an open mind to try this interesting recipe as it is very satisfying.


Raspberry and Chocolate With Almonds Grilled Cheese
an arrangement of ingredients for a sweet grilled cheese sandwich

Photo via FoodieCrush

Serving: 2 Sandwiches
Ingredients
  • 4 slices angel food cake (from a loaf)
  • 2 tablespoons butter, at room temperature
  • 1 teaspoon vegetable or canola oil
  • 4 slices havarti cheese
  • 4 tablespoons mascarpone cheese, softened
  • ½ teaspoon granulated sugar
  • 1 1.45-ounce bar HERSHEY’S Milk Chocolate with Almonds
  • ½ cup fresh raspberries
  • Zest of 1 orange
Instructions
  1. Spread ½ tablespoon of butter on one side of each slice of the angel food cake and turn the unbuttered side up, laying the buttered side down on a cutting board or piece of parchment.
  2. Layer each of the 4 slices of angel food cake with 1 slice of the havarti, then set 2 of the havarti topped slices aside. Spread half of the mascarpone on top of the other 2 slices and sprinkle with the sugar. Top these with a generous pinch of the orange zest then roughly break the pieces of the HERSHEY’S Milk Chocolate Bar with Almonds into chunks and divide among the 2 slices of cake with the mascarpone and zest. Top each slice with a few berries.
  3. Drizzle the oil into a non-stick fry pan over medium heat. Place the four sandwich slices in the pan buttered side down. Cover with a lid and cook for 3-4 minutes or until the bread is golden and the cheese and chocolate has melted.
  4. Transfer to a plate and top the chocolate, cheese and berry sides of the sandwich with the slices of cake with just the melted cheese. Enjoy hot.

Notes:

The Angel Food cake can be substituted for challah bread,sweetened brioche, or pound cake. Also, many other fruits can be used such as blueberries, strawberries, blackberries and even sliced stone fruit.

Recipe adapted via FoodieCrush

Free Cone Day at Dairy Queen

ice cream cone with a unique curl

Vanilla Ice Cream Cone At DQ with the Signature Curl (Image by: The Huffington Post)


You scream. We scream. We all scream for ice cream! Even though it is still wintery, it is only four days till spring begins. Today is a day of celebration for Dairy Queen as it commemorates its 75th anniversary of being open for business serving customers the “fan food not fast food.” Coincidentally, on the 75th calendar day of the year, this March 16th, participating Dairy Queen locations are offering a free vanilla small cone with the signature curl on the top to every customer which is limited to a single cone. Dairy Queen representatives have already stated that the company will be offering many food and treat innovations during the year to show their appreciation to their dedicated fans while celebrating being opened for 75 years, Dairy Queen even kicked off their celebration at the start of the year by featuring a birthday cake Oreo blizzard. On the behalf of Dairy Queen’s generosity, in turn, they are hoping that guests donate to the Children’s Miracle Network Hospitals which the company has sponsored for the past thirty years, in order to raise funds for children’s hospitals, medical research, and awareness of children’s health issues.  These donations will help save and improve the lives of children that are currently being treated at the 170 children’s hospitals across the United States and Canada.  Ice cream always taste good during any season at any time despite the flavor but it will taste even better knowing that you could be helping children all around America. And if you happen to be a fan of Dairy Queen, stay informed for all their special events either with their website or for a particular location with Facebook.


New York Dairy Queen locations participating in Free Cone Day:

5366 Sunrise Highway, Massapequa, NY

3095 Hempstead Tpk., Levittown, NY

54 W 14th St. New York, NY

Staten Island Ferry St. George Terminal Staten Island, NY

Bay Plaza Mall Bronx, NY

37-39 Junction Blvd. Corona, NY


If you can’t make it to any of the Dairy Queen locations but still want some fresh ice cream to eat. Here is one of the simplest vanilla ice cream recipes.

churning ice cream

Image by: Bordecia34


Vanilla Bean Gelato
Serves: approximately 1 quart
Ingredients
  • 3 cups whole milk
  • 1 vanilla bean, split and scraped
  • 1 teaspoon pure vanilla extract
  • 4 egg yolks
  • ¾ cups granulated sugar
Instructions
  1. Place the milk, vanilla bean and vanilla extract in a saucepan over medium heat and heat until almost boiling. Beat together the egg yolks and sugar. Remove the milk from the heat and whisk slowly into the egg mixture. Return the pot to the heat and stir until the mixture thickens slightly, approximately 3-4 minutes. Remove from the heat and discard the vanilla bean. Allow to cool (preferably overnight).
  2. Pour the mixture into an ice cream maker and follow the manufacturer’s instructions until the gelato is frozen and scoopable. Alternatively, place the mixture in a metal container and freeze, beating at 1-hour intervals, until the gelato is scoopable.

Recipe mostly adapted from: Savory Simple

Eat Ice Cream for Breakfast Day

Girl Ice CreamCrazy Ice CreamBiden Ice Cream

(From Left to Right)

Image by Daniel Rothamel via Flickr

Image by Don Ryan via ABC News Go

Image by Unknown via PixShark.com


As young children, we fantasized about the days when we could eat candy and all other kinds of sweets for breakfast. Instead of eating healthy food for the most important meal of the day, we wanted feast on cakes, cookies, or ice cream. It seemed like was an amazing dream come true despite our parents’ opinions. In the 1960’s, Eat Ice Cream for Breakfast day was founded by Florence Rappaport of Rochester, New York, most likely, from an enormous blizzard that hit hard in their area that year. In order to avoid her six children from becoming restless due to school closures, she allowed them to spontaneously eat ice cream for breakfast. Her children enjoyed the occasion so much that the following year they asked their mother if they could celebrate her made-up holiday again and it continued to be a family tradition every year and was passed on to others who interacted with the Rappaport family. Eat Ice Cream for Breakfast day is currently observed on the first Saturday of every February. Now, this food inspired holiday is widely celebrated on February 18th in order to bring awareness to childhood cancer in the world. In 2010, nine year old Malia Grace succumbed to her long battle with cancer. To honor her beautiful yet short life, in 2013 Eat Ice Cream for Breakfast day became viral on social media to honor many children suffering from this aggressive disease by doing one of Malia’s favorite traditions that she did on her birthday every year.

Coffee and Donuts

Image by Gnokii via OpenClipart


Below is a recipe for an interesting flavor of ice cream that is perfect for breakfast and a rather fun approach to celebrate Eat Ice Cream for Breakfast day next year or you can simply purchase a pint of Häagen-Dazs instead.


Coffee and Doughnuts Ice Cream

 Yield: 1 quart

Prep time: 8 hours

Total time: 12 hours

Ingredients:

1½ cups whole milk
¾ cup granulated sugar
1½ cups whole coffee beans
3 glazed doughnuts, chopped, divided
Pinch of salt
1½ cups heavy cream
5 egg yolks
¼ teaspoon vanilla extract

Directions:

1. Warm the milk, sugar, whole coffee beans, 2 doughnuts, salt, and 1/2 cup of the cream in a medium saucepan. Once the mixture is warm, cover, remove from the heat. And let steep at room temperature for one hour.

2. Rewarm the coffee-infused milk mixture. Pour the remaining 1 cup cream into a large bowl and set a mesh strainer on top. In a separate medium bowl, whisk together the egg yolks. Slowly pour the warm coffee mixture into the egg yolks, whisking constantly, then scrape the warmed egg yolks back into the saucepan.

3. Stir the mixture constantly over medium heat with a heatproof spatula, scraping the bottom as you stir, until the mixture thickens and coats the spatula (and registers 170 degrees F on an instant-read thermometer). Pour the custard through the strainer and stir it into the cream. Press on the coffee beans and doughnuts in the strainer to extract as much of the coffee flavor as possible, then discard the beans and doughnut remnants. Mix in the vanilla and stir until cool over an ice bath.

4. Chill the mixture thoroughly in the refrigerator, then freeze it in your ice cream maker according to the manufacturer’s instructions, adding the remaining chopped doughnut during the last few minutes of churning.

Coffee and Doughnut ice cream recipe via Brown Eyed Baker

Beginner’s Molecular Gastronomy

Hello, my name is Brianna Vasquez and I am a sophomore, majoring in hospitality management at New York City College of Technology. I am in love with all subjects pertaining to food and its innovations that are trending in the culinary world since I aspire to become a pastry chef. But I wanted to share easy gourmet dishes that can be made from the items you most likely already have at home in the fridge or pantry. I am overly obsessed with molecular gastronomy which is a food practice that applies scientific principles to the improvement of food by different techniques and ingredients. It can affect the texture, color, shape, and flavor of the food item. Molecular gastronomy has gotten so popular that it now provides kits for professional chefs and home cooks to use which can be expensive ranging from $30-$350 depending on what is offered in each kit. It is an expensive practice due to the gourmet ingredients used like xanthan gum that is not readily available in local supermarkets. Nevertheless, I wanted to share an inexpensive recipe for molecular gastronomy spherification which is commonly used as a garnish that can allow you to feel like a Michelin star chef in quality without spending a lot of cash.

Here’s the Recipe for Gelatin “Caviar”:

But first is some basic information when making gelatin caviar is

1.  Choose strong flavors such a strong brewed coffee or balsamic vinegar that can be easily tasted due to their potent flavors.

2. Choose an oil whether vegetable (which is what I recommend since it is more versatile and readily available) or grape seed. Don’t use olive oil or coconut oil and other oils that can easily solidify. Since the oil must be cold in order form the caviar to solidify into its pearl-like shape. The oil can either be put in the freezer for an hour but preferably overnight to chill or be placed in an ice bath.

3. Choose what tool to drop with whether a plastic squeeze bottle (which is what I used), a culinary syringe, or an eye dropper in order to drop the liquid into the oil.

edible pink and blue pearls

Image by ckubber via Flickr


Gelatin “Caviar”

Yield: about 3/4 cup caviar
Special equipment:
Plastic squeeze bottle, unused medicine dropper (pipet) or culinary syringe
Mesh sieve
Ingredients:
2-3 cups vegetable oil
2 – 1/4 oz. packages powdered gelatin (or 4 teaspoons) {** if making, a vegan version, replace the powdered gelatin for powdered agar agar for the same measure}
3 tablespoons cold water
3 fluid oz. hot liquid (1/4 cup plus 3 tbsp) i.e. hot coffee, or other liquid heated on the stove-top or in microwave
Ice
1/4 cup salt for water bath

1.Place oil in a 9×13-inch metal pan (or similar size) and store in refrigerator overnight. The oil must be very cold for the gelatin to set properly.

2.In a medium bowl mix the gelatin and water until thoroughly combined and no lumps of gelatin remain. Let stand while you prepare the hot liquid.

3.Warm 3 oz. liquid on the stove-top or in a microwave until very hot but not boiling. Pour liquid over set gelatin mixture and stir until gelatin is melted.  This may take a few minutes and you can break up the gelatin with a spoon for quicker dissolve.

4.When gelatin is completely melted transfer liquid to a squeeze bottle. You can also leave the mixture in the bowl and use a medicine dropper or syringe to draw the liquid for dropping.

5.Let the mixture stand for a few minutes, if it’s too hot the gelatin will not set properly and the “caviar” will be misshapen. It should be just barely warm – almost room temperature.

6.While you wait for your mixture to cool, prepare the oil for the ice bath. Transfer chilled oil to a 1 quart container (preferably metal because it will aid cooling, but glass will work too).  Prepare the ice bath. Make sure the bowl you are using for the ice bath is larger than the container holding the oil.  Fill bowl with ice and then add water until the bowl is two-thirds filled. Add 1/4 cup salt and stir until mixed.  Rest the container of oil inside the water bath.

coffee liquid dripping from syringe

Image by Two Helmets Cooking via Flickr

7. Begin dropping gelatin mixture into the cold oil, 1-3 drips at a time. The amount of drips will vary according to the viscosity of the oil and type of dropper you use.  As you can see in the video it took three drops for one caviar pearl to form. You’ll know the correct amount when the mixture forms a ball that rests on the surface for a moment then sinks to the bottom.

8.When half the  mixture has been used, wait for 3-5 minutes then scoop the caviar into a mesh sieve to drain. Place caviar in an air-tight container or a canning jar with a screw-tight lid. Resume dropping the gelatin mixture into the cold oil until all of the mixture is used.

9.Personal note: I was too slow, so a little of my mixture solidified before I could pipe it all. Try to be quick but don’t stress. I still had plenty of caviar at the end.

10.When finished, place caviar in a canning jar or in an air-tight container with a little of the oil poured over top. This may sound weird or gross, but it keeps the caviar moist for up to a week.  Plus, if you don’t like the idea of oil being on the caviar you can rinse it in a sieve under cold water before placing on the dessert.

11.When stored with a little oil poured over and placed in an air-tight container the caviar will keep for up to 10 days.
Sources:

http://www.sprinklebakes.com/2012/07/dessert-caviar-minus-molecular.html