Date 10/19
- Topic: Digital Fabrication 3 ( Arduino Advanced)
Contents
Pre-class
-
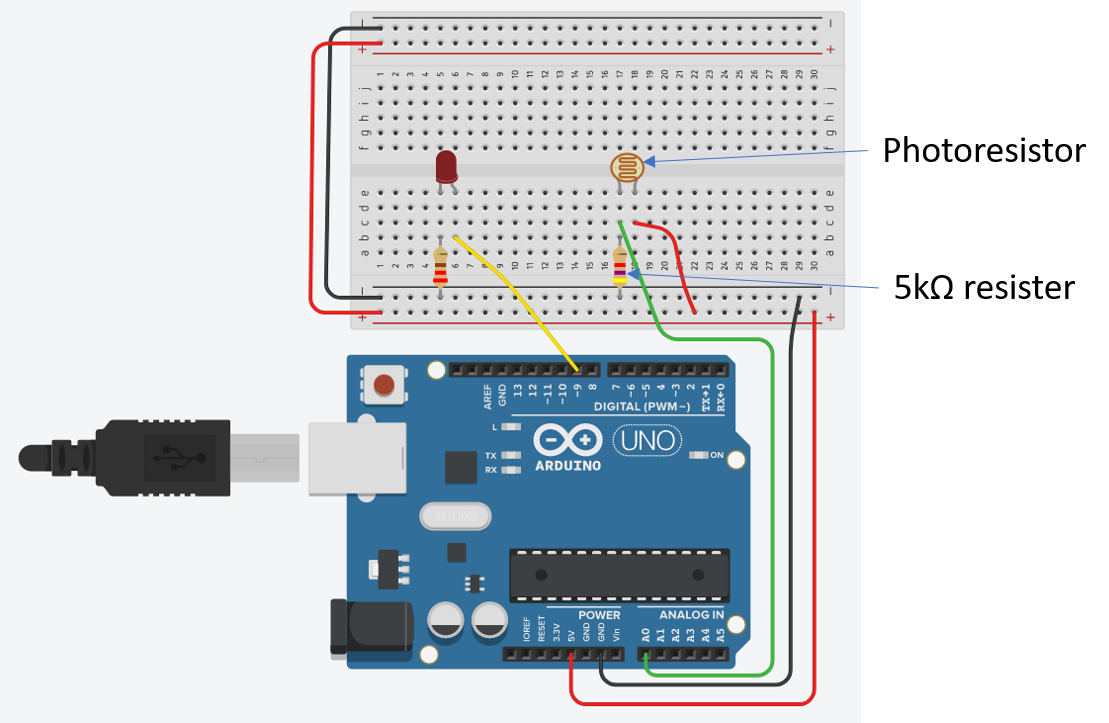
Learning sensor – Photoresistor
- Build a physical circuit below
- Components
- 220 Ohms – for LED
- 5k1 Ohms for Photoresistor
- Write the codes on Arduino
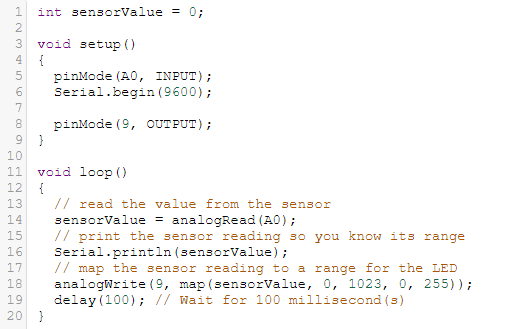
- Upload and test it
- Keep this circuit and source codes. We will use them in the class.
In-class
-
Learning sensor – Photoresistor
- Using the Arduino photoresistor built in the pre-class, change the amount of light goes to Photoresistor and see what happens.
- Open Serial Monitor on Arduino [Tools] – [Serial Monitor]

- Your reflections
- In Arduino programming, how can you trace data flow while running it?
- How did this example get input signal? Analog? Why?
-
An application of Photoresistor, Light Detector
- Project Goal: Make a light detector that turns on LED in the dark and turn off when it is bright.
- Use the same circuit from the previous Photoresistor example.
- Change the previous codes to achieve the project goal. You can follow following steps to make your codes.
- Read the sensor value. => sensorValue = analogRead(A0);
- Compare if the sensorValue is greater 200. => if (sensorValue > 200)
- If yes, it means it is bright. Then turn off the LED => digitalWrite (13, LOW);
- if no, it means it is dark. Then, turn on the LED => digitalWrite (13, HIGH);
- wait 0.1 seconds => delay(100);
- Sample codes
- int sensorValue = 0;void setup()
{
pinMode(A0, INPUT);
Serial.begin(9600);pinMode(13, OUTPUT);
}void loop()
{
// read the value from the sensor
sensorValue = analogRead(A0);
// print the sensor reading so you know its range
Serial.println(sensorValue);
// map the sensor reading to a range for the LED
//analogWrite(9, map(sensorValue, 0, 1023, 0, 255));
if (sensorValue > 200)
digitalWrite(13, LOW);
else
digitalWrite(13, HIGH);
delay(100); // Wait for 100 millisecond(s)
}
- int sensorValue = 0;void setup()
- Run your Arduino and see what happens
- Your reflections
- Explain the codes you used.
- If you want to change the sensitivity of the photo sensor, what parts of the codes do you need to change?
- How can you apply this technique into real-world problem-solving?
-
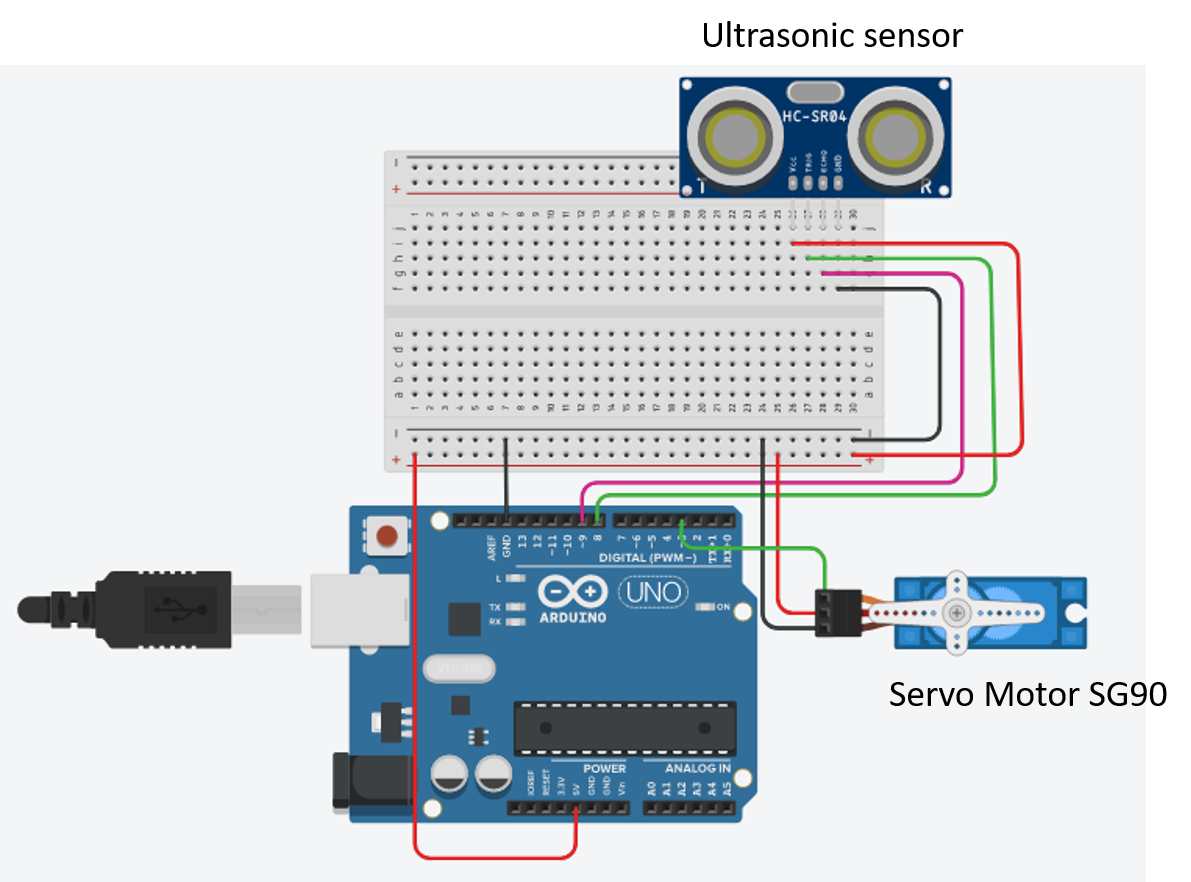
Ultraviolet Sensor and Servo Motor
- Goal: Build a device that moves a motor 180 degrees when it detects motions.
- Required Components
- Ultrasonic sensor
- Servo motor, MicroServo 9G

- Download the source codes and run.
- #include<Servo.h>
int trig=8;
int echo=9;
int dt=10;
Servo servo;//int distance,duration;
void setup() {
// put your setup code here, to run once:
pinMode(trig,OUTPUT);
pinMode(echo,INPUT);
Serial.begin(9600);
servo.attach(3);
}void loop() {
// put your main code here, to run repeatedly:if (calc_dis()<10)
{
for (int i=0;i<=180;i++)
{
servo.write(i);
delay(1);
}
delay(100);
for (int i=180;i>=0;i–)
{
servo.write(i);
delay(1);
}
delay(100);
}
}//This code is written to calculate the DISTANCE using ULTRASONIC SENSORint calc_dis()
{
int duration,distance;
digitalWrite(trig,HIGH);
delay(dt);
digitalWrite(trig,LOW);
duration=pulseIn(echo,HIGH);
distance = (duration/2) / 29.1;
Serial.println((String) “Duration: ” + duration + ” Distance: ” + distance);
return distance;
}
- #include<Servo.h>
- Upload the codes and run your Arduino. Explain how and why your Arduino works
-
Project Project 3: Design an Automatic Hand-Sanitizer Dispenser.Using above the Ultrasonic sensor and a servo Motor, design a hand-sanitizer dispenserProject detailsTeam project. Groups of four.Find a Hand-Sanitizer product from the Internet.Design a physical mechanism that automatically operates the dispenser by the Ultrasonic sensor.
Lab report should includea sketch for physical settings. Recommend to use TinkerCAD.a circuit diagram with Arduino, source codes.Anticipated outcomes
Post the report to your Open Portfolio.Due Oct 23rd (Friday) 5pm.
- Reflections
-
- What did you learn?
- How can you apply this example into real-world applications?
-
Post-class
-
Assignment: [Lab report Automatic Hand-Sanitizer], Due Oct 23rd.- Next week
- Will start the capstone design project.
- Grouping
- Basic – Randomizing
- How? Special Request?
- Explore Arduino Project. [see next week’s Pre-Class]
 This site is licensed under a Creative Commons Attribution-NonCommercial 4.0 International License. You are free to share (copy and redistribute the material in any medium or format) and adapt (remix, transform, and build upon the material for any non-commercial purpose). Under the following terms you must give appropriate credit, provide a link to the license, and indicate if changes were made.

Recent Comments