BRIEF
Create a stop-motion sequence with six frames, then re-interpret and illustrate each frame using a different color scheme: monochromatic, analogous/adjacent, complementary, split complementary, triadic, and full spectrum. These works will be combined into an animated GIF.
BACKGROUND
Len Lye was an animation pioneer from New Zealand, who believed that movement is part of the language of art. He revitalized experimental techniques from the early days of film, painting directly onto film stock and creating entire sequences without the use of cameras. His work was heavily influenced by the art of Pacific and Aboriginal cultures, which is reflected in his colorful, complex and abstract geometries. While major movie studios refined film as a commercial medium, Lye continued to embrace the avant-garde potential of the moving image, and his legacy can be seen through animation history, from Fantasia to Rick and Morty.
Rainbow Dance was created by Len Lye in 1936 as an advertisement for the British Post Office Savings Bank. It is a surreal sequence, superimposing figures dancing and playing tennis in front of abstract backgrounds, over a 1930s jazz soundtrack.
PURPOSE
- Experiment with the basics of color theory
- Gain hands-one experience with Photoshop
- Explore visual simile and metaphor in design
- Practice technical drawing skills of reproduction and proportion
BREAKDOWN
-
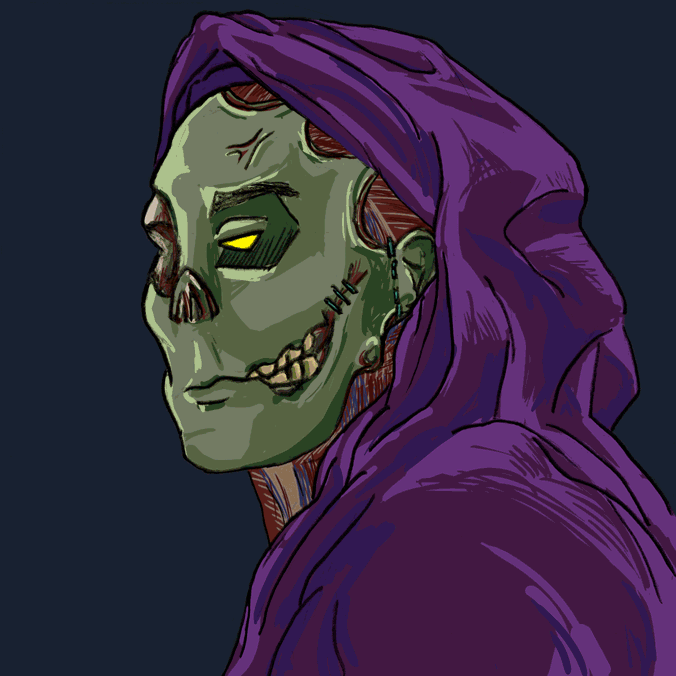
- Full Spectrum: any hues from anywhere on the color wheel, but must incorporate each primary and secondary color.
-
- One “base” hue (blue in this example) and two other hues adjacent to that hue’s complement (the complement of blue is orange, so the *split* complements are yellow and red-orange).
-

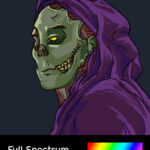
- Two hues that are totally opposite each other on the color wheel (blue-orange, green-magenta, etc.)
-
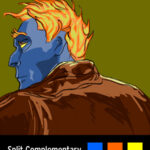
- Three hues evenly spaced around the color wheel – you can visualize this as four hours’ difference on a clock.
-
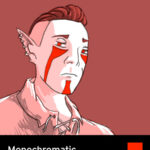
- Only one hue.
-
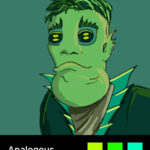
- Three hues adjacent to each other on the color wheel.
Part 1: Capture, Simplify, Outline
- Record a video of yourself in motion. Ideally you start and end at roughly the same position so it loops seamlessly when repeated, but this is not required. The final sequence is only six frames, so big, simple movements are best (waving looks better than typing on a keyboard).
- Import your video into Photoshop (file -> import -> video frames to layers, and you may want to check the box for skipping every X frames so you’re not dealing with dozens or hundreds of individual frames). Crop the image down to a square (1:1 aspect ratio).
- Use the timeline (window -> timeline) to preview your sequence and help you narrow it down to 6 frames. You can use the timeline panel to start/stop playback and navigate to specific frames. Look out for poses that capture the beginning or end of movements (known as “key frames” in animation). You’re not incorporating these images into the project directly, so image quality doesn’t matter as long as its clear/sharp enough for you to redraw it.
- Create a 3 x 3 guide layout (view -> guides -> new guide layout). These will show up as bright blue lines over your image.
- Draw a 6″ x 6″ square in your sketchbook (or bristol board, if you plan to complete project as paintings), then divide it into a 3 x 3 grid (gridlines at 2″ and 4″). Choose a frame from your sequence, then lightly redraw your pose, using the grids to help you with position and proportion. Don’t shade or fill space yet, just light outlines, and ignore background elements unless they are directly relevant. Repeat this process for the remaining five frames.
- Complete all six drawings in black and white (pencil, ink or charcoal) according to your imagination. That means you can stay literal (adding detail and background elements from life), get interpretive (e.g. your profile reimagined as a rock formation) or metaphorical (a person in a visually similar pose but performing an unrelated action), even abstract (collections of shapes, lines and forms that form the same basic composition). I think you’ll get more out of this if you do something different for each frame, but you can use the same style/theme throughout if you want.
Part 2: Color
If you’re coloring digitally:
- Scan the drawings with a flatbed scanner (not your phone, we have one in the classroom). Scan in color at 300ppi resolution, and save the files in TIFF format.
- Open the scanned images in Photoshop. Crop each to a square (1:1 aspect ratio), then resize to 1500 x 1500px. Use the transform tools (edit -> transform or edit -> free transform) to make the size, position and angle of each image consistent.
- Use the basic touchup tools and liquify (filter -> liquify) to “clean up” your drawings. Add a “levels” adjustment layer (layer -> new adjustment layer -> levels), and use it to tweak the color and contrast. You can keep things consistent by copying an adjustment layer from one document to another using “duplicate layer” (layer -> duplicate layer).
- In each document, select all the layers (select -> all layers) and combine them into a smart object (layer -> smart objects -> convert to smart object). You can still edit them individually if needed by double-clicking the smart object’s icon in the layer panel. Set the blend mode of this layer to “multiply” using the drop-down menu at the top of the layer panel.
- Add layer(s) below your smart object/outline layer, using the brush tool to add color to your drawings. Each drawing must utilize a different color scheme, from among monochrome, complementary, adjacent complementary, analogous, triadic, and chroma (full spectrum).
If you’re painting:
- Prime your paper with a white wash to prepare the surface for more paint.
- Paint each drawing with a different color scheme, from among monochrome, complementary, adjacent complementary, analogous, triadic, and chroma (full spectrum). You can use markers/sharpies over the paint to help define fine lines and detail.
- Scan your completed paintings with a flatbed scanner (not your phone, we have one in the classroom). Scan in color at 300ppi resolution, and save the files as TIFFs.
- Open the scanned images in Photoshop. Crop each to a square (1:1 aspect ratio), then resize to 1500 x 1500px. Use the transform tools (edit -> transform or edit -> free transform) to make the size, position and angle of each image consistent.
- Add a “levels” adjustment layer (layer -> new adjustment layer -> levels), and use it to tweak the color and contrast. You can keep things consistent by copying an adjustment layer from one document to another using “duplicate layer” (layer -> duplicate layer).
Part 3: Animate and Complete
- Create a new Photoshop document at 1500 x 1500px size and RGB color mode, 300ppi. Use “place” (file -> place embedded) to add the .PSD file for each completed frame to this document as its own layer/smart object.
- In the timeline panel (window -> timeline), click “create frame animation”. If it’s not visible, click the arrow next to “create video timeline” and choose “create frame animation” from the dropdown.
- Click the arrow at the bottom right corner of the first frame in the timeline, and choose “0.3” from the popup menu. This controls the frame delay (the time between each frame), which corresponds with the apparent speed of the animation. Change this number later if your animation needs to be faster or slower.
- Click the “+” icon at the bottom of the timeline panel to create a new frame, then repeat until you have six in total. You can click the frames’ thumbnails to navigate between them.
- For each frame, show/hide the appropriate layers (eyeball icon next to the layer preview, in the layers panel). For example, on timeline frame 1 you would hide every layer except for the one showing your first drawing/painting, and so on. You can preview your animation by clicking the “play” button at the bottom of the timeline.
- Once you’re satisfied with your sequence, export it as an animated GIF (file -> export -> save for web (legacy)). Use 256 colors, with “dither” at 100% and “lossy” set to 0. Save, then upload and post to OpenLab and tag with “Project 2: Rainbow Dance”.
- Note: you can export at 676 x 676 or less as well so the preview image will “play” on OpenLab.