Author Archives: Jacquelyn Blain

Day One Test Post

The purpose of this is to make sure you can Post on Open Lab efficiently. So here’s what you’ll do:

  1. Tell us your name, and a little about yourself (a couple of sentences will do).
  2. Add an image that you think represents you in some way. Use the Add Media icon above, find or drag in an image, then choose where on the page you want to place it and what size you want it to be, then Insert.
  3. Now write a sentence or so about why you chose this image.
  4. Click on the box next to “Day One Test Post” in the Categories menu on the right hand side.
  5. Hit Publish.
  6. Toggle back to the site by clicking on ENG2575 Technical Writing at the top of the Dashboard page.

And you’re done!

Reading/Writing Assignment Week One – Email

There are two parts to this:

  1. Read this article: http://Laura Portwood-Stacer, “How to Email Your Professor (Without Being Annoying AF),” https://medium.com/@lportwoodstacer/how-to-email-your-professor-without-being-annoying-af-cf64ae0e4087#.1m6lc0rkd.
  2. Create a Post in Open Lab formatted like an memo (here’s the link to the Purdue OWL page about formatting memos), addressed to Prof Blain, in which you tell me a little more about your professional interests and goals after college. If you want to include another image to show me/us more about what you’re hoping to do, feel free to do so using the Add Media icon/button.
  3. Click on the box “EMail Assignment” in the Categories menu.
  4. Hit “Publish.”

Summary_2

For Phase 2, you’ll do the first draft of your 500-word summary.

Again, here is the Format for 500 word summary

  • Briefly, you’ll use the memo format for your document’s header, followed by an APA formatted bibliographic entry, and finally the body of your document, which includes an executive summary/abstract of the article (100-200 words) and lengthier summary (300-400 words). The body of your document should be as close to 500 words without going over as possible. Remember, the word count is an important requirement for this document.
  • When you finish your draft, print out a copy and bring it to class/swap with a neighbor or two. Give each other feedback on both the quality of the writing and the successful completing of the layout and style requirements for this document.
  • Take your draft and feedback home, and revise your 500-word summary.

Once you’ve done that, compile the summary and the bibliography of the five potential articles you generated in Phase 1, and print them out and bring them to class next week.

Summary_1

500-Word Summary – Phase 1

For this assignment, you’ll summarize an article related to your major/career, and do it as a 500-word memo. Here’s the Format for 500 word summary

Phase 1 asks you to do the following:L

  • Using the library’s databases and journal holdings, find five articles that are related to your major/career interests. They should be recent and rigorous.
  • Using those five articles, create a memo that lists the bibliographic information of those articles in APA format. Follow this guide for periodical sources, “Articles in Journals,” https://owl.english.purdue.edu/owl/resource/560/07/. Format your memo using the “heading element,” “opening element,” and “task elements” found in this guide: https://owl.english.purdue.edu/owl/resource/590/02/ . Then list each article’s bibliographic information. Save this document (feel free to post it on Open Lab — to do that, create a post, then click the box “Summary-1” in the Categories menu, and hit Publish). Print and bring one copy to class.
  • Last, choose one of your articles that you would like to use for your 500-word summary assignment. Create a reverse outline of this article. The easiest way to do that is to read the first paragraph, then in your notebook, write a one-sentence summary of that paragraph in your own words. Then read the next paragraph, and skip a line in your notebook and write a one-sentence summary of that paragraph in your own words. Do this for each paragraph. As you write this reverse outline, identify the article’s argument/main point and identify the supporting evidence for the article’s argument/main point.

Instructional or Training Manual

Instruction Manual Assignment Instructions

Phase One – Introduction and Building

For this assignment, you will create a set of reader-centric instructions for building a Lego model of your own design.

  • For our purposes, we will say instructional manuals are external facing, meaning they are meant for end users, customers, or clients.
  • Training manuals are internal facing documents, meaning they are meant for employees, contractors, and colleagues.
  • You choose your audience (internal or external).
  • Its word count should be 1500-2000 words.
  • Combine words with pictures, illustrations (drawings), and/or screenshots. Any images that you use must be created by you or taken by you.
  • Clearly define the purpose of your manual. What does it teach? What does it help a person do? What task or tasks does it help someone complete in a straightforward and easy manner?
  • Telling versus showing. Always aim for showing, but provide the telling as context, clarification, and additional information.
  • Use the body of your document for writing, steps, etc. Don’t be afraid to include text boxes and end notes.
  • Provide a cover sheet, table of contents, introduction/purpose, and glossary of important terms. It can be as few or as many pages as needed.
  • Be consistent with your explanations and learn from similar kinds of manuals about what terms you should be using to explain how to do something (e.g., tapping, pressing, clicking, holding, dragging, typing, etc.).

Let’s look at some examples:

Find your own examples for ideas and inspiration.

Now it’s time to Create your Lego model that you’ll write your instruction manual for.

  • Using approximately 50 Lego bricks, build a model of a technology that in some way connects to your field of study or major interests.
  • Take a photo of your model (make sure that your image is well lit, easy to see, and in focus because you’ll be using it in your instruction manual (and I’m taking back my Legos at the end of class!)
  • Write down a general list of instructions for making it. You can do this as you go, or you can dismantle it and write the instructions in reverse order.

Post your image and a description of what it is to Open Lab: make sure you check the “Instruction Manual – Model” box in the Categories menu before you publish.


Phase Two – Planning for testing

You should have your general list of instructions with you in class today. We’ll be doing a plan-of-action memo first, and then you’ll have the rest of the class to draft your Instruction Manual

The memo should be in three sections (be sure to lay it out like this):

  • Introduction: state exactly–use precise language–you are creating instructions to do and who your targeted user is.
  • Instruction plan: explain how you plan to instruct/guide your reader to accomplishing the task or learning a procedure. Will you use a list of instructions, a diagram, screenshots, photos, text boxes, appendix, etc.? For each of these things, you will want to say how you will use each element to support your audience.
  • Usability test plan: explain how you’ll get feedback from your testers. Will they write a narrative reaction? Use a Likert scale? You’ll be using this to do a usability text next class.
  • Preparation plan: write a short section that lays out your plan for what order you plan to complete your instruction manual. How will you use the results of your usability test? After finalizing your written instructions, will you take screenshots or photos of each step? Will you add a layer of contextual information for your manual–in text boxes or an appendix?

You have 45 minutes to write this and send to me via email as a DOCX or PDF file–no invitations to edit on Google Docs, please!

For the rest of the class, you’re free to work on your manual. Focus on your instructions and visual aids (diagrams, photos, screenshots). We will use these during the first part of class to do UX testing. If the object of your manual is unavailable in our classroom, we will pair off and have you walk through the document with a peer. If you can arrange for the object to be in class, please feel free to do so, because this would of course make for a stronger UX test. The remainder of time in our next class will be on the other elements of the instruction manual (layout, TOC, introduction, contextual info and in-text definitions, glossary, citations).

Be sure to bring one printed draft of your instruction/training manual to the next class.

Here’s a 
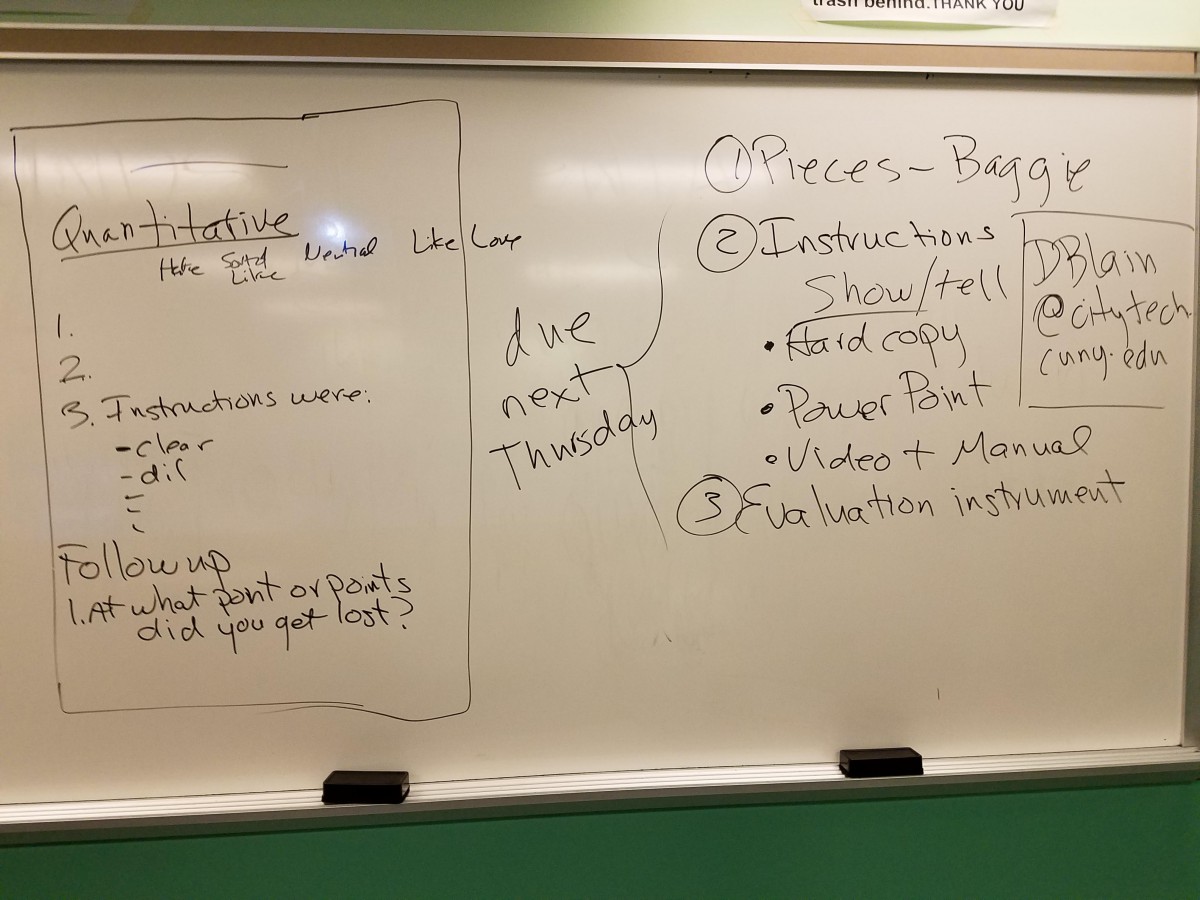
picture of the board that shows what you need to have for Thursday, Oct. 26.

Phase Three: Testing and Revision

Part 1: 

  • Exchange your instruction manual (printed or online) with one other person in class for a round of user experience (UX) testing.
  • Carefully read over the instruction or training manual that you receive.
  • Then build the model.

Part 2:

  • When you’re finished, write a memo addressed to the designer of the manual that is at least 500 words long. Your memo should include one paragraph responding to these:
    • Summarize what the manual attempts to do in your own words.
    • What works well in the instruction manual? Each statement should be followed by “because” and reasons why.
    • What does not work well? Each statement should be followed by “because” and reasons why.
    • What suggestions can you give the author of the manual to help them complete the assignment and improve it for a good grade?
  • Email your memo in Word docx format to the author of the manual and carbon copy (cc) Professor Blain on that email (DBlain@citytech.cuny.edu). You may quote some material from the manual in your memo, but excessive quoting should not be used as a strategy to avoid writing 500 words of your own responses.

For next week: 

Take the feedback offered in the memo to revise your draft manual for the final deliverable due at the beginning of our next class either as a hard copy or posted on Open Lab (make sure you check the “Instruction Manual – Final” box in the Categories menu before you publish).

Here’s a copy of the format for the Instruction Manual: Format for Instruction Manual

Final revision checklist:

  • Have you met all of the assignment details on this post?
  • Are any screenshots, images, or diagrams of your own making?
  • Have you asked someone to proofread another draft?
  • Have you read your final draft aloud and made appropriate corrections?
  • Are all citations documented and quoted parenthetically cited using APA?
  • Have you used the APA Style Manual for your citations?

And… for your reading interest, here are the formal assignment components:

1500-2000-Word Instructional or Training Manual Individually, you will write a 1500-2000-word instructional or training manual that demonstrates: 1. ability to explain a task/process in clear, concise language. 2. selection and definition of appropriate terminology and concepts. 3. awareness of the intended user/audience. 4. knowledge of instructional manual format. All diagrams, illustrations, or photos must be created by the student and integrated into his or her manual. Any outside sources cited should be documented according to APA format.

750-Word Expanded Definition

The Assignment:

750-Word Expanded Definition Individually, you will write a 750-1000 word expanded definition of a technical or scientific term, with cover memo, which demonstrates: 1. correct memorandum format. 2. knowledge of the etymology and historical development of the term. 3. examples of the term’s use in various written contexts. 4. ability to compare and contrast various uses of the term. 5. use and citation of sources with proper attribution. 6. awareness of audience. At least three library-sourced citations are required and should be cited following APA format.

500-Word Summary

Here’s the Assignment in general:

500-Word Summary Individually, you will write a 500-word summary of a technical or scientific article that demonstrates: 1. ability to identify key processes and concepts in a professional science or technology article. 2. ability to describe complex processes and concepts clearly and concisely. 3. an awareness of audience. The summary should cite the article and any quotes following APA format.

Go to Summary_1 to see the first part of this assignment.