
Objective: Connect servomotor and control servomotor through the use of an Arduino.
A servomotor is a rotary actuator that allows for precise control of angular position, velocity and acceleration.
Materials
Servomotor
Arduino
“SERVO”library
Jumper cables
Procedure:
- Plug in Arduino to make sure power light comes on.
- Open Arduino software and select the “tty usbserial” port under tools
- Verify that the proper board is selected
- Load a test such as the blink example from the basic example menu
- Load up the sweep example under the servo example menu
- Upload the servo program
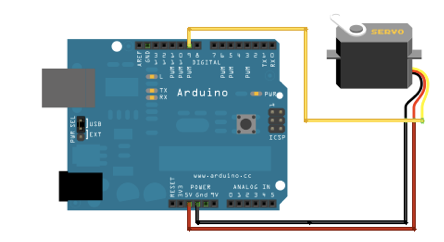
Here is an image showing the fritz diagrams for this example

Results:
- Light came on Arduino received power
- Selection appeared and I was able to select it
- Under the board selector I found my board type
- Press the check to compile the program
- Press the upload button to send it to the Arduino
- Arduino is talking and loading the code properly
- This example sweeps the shaft of a RC servomotor back and forth across 180 degrees
- According to the code the power wire need to go into the a 5V pin, the ground goes to ground and the signal wire goes into pin 9 because that’s what the example tells it to go to
On a side note there is no need to worry about the starting position of the servomotor like we do when using a stepper motor. Its positions are absolute so when we signal it to move to position 0, it already knows what position 0 is for it.
We edited the example and created another program that does not use a delay at each step.

Discussion:
The servos did exactly what we asked them to do. I plan on including a few servos into my project for rudder control underwater.

