While our first project was dealing with general problem solving and communication principles, project number two delved into the real world of technical direction. We were given the ground plan for a sequence of two shows (concert and talent show), and had to develop complete paperwork package for their implementation.
Additional details:
- Timeframe is as follows:
– Thu – Haunted Hotel strike;
– (+8 days) Fri – Concert;
– (+1 day) Sat – Talent Show; - Band’s logo (8′-0″ x 8′-0″ max) must be painted on the floor for the concert only;
- Floor for the talent show has to be glossy black;
- Platform facings and stairs must be matte black for both shows;
- All work will be done by regular Tech Production scenery crew;
- Budget is unlimited;
- Paperwork package content has to be determined by ourselves;
Our group’s (Laura, Steven, Irene) first step in solving this complex problem was to define the key issues. These issues were:
- What construction method should we use for the raked stage (legged open frame platforms vs. triscuits with stud walls)?
- How to construct wrap around step units?
- What should we do with the band’s logo after concert (removable masonite sheets vs. paint over the entire deck vs. marley)?
- What kind of paperwork, besides construction drawings, do we need (calendar, budget, proposal)?
After discussing the key issues, we divided our group’s responsibilities as follows:
Laura – budget and proposal development;
Steven – calendar creation;
Irene – construction drawings creation;
We decided to construct our deck using legged open frame platforms (framing – 2×4 pine, lids – 3/4 plywood, step legs – 1×3 pine) and then cover it with 1/4 masonite. As for steps, our decision was to build three 3-step units (6′-4″ each) and then connect them together. Since the band’s logo was 8’x8′ max, we chose to draw it on two sheets of masonite, which would be centered on the deck for the concert, and then changed over with the glossy black sheets for the talent show.
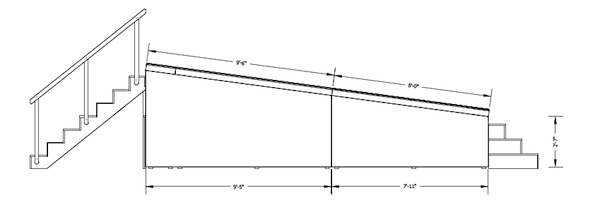
The first thing I needed to know for the construction drawings, was the angle of the rake and true size of the raked surface of the deck. Based on the information provided in the ground plan, I developed the following side view:
 The next thing was to develop true size platforms and masonite layouts in such a way that the seems don’t overlap.
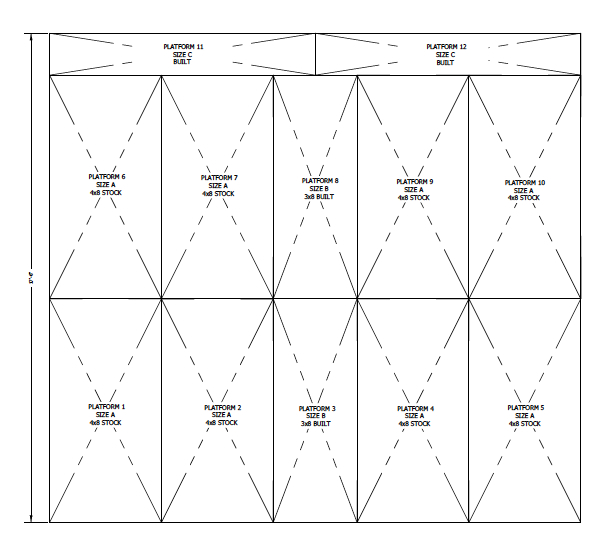
We decided to use as many 4×8 stock platforms as possible, and ended up with only 4 custom units.
 Because the size of a sheet of masonite is 4′-1″ x 8′-1″, and because of different orientation of the sheets, we know that the seems of platforms and masonite do not overlap.
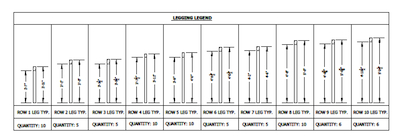
After finishing these drawings, I moved to figuring out lengths and quantity of all legs needed for the rake. The length of the step is the desired height of the platform minus the thickness of the platform. The length of another part of the leg is the desired height of the platform minus 1″ (3/4″ for the lid and 1/4″ gap at the top):
The hardest thing for me in this problem was to figure out how to construct wrap around steps. My first approach was to use a lot of 1×12 stringers, 3/4 ply treads and risers and 1×3 legs. I was thinking of using longer double stringers at corner joints:
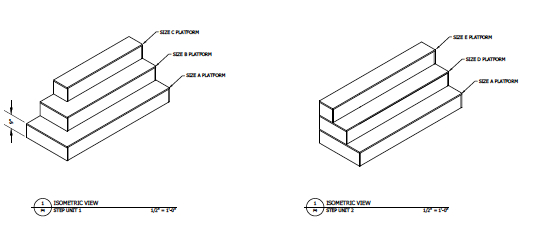
 After having a class dedicated to wrap around steps construction methods, I figured out that my approach failed on both structural and rational levels. I decided to use another, much simpler approach: build nine individual all-plywood platforms and connect them together:
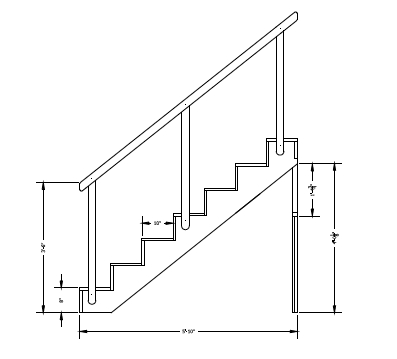
 After being done with wrap around steps nightmare, I moved to figuring out construction method for the escape stairs. I decided to use 1×12 pine for stringers, 3/4 ply for risers and treads and 1×3 pine for legs and railings:
 Then I decided to make two more plates: one for the band’s logo layout, and another one for duvetyne masking.
![]() Logo has to be painted on two sheets of masonite, which will be removed right after the concert, and another two sheets painted glossy black will be put on their place.
Logo has to be painted on two sheets of masonite, which will be removed right after the concert, and another two sheets painted glossy black will be put on their place.
 The stage right side of the deck has to be covered with duvetyne, so the audience couldn’t see legs and other ugly stuff under the platforms.
A total of seven plates were produced for the final version of our construction drawings. Based on these drawings and additional research, Laura created great budget estimate spread sheet for the project, and Steven made a calendar, which reflected all stages of construction and installation.
I think, our group did pretty well on this project. All work was done on a timely manner, and communication was good. I started developing detailed construction drawings in AutoCAD too early and, as a result, spent too much time on the wrong approach to steps construction. For the next project I will make just simple sketches on the early stages of work. I learned a lot of new stuff, such as different construction methods for raked stage and wrap around steps, excel tricks, better time management, new materials (such as Flamex and marley) etc. Also, the day when all groups presented their approaches in problem solving was very informative: Sarah shared new types of paperwork with the class, and Mike did a great explanation of his approach using SketchUp.
Overall, it was a challenging and interesting project, which broadened my knowledge in different areas.
Links:
Problem#2 – Assignment
Problem#2 – Presentation write-up
P2-Deck
Group Documents:
ENT4410_DECK_Plates_1_t_7
Spread sheet for TD

