
- The sandwich must be fresh and edible;
- The sandwich will be assembled by the ‘local crew’;
- All paperwork and materials must fit inside the 9″x9″x9″ ‘truck’;
- The budget for this project is limited to $20;
After definition of the problem, our group (Sergio, Jose and myself) decided to divide the responsibilities as follows (on the later stages of our work, however, some responsibilities were shared between all members of the group):
Jose – treasurer, budget spreadsheet creation;
Sergio – materials supplier, construction consultant;
Irene – construction paperwork creation;
The first piece of paperwork that I made for the project was an Inventory List (or Truck Pack) – a numerated list of all the items that will be loaded into the truck. Later, when Jose and Sergio gave me the actual materials, I updated this list with photos and exact dimensions of every item. After that I decided to write a first draft of instructions, based on the inventory list and some raw sketches made by Sergio: 
I developed Sergio’s ideas a little bit further, imagining that the sandwich is going to be assembled by someone, who doesn’t know what a PBJ sandwich is. It wasn’t too hard, because this someone was actually me (yes, I’ve never heard about a PBJ sandwich before:)). So after reading all the articles referenced in P-1 Designer Research and doing some more research on my own, I wrote the following instructions: 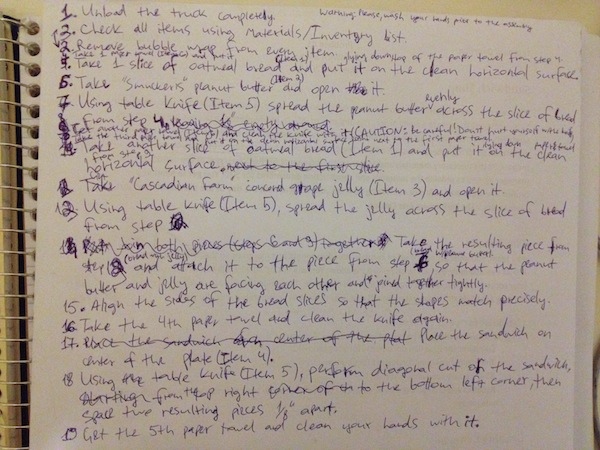
After making some corrections, I typed everything into the Word document, made AutoCAD illustrations for all the important steps and inserted them in the text. Here is the final version of the document: PBJ-2K ASSEMBLY INSTRUCTIONS. Also, I decided to make a full scale drawing, containing the front, side and isometric views of the final product: PBJ_Sandwich_ARCH_C.
Jose and Sergio did a great job in finding correct construction materials (e.g. oatmeal bread, appropriate sizes of jelly and peanut butter jars). Since all our items were going to be loaded inside the ‘truck’, we decided to use bubble wrap in order to secure materials during transportation. Sergio even brought some ice, so we actually had a refrigerator truck. Also, we decided to add one extra piece of bread for contingency: 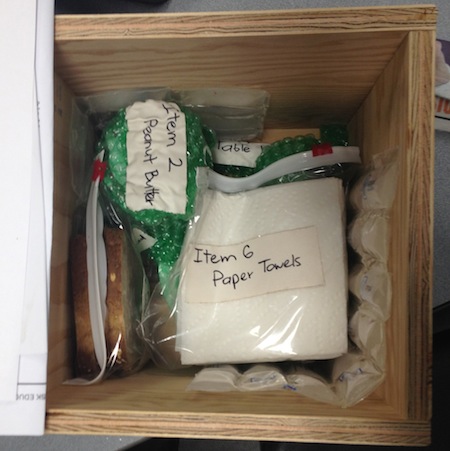
I think, our approach to solving this problem was right, because Pat was able to assemble the sandwich exactly as we intended it to be, and also it was pretty close to the designer’s rendering and research. The AutoCAD Arch C drawing was probably unnecessary, because it duplicated the information provided in the instructions. Also, we haven’t considered that actor, who will be eating sandwich, might be allergic to peanut butter. Packing list would be better if it had a checkmark and initials (of the person who put the materials in the ‘truck’) next to each item in the list. Instruction would be more clear, if it started with the picture of assembled piece, and then went to the step by step description of the process.
However, all drawbacks listed above are just minor issues, and overall procedure can be considered successful. While doing this project, I learned how extremely detailed even a simple problem could be, and how important is to pay attention to all these details. Also, I learned, how crucial is to provide clear instructions that can only be interpreted in one possible way.

