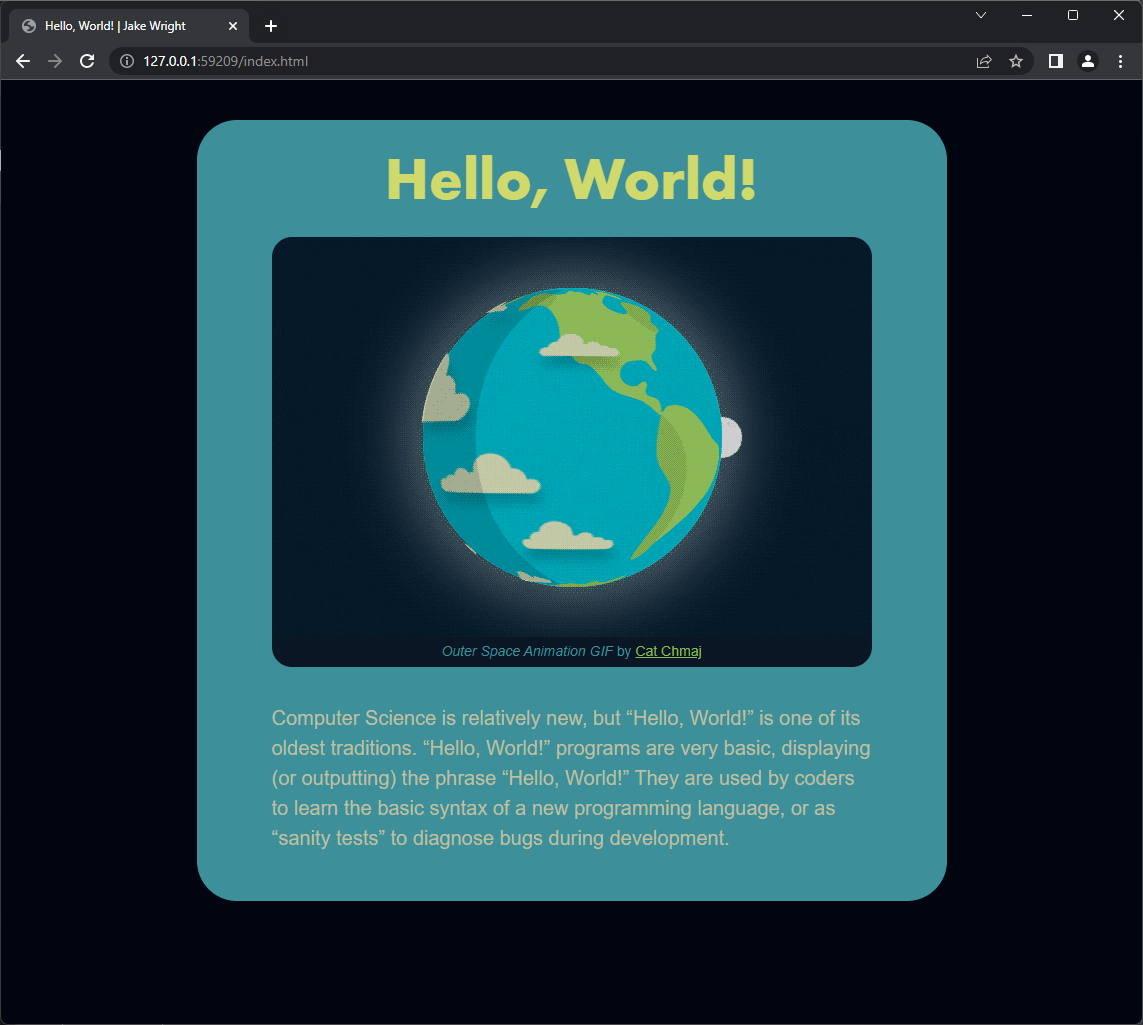
A finished version of the site.
BRIEF
Computer Science is relatively new, but “Hello, World!” is one of its oldest traditions. “Hello, World!” programs are very basic, displaying (or outputting) the phrase “Hello, World!” They are used by coders to learn the basic syntax of a new programming language, or as “sanity tests” to diagnose bugs during development.
OBJECTIVE
Create a “Hello, World!” website, applying the fundamentals of site structure and style to present the title phrase, a paragraph of text (you can use the description from the brief above), and an image of your choice in an eye-catching static layout. Upload your site so it can be accessed by visiting your personal domain.
- apply tags to raw text to categorize the headline and body copy
- use <img> to display a locally-hosted image; describe for screen readers in alt attribute
- structure your layout with semantic tags <main>, <figure> and <figcaption>
- use <style> to set the colors, sizes/proportions, and typography of your page
- upload the site to your hosting account so it can be accessed by visiting your personal domain
PROCESS
Step 1: Setup
- create a new folder for the site on your laptop or USB drive
- drag this folder into Brackets to make it the active project
- use Brackets to create a new file; save it as “index.html”
- code the basic html structure (doctype/head/body)
Step 2: Content and Organization
- paste the headline and description paragraph into the body of your html, then tag with <h1> and <p> respectively
- find an image to present with your text, then save a copy to your site’s folder – make sure to save the image’s original URL, so you can link to it later
- add the image to your layout with <img>; write an alt attribute briefly describing the image for screen readers
- wrap image in a <figure>, alongside a <figcaption> with the title of your image, the creator or publisher’s name, and a link to its original URL
- wrap all content inside body in a <main> element
Step 3: Layout and Styling
- add a <style> element inside <head>; use this to write style rules and control the appearance of your site
- set the color of text elements and hyperlinks, and background-color for key layout components
- apply width, margin, and padding to page elements to control their size, position and proportions
- set font and size of text elements
- check code and links, refine details
Step 4: Upload
- upload your site to your hosting server, using either an FTP program (Cyberduck/Filezilla) or CPanel’s file manager
- post a screenshot of your site in a browser window to OpenLab, with a link to its URL (this should be your personal domain). Apply categories “Student Posts” and “Site 1: “Hello, World!”