Objective: Create a black & white self portrait, using patterns to indicate areas of highlight and shadow
Materials: Adobe Photoshop, Adobe Illustrator, digital camera (phone/laptop is fine)
Concepts: Color and pattern (value, visual mixing)
Technical Skills: vector shapes, pattern design
Design Process:
- Step 1: Capture
- Step 2: Divide
- Step 3: Realize
- Step 4: Deliver
Step 1: Capture
Use a digital camera to take a selfie -OR- a portrait of a friend/loved one.
Guidelines:
- frame the photo from the collarbone/shoulders up (like an ID photo)
- use a plain white or light-colored background (we want a strong contrast between subject/ground)
- images with a wide range of shadows and highlights work best – if you’re having trouble capturing an image indoors, try taking the picture outside in late afternoon (“the golden hour”)
Step 2: Divide
Use Adobe Photoshop to reduce your portrait to six shades of gray, resize and export the image, then use Adobe Illustrator to break it into vector shapes in those shades
1. Open your portrait in Adobe Photoshop
2. Convert your image to black & white (image -> adjustments -> black & white)
4. Crop your image to a square (1:1) ratio.
5. Export your image at 2250 x 2250 px (file -> export -> save for web (legacy)); enter 2250 for the width/height in the export window)
6. Create a new document in Adobe Illustrator with the following settings:
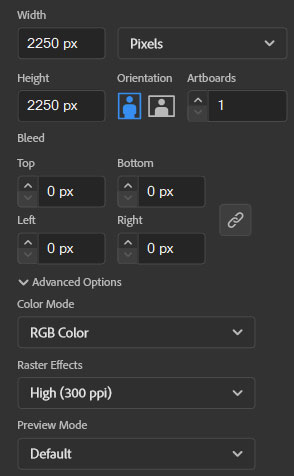
7. Place your photo in Illustrator (file -> place), making sure it’s scaled to fill the entire artboard. (click and drag on the white squares in the corners to resize; hold the shift key to scale it evenly)
8. Use the “image trace” interface to convert your image to vector paths (object -> image trace -> make). You may get a warning about tracing proceeding slowly; it is safe to ignore this.
9. Open the “image trace” window (window -> image trace), then choose the “6 color” preset from its dropdown menu. In the slider below, enter “5” instead of “6” (image trace doesn’t count black as a color; this gives us four shades of gray, black, and white).
![]()
10. “Expand” your image (object -> image trace -> expand). This converts the image to vector paths – geometric shapes we can manipulate and edit.
11. Ungroup the expanded vector paths so you can select them individually (object -> ungroup).
12. Separate each color into its own group of shapes. Click on a vector shape, then all other objects of the same color (select -> same -> fill color), then group the objects (object -> group). Repeat this until all six colors (black, white, four shades of gray) are grouped together.
13. Export your image as a .jpg, using the high-quality preset (file -> export -> save for web (legacy)), then post the image to OpenLab. Make sure to categorize it as step 2 of project 2 to make it easier to find.
Step 3: Realize
Use Adobe Illustrator to design four geometric patterns, one for each shade of gray in your portrait, then replace the solid grays with the new patterns.
This video/tutorial explains the process of creating patterns in Adobe Illustrator. The specific process and method you use will depend on the pattern you make, but remember:
- Only use black (#000000) and white (#FFFFFF). No colors, no shades of gray.
- Use the scale and rotate tools to adjust the size and angle of the pattern without making changes to the shapes
- you can temporarily scale patterns small (~10%) to help visualize the shade of gray each represents.
Step 4: Deliver
Export your finished portraits in PNG format and submit via Blackboard and OpenLab post. Print your portrait at 7.5 x 7.5 inches (its real-life dimensions) on high-quality 8.5 x 11 paper.