Expressive Line : Master’s Study Egon Sheile & David Mack

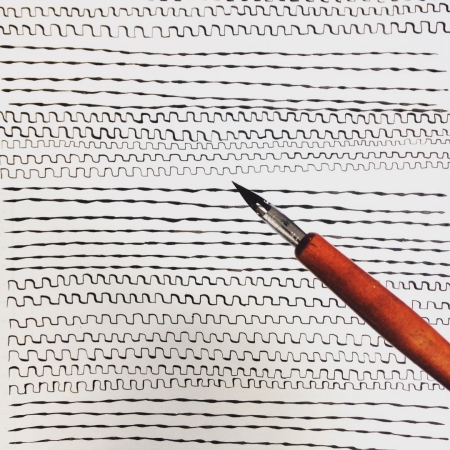
Lines are where most people begin when first starting to draw. By themselves, lines are powerful drawing tools! They have shape, texture, and weight, all of which can add up to a very expressive drawing if you’re thoughtful about their creation.

1468363023016

When beginning a drawing, people often carefully inspect an object’s outside edge, or silhouette, as a starting point. They render each line representing an edge or contour. Next, people usually fill in those contours with value.

However, so much can happen using just line alone! A line by itself is capable of conveying all sorts of emotions. In your drawings, lines can and should have life.


Try this

ill_232_v9_m5_p6-lines

In your sketchbook, take five minutes to draw as many different kinds of lines as you can imagine. Try different movements with your hand, drawing lines from your wrist, your elbow, and then your whole arm. Try different amounts of hand pressure, creating straight lines, parallel lines, curves, and spirals. There’s no wrong or right answer here! This freeing exercise will help open up your expressive drawing skills, warming you up to this medium.
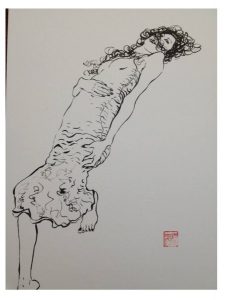
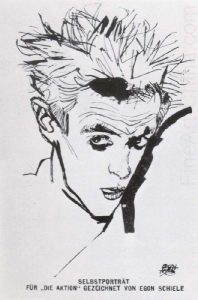
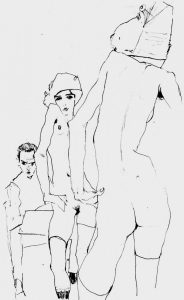
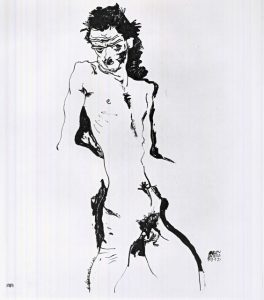
Egon Schiele

German expressionist Egon Schiele is a master of the living line. In these images note how he uses nothing but varying kinds of line in order to imbue these portraits with interest and emotion.

Line Weight

Part of what we see creating the sense of liveliness and emotion in Schiele’s lines is an incredible understanding of line weight.

Line weight is an important drawing concept. Different tools create different kinds of lines, and allow us different methods of varying line weight. A line’s weight, meaning how dark or thick it is, will make that line either move forward in an image (if it’s a strong, dark line) or sink farther back (if it’s light or thin). This is useful when trying to give the impression of something being closer or further away. A heavier line weight will also create emphasis on a particular area of a drawing, which is of course useful in creating our focal points.

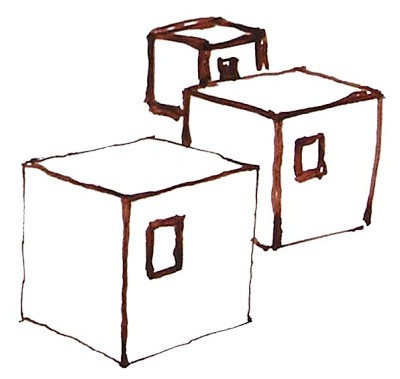
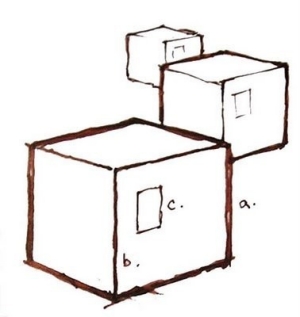
In the two images shown here, note how the image on the left is logical. The closest block is also the one with the thickest contour line, which makes visual sense. However, in the image on the right, the line weights of the blocks don’t follow the correct hierarchy, as they don’t recede in space logically.
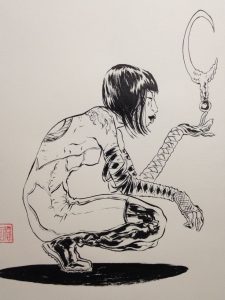
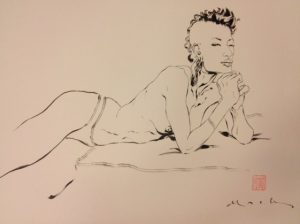
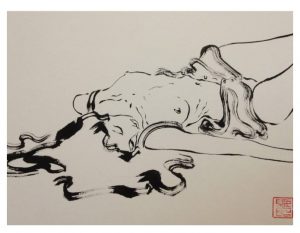
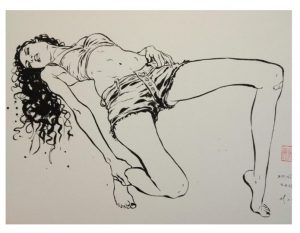
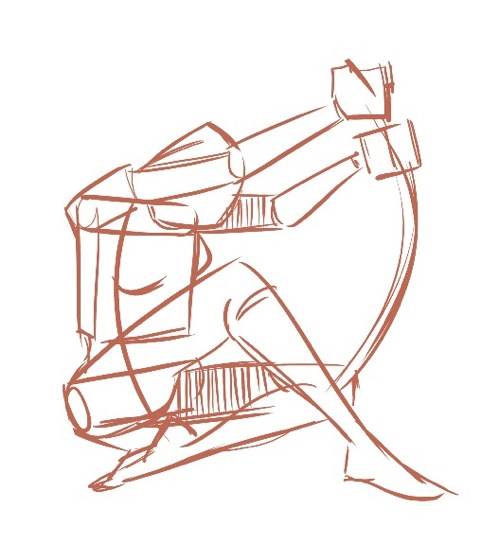
David Mack

David Mack, contemporary comic book illustrator and creator, is known for his linear figure drawing style. In the next series of drawings, notice how Mack uses only contour lines in order to describe the body. It’s useful to note that he cites Schiele as an influence to his work. His expert use of line weight is especially obvious in the implied shadows that convey a feeling of gravity entirely though varying thickness of line.

Inking Tips and Tricks

Ink can be a messy medium!

Before you begin your work in this medium, here are some helpful tips and tricks.

1472596863412

  • Always warm up.

Just as you would warm up before exercise, warm up before using ink. Take the time to work on your lines and strokes on a separate sheet of paper before you begin working on your actual illustration. This will ensure that you have proper command of your hands.

This image is of comic book artist Jacob Halton’s inking warm-up, which he does in the morning to “get command of his hands”.

1472596872881

  • Don’t tape down your page.

Marks are easier to make when moving your hand in certain directions, so move your page around in order to make this possible. Work your hands in the way that they move naturally.

  • Begin with thicker lines.

This is a way to keep warming up your hands. Thicker lines are safer to work with until you feel confident enough to move onto the drawing’s fine detail portions.

  • Work in a way that minimizes smearing.

Don’t try to work on the illustration in a left-to-right method, or in any order like that. Instead, think about where your hand may smear the ink, and work in a way that minimizes that smearing. Some artists place a piece of paper or paper towel under their inking hands in order to help with this process.

  • Address large areas of ink last.

All paper, including watercolor paper or Bristol board, will warp when wet. It’s much easier to draw controlled lines on completely flat paper. Therefore, draw your lines before soaking any large areas with ink, otherwise known as executing an ink wash. Another method is to fill in large areas of ink, and then either allow for drying time or use a hair dryer before moving on to finer details.


Pen and Ink Tools – Part 2

Pen-and-ink Drawing Surfaces

Pen-and-ink drawings are usually created on different types of paper. The tooth or grain of the paper can affect the marks made by the pen. Because of this, most illustrators prefer to work on smoother surfaces that are still absorbent to the ink, creating detailed ink drawings in this way.

You can use ink to draw on your sketchbook paper, but over time this paper will warp or fray with the wetness of the ink. The paper in this sketchbook simply isn’t heavy or absorbent enough. For final work, illustrators usually choose something with a little more heft.

Paper

Bristol Board is a smooth-surfaced paper that’s heavier than regular drawing paper. It’s a popular choice for pen-and-ink drawings.

1468363892784-1

Another popular choice for ink drawings, and the paper used for this class, is hot-press watercolor paper. Hot press refers to the method used to make this special kind of paper. This paper’s surface has been ironed smooth, and is very versatile, allowing artists to make fine details in ink as well as combine other media such as watercolors or colored pencils.

 1472596797004

Figure Drawing Reference

Getting the right reference is key in creating a great final art piece!

Though we some times don’t know how to get our figure drawing exactly right… we can sure see when it has gone wrong! Poor drawing is one sure way to ruin a great idea.  So, lets get the right reference so that we can do out best work!

NOW of course the BEST thing to do is go and draw a REAL LIVE PERSON… but you may not have access or may not be able to get just the right pose for your visual concept.  FEAR NOT!  there are some great resources out there!

ART POSE APP

screen696x696  artpose_male_worms_eye-675x1200  screen696x696-1

Art Pose and Art Pose Female Edition are perhaps the most practical and intuitive artist anatomy reference applications for iOS and Android.  You can pose your figure, see musculature and move your camera all around it.  You can even go to a silhouette view.  Pretty good stuff!  Learn more! 


figure-8-1303874382

Pixelovely Is probably my favorite reference site. It has figure great drawing poses, choose between kinds of models, clothed or nude male or female etc.  Plus animal poses!  MEOW! Within each category are sub-categories. For example, under the animal category, you can choose the species of animal – and whether or not to time the session.


figure_woman_bend

Quick Poses is a great figure reference site. You can choose between gesture drawings (timed poses) or random pose studies (not timed). There is a healthy selection of both clothed and nude models to choose from.  The site also includes tips to improve your study.


Life Drawing in New York

Since we are in New York City artists have many options to improve their life drawing skills by drawing from a model outside of this class.  Most of these options offer a student rate. Practicing our craft is VITAL.  Take advantage of the resources in our city!

sketch11sept

title

The New York Society of Illustrators is an incredible resource for up and coming commercial artists.  The sketch night is a great way to get to know this institution.  Its lively with great models,live music, pro illustrators, and often comes with FOOD!  This one is wonderful and is the cheapest option I’ve found.