
Week 9 – Lab
Objective: Connect servo motors to Arduinos and make them do stuff
Materials Arduino, motor, 3 jumper cables, servo library (for code), Fritzing (to lay out schematics), held magnifying light, cell phone camera,
FYI Servos are little motors that are smart. They are found in remote control cars all over the world. They are used to control the steering mechanisms (they are rotary actuators). But please keep in mind the engine is powered by a DC current.
We will be playing with some code we found in the library under File:Example:Servo:Sweep and Fritzing, which gives you a visual and easy to use schematic system. This program will come in very handy when my group is documenting our AUV.
Sweep – Sweeps the shaft of a RC servo motor back and forth across 180 degrees. (This example makes use of the Arduino servo library.)
Procedure:
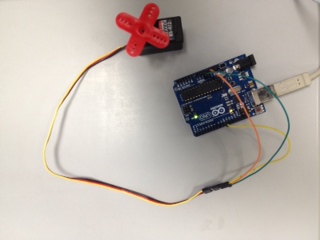
Put the three jumpers on their connections on the Arduino after attaching the motor end.
- Yellow to pin 9
- Red to 5volt (red is in the middle in an attempt to stop people from crossing the cables)
- Black to the ground.
Below is the schematic from the Arduino site:

schematic
But before we compile our code we realize that the USB cable is no good so we switch it out. When that doesn’t work we double-check everything again and decide it is one of the cables.
It takes a bit of tinkering and we have to restart everything so that the modem shows up in our tools section but we successfully download the code in from the Arduino site and now our motor is running the program we want and not the one that was already loaded.
We then change the delay time from 15ms to 500ms. This was also successful. (Then for fun we made it go fast by changing it to 1ms.) The problem with making it go fast is that it doesn’t give it time to do the full iteration. So we changed it to 5ms. Then it completed the full range of motion.
re-calibrated
The code that makes all this happen is predominantly written in C and C++. There are two loops, one makes it go from 0 to 180 and the other makes it come back. They are continuous loops.
If you physically stop the propeller from turning the Arduino and little motor really shine because it pushes back and tries very hard to do what it is programmed to do.
Result: Our lab was very successful we were able to complete everything we were instructed to do and more! (BTW – this was a lot of fun!)

