
Due to COVID-19, City Tech (and all of CUNY) shifted its in-person classes to online, distance learning instruction. In this post, I reflect on my current class’s transition to distance learning, show how I have configured my office and computer for screencasting and video conferencing, describe some software and services that support distance learning, and give instructions for uploading a video to YouTube.
My Transition to Distance Learning
For my current Science Fiction (ENG2420) class, this was not too much of a disruption, because I was already leveraging online technologies to support student learning and course material accessibility. I designed the course as a zero textbook cost class, meaning I find resources that I can make available to students via PDFs and handouts, and choose readings that are available freely online, such as the unparalleled Archive.org.
Also, I redesigned some of the course assignments to emphasize the importance of note taking by teaching good note taking practices and evaluating students on the quality of their notes. To support this, I recorded each lecture during our earlier in-person classes and posted them on YouTube after class ended, so that students could use the videos to fill in gaps in their notes and allow those students who missed a class to make their own notes based on the video lectures.
I collect student work via email and on OpenLab, “an open-source, digital platform designed to support teaching and learning at City Tech (New York City College of Technology), and to promote student and faculty engagement in the intellectual and social life of the college community.” I joined the OpenLab team as a co-director of the project this year, but I have been using OpenLab in all of my classes since joining City Tech in 2014.
Now with classes meeting asynchronously online, I have tweaked assignments and the schedule to accommodate students accessing materials and completing their assignments. I hold office hours once a week at a regularly scheduled time via Google Hangouts, and I can hold private office hours by appointment with students. I use email to respond to questions and concerns on a daily basis.
Now that I have reconfigured a space in my apartment to support my class and the many other online meeting responsibilities that I have with OpenLab and other projects, I wanted to share some tips and ideas to help others transitioning to facilitating their classes with distance learning.
Office Configuration
I know how easily distracted I am by busy backgrounds, I wanted to provide as neutral a space for my lectures and online meetings. To this end, I appropriated my apartment’s closet as a distance learning and video conferencing studio.

I positioned the Logitech C615 webcam so that I am centered in the frame when video conferencing or recording myself lecture. Above the camera, I positioned a white light to illuminate my face.

I arranged the desk so that my back would be against a solid white wall as pictured above looking from behind my monitor towards where I would be sitting facing the monitor and webcam.

Notice that I taped a small piece of cardboard above the webcam. This blocks glare on the camera lens from the light above that illuminates my face. I was careful to cut and position it so that it is out of frame of the camera lens. Depending on your webcam, be careful not to cover the microphone if you build a similar lens shade.

To the side of my desk, I have a larger lamp that points against the wall and behind me. This reduces my shadow from the desk lamp in front of me.
The end result looks like this:

Software and Online Services for Distance Learning
As mentioned above, I use email and the OpenLab for interacting with students, disseminating materials, and collecting student work. And, I am using Google Hangouts for regular office hours since it is a far easier lift for students than official CUNY supported video platforms like Skype and WebEx.
To create my class lectures, I do the following things.

First, I create a presentation slide deck using Slides in Google Docs.

While presenting my slides in full screen mode, I use OBS Studio, a “free and open source software for video recording and live streaming” that supports Windows, Mac, and Linux, to record a video of my desktop (the Slides presentation) and my webcam video and audio in a smaller picture-in-picture that positioned in the lower right corner of the screen, which produces a video like my recent lecture embedded below.
Before I can post the video to YouTube, I like to edit it (though, editing isn’t absolutely necessary). I like to use Shotcut, a “a free, open source, cross-platform video editor.” After trimming the video, I then upload it to YouTube, get the video’s sharable link, and embed the video with the link in my class’ OpenLab site.
OBS Studio and Shotcut have steep learning curves, but each have extensive online documentation and there are communities of users online who share tips and advice about how to setup and use these powerful tools.
There are many other options for working with video. On Mac OS X, one can use Quicktime Player to record a screencast or iMovie to create something more advanced. On Windows 10, the built-in Xbox Game Bar can be used for creating a screencast movie. Also, there are commercial solutions, such as Screencast-o-Matic.
In some cases, you might not even need a computer. iPhones with iOS and Android phones can use video recording software that’s built-in or with an app to record and edit video, and there’s a YouTube app for both platforms that you can use for uploading the resulting video.
In the next section, I will show you step-by-step instructions for uploading a video made on a computer to YouTube.
Uploading a Video to YouTube
Once you have a video ready to share with students, the following step-by-step guide for uploading your video to YouTube shows you how to upload and share a link to your video.
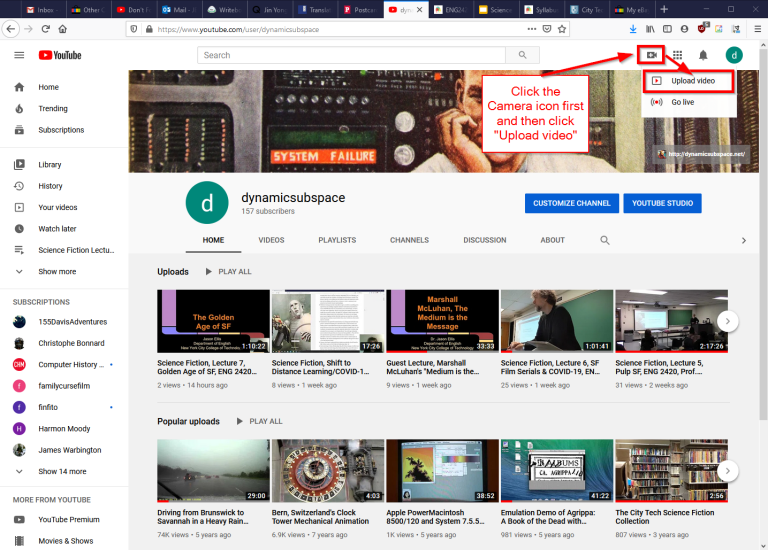
First, navigate to YouTube.com and login to your account. Then, click on the camera icon in the upper right corner and then click “Upload Video.”
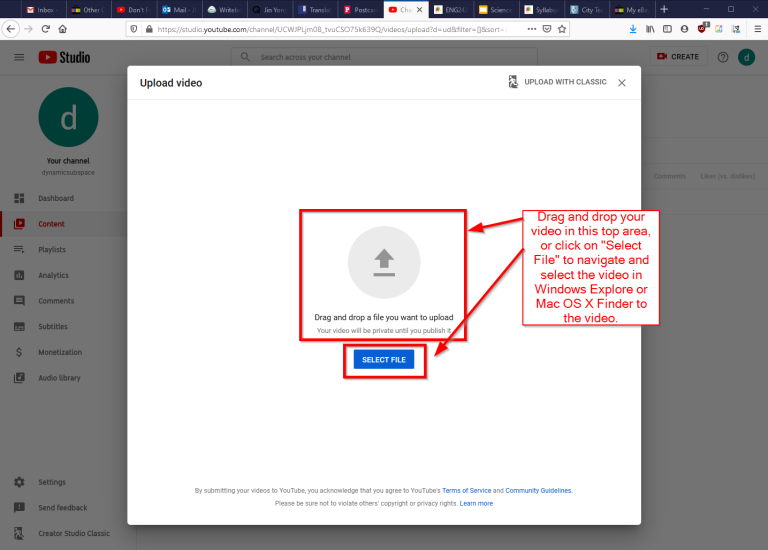
Second, drag-and-drop your video from your computer into the center of the window that opens, or click on “Select File” to navigate to and select your video file on your computer.

Third, while your video is uploading and processing (updates are shown along the bottom edge of this window shown above), fill out the Title and Description boxes and choose a thumbnail for how the video will initially display before the play button is pressed. Then, scroll down the window.
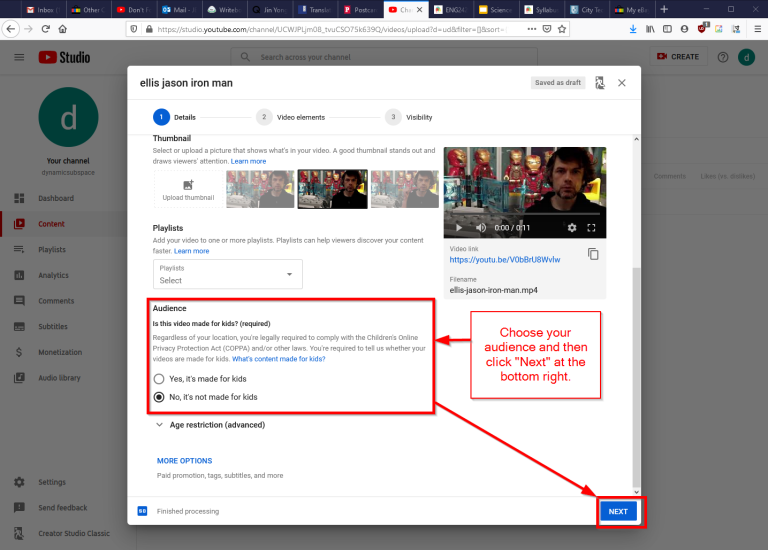
To comply with the COPPA law, select if your video is for kids or not. Then, click Next in the lower right hand corner.

Fourth, you can skip the options on the Video Elements screen and click Next in the lower right corner.

Fifth, select the Visibility option for your video. The most versatile choices are Public (this is what I choose) and Unlisted. In these cases, you will have a sharable video link that you can send via email or easily embed in a webpage. Private is also an option, but you have to choose who is permitted to see the video, which requires students having a Google account and you knowing those accounts to grant permission to each one. After making your selection, click Publish in the lower right corner.
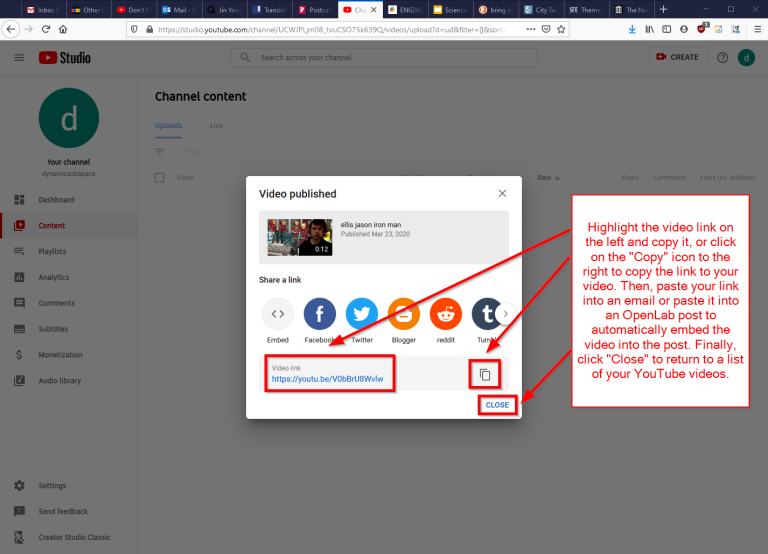
Finally, highlight and copy the video link on the resulting screen, or click on the copy icon on the right to automatically copy the video link to the Clipboard. Click “Close” on the lower right to return to your list of videos on YouTube. With the link on your Clipboard, you can go to email, OpenLab, or another platform to paste and share the video link with your students.
On OpenLab and WordPress-based sites, pasting the link into a post or page will automatically embed the video so that students can simply navigate to your class site and watch the video on the class site instead of going over to YouTube as an additional step.
If you’re working on transitioning your classes to distance learning, it’s okay to feel overwhelmed and frustrated like Miao Miao below. Just don’t give up. We’re doing good work for our students, and it takes time to think through and implement distance learning. Also, it’s okay to let your students know that this is a work-in-progress and things might change based on what works and what doesn’t.

This post originally appeared on Jason’s teaching and research blog here.

