The Journey

My journey on the search for an internship has been a successful one. Although it was a short journey I did learn a few things on the way that will help me in the future for when I partake on this journey once more. I was so optimistic in my search because I was so confident in my resume and my capabilities as a designer I was completely relaxed going in to my interview. Now my initial view of what I expected my interview to be like and what I thought Id be doing at this internship was totally Not what I was expecting. The location was also not what I initially thought either but I realized certain companies have a “Front entrance” and a “Back entrance” which means that sometimes you may have to take the back entrance to get to the front. I don’t considered this in any way as something that is bad because in reality thats how it all starts. My Interview was extremely short and informative in the same instance and I got to see how a few of the machines worked that the company used for printing. I then was introduced to all the workers and designers who seemed pretty much like interesting individuals So I am sure to learn a lot from them. From their I was on my merry way with a schedule and a new job.

Posted in Uncategorized | Leave a comment

Photo Description-Angel Diaz

city

I really enjoy Micheal Kenna’s work especially this one titled Manhattan Skyline. Most of her work is in black and white which isn’t something I would look for in a picture but just the view of the buildings in this image catches me and makes me feel some sort of amazment. The worms eye view is perfect and the image is well balanced with the number of buildings and the back ground of the sky. Not to mention how the buildings on the side work as a frame in it. All of Micheals pictures of the city whole are amazing and have a great view of what the city truely is no matter the angle or how far or close the picture was taken.


Posted in Uncategorized | Leave a comment

Luis Lopez – HW1

Michael Kenna

135cc10

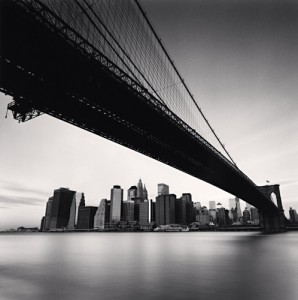
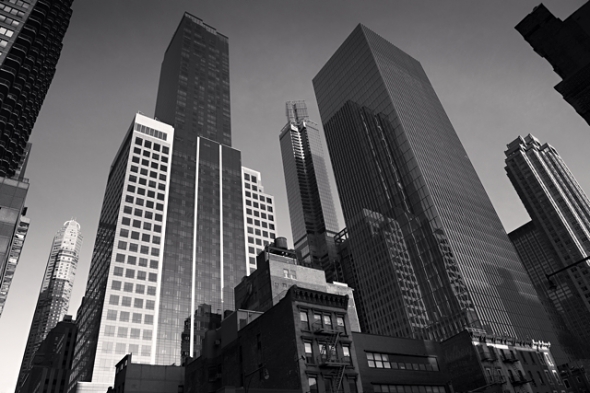
Brooklyn Bridge, Study 1, New York City, USA, 2006

http://www.michaelkenna.net/gallery.php?id=14


The photo that I have chosen is of the Brooklyn Bridge. It was shot from an angle, it shows the water under the bridge and the buildings in Manhattan if I’m not mistaken. I would say that it has a calm and peaceful felling because of the resting waters and how the buildings appear in the image, doesn’t feel too busy to me like New York usually is. The contrast from the top of the image to the body of water also helps create that peaceful sensation. Especially with the bright sky on the side.

There is a strong diagonal line, which is the bridge, I think that it makes you stop and stare at the bridge for a second before looking at everything else. There are also lines on the structures holding the bridge creating interesting shapes. The buildings in the back also create more lines that are straight, as well as the piece where the bridge begins or ends that combines with the buildings lines really well. For framing, I don’t that there is much of that but I can see how someone can argue that the bridge itself is a frame, showcasing the sky and the water with the buildings. I don’t think I would agree though. However for patterns there are plenty, the patterns on the building that allow you to differentiate the buildings from each other as well as the pattern of the windows. The interesting pattern of the reflection on the surface of the water. Also, the most noticeable pattern that’s on the bridge, not only of the supporting wires but also of the entire structure, the repeating boards and rods that create the bridge itself. When I first looked at the image it seems as though there is no depth of field but the more I look at it, I start to think that the photographer wanted the viewer to focus on the left side of the image, because some detail is lost near the right of the bridge but I am not entirely sure. The contrast is something that you notice right away because the image is in black and white. As I’ve said before the focus of the image is primarily on the bridge and part of the reason is because of the high contrast between black and white. Or if you’re more drawn to lighter colors you might look at the water first. Either way contrast plays a big part into what you decide to focus on first. For the last part the vantage point or angle of view is my favorite part of the image. It almost feels as though you’re flying or walking on the water creating that blissful felling. It reminds me of dreams that I’ve had. I think that the angle is brilliant, it’s at a perfect height, capturing the mood together so well!

Posted in HW1-photo description | Leave a comment

DOF

GreenWich091013_0001 GreenWich091013_0002


Depth of field is how photos capture images with range or with out range. In the photo on the left I focused on the leafs making everything behind the leafs seem blurry. to do this i put the camera in macro mode and then changed the seen settings to close up. in the photo on the left i took off macro mode then changed the scene settings to wide range/ standard range. with camera i was using it was easier to capture in extensive depth of field. I would chose to use shallow depth of field when i’m trying to capture certain subject or if i want my image to be focused on the detail of a certain subject. I would use extensive depth of field when there was no actual point of interest and the photo had a good look all together. I would also use Extensive depth of field when all of the key elements were important and needed to be sharply seen.

Posted in Learning Logs, LL3-DOF | Leave a comment

3 Point Portrait

The 3 point portrait shot is basically ways to capture someone correctly when using light. the first light we used was the broad light. this light added shadows to the models face. we also altered how the light looked with reflectors from the umbrella on the strobe light. The next light was a back light. The back light was used to create a highlights against the background for the frame to capture. The last light that was used was the fill  light. The fill light was used to help the broad light to extend to some further portions of the model.


Posted in Learning Logs, LL5-PortraitBasics | Leave a comment

Portrait Expressions

IMG_3231 IMG_3344

These are the best photos I took that show expression. The right photo has a really innocent look to it. The big smile plus the white back ground makes the photo give off a gentle feeling. The photo on the left has a whole different feeling to it . His face has a real serious look to it. That plus the black back ground and the position of his hands give off a very darker look. both show a lot of expression in two totally different ways.

Posted in Learning Logs, LL6-Portrait Lighting for Mood | Leave a comment

Painting with light.

IMG_3402 IMG_3448

Painting with light was a really fun class. In a way I felt like a child and tried to re create some actions of cartoons in my child hood. With this class there was also a lot of free time to create things how i wanted. Working with a small team on this was good to. We got to exchange a whole bunch of ideas and test them out the way we wanted to.

Posted in Learning Logs, LL7-Painting with Light | Leave a comment

Final Evaluation

This class was quite an experience. Learned how to really use a camera, instead of a conventional point and shoot style. I really like the teaching style of the professor. The trips were really enjoyable got to see some things I probably would of never saw. Could now capture moments in with a camera in a way that I wasn’t able to do before. learned meanings of things that would of been gibberish before this course. Overall it was a great time because photos in this day and age plays a huge part on so many roles in life and entertainment. I feel like i would be able to use these teachings further down the line in my career in so many ways.

Posted in Learning Logs, LL8-Final Evaluation | Leave a comment

Hw 1

Morning Traffic, Midtown, New York City, USA, 2000

After overlooking all the different photographers and seeing there various styles only one photographer really stood out to me and that is Michael Kenna. One of his photo’s that reached out and grab me is Morning Traffic Midtown. The picture is a black and white photo of an early morning in Manhattan, which looks like it had had just stop raining before the picture was taken. In the background you can see the unfocused/blurred car and streetlights.  Behind that you can the buildings becoming more blurred until it final disappears into the horizon. This photo gives off a sad mood because no ones likes to think about having to get up this early to go to work or school to see an eerie sight. The lighting also seems to convey this idea seeing how the darkness helps extends the shadow and engulf the light. I think of this as one of those photos that’s just wouldn’t look as good in color as it does in black and white.


In this photo I think the photographer has an unbalance contract and that the black is overpowering the white so it gives the photo a darker feel to it. The photo is unsharpened but not enough that you can’t recognize familiar things such as cars, buildings, and where the sidewalk ends and where the street begins. The perspective of the photo is very narrow to stop the viewer from having gazing eyes to parts of the picture the photographer deemed unnecessary or parts that they intentionally cropped out.  The photo has no type of pattern to show or any distinctive lines that led you to a different part of the picture. I find that the focal point of the picture is in the middle it is the most luminous part of the picture and it draws your eyes to it.

Posted in HW1-photo description | Leave a comment

LL5

Three-point lighting is a method used in photography to have light coming from different directions.(front-light, fill-light, and backlight) The front light is a firect light you have coming from illuminate the subject. The fill light is a light you have begin reflected by an umbrella so its not as strong as the front light and so that it can cast different shades.The back light is a light behind the subject so you can see the outlines of it and it also gives the subject a type of aura.

Posted in LL5-PortraitBasics | Leave a comment