I want to wish you all the best of luck in our class, and your other classes, too!
As we close the book on this semester, I wanted to give you a few reminders to help you see things through:
All work is due by the end of the day on Wednesday, May 19.
The latest that I can receive your work is Tuesday, May 25 (email me by Wednesday, May 19 if you need this extra time).
Our last office hours will be on Wednesday from 3:00-5:00pm on Google Hangouts here.
To submit your team’s Collaborative Project:
One team member creates a Post on our OpenLab Course Site, which includes the title of your project, all contributing team members’ names, and a link to your team’s OpenLab Project Site. Make sure that you test this link after publishing your post.
Your team’s OpenLab Project Site should include:
Link to Shared/Viewable Version of Research Report
Embed Presentation Video
Summarize Research Report across separate pages for Problem, Solutions, and Recommendations
Include an “About Us” page with bios, headshots, and links for all participating team members
Each team member has to email me your Individual Report on Collaboration (250-500 words).
Catch up on Individual Projects and email those revisions/make-ups directly.
If you have any questions, email me at jellis at citytech.cuny.edu or come to office hours this week!
This week’s Weekly Writing Assignment continues to focus on the work that you are doing within your team on the Collaborative Project.
After talking with your team (synchronously or asynchronously), write a short memo together in your Google Drive Shared Folder in a new Google Doc. Address it to Prof. Ellis and use the subject, “Delegating Point Persons.” In the body of your memo, briefly write a few sentences that identify who is taking point on the each of the main parts of the Collaborative Project: orchestrating the Research Report, organizing the presentation, and setting up your OpenLab Project Site. These point persons are only responsible for communicating with team members about meeting self-imposed deadlines and responsibilities. Point persons are not responsible for all of the work. All of the work should be shared by all team members.
After completing the memo, all team members need to copy-and-paste the memo into a comment on this week’s Weekly Writing Assignment to receive credit (i.e., if you have four team members, all four team members need to copy-and-paste the one memo into a comment each added to this post for a total of four comments).
Discuss Homework (conduct and compile research for report) and Weekly Writing Assignment (each team member should independently write a short memo describing what research they will contribute/have found so far for the team’s research report)
This previous week, your team should have established a means of communication (e.g., text messaging, WhatsApp, Slack, Discord, etc.) in addition to campus email, and your team should have discussed and selected a problem as the topic of your team’s Research Report. If you haven’t done these things yet, it’s important that you take care of them ASAP so that you have as much time as possible to focus on the project.
After establishing team communications and picking your Research Project’s problem, your team needs to delegate how each team member should be conducting and reporting back their research contributions to the Research Report document in your Google Drive Shared Folder. As discussed in this week’s lecture, all team members might research both the problem and its solutions, or some team members might research just the problem and others the solutions. How you divide these responsibilities is up to each team as long as all team members are contributing equal amounts of research and writing to the Research Report.
For this week’s Weekly Writing Assignment, each team member should independently write a short memo of approximately 250 words and addressed to Prof. Ellis with the subject, “Research Responsibility,” that describing what research they will contribute/have found so far for the team’s research report.
If you couldn’t make it to the Literary Arts Festival last week but would like to earn the extra credit, you may watch the ~2 hour long event video above, write 250-words about your experience (who did you hear speak? whose work resonated with you? what did you take away from the event?), and email your response to Prof. Ellis (jellis at citytech.cuny.edu).
In addition the Google Drive folder detailed in this week’s Weekly Writing Assignment below, you should create a second Google Doc within that shared folder that you will use for writing your Research Report. It can also be used to collect your notes, research, and reference entries. Be sure to document all of your research so that quotes are properly quoted and given parenthetical citations and a bibliographic entry in APA format is added to the References list at the end. You can copy the following outline into this document as a guide for the general layout of your Research Report:
Introduction (topic and why your report is important)

Objectives of the research (what were you attempting to do?)

Method (methodology–what kinds of research did you do, how did you do it, and why is the research sound?)

Results (what did you find in your research? facts, quotes, figures, interviews, surveys, etc.)

Discussion (how do you interpret your results? what story does your data tell us? results and discussion can be combined, but title this section appropriately if you do so)

Conclusions (what conclusions do you draw from your results and discussion? what is the significance of what you discovered?)

Recommendations (what do you think should be done to solve the research problem based on your research? this section is what all of your work is leading up to.)

References
Also, here are some resources and examples that I discussed in this week’s lecture to help you with writing and designing your analytical research report.
After watching this week’s lecture, your team should do the following:
Establish another communication channel for team discussion besides email (you may use email, but you should have another channel that supports easier and faster communication among the team members).
Discuss and decide amongst yourself which project your team chooses from last week’s brainstorming exercise.
Create a shared folder on Google Drive and add all team members to the folder as Editors
One team member should create a Google Doc in the shared folder. In this document, write a brief memo with TO (Prof. Ellis), FROM (all team members’ first and last names), DATE, SUBJECT (Collaborative Project Topic). In the content area, write a few sentences describing the scientific or technical problem that you will research for your collaborative project. Include any information about how your deliberations and discussion might have focused your topic from what one of your team members’ presented in the brainstorming exercise.
Each team member should copy-and-paste your completed memo into a comment made to this Weekly Writing Assignment post. This demonstrates that all team members can access your shared Google Drive folder and its files.
For this week’s homework, you should discuss how to begin your research. Perhaps delegate one resource to each team member to find a few possible sources each. For example, one team member should look in IEEExplore, one team member should look in Academic Search Complete, etc. for library-based resources, including also General OneFile (Gale), Ebook Central, and others here.
This week, you will want to reply all to the email that I send to each team for peer review of your instruction manuals. Pay attention to the names in your email, because I have reassigned some students to different teams due to some teams losing members. If you see a new name in your team, please welcome that person, and if you are a new member to a team, please introduce yourself to your new teammates.
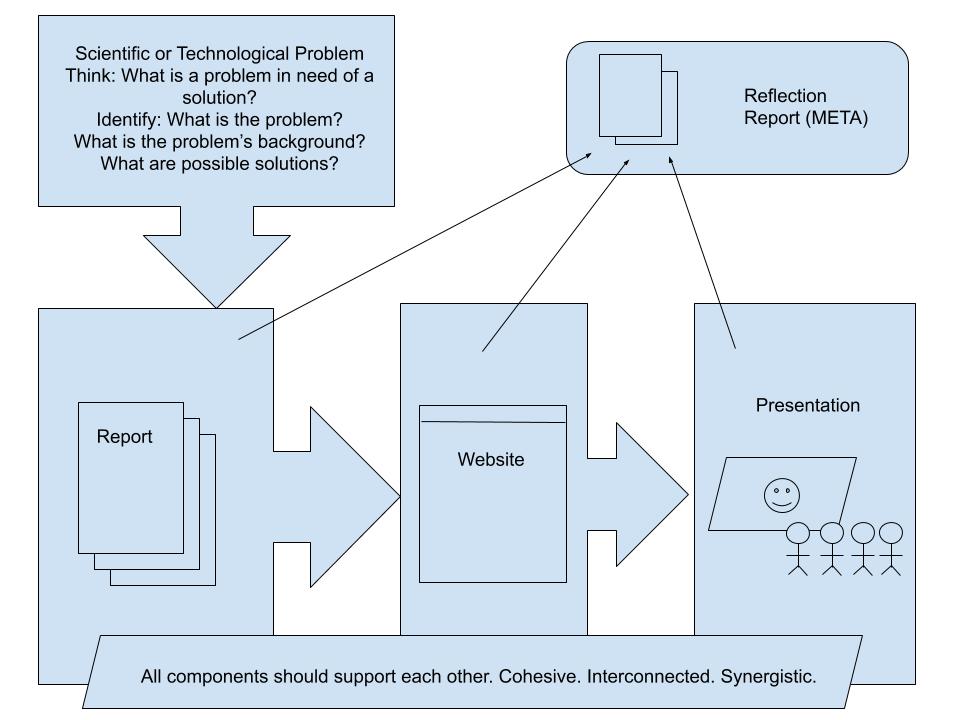
While we are wrapping up your individual Instruction Manual projects, we are going to begin working on your Collaborative, Team-Based Project so that you have as much time as possible to complete this important set of interconnected assignments that will carry us to the end of the semester.
Below, I have mapped out the Collaborative, Team-Based Project diagrammatically.
The Collaborative, Team-Based Project is comprised of these assignments:
Collaborative: 4000-6000-Word Analytical Research Report, 15%
Each team member contributes 1000-1500-word contribution to a 4000-6000-word analytical research report on a scientific or technological problem that demonstrates: 1) knowledge of the history and context of the problem, 2) knowledge of the causes and nature of the problem, 3) ideas for solving the problem, 4) the ability to explain the problem and offer possible solutions to a general audience, 5) the ability to integrate written work with the written work of a partner or partners in a coherent report, and 6) knowledge of proper research report format. At least six library-sourced citations must be included (non-library-sourced citations are encouraged, but they do not count toward the six library-sourced sources). Any outside sources cited should be documented according to APA format.
Collaborative: Seven-to-Ten-Minute Oral Analytical Research Report on a Scientific or Technological Problem, 10%
The goal of this part of the project is to transform your written report into an spoken presentation anchored by a PowerPoint or other visual presentation supplement. As a team, adapt and present your analytical research report as an oral presentation that demonstrates: 1) knowledge of oral presentation techniques and conventions, 2) the ability to organize a presentation effectively, 3) the ability to incorporate various media into the presentation, including appropriate computer software, 4) awareness of audience, 5) the ability to communicate the value of the product or service in clear spoken English, 6) the ability to answer audience questions, 7) the ability to collaborate productively with a partner or partners, and 8) the ability to explain the problem and offer possible solutions to a general audience.
Collaborative: Website Advertising a Product or Service Responding to the Analytical Research Report and Oral Presentation, 10%
The goal of this part of the collaborative project is to imagine a service or product that your team can offer that is related to your research report and oral presentation, both of which will be featured on the website in some way. The website should demonstrate: 1) knowledge of the product or service offered, of pertinent market forces, and of the potential customer base, 2) basic knowledge of web page design and composition, including appropriate software. The website will be based on your presentation and it is encouraged to be integrated into your presentation (perhaps to demonstrate how your team is promoting your product or service). All graphics, logos, design, and text must be created by your team.
Individual: 250-500-Word Reflection on Collaboration, 5%
At the end of the collaborative project, each student will have an opportunity to submit their own 250-500-word Reflection on Collaboration directly to Prof. Ellis via email. This document should include a discussion of challenges faced and overcome (or not) by the team, their contribution to the project, and the contribution of their teammates to the project. The instructor will consider these documents when assigning grades on the collaborative project.
The main part of the collaborative project is the research report. It anchors everything else. It should be completed first and adapted or transformed for use in the other deliverables: the website and the presentation. The report, website, and presentation will be submitted on our OpenLab Course Site. You will find the work done on earlier projects, such as article summarization, defining terms, and using proper citation formats, will all be in play on this project.
Each team member should keep a log in their notebook about the work that they contribute to the project as well as their observations about other team members’ contributions. These notes will inform an individual report that each team member will submit directly to Prof. Ellis via email as the Reflection on Collaboration.
Think of each of the following projects as part of an interconnected larger project. Each team member should contribute to each part, but individual team members may take the lead on one part versus the others depending on their skill set and interests. For example, one team member may take the lead on the research report and collect contributions from the other team members for the first draft, and another team member may take the lead on the presentation or the website.
For this week’s Weekly Writing Assignment, I would like you to brainstorm some possible scientific or technical problems that you can discuss with your team. Specifically, I would like you to focus on scientific or technical problems related to your major and career goals. Perhaps it will involve problems relating to computing hardware or software, networking, electrical engineering challenges, applications of computing and networking to other real world problems (such as, smart power grids, driverless cars, Bitcoin energy use, etc.). There are many, many problems out there for you to think about, discuss, and choose among for your team’s project.
So, the Weekly Writing Assignment is to write at least 250-words in a memo format addressed to Prof. Ellis with the subject, “Team Project Brainstorming,” and discussing three possible technical or scientific problems relating in some way to your major and career goals. For each problem, clearly state what the problem is, who or what industry it affects, and some of your own thoughts about how the problem might be solvable. After you’ve written this memo, copy-and-paste it into a comment on this blog post AND circulate it via email (reply all) to the email that I will send to each team for peer review (on the Instruction Manual project).
If you’d like to earn extra credit to apply toward a Weekly Writing Assignment or points to another assignment as needed, you can attend the Literary Arts Festival next week, write at least 250 words describing your experience of the event (naming the people you listened to, what you learned and liked, etc.), and email your event write-up to me at jellis at citytech.cuny.edu.
Spring Recess is next week, so there is no lecture or assignments next week. Keep working on your Instruction Manual and be prepared for peer review when we return to class on Wed., April 7.
I have a meeting time conflict this week during our regular office hour time, so I am accepting appointments for office hours this week. Email me with your availability if you’d like to talk about anything relating to the class.
Also, if you have any questions about the class or assignments, don’t hesitate to reach out by email at jellis at citytech.cuny.edu.
For this week’s Weekly Writing Assignment, write a memo addressed to Prof. Ellis with the subject, “Instruction Manual Challenges and Solutions,” and about 250 words in length. In the body of your memo, discuss challenges that you faced while drafting your instruction manual and explain how you overcame those challenges. The challenges can come from any part of the writing process so far or any aspect of the project. After you’ve drafted your memo some place safe, copy-and-paste it into a comment added to this post on our OpenLab site.
Remember that next week is Spring Recess, so you have two weeks to work on this. It is due Wed., April 7.
Remember to watch this week’s lecture completely for instructions on submitting your Expanded Definition Project by Friday, Mar. 26 and for details on this week’s homework and Weekly Writing Assignment.
You might find it beneficial to reflect on your experiences with a given type of document–including those you have made and those made by others that you have used. Let’s do this with instructions.
After watching this week’s lecture, I would like you to write a brief memo of at least 250 words reflecting on instructions. There are two main things that I would like you to respond to in your reflection: (1) Discuss a good set of instructions that you’ve used before, (2) Discuss a bad set of instructions that you’ve used before, and (3) Write some ideas that you have about how to make technical instructions useful and engaging.
When you have completed your memo, copy-and-paste it into a comment added to this post on our OpenLab Course Site.
Last week, I sent around the “Reply All” starter email for each team’s peer review on the second major project in our class: the Expanded Definition Essay project.
Since peer review didn’t begin until Friday, Mar. 12, you have until Friday, Mar. 19 to complete peer review on your Expanded Definition Project.
This gives you until Friday, Mar. 26 to submit your Expanded Definition Project on OpenLab (though, you are welcome to submit it earlier when you are ready).
Below, I am including the model for the Expanded Definition Project with a few notes to pay attention to regarding publishing your Expanded Definition Project as a post on our OpenLab Course Site. Watch this week’s lecture for detailed instructions on posting your work to OpenLab.
Your Name's Expanded Definition of YOUR TERM

TO: Prof. Jason Ellis
FROM: Your Name
DATE: Due Date
SUBJECT: Expanded Definition of YOUR TERM

Introduction [Heading Level 2]
What is the purpose of this document? What term are you defining? How are you discussing the way it is defined and the way it is used in context? Describe a road map for what follows (definitions and context). This content should be published as paragraphs, unlike the heading for this section, which is a level 2 heading.

Definitions [Heading Level 2]
Quote several definitions of the term that you selected. Provide quotes and parenthetical citations for each definition, and include your sources in the References section at the end of the document. Each definition that you include deserves discussion in your words about what it means and how it relates to the other definitions that you include. Consider how they are alike, how are they different, who might use one versus another, etc.

Context [Heading Level 2]
Quote several sentences from a variety of sources that use the term in context. A range of sources would provide the best source material for your discussion of how the term is used in these contexts. For example, a quote from an academic journal or two, a quote from a newspaper or magazine, a quote from a blog, and a quote from social media would give you a range of uses that might have different audiences. For each quote, you should devote at least as much space as the quote discussing what it means in that context and how it relates to the other quotes in context. Each quote should be in quotes, have a parenthetical citation, and a bibliographic entry in your references at the end of your document.

Working Definition [Heading Level 2]
Based on the definitions that you quoted and discussed, and the contextual uses of the term that you quoted and discussed, write a working definition of the term that's relevant to your career field or major, which you will need to identify (this is the specific context for your working definition).

References [Heading Level 2]
Order your APA-formatted bibliographic references by the author's last name, alphabetically. In your posted version, they do not need a hanging indent. And, they should not be in a bulleted list.
Remember to remove the bracketed headings information before publishing your work–this is only a guide to help you choose the correct heading levels while creating your post.
I wanted to give you all a heads-up that your midterm grades are now available on our OpenLab Course Site. Click on the Gradebook link on the left side to see your midterm grade. This is only an indication of how you are doing in the class. It doesn’t average into your final grade. I looked at your participation on the Weekly Writing Assignments and other work so far this semester. Midterm grades are: Passing, Borderline, and Unsatisfactory. If you received Borderline or Unsatisfactory, there’s still plenty of time to turn that around and earn a good grade in the class. If you have any questions or need some extra support, remember to email me or come to my office hours on Wednesdays from 3-5pm.
During this week’s lecture, I discussed peer review for the Expanded Definition Project, and I introduced the Instruction Manual Project.
After watching the lecture, scroll down for the Weekly Writing Assignment, and watch for the team emails for peer review (remember to click “Reply All”).
Below are example instruction manuals that you can refer for examples and ideas about how to approach your own instruction manual project.
To begin your thinking for the Instruction Manual Project, use this week’s Weekly Writing Assignment to brainstorm three possible topics relating to your studies and future career for your instruction manual.
For this assignment, create a memo addressed to Prof. Ellis with the subject line of Instruction Manual Options. In the body of the memo, briefly discuss the pros and cons of each of your three options for the instruction manual. The pros would be the things that would support your success on the project (e.g., knowing a lot about the topic, having access to what your instructions would be about, etc.) and the cons would be the things that would make the project difficult (e.g., having to learn more about the topic, not having access, etc.). After weighing the pros and cons for each of your three options, state in the last sentence which topic you have selected for your instruction manual.
Write your memo in your word processor of choice, and then copy-and-paste it into a comment added to this post.
For your additional homework this week, engage in peer review on the Expanded Definition Project after Prof. Ellis sends emails to each team, and create a Google Doc using the Instruction Project outline below and begin writing the directions portion of your document. The lecture next week will go over more details for the other sections. And, your own review of instruction manuals will help you think through what information you should include in these sections.
1.0 Introduction
1.1 Purpose
1.2 Intended Audience
1.3 Scope
1.4 Organization Description
1.5 Conventions (abbreviations, left/right)
1.6 Motivation (answers the “so what” question)
1.7 Safety and Disclaimers
2.0 Description of the Equipment
2.1 Illustration of the Equipment
2.2 Description of the Equipment’s Parts
3.0 List of Materials and Equipment Needed
3.1 Illustration of the Parts Needed to Carry Out the Instructions
3.2 Tools needed
3.3 Table of the parts with description of each
4.0 Directions
4.1 The Task These Directions Are Designed to Show
4.1.1 Step 1 (don’t write Step 1--write a brief statement on what the first step is)
4.1.2 Step 2
4.1.n …Step n being some number (write as many steps--briefly--as you can think of--you can fill this list out later)
5.0 Troubleshooting
6.0 Glossary
7.0 Reference List
In this week’s lecture, I continue discussing the Expanded Definition project, set out the goals for the project over the coming weeks, mention the Job Search Advice OpenLab site, and go over the Weekly Writing Assignment.
This Weekly Writing Assignment is meant to help you vet or evaluate where some of your research comes from and report back what you find. Watch this week’s lecture before performing this assignment so that you learn more about the process that I suggest for discovering the information requested below.
For this assignment, refer to two journal articles from different journals that you came across in your research (or, search for your Expanded Definition term again in IEEExplore and/or Academic Search Complete to find two examples for this assignment).
Using the built-in tools in the databases where you found the article and search sites like Google, DuckDuckgo, or Bing, learn more about the specialization of the journal and the kinds of research that it publishes and find out the name of the editor-in-chief and their professional background (degrees, affiliation, and research specializations).
Then, type a short paragraph in your word process of choice that identifies the name of the two journals that you investigated for this assignment and describe in your own words what each journal specializes in. And, identify each journal’s editor-in-chief and describe their professional details, such as degrees and where they were earned, their affiliation (where they work/teach), and their research specializations (if possible to find).
Finally, copy-and-paste your paragraph into a comment added to this post.
This assignment should not take very long. Focus most of your time this week on completing a draft of your Expanded Definition essay.
As discussed in this week’s lecture, I built an OpenLab Site called Job Search Advice. It offers help with preparing your resume, cover letter, and other materials for your job search. It includes a video lecture, sample documents, and useful links. It’s meant to be a useful resource for you all. If you know other City Tech students not in our class who might want to check it out, please feel free to share!
Remember to watch this week’s lecture and take notes on it before proceeding with the work described in the posts below, which cover the Expanded Definition project, the Weekly Writing Assignment, and submitting your 500-Word Summary project.
Stop by my office hours on Wednesday from 3:00-5:00pm with your questions, or email me at jellis at citytech.cuny.edu.
During this week’s lecture, I discussed the following outline as a good model for you to follow while creating your own Expanded Definition essay. A good rule of thumb for your quoted material would be at least 2 cited definitions and 3 cited contextual sentences, but you might find having more definitions and more contextual sentences strengthen your essay. Remember to discuss, explain, and compare/contrast the quotes that you find to help your reader understand how these all relate to one another before endeavoring to write your working definition at the end of your essay.
Your Name's Expanded Definition of YOUR TERM

TO: Prof. Jason Ellis
FROM: Your Name
DATE: Due Date
SUBJECT: Expanded Definition of YOUR TERM

Introduction [Heading Level 2]
What is the purpose of this document? What term are you defining? How are you discussing the way it is defined and the way it is used in context? Describe a road map for what follows (definitions and context). This content should be published as paragraphs, unlike the heading for this section, which is a level 2 heading.

Definitions [Heading Level 2]
Quote several definitions of the term that you selected. Provide quotes and parenthetical citations for each definition, and include your sources in the References section at the end of the document. Each definition that you include deserves discussion in your words about what it means and how it relates to the other definitions that you include. Consider how they are alike, how are they different, who might use one versus another, etc.

Context [Heading Level 2]
Quote several sentences from a variety of sources that use the term in context. A range of sources would provide the best source material for your discussion of how the term is used in these contexts. For example, a quote from an academic journal or two, a quote from a newspaper or magazine, a quote from a blog, and a quote from social media would give you a range of uses that might have different audiences. For each quote, you should devote at least as much space as the quote discussing what it means in that context and how it relates to the other quotes in context. Each quote should be in quotes, have a parenthetical citation, and a bibliographic entry in your references at the end of your document.

Working Definition [Heading Level 2]
Based on the definitions that you quoted and discussed, and the contextual uses of the term that you quoted and discussed, write a working definition of the term that's relevant to your career field or major, which you will need to identify (this is the specific context for your working definition).

References [Heading Level 2]
Order your APA-formatted bibliographic references by the author's last name, alphabetically. In your posted version, they do not need a hanging indent. And, they should not be in a bulleted list.
For this week’s Weekly Writing Assignment, compose a short memo (remember the memo header of TO, FROM, DATE, and SUBJECT) to Prof. Ellis with the subject, “Expanded Definition Research.” In the body of your memo, write and reflect on how and where you are finding sources for your Expanded Definition project. What databases and research websites are you using? Are you using The New York Times (signup for a free pass here) and Archive.org? No more than 250 words are needed. The main thing is to communicate to me that you are performing your due diligence to find useful definitions and contextual quotes of the term that you selected. Write your memo in your preferred word processor and then copy-and-paste your memo into a comment added to this post.
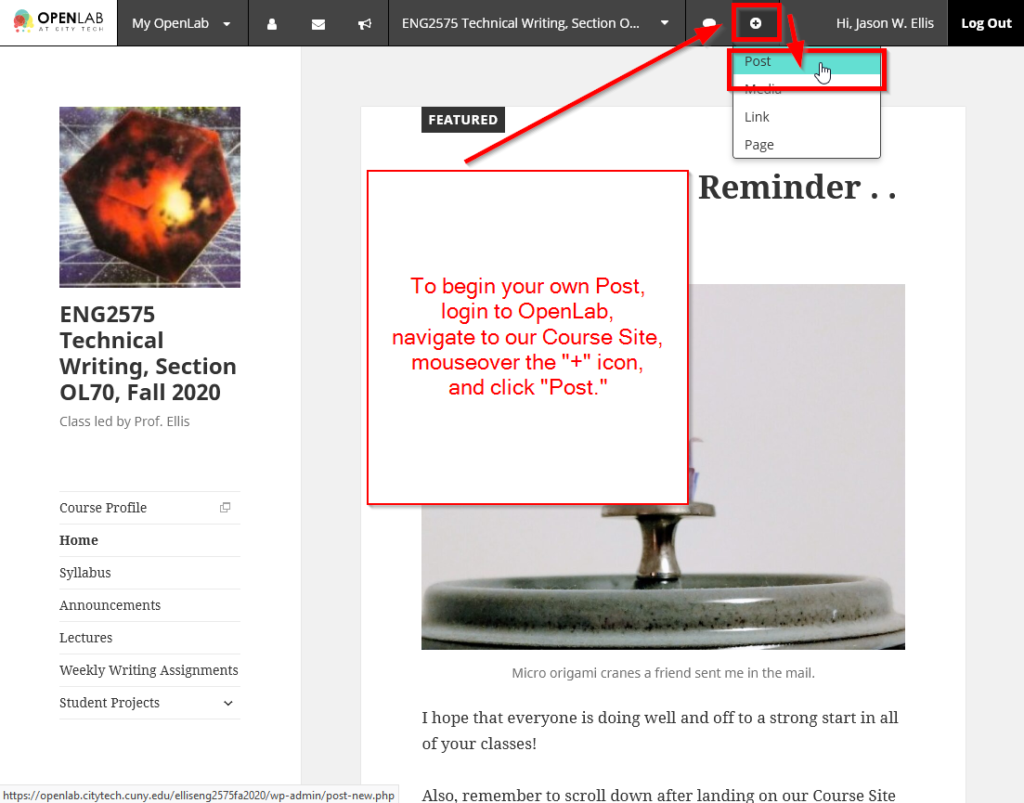
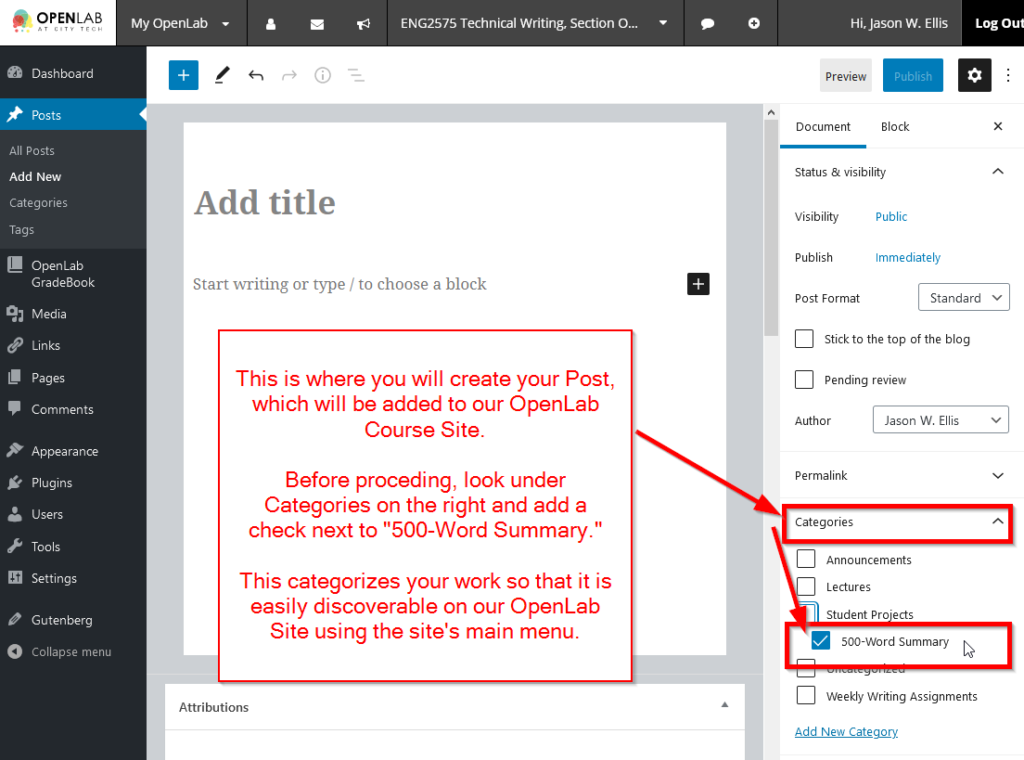
Refer to this week’s lecture for more details on how to post your 500-Word Summary project to our OpenLab Course Site.
Below, I am including some screenshots to guide you through the process of creating a post for your 500-Word Summary.
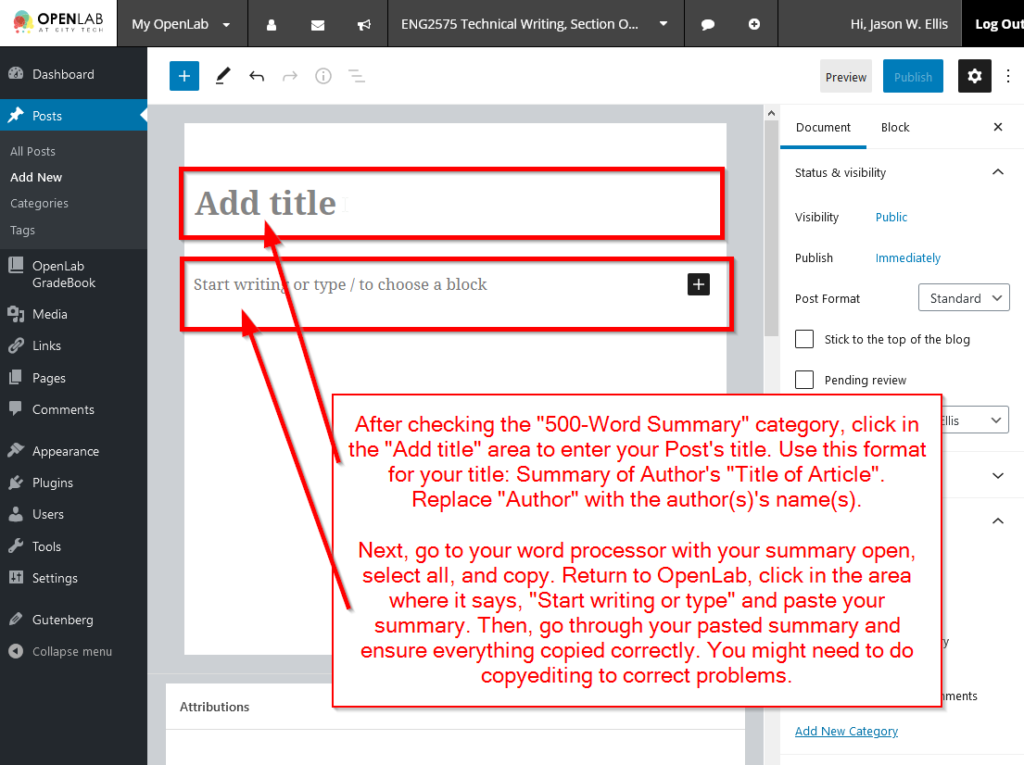
To begin your own Post, login to OpenLab, navigate to our Course Site, mouseover the “+” icon, and click “Post.”
Before typing anything, look under Categories on the right and add a check next to “500-Word Summary.”
Click in the “Add Title” section to enter your title (e.g., Summary of Lin’s “3D Layering of Integrated Circuits”). Then, click in the “Start Writing” area and copy-and-paste your 500-Word Summary memo from your word processor into this area.
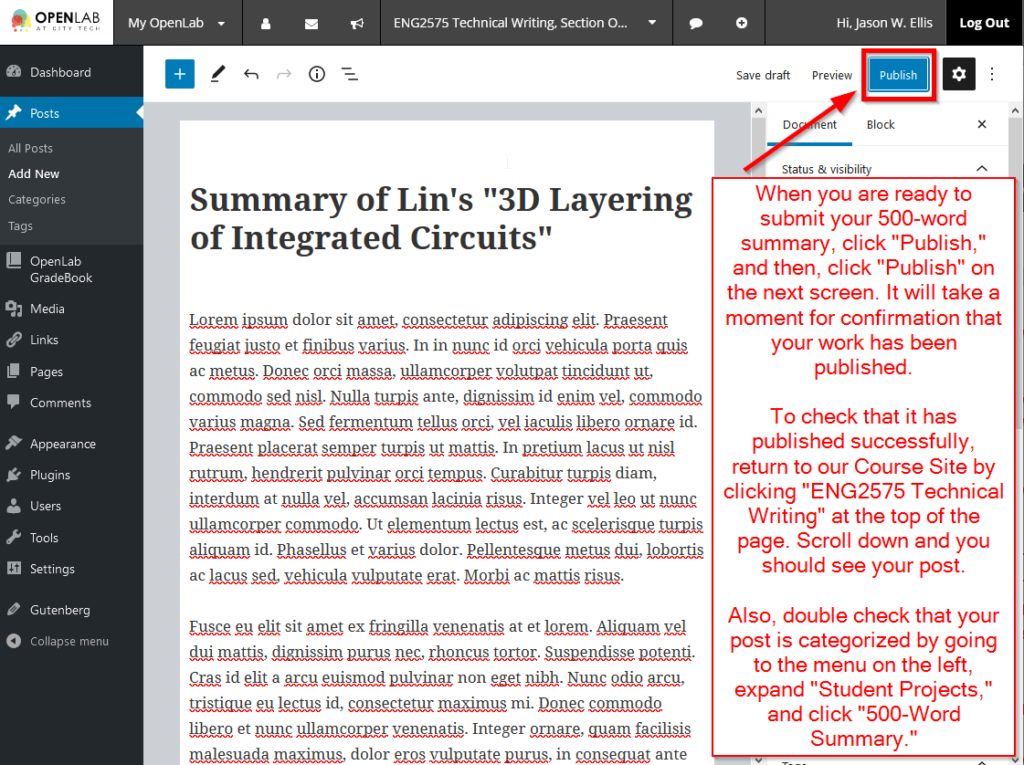
After copyediting your work to ensure everything is as you want it to be, click on “Publish” and then click “Publish” on the next screen. Verify that your post is live on the site by clicking on “ENG2575 Technical Writing” at the top center to return to our Course Site and then click on the down arrow next to Student Projects in the left menu and 500-Word Summary beneath it to see your project posted.
In Week 3’s lecture, we cover: Announcements/Housekeeping, Peer Review for the 500-Word Summary, the 750-1000-Word Expanded Definition Project, and this week’s homework (peer review) and Weekly Writing Assignment (beginning research for the Expanded Definition Project). Remember to watch the entire lecture and make notes before responding to Peer Review or the Weekly Writing Assignment. Also, office hours on Wednesday from 3:00-5:00pm via the link on the syllabus, or you can email me at jellis at citytech.cuny.edu with your questions.
After watching this week’s lecture above, use this week’s Weekly Writing Assignment to begin your initial research on the next project: 750-1000-Word Expanded Definition Project. This is the second individually-based project in the class. The goal is to write 750-1000 words that provide an extended definition of a term relevant to your field of studies and/or future career. Below is the synopsis of the assignment from the syllabus:
Individual: 750-1000-Word Expanded Definition, 15%

Individually, you will write a 750-1000 word expanded definition of a technical or scientific term, with cover memo, which demonstrates: 1. correct memorandum format. 2. knowledge of the etymology and historical development of the term. 3. examples of the term’s use in various written contexts. 4. ability to compare and contrast various uses of the term. 5. use and citation of sources with proper attribution. 6. awareness of audience. At least three library-sourced citations are required and should be cited following APA format.
As detailed and explained in this week’s lecture, your Weekly Writing Assignment this week is an opportunity to begin your research, settle on a term to focus on, and find three quotes that you might use in your project. With that in mind, add a comment to this post with the following before next week:
Begin with a short paragraph that begins with a statement about three possible terms that you considered and performed cursory research on for your project and concludes with the one term out of the three candidates that you ultimately decided to focus your expanded definition project on.
After using the library’s databases and reference guide shown in this week’s lecture, perform more focused research on the single term that you selected and copy-and-paste three quotes–each quote must come from a different source (e.g., one from a dictionary, one from an encyclopedia, and one from an ebook, or all three from different dictionaries, or all three from three different encyclopedias, or all three from journal articles, etc. All combinations will yield quotes that you might use in your expanded definition essay).
After each quote, write an APA bibliographic reference for your selection.
As always, write your Weekly Writing Assignment in a word processor, save your work, and then copy-and-paste it into a comment added to this post.
As we begin to wrap up the 500-Word Summary Project, we will use peer review to request and receive feedback from your peers in the class. This serves two purposes: 1) you get experience working with the writing of others, which improves your writing ability through this critical engagement, and 2) you receive invaluable feedback and suggestions on how to improve your own writing from others.
To perform peer review on this assignment, do the following after watching this week’s lecture above:
Watch for an email on Wednesday from Prof. Ellis to you and your teammates.
Choose to “Reply All” to this email. This will send a single reply message to all recipients of the original email, which includes your teammates and Prof. Ellis.
Open with a salutation to everyone.
Introduce yourself to your team (major, career goals, hobbies).
Write a message to your team–ask for feedback and offer to provide feedback.
Copy-and-paste your 500-summary below your message.
Give a closing and signature (Best, Your Name or Cheers, Your Name).
As you receive emails from your team:
Read their 500-Word Summary
Click “Reply All” to their message
Write a brief email (Salutation, Body, Closing)
In the body:
What works best
What needs improvement
Quote one random sentence and rewrite it as a suggestion
Remember to be polite, understanding, work through problems, be considerate, be the bigger person if there are any misunderstandings.
Feel free to use your emails for discussion about the project and your team, but keep all discussion professional and appropriate.
Reach out to Prof. Ellis if there are any unsolvable problems within your team at any point during the semester.
Greetings, all! Here’s the lecture for the second week of Technical Writing. In this week’s lecture, I review some points about the class and syllabus, discuss what is technical writing, and show you how to transform your reverse outline into the first draft of your 500-Word Summary project. While you watch this week’s lecture, remember to have your notebook out to write notes. Then, scroll down and complete the Weekly Writing Assignment and 500-Word Summary homework described in the two posts below.
Remember, I will have office hours on Wednesday from 3:00pm-5:00pm (the link to the Google Hangout is at the top of the syllabus). Also, you can email me at jellis at citytech.cuny.edu with your questions or to make an appointment to meet with me at another time.
For this week’s Weekly Writing Assignment, I would like you to write at least 250 words the describes (1) how you selected the article that you did for the 500-word summary including details, such as which databases you used, what keyword(s) you used, and what criteria you used to focus on some articles and not others; and (2) a set of instructions that someone else could use to find the specific article that you selected, which can be a description of steps in sentences or a list of steps: 1, 2, 3, etc.
Watch this week’s lecture above for a full description of this assignment before completing it.
Type your response into your word process of choice and save your work some place safe. Then, click on the title of this post above (“Weekly Writing Assignment, Week 2”), scroll down to the comment box, copy-and-paste your response from your word processor into the comment box, and click “Post comment.”
As discussed in the lecture this week, this week’s homework on the 500-Word Summary project is to transform the reverse outline that you wrote last week into a first draft that you will share with your team and Prof. Ellis as a part of next week’s homework (I will cover this in the Week 3 Lecture).
In the Week 2 lecture above, I show how to format your 500-Word Summery as a memo, add an introductory topic sentence, add a road map sentence, incorporate a quote and citation, and add a reference in APA format at the end of the document. The example that I created in the lecture is included below for your reference.
After you have completed your first draft, save a copy and be ready to circulate it next week after I assign teams. When you share your work, your teammates will provide feedback and Prof. Ellis will see your work. I will explain this more next week.
TO:      Prof. Ellis
FROM:    Your Name
DATE:    3/3/2021
SUBJECT: 500-Word Summary of Article About Virtual Reality

The following is a 500-word summary of a peer-reviewed article about tracking human bodies in virtual reality. The authors discuss the body tracking software that they developed called Pfinder by showing how the software was developed, tested, and improved. According to the authors, “To  address  this  need  we  have  developed  a  real-time  system called   Pfinder   (“person   finder”)   that   substantially   solves   the problem  for  arbitrarily  complex  but  single-person,  fixed-camera situations” (Wren et al., 1997, p. 780). Lorem ipsum dolor sit amet, consectetur adipiscing elit. Vestibulum at porttitor neque. Nullam dapibus pulvinar hendrerit. Etiam elementum ipsum quis elit aliquet tincidunt. Aliquam dui augue, tempor quis pretium et, fermentum et dolor. Praesent sit amet velit et ligula iaculis vulputate. Nulla facilisi. Aliquam lobortis pulvinar rhoncus. Aliquam neque sem, tincidunt sollicitudin ante gravida, congue pretium odio. Nullam in vestibulum tellus, accumsan dignissim dolor. Sed convallis nisl vel venenatis sagittis. In eu turpis risus. Phasellus ac rhoncus est. [The body should be 500 words long +/- 20 words.]

Reference

Wren, C. R., Azarbayejani, A., Darrell, T., & Pentland, A. P. (1997). Pfinder: Real-time tracking of the human body. IEEE Transactions on Pattern Analysis and Machine Intelligence, 19(7), 780-785. https://doi.org/10.1109/34.598236
You can find the website for the Research Report on Issues with Robots here. It was written by Mohammad Al Amin, Kiara Candelario, Neil Domingo, and Ali Hossain.
We’ll develop a simple compass app that will utilize the internal accelerometer and magnetometer sensors of the Android device. Accelerometer is a sensor which converts the mechanical acceleration information to electrical signals and similarly a magnetometer is used to translate the magnetic field intensity to electronic signals.
Most Android devices have an accelerometer and a magnetometer sensor inside therefore using a compass app only requires software rather than additional hardware.
As we develop our compass app, we’ll learn setting permissions to use sensors, reading acceleration and magnetic field data in Java code, extracting the orientation data from the sensor data and animating images. In the end, we’ll have a complete compass app that we can use in daily life.
2.0 List of Materials and Equipment Needed
Windows/Mac/Linux Desktop/Laptop
Minimum 8GB of RAM and Enough storage to hold all the data
Let’s start by creating an Android project first in Android Studio. I named the project as Compass App and selected Empty Activity as the default activity type. The minimum API is also set to 15.
We’ll need a compass image whose needle shows the absolute north. I found the royalty free image shown in Figure 3.1 for this aim (I chose this one because it looks sort of ancient like an ancient compass). You can of course use any other image you like in your project. Please copy and paste this image to your drawable folder as a resource file to use as a UI component. The name of the image is compass.png, we’ll use its name to access it in our code.
Figure 3.1. The compass Image
If we use sensors in an Android project, we have to get the required permissions to use these sensors in the AndroidManifest.xml file which is located in the manifests folder as shown below:
Figure 3.2. The AndroidManifest file in the project explorer
Open this file by double clicking on it in Android Studio and you’ll see its default contents as shown in Figure 3.3. Please add the lines shown in Code 3.1 to this file before the <application> tag and you’ll obtain the finalized contents as shown in Code 3.2. These lines make the accelerometer and magnetometer outputs available to be used in our app.
Figure 3.3. Default contents of the AndroidManifest.xml file
Now, let’s design the layout of the app. Please open the layout_main.xml file for this and change the text of the default Hello World TextView to Compass App which will serve as the app title. Please set its font size as 30sp and bold style. Then, please position it as follows:
Figure 4.1. The TextView used to display the title of the app
Let’s now place an ImageView in the middle of the GUI and select the compass image that we pasted to the drawable folder:
Figure 4.2. Selecting the compass image for the ImageView component
After we place the ImageView, it’ll be selected. Then, please set up its ID as iv_compass (short for ImageView_compass) from the right pane of Android Studio as follows:
Figure 4.3. Setting the ID of the compass ImageView
Finally, let’s place a TextView below the ImageView in which we’ll display the orientation angle in real time. I set its ID as tv_degrees (short for TextView_degrees), and made it 24sp with a bold text as shown below:
Figure 4.4. Adding the TextView to display the orientation angle
5.0 Writing the Main Code of the App
We completed the design of the user interface and now ready to continue with the coding. Please open the MainActivity.java file in Android Studio. This file will have the default contents as follows:
Code 5.1
The horizontal direction of a compass bearing is called as azimuth. We’ll calculate this angle from the magnetometer and accelerometer outputs. Let’s define a float type variable to hold this data:
Code 5.2
We also need to define objects related to the sensors as follows:
Code 5.3
In this code, the first object is a SensorManager object that is used to access the sensors. The other two declarations define Sensor objects for reading the outputs of the accelerometer and the magnetometer.
Finally, let’s declare ImageView and TextView objects which will be used to access the corresponding components in the GUI:
Code 5.4
We can place these declarations inside the MainActivity class just before the onCreate() method. Then, we can assign the default accelerometer and magnetometer sensors to their objects inside the onCreate() method as follows:
Code 5.5
After these declarations and assignments, the MainActivity.java file currently looks like Code 5.6.
Code 5.6
In order to continue with reading sensors, we have to implement SensorEventListener class. We do this by using the implements keyword in the main class definition as follows:
Code 5.7
Note that this is a single line code.
When we implement SensorEventListener class, Android Studio warns us by a red bulb saying that we need to implement the required methods in our code:
Figure 5.1. Warning for implementing the required methods
Please click the Implement methods and then Android Studio will automatically place the onSensorChanged() and onSensorActivityChanged() methods when we click the OK button in the dialog box:
Figure 5.2. Dialog showing the methods which will be implemented
Android Studio automatically places the following code to MainActivity.java:
Code 5.8
We’ll write our main code inside the onSensorChanged() method. However, before moving on to the main code, let’s write the onResume() and onPause() methods for the main activity because sensors are power hungry components therefore it is important to pause and resume the sensor listeners when the activity pauses and resumes. For this, we simply add the following code just below the end of the onCreate() method:
Code 5.9
In the onResume() method, the sensor listeners are registered meaning that the sensors are powered on again when the activity resumes. Similarly, the sensors are unregistered (disconnected) in the onPause() method when the activity pauses.
We’re now ready to write the main code. Firstly, let’s define two float type arrays to hold the accelerometer and magnetometer output data. These will be array variables because the outputs of these sensors are vectoral quantities i.e., they have different values for different directions.
We can define the arrays named accel_read and magnetic_read for these sensors as follows:
Code 5.10
Please write these declarations just before the onSensorChanged() method so that we can access these variables from anywhere in the onSensorChanged() method.
Inside the onSensorChanged() method: This method is called automatically when there’s a new sensor event therefore we’ll write our main code inside this method. The following code creates objects to access the ImageView and TextView of the GUI which will be updated when a sensor event happens:
Code 5.11
Then, the following code reads accelerometer and magnetometer sensors and stores the output data to accel_read and magnetic_read arrays:
Code 5.12
If the sensor outputs are available (i.e. they are not null), we’ll use the accel_read and magnetic_read variables in the method called getRotationMatrix() to get the rotation matrix R of the device as follows:
Code 5.12
If this operation is successful, the successful_read variable will be true and the rotation matrix will be stored in the variable R. In this case, we’re ready to get the azimuth angle (the angle between the device direction and the absolute north) as follows:
Code 5.13
In this code:
A new array called orientation is declared.
The orientation of the device is extracted using the getOrientation() method and 3-dimensional orientation data is stored in the orientation array.
The first component of this array is the azimuth angle in radians, which is assigned to the azimuth_angle variable in the fourth line.
In the fifth line, the azimuth angle in radians is converted to degrees and assigned to the newly created variable degrees.
The degrees variable is of float type therefore it is better to round it to an integer. The sixth code line does this job using the method Math.round().
Finally, the azimuth angle in integer degrees is shown in the TextView in the user interface. The char 0x00B0 is used to display the degree symbol (°).
It is also good to rotate the compass image according to the azimuth angle. For this animation, we need to declare a float type variable which will hold the current value of the ImageView’s rotation degree:
Code 5.14
Then, we can use the following animation code which will rotate the ImageView according to the azimuth angle:
Code 5.15
In this code, we declared a RotateAnimate object and then set the animation duration. The startAnimation starts the rotation of the ImageView. This code rotates the compass image in real time according to the degreesInt variable which holds the azimuth angle data.
Combining all these code lines, we reach the following MainActivity.java shown below:
If we try to run the app in an emulator, the compass will constantly show the north and the azimuth angle as 0 degrees. We need to try this app on a real device with a magnetometer and accelerometer inside (most Android devices have). Please build the app in Android Studio and install it on a real device. I tried this app on Asus Zenfone and it works as expected:
The purpose of this document is to discuss the history of a term for those who are studying computer system technology. The term that I am defining is “Cyber Security”. This document will explain why and how to enhance cybersecurity. Reducing model complexity, improve prediction accuracy and assess exploitability are the topic that will be explained throughout the document. Here, I am going to discuss the definitions of the term and discuss the contextual use of the term. At the end of this document, I am going to provide a working definition of the term that is relevant to the people who are studying computer system technology.
Definition:
The Oxford English Dictionary defines cybersecurity as “The state of being protected against the criminal or unauthorized use of electronic data, or the measures taken to achieve this.” Computer security, cybersecurity, or information technology security (IT security) is the protection of computer systems and networks from information disclosure, theft of or damage to their hardware, software, or electronic data, as well as from the disruption or misdirection of the services they provide. With associate degree increasing variety of users, devices, and programs within the trendy enterprise, combined with the accumulated deluge of information — a lot of that is sensitive or confidential — the importance of cybersecurity continues to grow. The growing volume and class of cyber attackers and attack techniques compound the matter even further. With an increasing variety of users, devices, and programs within the fashionable enterprise, combined with the exaggerated deluge of knowledge — a lot of that is sensitive or confidential — the importance of cybersecurity continues to grow. The growing volume and class of cyber attackers and attack techniques compound the matter even further. “In the last few years, advancement in Artificial Intelligent (AI) such as machine learning and deep learning techniques has been used to improve IoT IDS (Intrusion Detection System).” Reducing model complexity, improve prediction accuracy and assess exploitability are the topic that will be explained throughout the document. “In the last few years, advancement in Artificial Intelligent (AI) such as machine learning and deep learning techniques has been used to improve IoT IDS (Intrusion Detection System).” “Dynamic Feature Selector (DFS) uses statistical analysis and feature importance tests to reduce model complexity and improve prediction accuracy.” Using normal human selection is a lot slower and have higher feature size. Whereas dynamic feature selector is the only way to go. The energetic and intelligent highlights of programming dialects are powerful develops that software engineers regularly say as amazingly valuable. However, the capacity to adjust a program at runtime can be both a boon—in terms of flexibility—, and a curse—in terms of device back. For occasion, utilization of these features hampers the plan of sort frameworks, the precision of inactive investigation tech- neq, or the presentation of optimizations by compilers. In this paper, we perform an observational consider of a expansive Smalltalk codebase—often respected as the poster- child in terms of accessibility of these features—, in arrange to evaluate how much these features are really utilized in hone, whether a few are utilized more than others, and in which sorts of ventures. In expansion, we performed a subjective investigation of a agent test of utilizations of energetic highlights in arrange to reveal the principal reasons that drive individuals to utilize energetic highlights, and whether and how these energetic highlight utilized.
Context:
The Internet of Things has a great influence over system which have attracted a lot of cybercriminal to do malicious attack and open an end node to attack continuously. To prevent huge data loss, it is crucial to detect infiltration and intruders. Reducin0g model Complexity and improving prediction accuracy can do the work. Machine learning and Deep machine learning are helping the matter of detecting intruder. “Abstract Machine learning algorithms are becoming very efficient in intrusion detection systems with their real time response and adaptive learning process.” Statistical analysis and feature importance tests can be used to reduce model complexity and improve prediction accuracy. This is where dynamic feature selector comes to rescue. DFS showed high accuracy and reduce in feature size. “For NSL-KDD, experiments revealed an increment in accuracy from 99.54% to 99.64% while reducing feature size of one-hot encoded features from 123 to 50. In UNSW-NB15 we observed an increase in accuracy from 90.98% to 92.46% while reducing feature size from 196 to 47.” The new process is much accurate, and less feature are required for processing.
Working Definition:
Based on the definition and quotes that I discussed about the term cyber security it is related to the major computer system technology. As per my understanding, in machine learning, model complexity often refers to the number of features or terms included in each predictive model, as well as whether the chosen model is linear, nonlinear, and so on. It can also refer to the algorithmic learning complexity or computational complexity. Accuracy is defined as the percentage of correct predictions for the test data. It can be calculated easily by dividing the number of correct predictions by the number of total predictions. An exploit is any attack that takes advantage of vulnerabilities in applications, networks, operating systems, or hardware. Exploits usually take the form of software or code that aims to take control of computers or steal network data.
Reference:
Alazab.A., & Khraisat.A.(2021), Cybersecurity, A critical review of intrusion detection systems in the internet of things: techniques, deployment strategy, validation strategy, attacks, public datasets and challenges, 4, Article number: 18(2021).
Ahsan.M., Gomes.R., Chowdhury.M.M., & Nygard.K.E.(2021), Enhancing Machine Learning Prediction in Cybersecurity Using Dynamic Feature Selector, J. Cybersecur. Priv. 2021, 1(1), 199-218.
Ahsan.M., Gomes.R., Chowdhury.M.M., & Nygard.K.E.(2016), Len.oxforddictionaries.com was first indexed by Google in September 2016 Prediction in Cybersecurity Using Dynamic Feature Selector, J. Cybersecur. Priv. 2016, 1(3), 199-216.