Professor Lara Antal | COMD1123, D038 | Fall 2023

Category: Course Activities (Page 2 of 3)

9. Armature in Motion

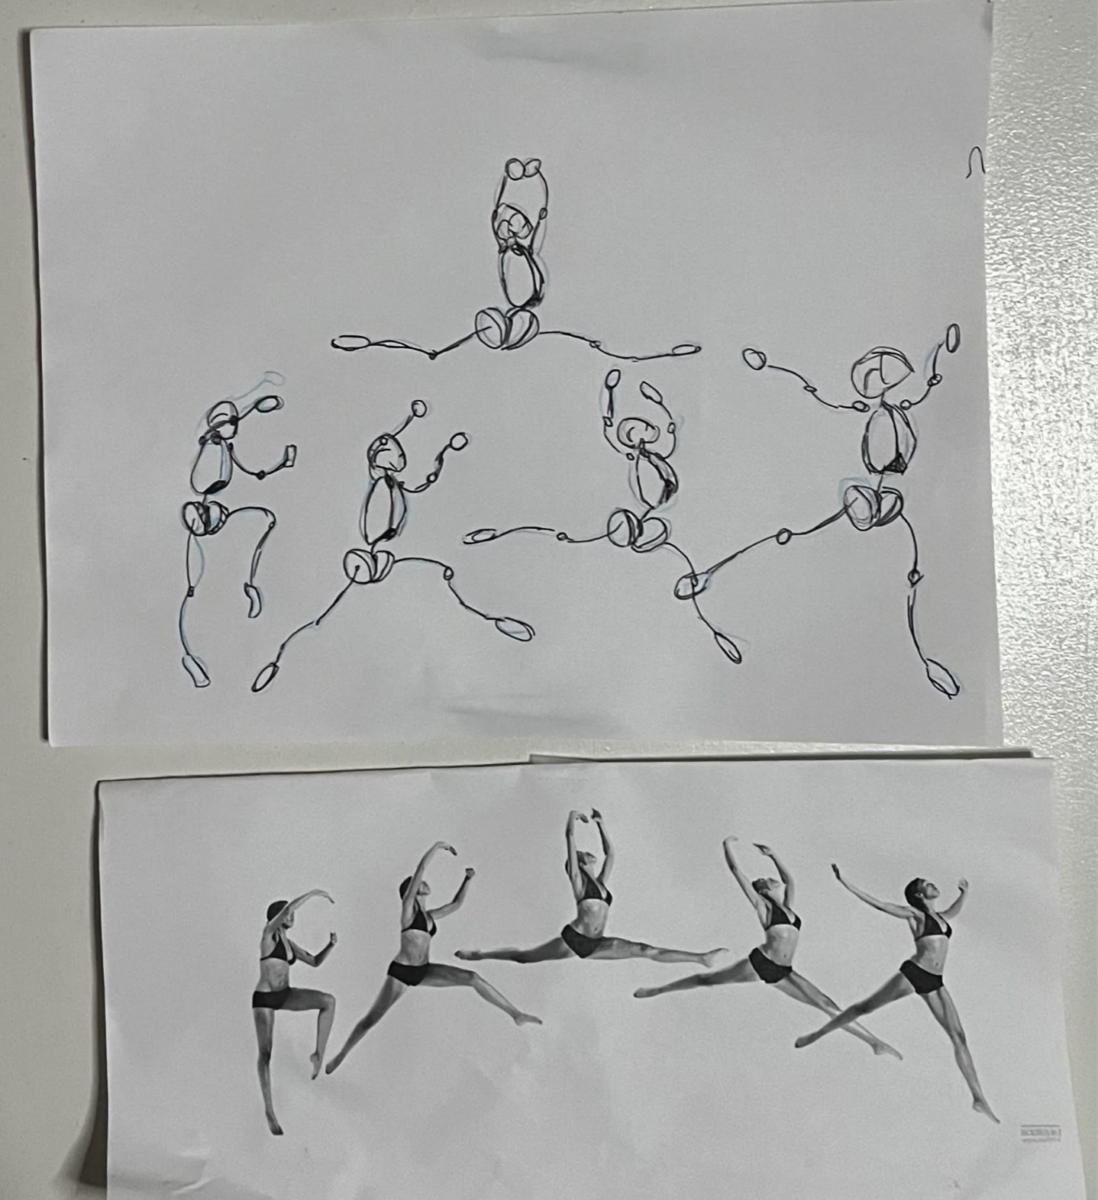
Fill 4 pages in your sketchbook, each page dedicated to a sequence of motion (4x types of motion in total.) This could be an ice skater, a boxer, someone hitting a baseball bat, etc. (google the phrase “motion sequence of a…” to find references.)

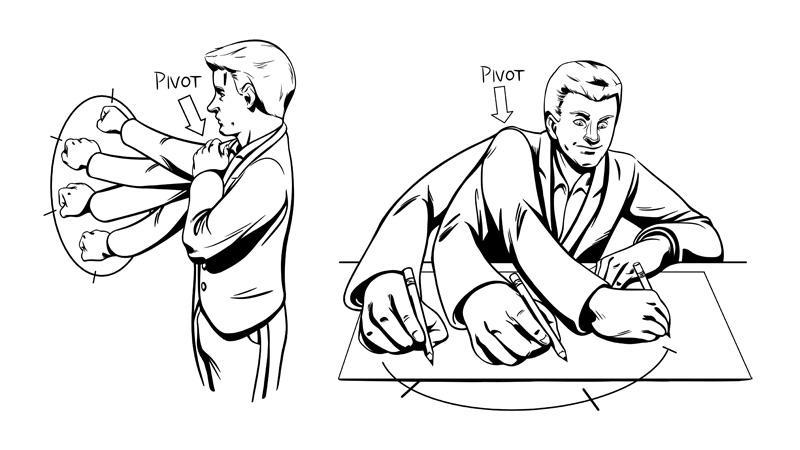
Draw at least 3 images from these sequences, drawing the figure as armatures. Look at the structure of each pose, the key anatomical landmarks, and how the weight is distributed in the figure. Make this as accurate as possible!

TIPS:

  • Print out your reference. Feel free to mark the printout with the anatomical landmark points.
  • Try to pick the most dynamic poses of the movement.

8th Week | OCT 19

BRING TO CLASS: Midterm Portfolio, Midterm Sketchbook, Sketchbook Assignment 7

Today we are taking our in-class midterm!

Students must complete the written and drawn portions to receive a grade.

We will also be handing in our midterm portfolios & midterm sketchbooks.

Class ends early after completing in-class work.

DUE NEXT WEEK:

Nothing, enjoy!

7th Week | OCT 12

Bring to Class: Assignment 6 

WARM UP: Morning Still Life

ACTIVITY: Commute Drawing
Sketch something you remember from your commute: an image, fellow commuters, or the physical space you were in. Anything that stuck in your brain. Draw from memory to the best of your ability.

ASSIGNMENT 6 CRIT: Spooky Self-Portrait

15 min Break

Lecture: The 5 Perceptual Skills of Drawing: The Whole Form
Pass out the study guide.

ACTIVITY: Sketch a Skeleton

  • Draw using only contour lines
  • Draw skeleton & background
  • Draw ONLY the negative space
  • Draw ONLY the shadows on the form
  • Draw from a toned paper

DUE NEXT WEEK:

  • MID-TERM SKETCHBOOK is due next week.
  • MID-TERM PORTFOLIO is due next week.

    Prepare 5-7 DRAWINGS to hand in as your Mid-term portfolio. Make any adjustments or improvements to better the work (and your grade!)

    Must be handed in as a flat bundle: in a portfolio or envelope.


MIDTERM

Exam:

Your Midterm consists of a Written and a Drawn Portion. 

The Written Portion we reviewed during class. 

The Drawn Portion is one still-life drawing, drawn to the best of your ability.

Mid-Term Sketchbook:

Be sure you have completed all previous weeks’ sketchbook prompts and feel free to include additional sketches.

Mid-Term Portfolio:

This is a curated portfolio of 5-7 DRAWINGS of your best work. This can be homework assignments or in-class drawings.

Take this as an opportunity to improve drawings. Go with quality over quantity. Be sure the work looks neat – presentation counts!

The work MUST be bundled together, either in a portfolio ( like this option) or an envelope.  Be sure your name is on your portfolio.

I will NOT accept LOOSE PAPERS.

6th Week | OCT 4

Bring to Class: Sketchbook - Quiz | Assignment 5 - Simple Forms with Value

WARM UP: Morning Still Life

Discuss:

  • Last week’s recap. Go over in-class exercises, value scales, simple forms.

Video: Vincent Bal – Shadowology , John Muntean – Shadow Sculptures

ACTIVITY: Break into groups. Stage a shadow still life by using a direct light source and cast a shadow. Draw the shadow, either as a contour outline or shaded form, and use that shape as the base for your own whimsical creation!

ASSIGNMENT 5 CRIT: Simple Forms with Value

  • Review pre-visualization thumbnails: composition and value sketches.
  • Review drawings

Break 15 min

Lecture: Light & Shadow

Video: Seeing Light & Shadows in Everyday Life

DEMO: Charcoal Techniques

  • Carve with your wand (compressed charcoal)
  • Toned paper (vine charcoal & tissue)
  • Texture
  • Taping off edges

ACTIVITY: Sketch a Skeleton

  • Draw ONLY the negative space
  • Draw ONLY the shadows on the form
  • Draw from a toned paper

DUE NEXT WEEK:

  • Sketchbook: NONE – hand in your sketchbook to grade quizzes 
  • Drawing Assignment – Week 6: Spooky Self-Portrait

6. Spooky Self-Portrait

Drawing Assignment Week 6

It’s officially October so it’s time to see ourselves in a spookier light… literally.

Using 18″x 24″ drawing pad and charcoal, create a self-portrait drawn from life that utilizes a direct light source. Use your light to create a dramatic or scary portrait.

First, set up your lighting using a lamp, flashlight, selfie ring light, etc.

Next, using a mirror, draw yourself from life. Use your charcoal to create a full range of values. Describe the details of your face and the unique shadows the light casts. Be specific, we want to see how YOUR face looks under these bold lighting conditions.

TIPS:

  • Try to block out ambient light sources. Turn off the lights, close the blinds, etc. to make the direct light source more effective.
  • GO SLOW to try and capture details, highlights, and shadows.
  • No white backgrounds! Create a soft background or use tones.
  • Try toning the paper and erase to create soft highlights.
Get Spooked with Classic Horror Movies on FilmOn TV
Boris Karloff in Frankensein (1931)
Vincent Price in The Bat (1959)
Janet Leigh in Psycho (1960)
Кадр из фильма «Ночь живых мертвецов»
Duane Jones in Night of the Living Dead (1968)
A Girl Walks Home Alone at Night' Defangs the Patriarchy
Sheila Vand in a Girl Walks Home Alone at Night (2014)

Gustave Courbet's “The Desperate Man” Is the Ultimate Self-Portrait of the  Artist as Mad Genius | Artsy
Gustave Courbet, The Desperate Man, 1843–45

Of interest:
Lighting in Horror Films – brief article & video

5th Week | SEPT 28

BRING TO CLASS:
Assignment 4 - Self-Portrait Through Objects

Value & Simple Forms

WARM UP: Morning Still Life

Discuss:

  • The progress of your take-home quiz. Any questions, or issues?
  • The reading Porpotions: Taking the Measure of Things. What is drawing from the midpoint? How do you draw using plumb and level? How did you measure in your drawing assignment?

ASSIGNMENT 4 CRIT: Self-Portrait with Objects

Discuss: Simple forms inherit in complex objects. Reference image below.


ACTIVITY: Warm-ups & Simple Forms

Lecture: The 5 Perceptual Skills of Drawing: Perception of Shadow & Light

  • What is Value?
  • Why is Value so important?
  • Value Scales & Shading Simple Forms
  • Observing Light and Shadow

Video: Art Institute of Chicago – Light & Shadow

ACTIVITY: Create 5 Value Scale

ACTIVITY: Practice Using the 5 Value System to render 3 dimensional forms. Use class props for reference.  Try Cubes, Spheres, Prisms, and oblongs. Try moving the Light source as well.

ACTIVITY: Start working on the Simple Forms with Value assignment.

  • Set up a specific still life with a light source.
  • Create the two thumbnails in your sketchbook, one for composition, one for value. Make sure these are complete before moving on to the final drawing.

DUE NEXT WEEK:

5. Simple Forms with Value

Drawing Assignment - Week 5


IN CLASS:
Set up a still life using the simple forms in the drawing classroom. Give them a light source.

While in class, create two sets of thumbnails and notes in your sketchbook. These will serve as your reference for your assignment.

  1. Composition: lay out the shapes and negative space of the drawing.
  2. Shadows & Light: Indicate where the shadow and light hit the forms. BE SPECIFIC, since these qualities will change in relationship to each other.


HOMEWORK:

Use 18″x 24″ drawing pad and charcoal.

This drawing should encompass a full range of values: from light to dark. Reference the value scale you made in class.

Render composition of simple forms, with a distinct light source. Include the background and surface they are sitting on, taking advantage of negative and positive space.

TIPS:

  • Try Lightly TONING your drawing paper before beginning your drawing to a middle value.
  • SPRAY the 2 drawings with Workable Fixatiff Spray when complete so they don’t smudge!

Warm-ups & Simple Forms

In-class exercises based on Simple Forms post.

  1. Draw from the shoulder.
    Grab your pencil and do some circles with your arm, pivoting from the shoulder. Get a feel for it.
Shoulder Rotation

2. Lines

  • Start by drawing a series of parallel lines equally spaced. Draw from your shoulder, and don’t focus on the line as you make it, focus on the motion.
  • Next, draw a group of offset parallel lines. Draw about four or five parallel lines, then draw another grouping rotated in a random direction. Then do it again. Keep the offset groupings close to one another, touching if possible.
  • The final variation is an unbroken, looping line. As you draw, alter the trajectory of the line while maintaining regular loops. Try and think about the line as an object that exists in three-dimensional space.

3. Circles

  • Try to produce a curve that is completely equidistant from an imagined center point at the heart of the circle. You may be tempted to draw quickly, which is fine. However, you might find it beneficial to actually slow down and make your mark more deliberately. Don’t worry if your circle isn’t perfect.
  • Next, draw many circles of vastly different sizes. It’s fine if they overlap. You may notice that by jumping at random between drawing small circles and large ones that your control of the motion increases over time
  • Finally, try drawing concentric circles. You’ve already practiced size control so your focus should be on equal spacing between the layers of circles as you draw. Don’t get discouraged if you have difficulty- it’s a challenging exercise!
Warm-up Exercise 2: Circles

4. Ovals
 Drawing an oval is just like drawing a circle except you make two “sides” closer in distance to the imagined center. It’s best that you think of ovals as circles rotated in space.

  • Draw multiple ovals of varying sizes and widths. Bisect your circle between it’s thinnest and thickest axes. This will show you the center point and the change in spacing as the far edge of the circle recedes in space.
  • You can also try drawing squares in space, bisect them, and draw ellipses.
Warm-up Exercise 3: Ovals

5. Cylinders

  • Begin by drawing an oval (the thickness of the oval is up to you). This is the end of the cylinder that faces you. Like a can of soup!
  • Next, add two lines for the sides of the cylinder.
  • The lines of the “can” will not be parallel unless you are looking directly from the side. The more extreme the pitch of the can away from you, the sharper the angle of the lines that form the sides of the can.
  • The last element is a curve that terminates the other end of the cylinder.
  • Practice drawing many cylinders of varying sizes. Change the pitch of the can by changing the appearance of the facing side (oval width).
Warm-up 4: Cylinders

6. Cubes

  •  Start by drawing a square turned away from you in space. Regardless of the angle of the side, one edge will be closer to you than the rest. Use that as your starting point.
  • Draw the remaining four edges that form the square and remember that parallel lines actually appear to converge on an imaginary point in the background. Edges that are farther away from you will appear smaller than edges that are closer to you.
Warm-up 5: Cubes

7. Compound Objects
Draw several groupings of basic shapes that relate to one another in space. Whereas in previous exercises it was fine to draw through your sketches, try to avoid doing so now (it defeats the purpose).

Choose a variety of shapes- spheres, cubes, cylinders- and rotate them various ways before drawing them in overlapping positions. Be deliberate and remember that as objects recede from you they get smaller. More than anything this is a thinking exercise.

Warm-up 6: Compound Objects

4. Self-Portrait Through Objects

Drawing Assignment - Week 4

Use 18″x 24″ drawing pad and charcoal.

Create a drawing with a thoughtful composition of carefully chosen objects that represent you.

  • Frame your composition.  
  • Decide on a unit of measurement on which to base the proportions in the drawing.
  • Compose the page.  
  • Consider the compositional concepts such as Balance, Rhythm, Symmetry, and Asymmetry. 
  • Use a variety of line weights to describe the forms.  
  • Consider how the forms interact with each other in space – overlap, foreshortening, and perspective.

This drawing should try to incorporate all the lessons we’ve discussed!

« Older posts Newer posts »

© 2024 Foundation Drawing

Theme by Anders NorenUp ↑