Professor Lara Antal | COMD1123, D038 | Fall 2023

Category: Sketchbook

Share pages from your weekly sketchbook practice here.

11. One-Point Perspective Plans

In your sketchbook fill 3 pages with the following drawings. The images below illustrate how to build the drawing step by step, but you just need one finished drawing per page.

The Bird’s Eye Buildings:

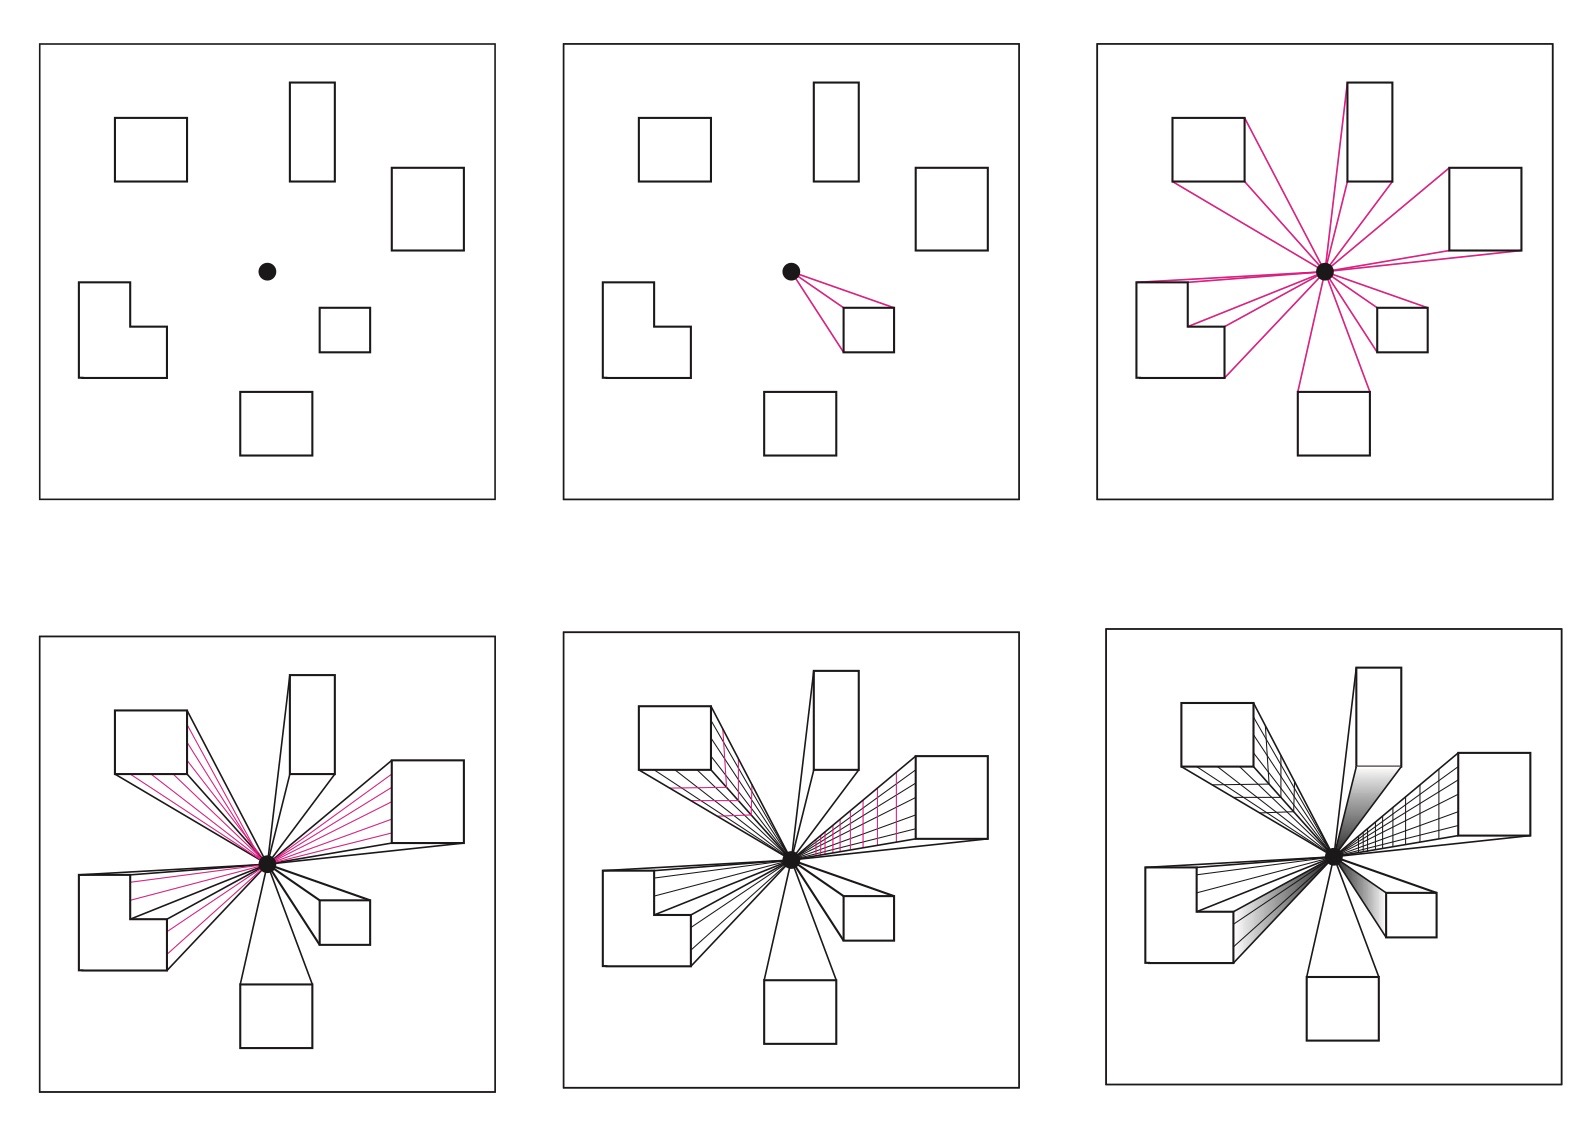
Add squares and rectangles around the vanishing point in the center of the paper.  

Begin with the square or rectangle closest to the vanishing point. Draw tangent lines from the corners of the square to the vanishing point.

  • If buildings run into each other, stop or erase overlapping parts.
  • Add shading, or value, to your buildings. The darker values will be closer to the vanishing point.
  • The original shapes will be the tops of the buildings, so you can add objects, like pools or helicopter pads as if you are looking at them from above. For example, a pool would look like a rectangle.
  • Try making an “L” shape in perspective. Does it change the process? Do you add more lines to the vanishing point?

The Landscape:

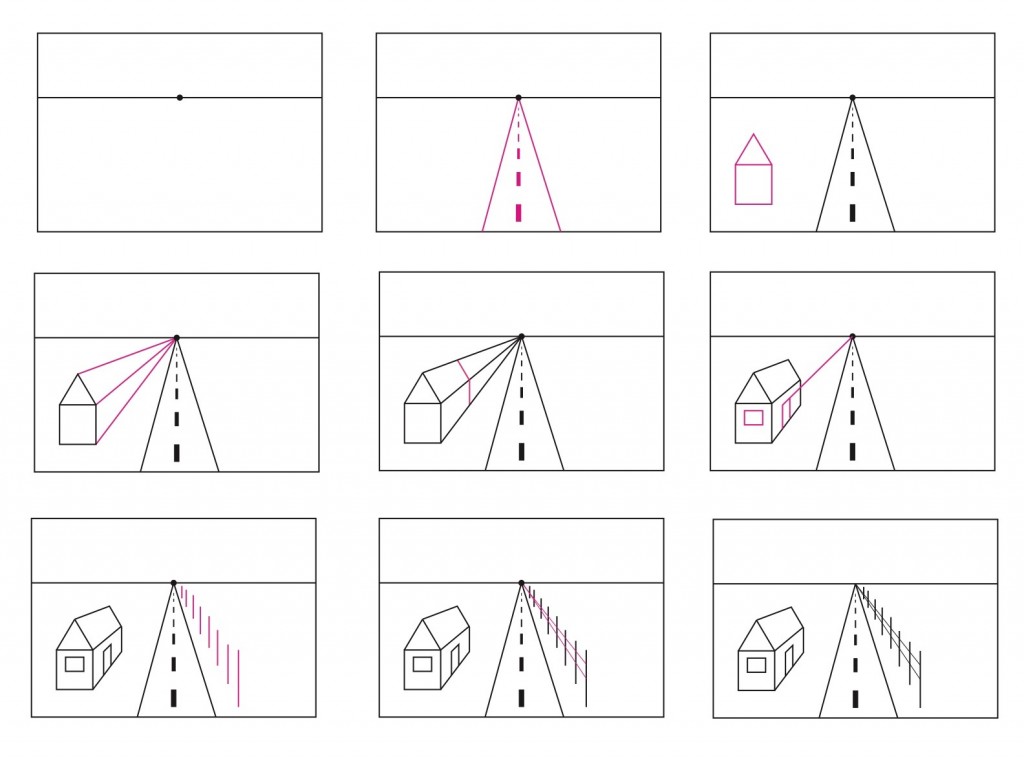
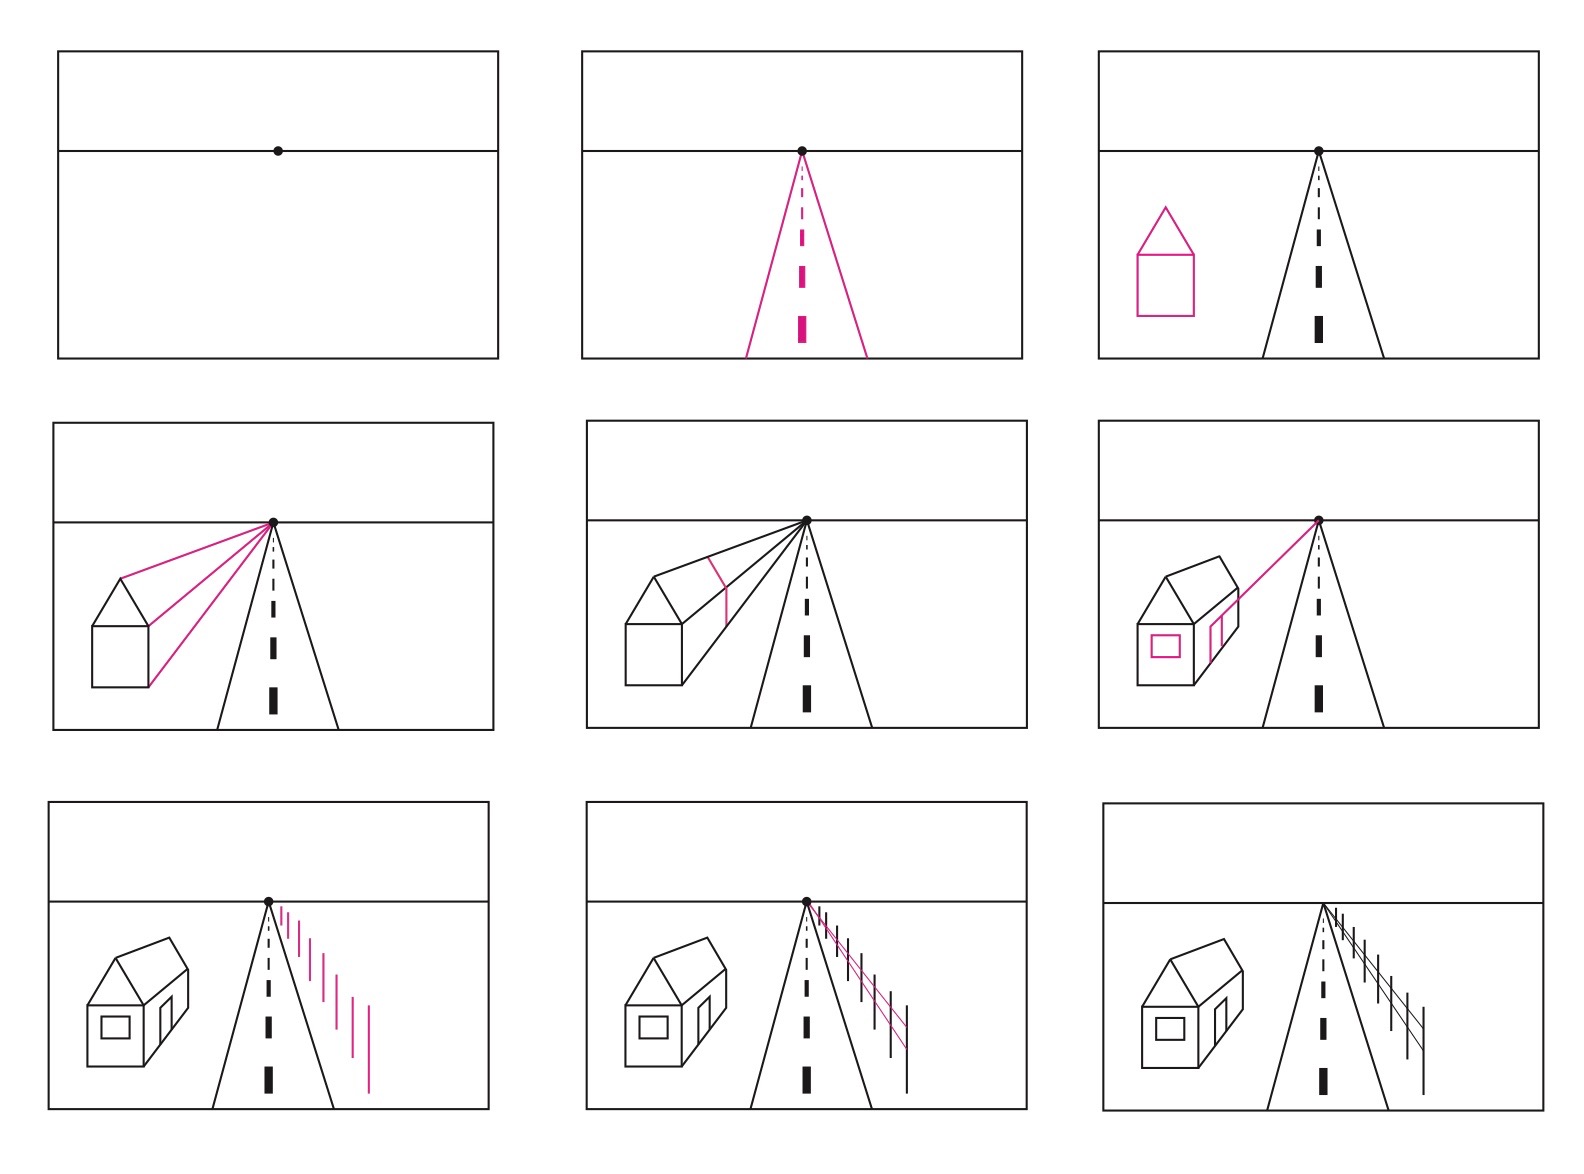
Drawn a horizontal line across the top third of the paper. In the middle place a vanishing point.

  • To make a road, lines should start at the bottom of the page and meet at the vanishing point.
  • Dividing lines in the road should be larger and further apart when they are lower on the paper and get smaller and closer together as they reach the vanishing point.
  • Houses start with squares and rectangles and their sides should go to the vanishing point. They should then be cut down using right angles.
  • Try overlapping the shapes.
  • Street lights, fences, or power lines should be parallel to the edge of the paper, or straight up and down. These should also gradually get shorter and closer together as they reach the vanishing point. If they have lines attaching the poles together, like a fence or power lines, the horizontal portions of those objects should go toward the vanishing point.

The Room:

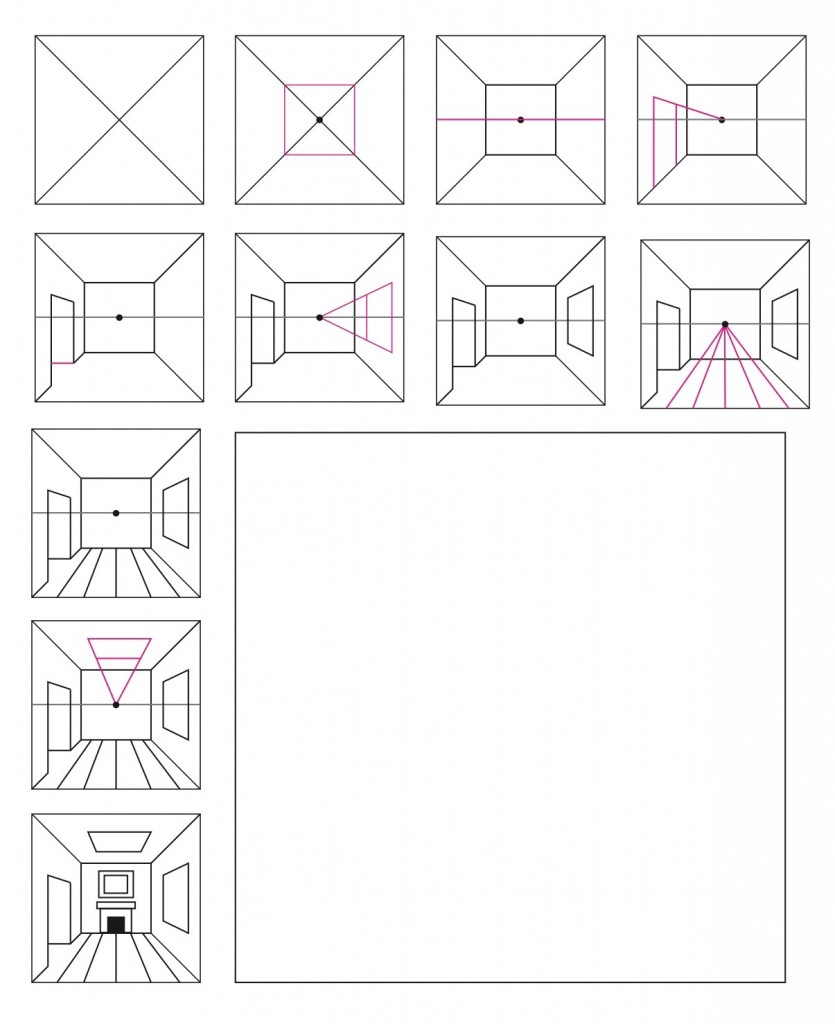
The middle square or rectangle represents the back of the room or hallway. Whatever you draw on that square should appear as if you are looking directly at it. Those objects will not need the vanishing point.

  • Everything on the walls, ceiling, or floor will line up to the vanishing point.
  • Anything below the horizon line will include lines moving up toward the vanishing point.
  • Anything above the horizon line will include lines moving down toward the vanishing point.
  • Vertical Lines should be parallel to the edge of the paper or straight up and down.
  • Horizontal Lines use the vanishing point to keep them in perspective.

10. Line of Action

Fill 4 pages in your sketchbook of full body dynamic poses, the line of action drawn in another color. These poses can serve as a reference for you, so pick a variety of body types and poses that seem interesting to you.

9. Armature in Motion

Fill 4 pages in your sketchbook, each page dedicated to a sequence of motion (4x types of motion in total.) This could be an ice skater, a boxer, someone hitting a baseball bat, etc. (google the phrase “motion sequence of a…” to find references.)

Draw at least 3 images from these sequences, drawing the figure as armatures. Look at the structure of each pose, the key anatomical landmarks, and how the weight is distributed in the figure. Make this as accurate as possible!

TIPS:

  • Print out your reference. Feel free to mark the printout with the anatomical landmark points.
  • Try to pick the most dynamic poses of the movement.

4. Take-Home Quiz

This “quiz” is really a packet of work you are responsible for doing in your sketchbooks by October 5th.  

You will not have to do your sketchbook pages for the next two weeks.  If you are behind in your sketchbook… NOW is a good time to catch up!

Read the whole packet.  Do Projects 1 A – 1 F in your sketchbook. Fill out the SELF assessment page.

You will hand in your sketchbook to me for grading on October 5th.

You have a printed packet, but below is the PDF as well.

3. Close-up Comps

Sketchbook - Week 3

4 pages, at least 8 compositions.

Frame each thumbnail in a bounding box.

Draw a cropped/focused/isolated part of this object.

Focus on interesting details, on the unique contours, or simplify shapes to abstract the form.

Use the object as inspiration for creating well-thought-out compositional use of space.

Sketchbook Practice

Students are required to draw a minimum of 2 hours (30 min per page) for a total of 4 sketchbook pages per week. However, students may draw more than the 4 required pages.

The sketchbook should also be used to keep relevant notes. Students are encouraged to illustrate concepts and vocabulary from class.

Sometimes a theme will be supplied, if no theme is supplied just draw from careful observation of the world around you.

Sketchbook requirements:

  • 4 pages per week, at least 2 hours worth of work
  • Pages must be dated
  • Notes and drawings must reflect the weekly topic
  • No pages can be ripped out

2. Very Boring Things

Sketchbook - Week 2

This week’s sketchbook theme is… Very Boring Things!

Consider the BORING everyday things you use in your life.  Brushes, Dental Floss, Toilet paper, Can Openers, Hair Gel, Spoons… All of the THINGS that you handle and use without thinking about them.

Fill 4 sketchbook pages with drawings of at least 8 objects. This is an exercise in observing detail.

TIPS:

  • What makes the design of this object unique from others like it? What shapes, textures, patterns, or branding are specific to this object?
  • Try drawing the object from unexpected angles to make it more interesting.

1. Meet the Artist

Sketchbook - Week 1

This week’s sketchbook theme is… Meet the Artist!

Page 1: #meettheartist

Create a meet the artist page for yourself in your Sketchbook! Look on Instagram or fb for #meettheartist and then design one to introduce yourself.  You may use any media and style you feel is appropriate!  You may choose to include any information about yourself you wish.

This is about letting your personality shine through, so use the details to say a lot!

TIPS:

  • Design. How will you organize your information? A written list, color-coded blocks, or something more pictorial like a picture frame? Make this legible, but fun!
  • Pose and body language. Would you be sit or stand, stand up straight or slouch? Do you carry a backpack, flash the peace sign, or brush your hair? Pick a pose that feels very “you.”
  • Written vs spot illustration. What things will you choose to write, versus illustrate? The most important drawing is your self portrait, however, feel free to make small illustrations of objects, icons, or whatever helps describe you!

© 2024 Foundation Drawing

Theme by Anders NorenUp ↑