Professor Lara Antal | COMD1123, D038 | Fall 2023

Author: Lara Antal (Page 1 of 5)

14th Week | DEC 7

Bring to Class: Drawing Assignment 11 | FINAL Portfolio | FINAL Sketchbook

WARM UP: Morning Still Life

CATCH-ALL CRIT: Critique our Kitchen Drawings and any other work that hasn’t been peer-reviewed.

DISCUSS: Final Project, we will review your sketches, source materials, and drawings. This is an opportunity to get your classmates’ feedback before moving on to the final image.

WORK on the final project in class.

DUE NEXT WEEK:

  • Final Project: The final drawing is due, along with the pre-visualization materials you used to create it.

13th Week | NOV 30

Bring to Class: Assignment 11 | Sketchbook 11

WARM UP: Morning Still Life

ACTIVITYFinal Figure Drawing! In addition to drawing the model as we see them, we will try different drawing approaches:

  • Continuous Contour
  • Drawing ONLY the shadows
  • Drawing the negative space

Drawing times:

  • 6x â€“ 30 seconds
  • 5x â€“ 1 minute
    BREAK
  • 2x â€“ 3 minutes
  • 3x â€“ 5 minutes
    BREAK
  • 2x –10 minutes
    BREAK
  • 1x – 20 minutes

DISCUSS: Final Project

DUE NEXT WEEK:

  • Sketchbook: Finish any remaining assignments for your FINAL SKETCHBOOKS
  • Drawing Assignment: Finish any remaining assignments for your FINAL PORTFOLIO
  • Final Project: Bring in sketches, source materials, and drawings to work on in class.

FINALS

Final Project- Due December 14th:

This will be due on the final day of class.

PDF here:


Final Sketchbook- Due December 7th:

Be sure you have completed all previous weeks’ sketchbook prompts and feel free to include additional sketches.


Final Portfolio- Due December 7th:

This is a curated portfolio of 5-7 DRAWINGS of your best work. This can be homework assignments or in-class drawings, but they must be NEW OR IMPROVED from the pieces selected at mid-term.

Take this as an opportunity to improve drawings. Go with quality over quantity. Be sure the work looks neat – presentation counts!

The work MUST be bundled together, either in a portfolio ( like this option) or an envelope.  Be sure your name is on your portfolio.

I will NOT accept LOOSE PAPERS.

12th Week | NOV 16

Bring to Class: Assignment 11 | Sketchbook 11

WARM UP: Morning Still Life

Discuss Go over last week’s class, review perspective

MASH-UP CRIT: Place any work that has yet to be critiqued on the wall. Each student will choose another student’s work and speak to the following:

  • What is one thing the artist did effectively?
  • What is something appealing about the drawing?
  • What advice would you offer to improve the drawing?

ACTIVITY: Drawing the Halls
Take your drawing pad or sketchbook into the halls of City Tech and find an area that exemplifies perspective. Make sure this area covers some distance and your drawing can include objects in the foreground, middle ground, and background. Aim to represent depth and space through value and line weight.

Draw this scene from life for 40 minutes and return to class.

ACTIVITY CRIT: Share your hallway drawings and discuss.

DUE NEXT WEEK:

11th Week | NOV 9th

Bring to Class: Assignment 9 & 10 | Sketchbook 9 &10

WARM UP: Morning Still Life of cubes, until 8:30 am

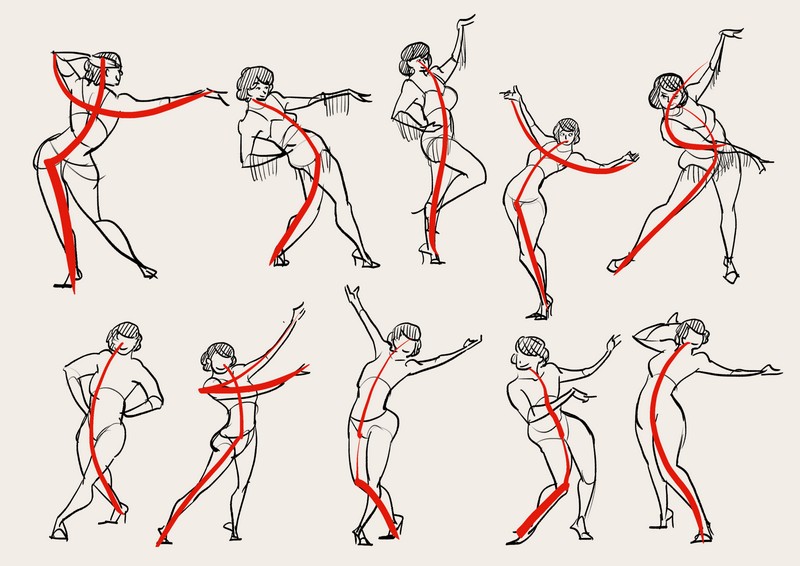
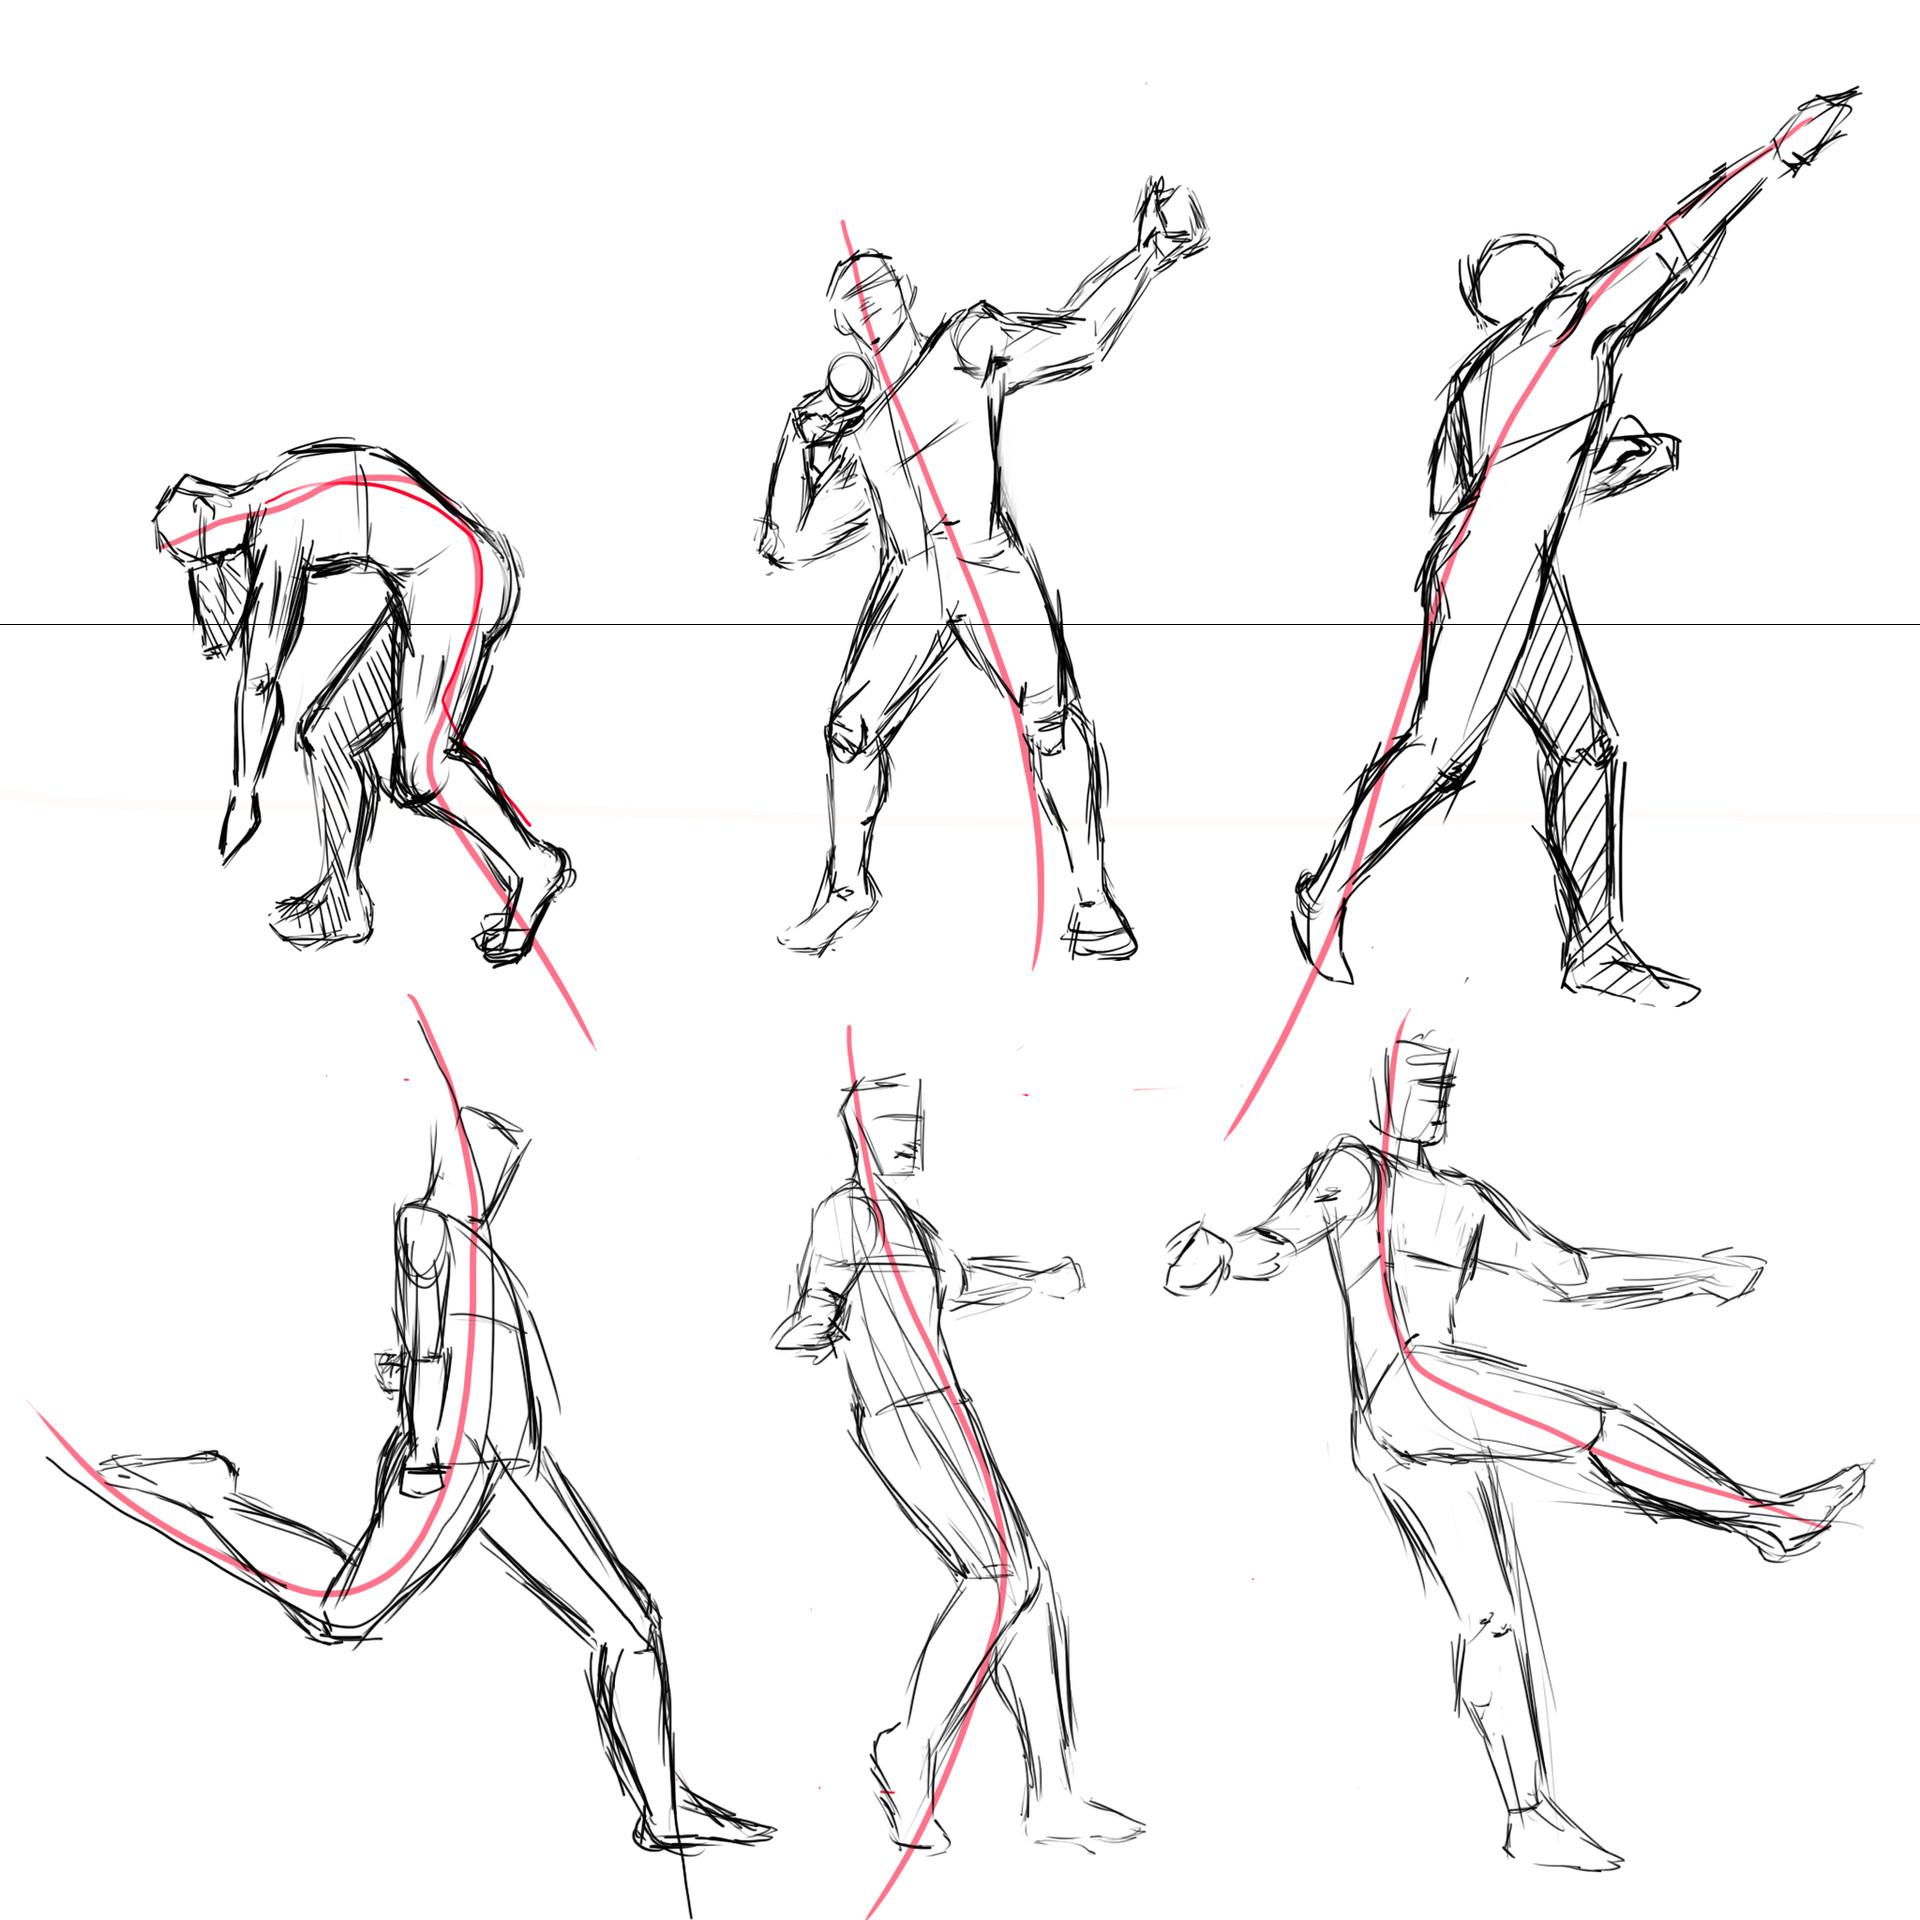
SKETCHBOOK 9 + 10 CRIT:  Armature in Action & Line of Action

Round 1:

  • Lay your sketchbook on a table, opening it to an ARMATURE IN ACTION sketch.
  • Then, go to the blackboard and write the name of the action you drew.
  • Before critiquing each sketch, guess which action is being illustrated.

Round 2:

  • Lay your sketchbook on a table, opening it to a LINE OF ACTION sketch.
  • Then, go to the blackboard and write the name of the action/type of pose you drew.
  • Before critiquing each sketch, guess which action is being illustrated.

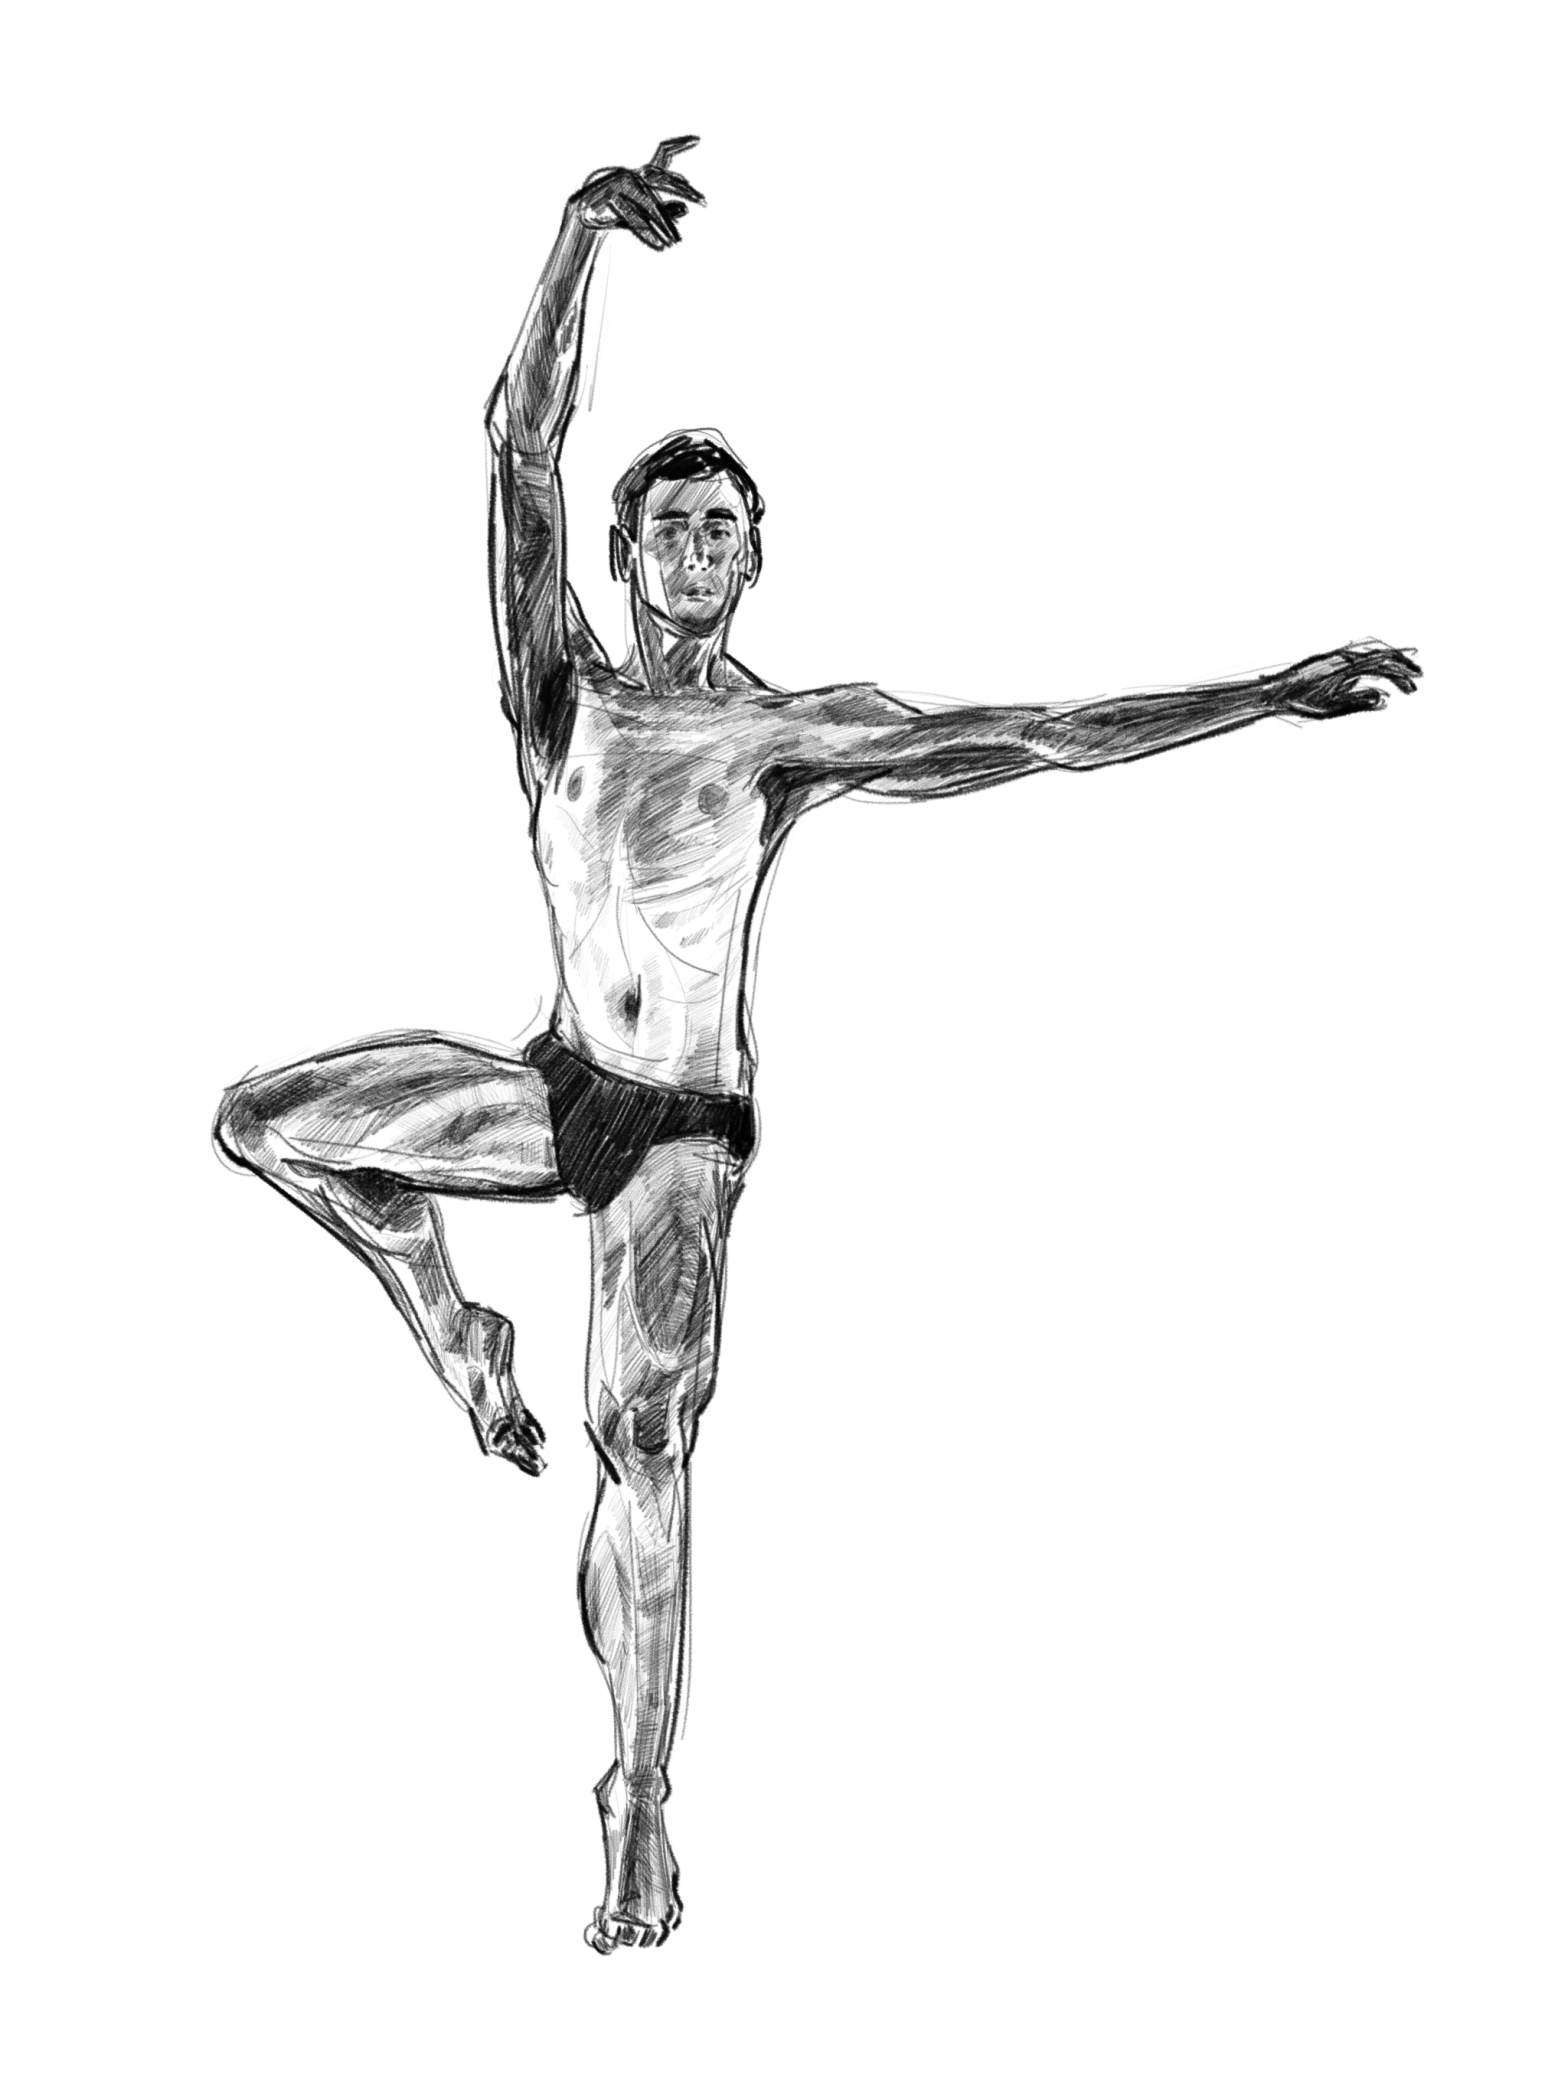
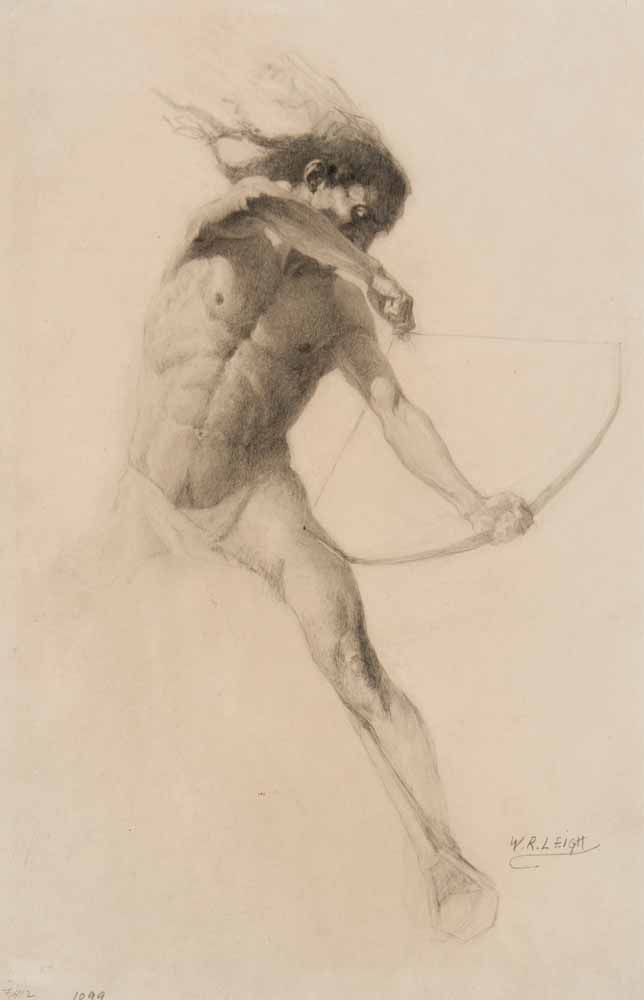
ASSIGNMENT 9 + 10 CRIT:  Nobody Puts Baby in the Corner & Power Poses
Hang your drawings side by side so they can be critiqued simultaneously.

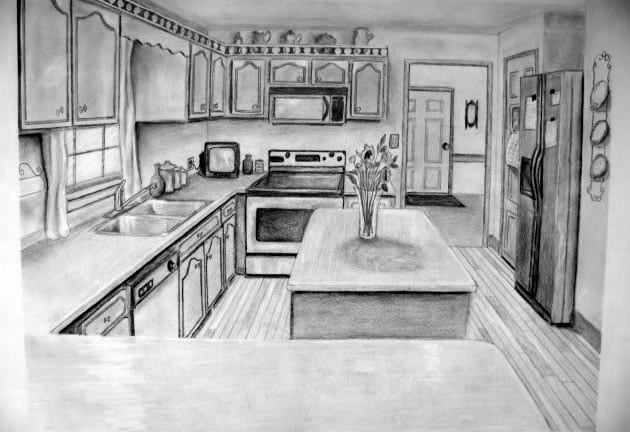
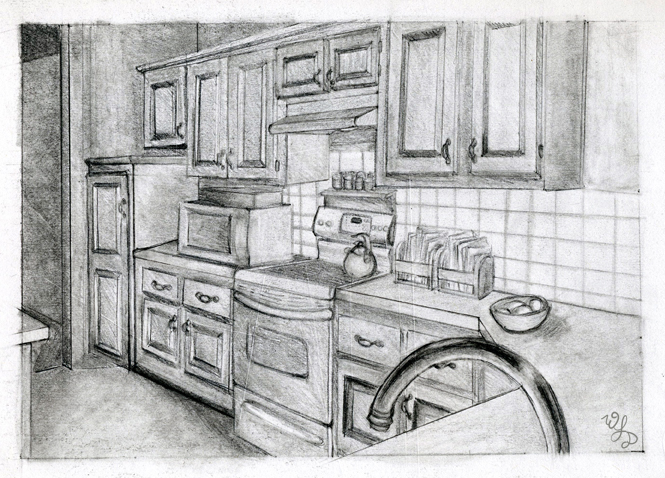
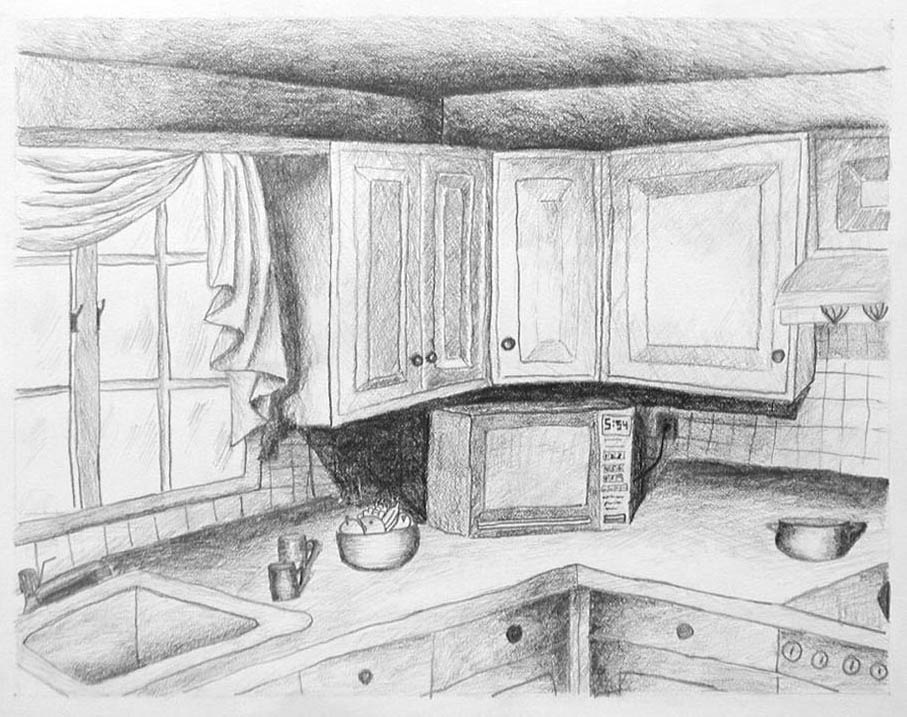
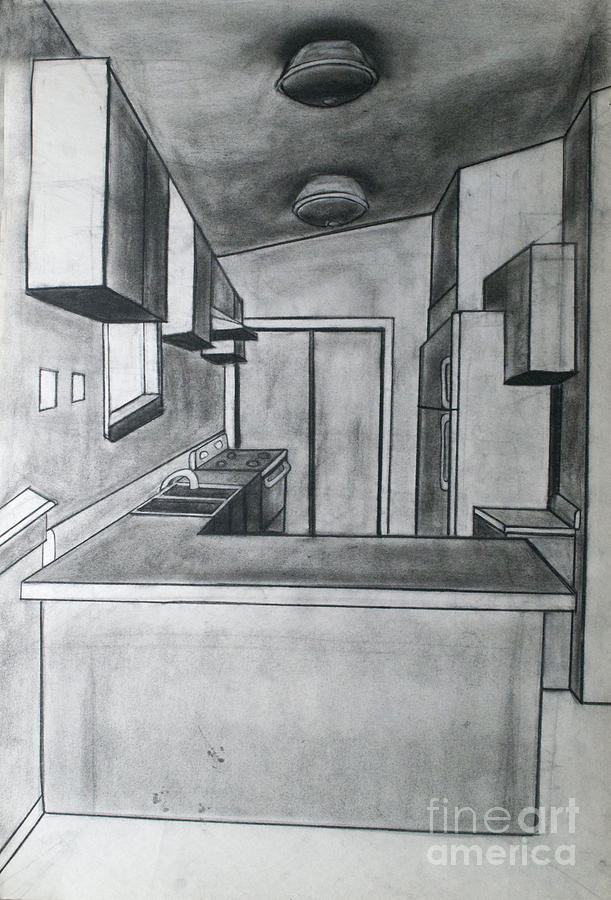
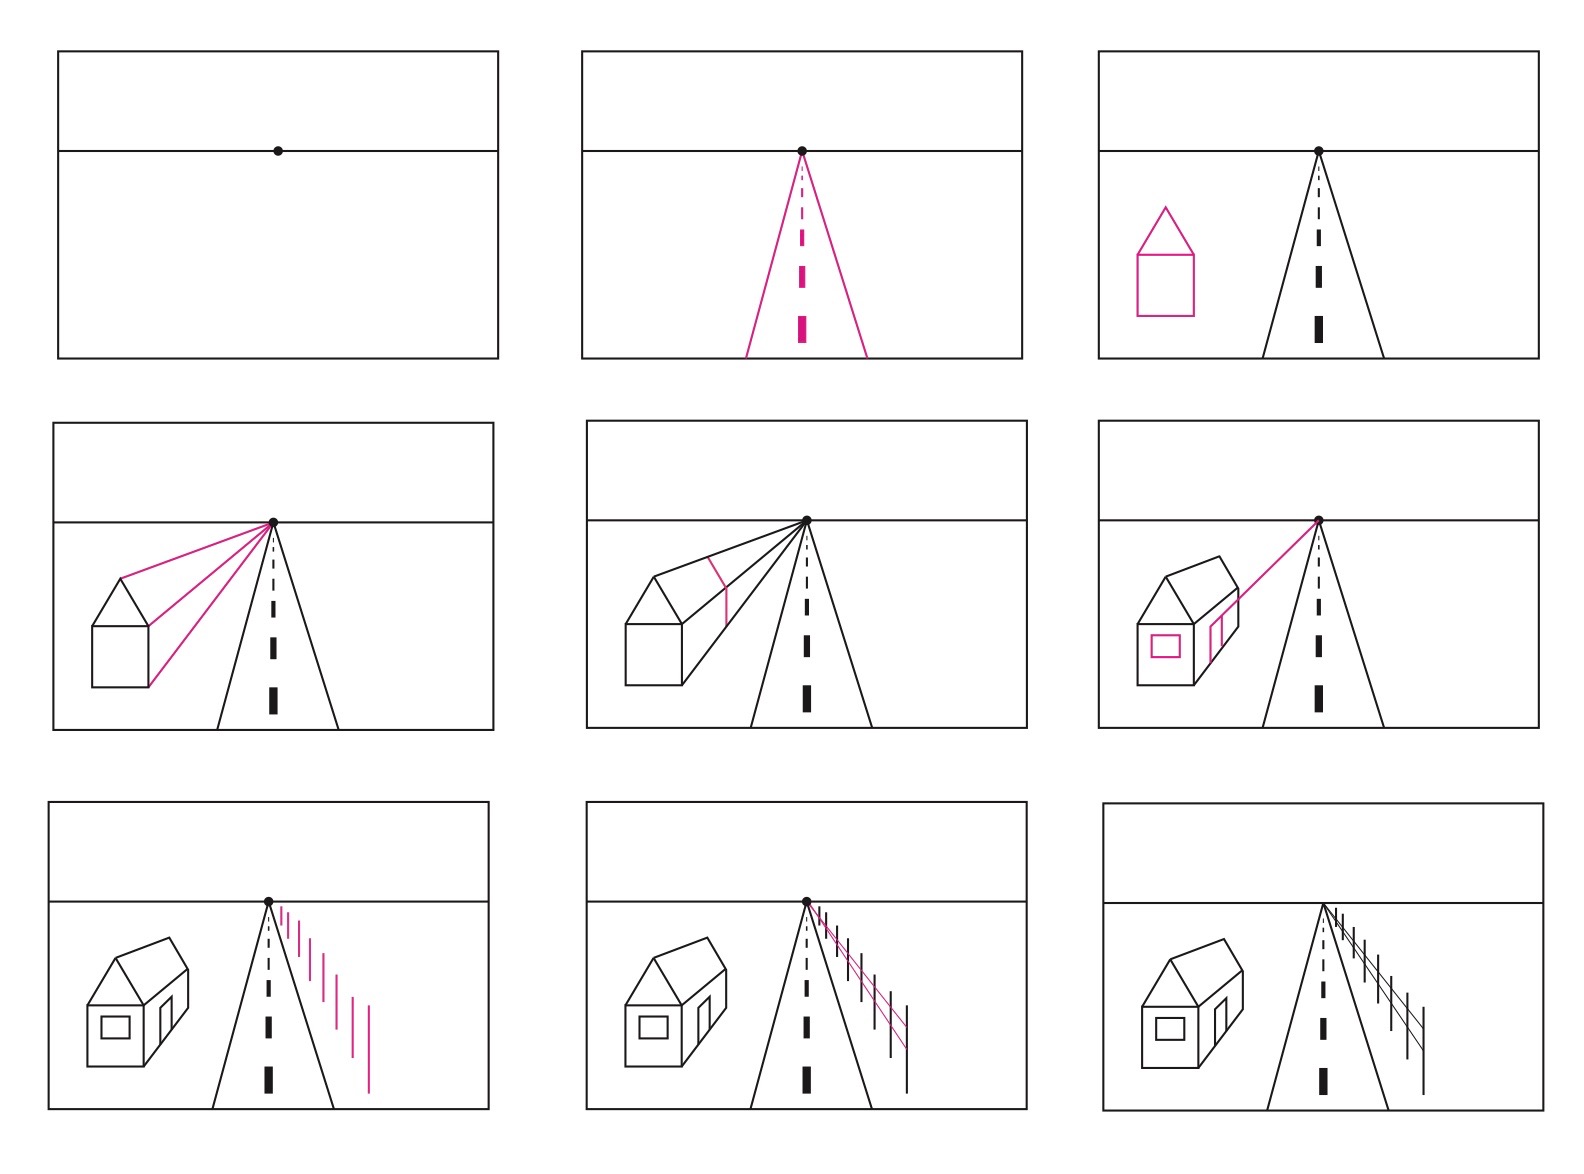
Video: Perspective Drawing – Play this video at 1.5 speed

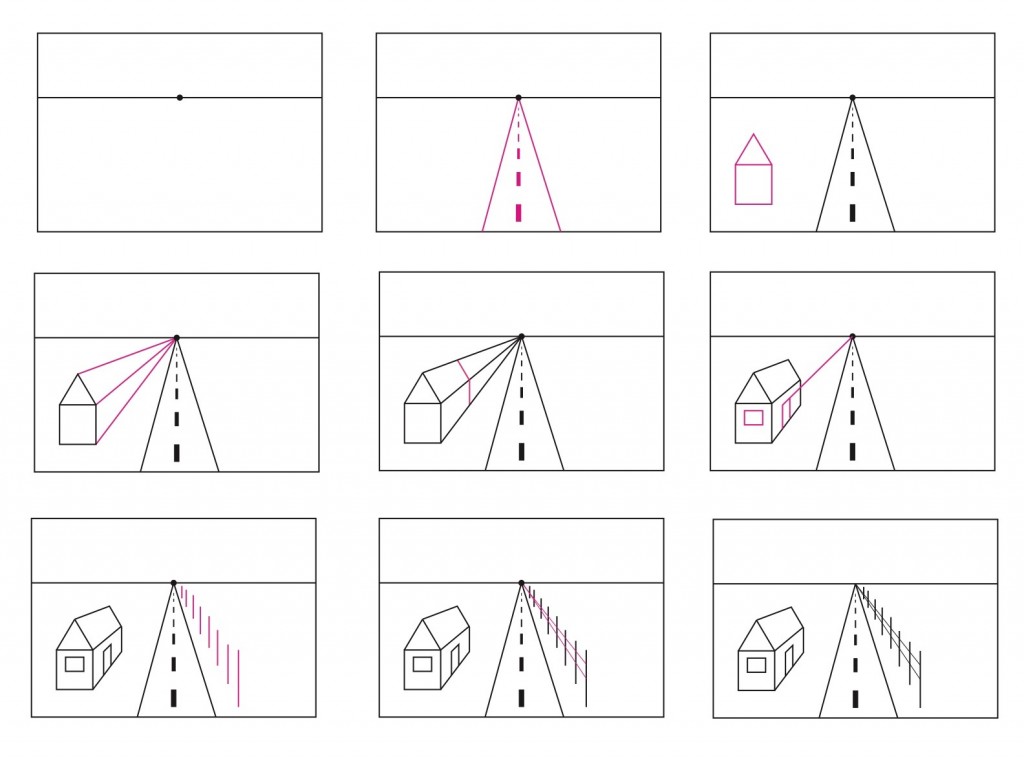
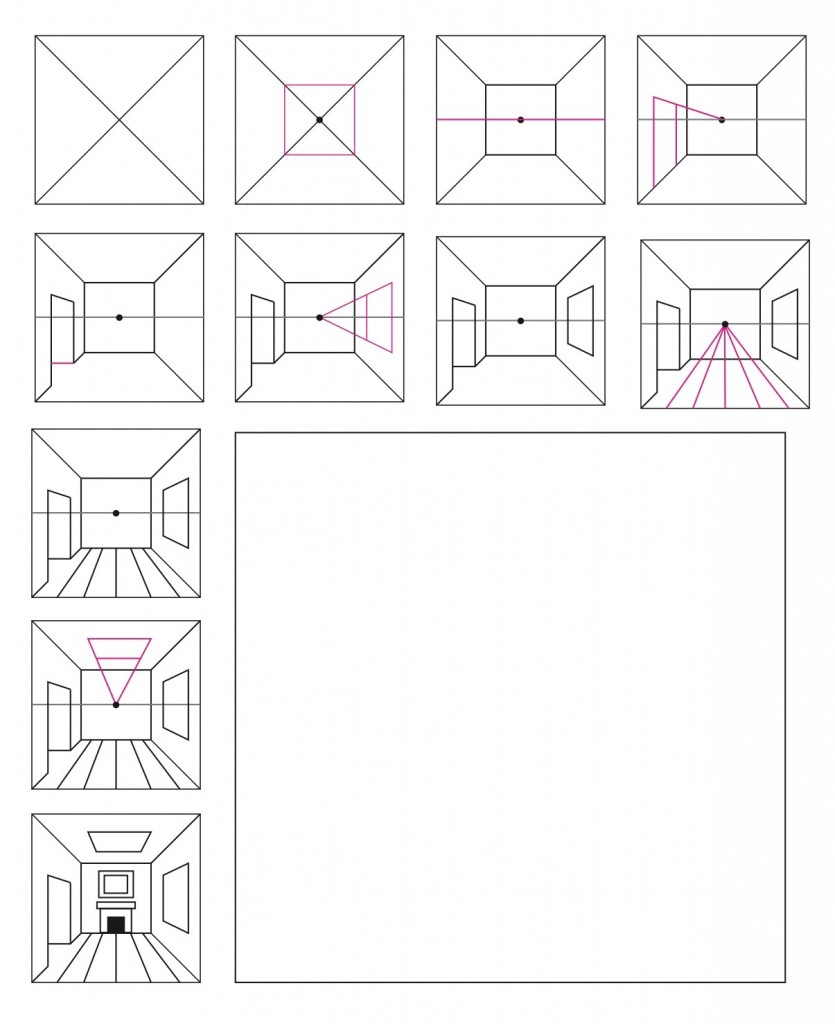
Discuss: One-Point Perspective

Vocabulary:

Horizon Line: 
The viewer’s eye level or where the sky meets the water or land.
When inside, it could be where the wall meets the floor.
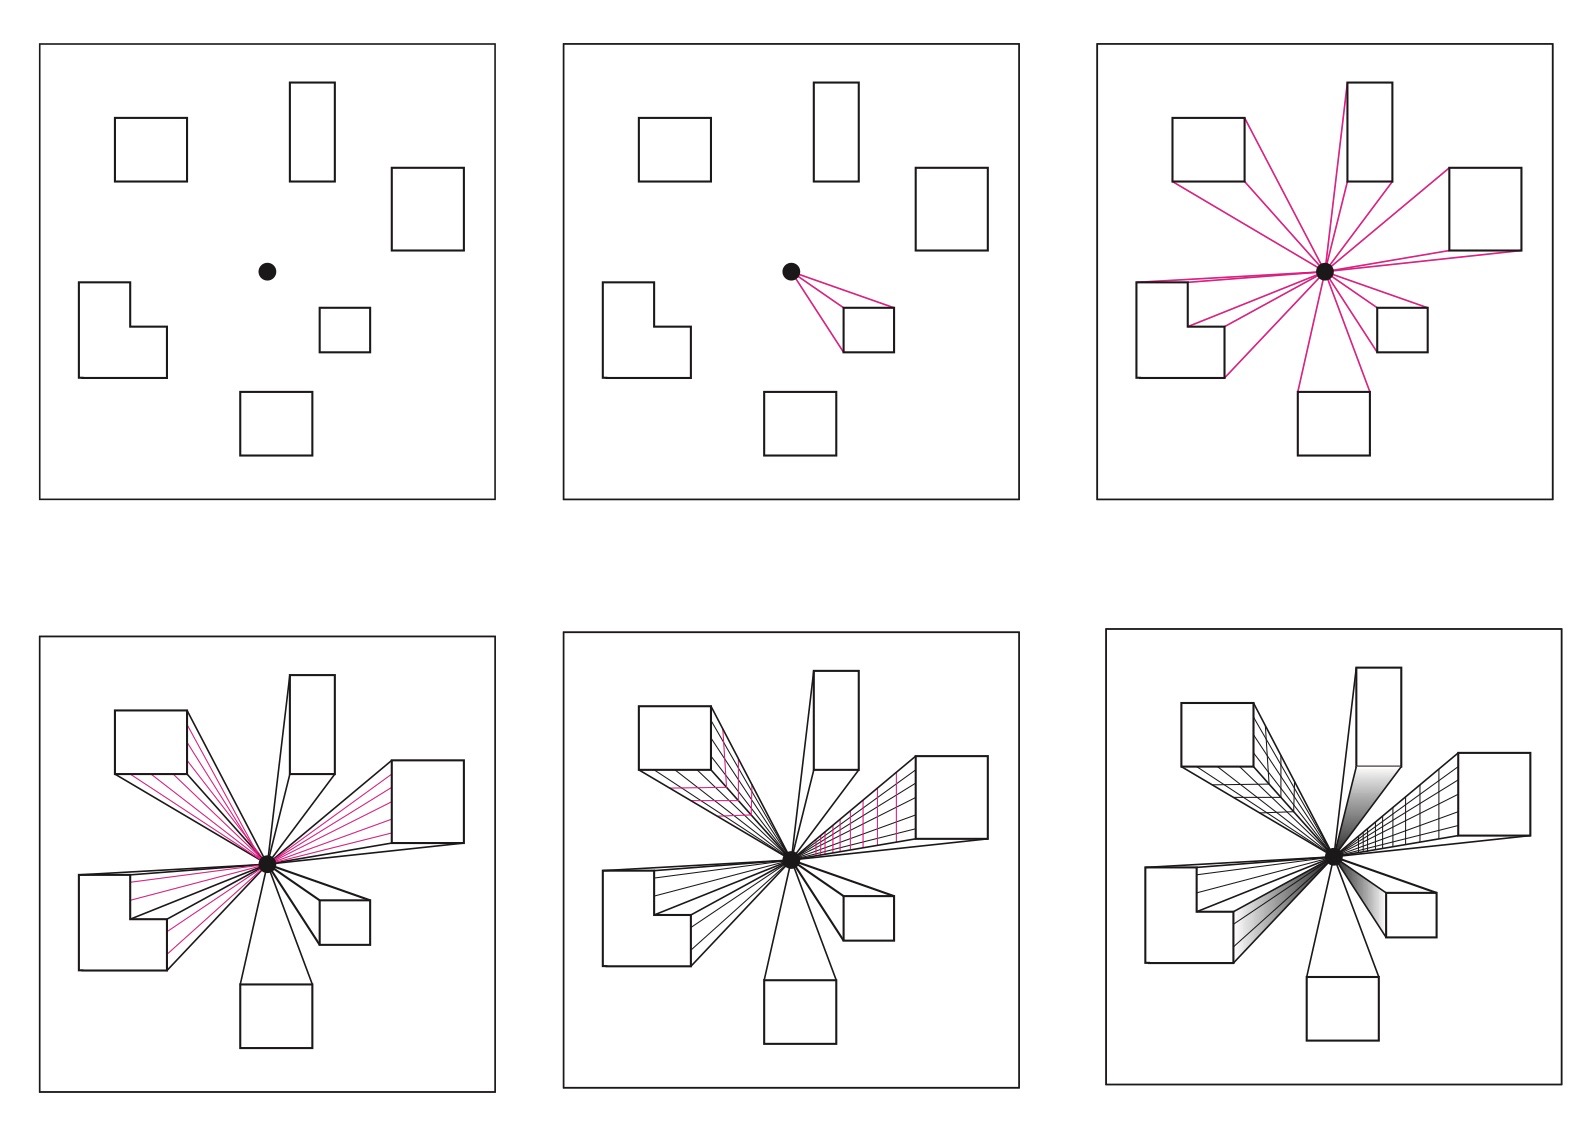
Vanishing Point: 
The place where something moves so far away from your view that it just vanishes. If it is a road, with parallel lines, it is finally where they vanish creating the illusion of them intersecting.

ACTIVITY: If time, start sketchbook homework.

DUE NEXT WEEK:

11. View to a Kitchen

Using your 18″x 24″ drawing pad and charcoal, draw your kitchen, in perspective, from life. We should see at least two walls and have a clear idea of where the horizon line is. Render using value to the best of your ability!

TIPS:

  • STEP BACK to capture as much of the room as possible. Don’t just use your camera lens to zoom out, as it uses a fish-eye-like lens and is distorted.
  • Try CHANGING UP THE HORIZON LINE. You can stand on a chair for a more birds-eye view, or try sitting on the floor to get an “ants-eye” view.
  • ADD UNIQUE DETAILS like appliances, utensils, spices or groceries, or even fridge magnets, etc. While this is a drawing about perspective, it is also an opportunity to show off your home’s personality and warmth!
  • Try including a FOREGROUND, MIDDLE GROUND, and BACKGROUND to help with perspective. Use OVERLAP and VALUE to help indicate objects that are closer or further away to the viewer.

11. One-Point Perspective Plans

In your sketchbook fill 3 pages with the following drawings. The images below illustrate how to build the drawing step by step, but you just need one finished drawing per page.

The Bird’s Eye Buildings:

Add squares and rectangles around the vanishing point in the center of the paper.  

Begin with the square or rectangle closest to the vanishing point. Draw tangent lines from the corners of the square to the vanishing point.

  • If buildings run into each other, stop or erase overlapping parts.
  • Add shading, or value, to your buildings. The darker values will be closer to the vanishing point.
  • The original shapes will be the tops of the buildings, so you can add objects, like pools or helicopter pads as if you are looking at them from above. For example, a pool would look like a rectangle.
  • Try making an “L” shape in perspective. Does it change the process? Do you add more lines to the vanishing point?

The Landscape:

Drawn a horizontal line across the top third of the paper. In the middle place a vanishing point.

  • To make a road, lines should start at the bottom of the page and meet at the vanishing point.
  • Dividing lines in the road should be larger and further apart when they are lower on the paper and get smaller and closer together as they reach the vanishing point.
  • Houses start with squares and rectangles and their sides should go to the vanishing point. They should then be cut down using right angles.
  • Try overlapping the shapes.
  • Street lights, fences, or power lines should be parallel to the edge of the paper, or straight up and down. These should also gradually get shorter and closer together as they reach the vanishing point. If they have lines attaching the poles together, like a fence or power lines, the horizontal portions of those objects should go toward the vanishing point.

The Room:

The middle square or rectangle represents the back of the room or hallway. Whatever you draw on that square should appear as if you are looking directly at it. Those objects will not need the vanishing point.

  • Everything on the walls, ceiling, or floor will line up to the vanishing point.
  • Anything below the horizon line will include lines moving up toward the vanishing point.
  • Anything above the horizon line will include lines moving down toward the vanishing point.
  • Vertical Lines should be parallel to the edge of the paper or straight up and down.
  • Horizontal Lines use the vanishing point to keep them in perspective.

10th Week | NOV 2

Bring to Class: Assignment 9 - Nobody Puts Baby in the Corner | Sketchbook 9 - Armatures in Motion

WARM UP: Morning Still Life

Lecture: Figure Drawing – Gestural

ACTIVITY: Live Figure Drawing
Today we are so lucky to have a live model in class!

Because of this, we will forego our class format and just do as much drawing as we can. We will resume critiques and activities next week.

  • 8x – 30 seconds
  • 5x – 1 minute
    BREAK
  • 3x – 3 minutes
  • 4x – 5 minutes
    BREAK
  • 2x / 3x – 20 minutes

DUE NEXT WEEK:

10. Line of Action

Fill 4 pages in your sketchbook of full body dynamic poses, the line of action drawn in another color. These poses can serve as a reference for you, so pick a variety of body types and poses that seem interesting to you.

10. Power Poses

Using your 18″x 24″ drawing pad and charcoal, draw a FULL BODY FIGURE in a dynamic pose. Use value and lighting to convey the forms.

What makes a pose dynamic? We should see action, movement, or interesting shapes in the human form. You can stage your own, or look at performers or athletes for ideas.

TIP: Try for poses that create triangles, whether it’s in the posing of the body or the negative space around the pose.

« Older posts

© 2024 Foundation Drawing

Theme by Anders NorenUp ↑