Field Trip To The Metropolitan Museum of Art

On Friday December 1st we will meet during normal class hours 12:00 – 3:20 at the Metropolitan Museum of Art.

Please be prepared to sketch on site as well as take pictures to be used as reference materials for your final project.  Please look at the Metropolitan Museum of Art website before we go and familiarize yourself with their collection.  If there are particular ares of interest for you PLEASE reply to this post so that we can be sure to visit them! 

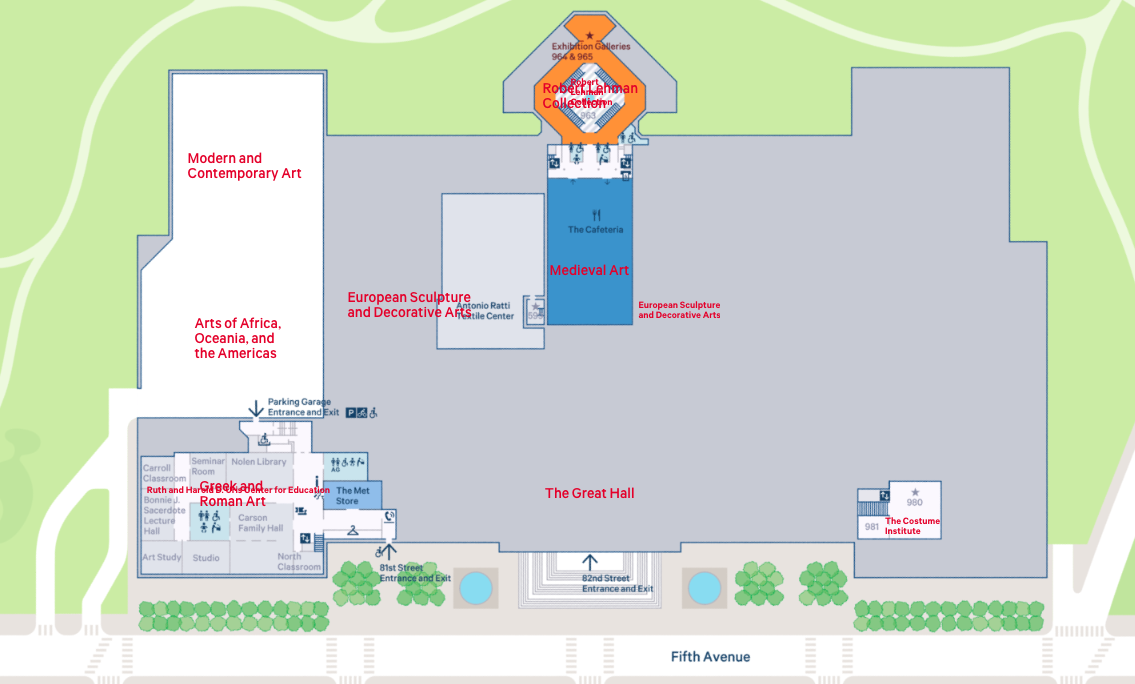
The Met is located between 79th and 83rd streets on 5th Avenue in Manhattan.  Take the 4,5,or 6 trains to 72nd street and its a 10-15 minute walk.

We will meet at the Educational Entrance (81st entrance) to the LEFT of the main staircase. We will be meeting inside at 12pm, just past the coat check.

This should be obvious but… DON’T check your sketchbooks and pencils! 


Updated Course Calendar

Oct 6 | Week 5

Proportion Continues: First Session with LIVE MODEL : Drawing what you SEE. Using what you KNOW.

NEW: Assignment 5

Oct 16 | Week 6

Light and Shade: Tonality studies of the Figure

DUE: Assignment 5

NEW: Assignment 6

Oct 20 | Week 7 :

Light and Shade: Tonality studies continue: Making distinct shadow shapes.

Proportion Continues: Front, Side, Back and 3/4 views of the Head

Midterm Review

DUE: Assignment 6

NEW Assignment 7 :  Front, Side, and 3/4 views of the Head.  Create a measurement guide to assist you in constructing a Self Portrait based on Photo Reference.  Focus on the Proportions.  Bring your guide and printed Photo Reference to class next week!

HINT:  Print a LARGE IMAGE. Use dramatic lighting and distinct shadow shapes to create visual  interest and to make the image easier to draw.

Sketchbook: Head Hunter! (Read Bridgemans on Heads and then FILL 4 PAGES FULL of Heads!

*Be sure ALL previous course weeks sketchbook pages have been filled!

Oct 27 | Week 8 : Midterm Portfolio Due*

Light and Shade: Tonality studies of Human head, Facial Features and Perspective

Work in class Assignment:  Using Measurement Guides and Photo Reference, Draw a self portrait.  Use dramatic lighting and distinct shadow shapes.

Complete as Homework Assignment 8.

Sketchbook: Head Hunter! (Read Mike Matessi on Heads and then FILL 4 PAGES FULL of Heads!

DUE: Portfolio : 5 – 7 of your best drawings

NEW Assignment 8 : Dramatic Self Portrait : Using your measurement guide coupled with careful observation and good reference.  Complete the self portrait you began in class.  Be sure to use dramatic lighting and a full range of value.

Nov 3 | Week 9

Drawing Heads and Hands.

DUE Assignment 8

NEW Assignment 9 : Dramatic Portrait : Lets take another crack at drawing the human head! Using your measurement guide coupled with careful observation and good reference.  Complete the self portrait you began in class.  Be sure to use dramatic lighting and a full range of value.

Buy Toned Paper for next weeks class and HW

Sketchbook: Hands! (Read Bridgemans and Hogarth on Hands and Feet and then FILL 4 PAGES FULL Studies!


Nov 10 | Week 10

Drawing Hands and Feet & Tonal Drawing of the Human Figure.

DUE: Assignment 9

NEW: Assignment 10 : Pose reference Study – Series of Photos pose guide. Bring in next week use in Class (2 week project)

Hint: Feel free to use props etc. and Interact with the environment.  

(Begin in class) Choose 1 of your poses, develop into long pose from reference.

You may choose to Superimpose the skeleton onto your figure!

Shoot Additional reference for this image!  Create more dramatic lighting, and shoot close ups for specific problematic areas! Hands, feet, head etc.  Be sure to recreate EXACT pose and lighting conditions.

Nov 17| Week 11

Drawing The Human Figure on Site with Perspective and Scale

DUE: Assignment 10

NEW: Assignment 11: Human Figure Long pose from Reference on Toned Paper

Using the toned paper, Choose 1 of your poses to develop into a long pose drawn from reference.

You may choose to Superimpose the skeleton onto your figure!  You may choose to use props or add additional elements as long as the figure is the main subject matter.

Shoot Additional reference for this image!  Create more dramatic lighting, and shoot close ups for specific problematic areas! Hands, feet, head etc.  Be sure to recreate EXACT pose and lighting conditions.

Nov 21*| Week 12 *Tuesday follows Friday Schedule

The Human Figure with objects in an Environment , Learning to consider composition and staging

DUE: Assignment 11

NEW: Assignment 12

Nov 24 | THANKSGIVING RECESS | NO CLASS

Hello!

Featured

Welcome to Figure Drawing!

Our goal in this course will be to build on what you have learned in your Foundational Drawing Class and develop your ability to accurately render the Human Figure. You’ll learn the basic forms of the human body, their proportions, and how those forms are connected.

By the end of the course, (with lots of practice!) you’ll be able to draw a human form interacting with the world around it.  This skill is the gateway to so many visual art careers! After all, we are human an the stories we are usually most interested in are ones depicting other human beings!

On this site you will have access to materials presented in class, your weekly assignments, and additional helpful resources.

Here you will also post your Sketchbook to share with your classmates.  Carefully read the directions in the UPLOADING INSTRUCTIONS POST on how to post to this site and to your ePortfolio.

— Happy Drawing!

Uploading Instructions

Featured

Upload photographs or scans of your Sketchbook from this semester in the Sketchbook Category on this site.  (I’ll be checking this category WEEKLY to monitor your progress and participation.  This is mandatory.)


Upload photographs or scans of your best Classwork and Assignment Drawings from this semester into your ePortfolio.  (I’ll be checking your portfolio at midterm and at finals.  This is mandatory.)


Be sure to give all the drawings a title.  On our class site, write brief descriptions of the drawings, and be sure to reference the drawings’ titles.  Your descriptions should include what you feel the aim of each drawing was, what you learned from making it, and what was challenging to do.  Of course you may write other comments as well. For instance, you may ask questions for other students to answers.

How to Post to our class: On this class site, go to Post located on the left > Give your drawing a title in the subject line like this: Assignment 1, contour drawing: “My Converse Sneakers” > Write a brief description of the drawing in the Comments space > Just above your title click on the Add Media icon (it looks like a camera on top of a music note) and browse for your file > Click Insert > Click Drawings in the list of Categories on the right > Click Publish at the top right.

Your description should include what you feel the aim of the drawing was, what you learned from making it, and what was challenging to do.  Of course you may include other thoughts as well.

How to Post to your ePortfolio:  Go to Dashboard > New Page > Pages > Add New > Locate “Parent” in the Page Attributes > choose “Academics” from the pull-down menu. In the Title area of your ePortfolio, be sure to write the name of our class (Figure Drawing) or our course code (COMD1231).  Also be sure to Publish, and invite me to join your ePortfolio.  In settings, be sure to state either “Public” or “Private>visible to City Tech members.”  Otherwise no one will be able to see what you’ve posted.

To take the photo, find a spot with even light so that you will have no shadows or strange light gradations across the drawing.  Frame the drawing so there is a small even frame on all sides.  Optimize the file, or reduce it to 72 dpi, with a file size no more than 1MB (about 8-9 inches on one side). Rotate it if necessary to it uploads right-side-up. If you have access to any photo-correcting program, see if you can increase the contrast so that delicate drawing lines are visible.

However, If you have access to a scanner, scanning is ALWAYS BEST.