Rick Redznak | D038 | Fall 24

Category: Uncategorized (Page 2 of 3)

Class 8 – Fall 2024

Class Info

  • Date: NOV 7
  • Meeting Info: 2:15 to 5:35
    P 114

Announcements:

  • Let’s review tote bags printed and place after effects files in drop box.
  • Home work- updated tote, after effects and make to go bag mock up printed.
  • Assignments have very specific NAMING and SAVING conventions and folders with names, no loose files. Moving forward -15 points if instructions are not followed.


_____________________________________________________________________
Topic

  • What is a manuscript or text evaluation?
    • This will determine all the typographical elements that you will have to design. There are similar and multiple levels of typographical hierarchy on this calendar. YOU WILL need to look at the actual text for this and take notes
  • Type Pairing
    Determine use of typefaces that go well together, in addition to be accurate to the look of the Festival and the rest of your typographical identity
    (max of two plus their variations)
  • If easier, consider style sheets for repeated elements.
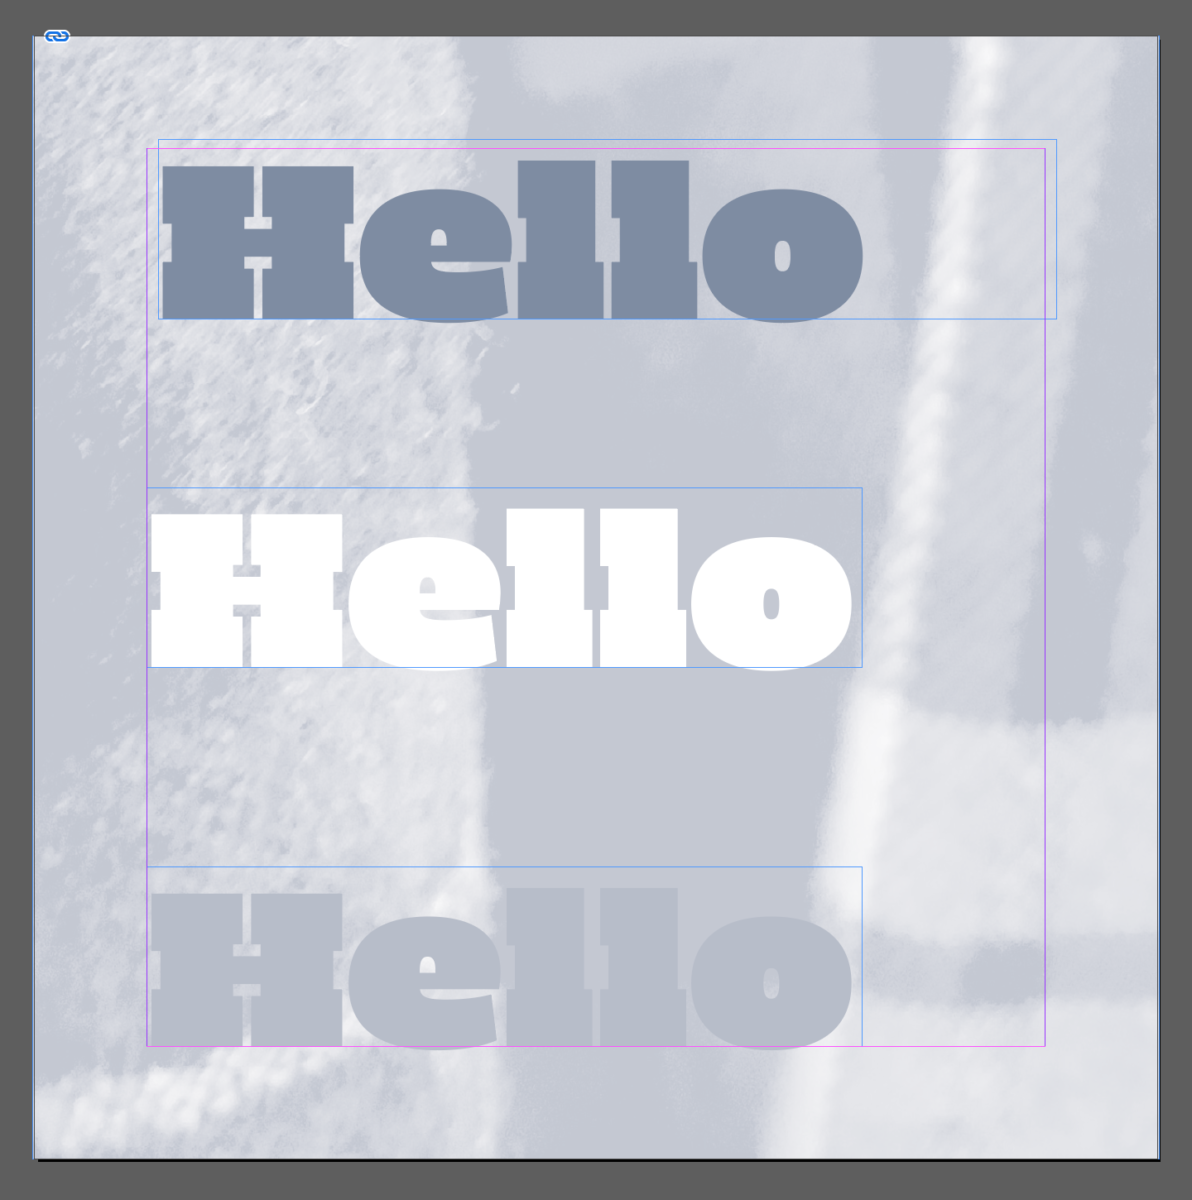
    There are two main kinds: paragraph and character style sheets
  • One color document in InDesign / COLOR and Typography
    Foreground and background relationship (text and textures or text and color)

Participation Activity

Lets work on the SHAKE STATION To GO Bag in class, I emailed you the ai file.

Bring in next class 2 different art directions- printed and mocked up on 11×17 paper. Needs logo/fonts/ colors

even add a message if you want.

SKIP BELOW

This looks similar to what we did a couple of weeks ago in Illustrator, but this time using InDesign. Different way of obtaining similar results. Color and legibility of typography.

1 color in InDesign

First take an image and bring it into Photoshop
Create a Greyscale version of it and save it as an JPEG

Then go to Indesign/ Create an 5 x 5 inches document

.5 margins all around

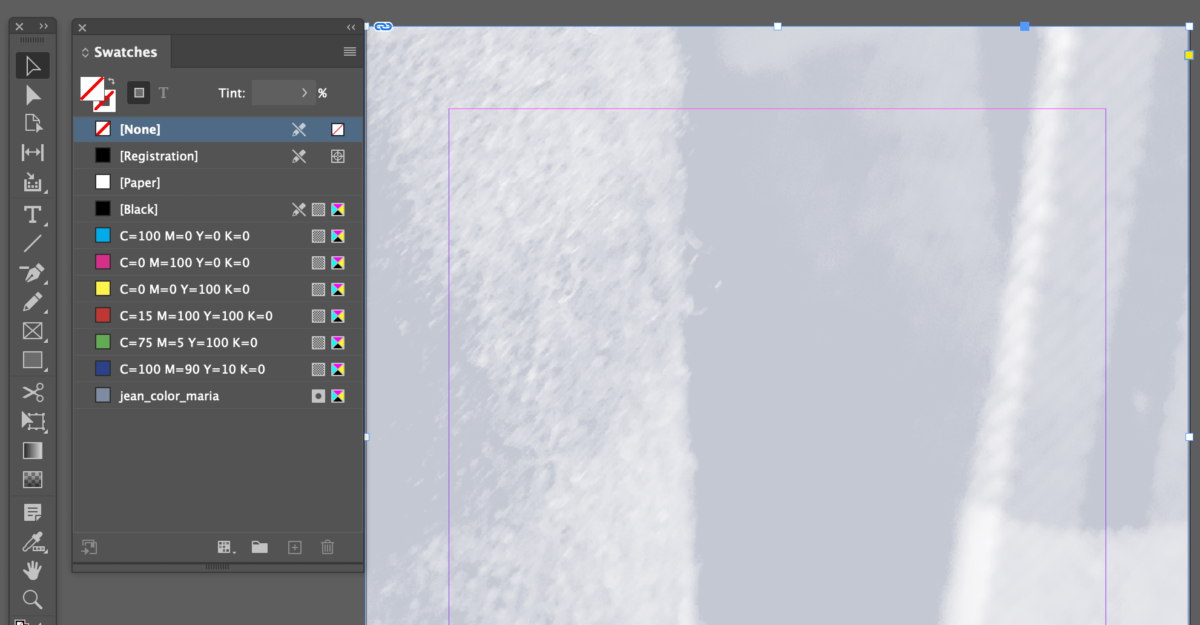
Place art into Indesign

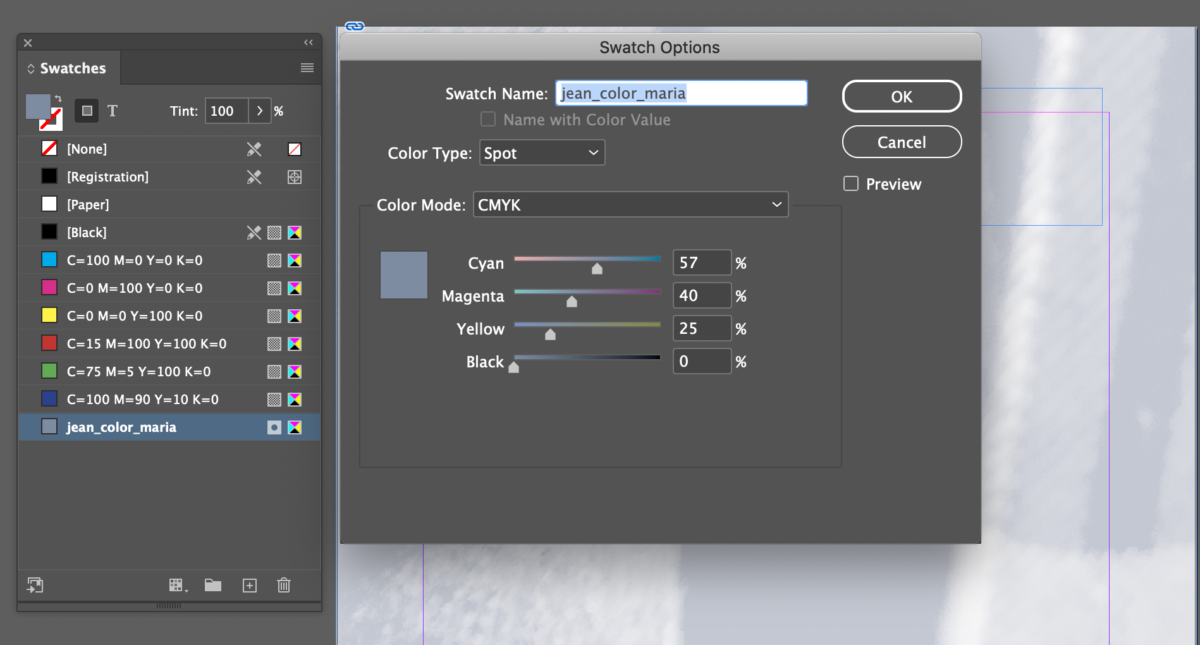
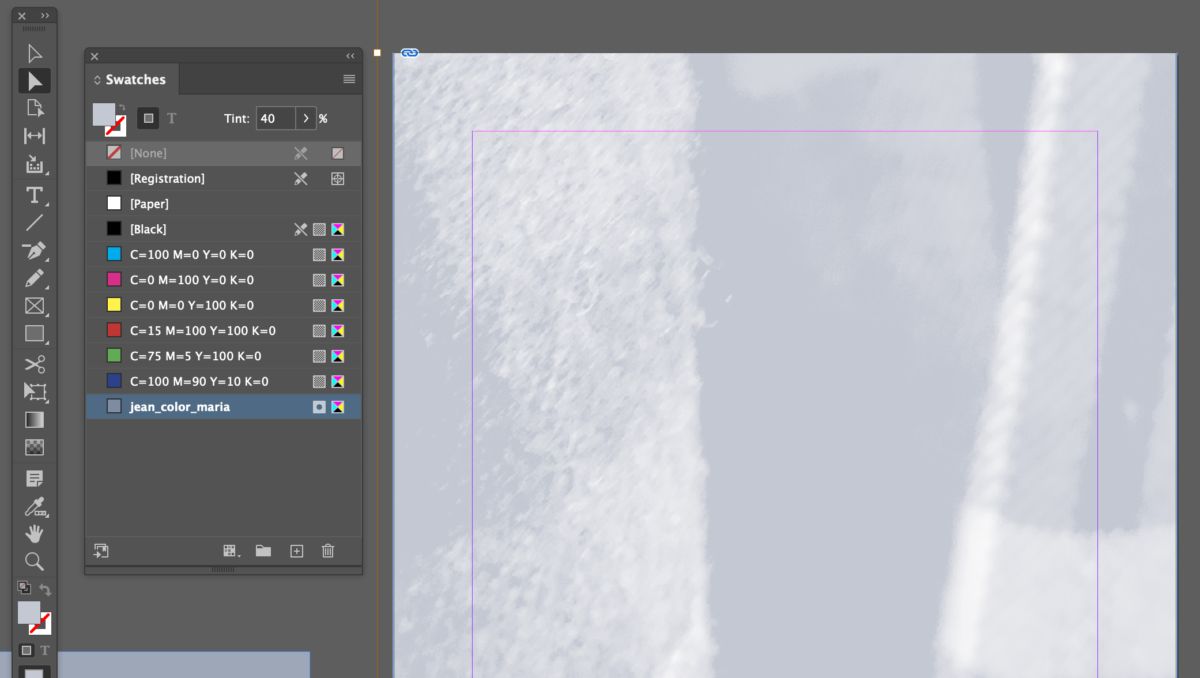
Create a 1 color color swatch in InDesign (spot color from cmyk)

Follow demo

Go to COLOR SWATCHES> Create a spot color with a CMYK recipe
With Selection tool- select none (or if adding a color select its tint)
With the Direct Selection tool (making sure a little hand shows up first), selected color and tint
Add a few words, USE the same color and change their contrast.

Take a screenshot and place in Participation Activity

  • Make a new post:
    Go to the DASHBOARD>POST>ADD NEW

    ADD title  “Color ID”

    Categories
    Under the GEAR to the right of the screen GO to DOCUMENT>CATEGORIES, then check the following categories: 
    “Student Post ” and “Participation Activity”

    Add your image as a JPG:
    •   “yourlastname_firstname_PA_march21_colorID”
  • PUBLISH (Open lab has a little delay when posting. Avoid posting numerous times)

_______________________________________________________________________________________

Design Continuity

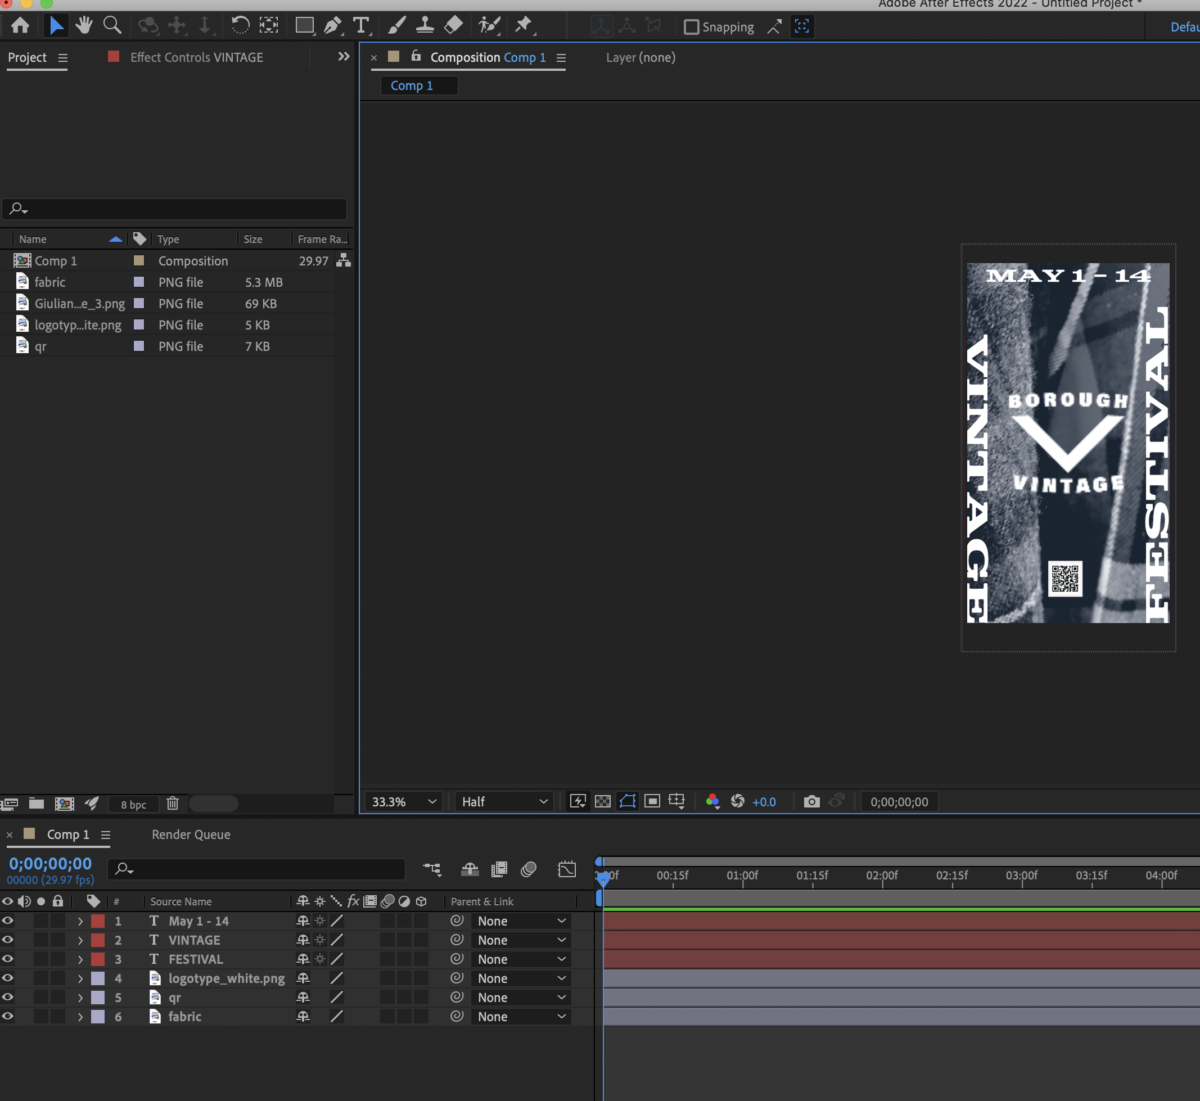
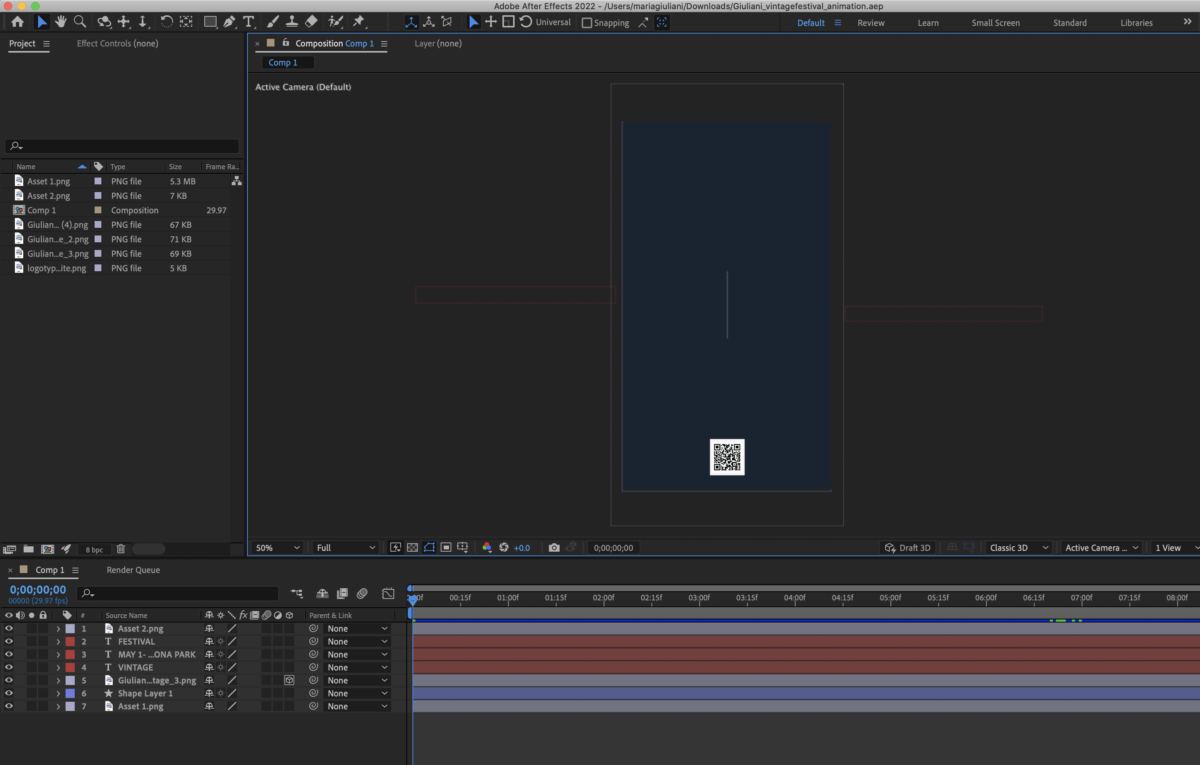
logotype/poster/banners//poster in motion

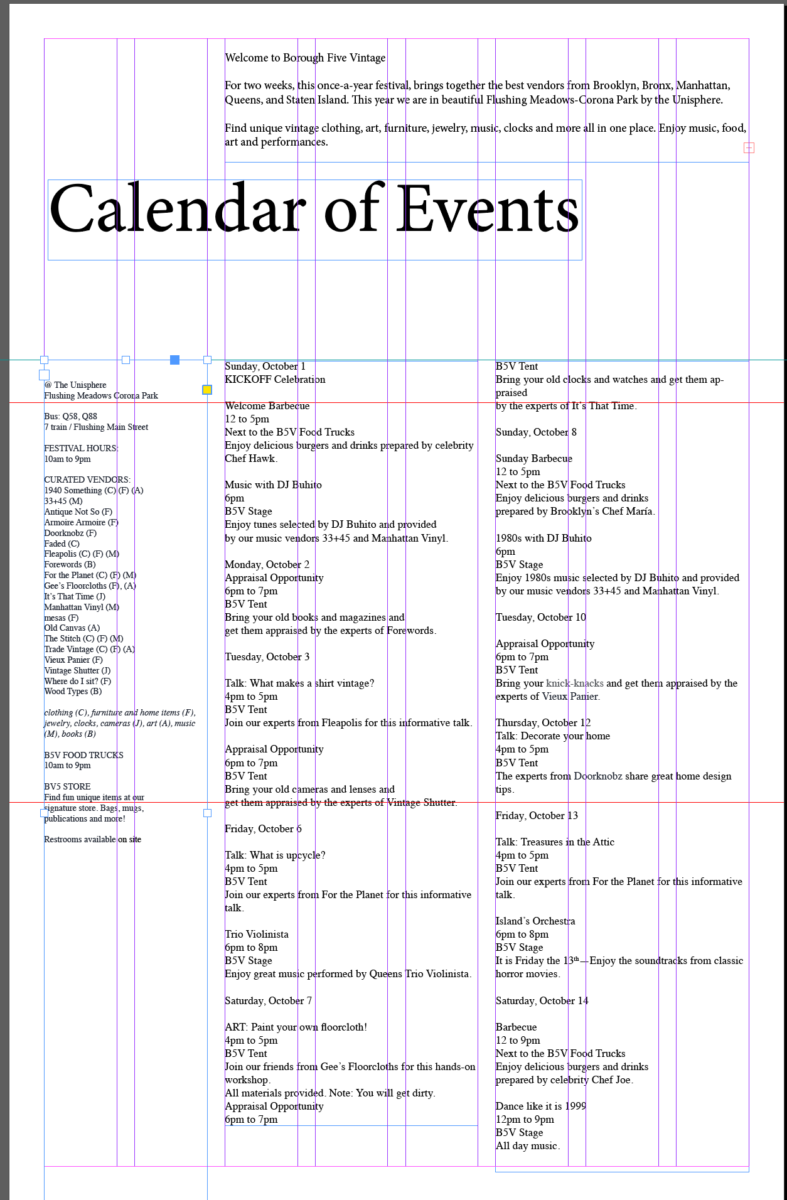
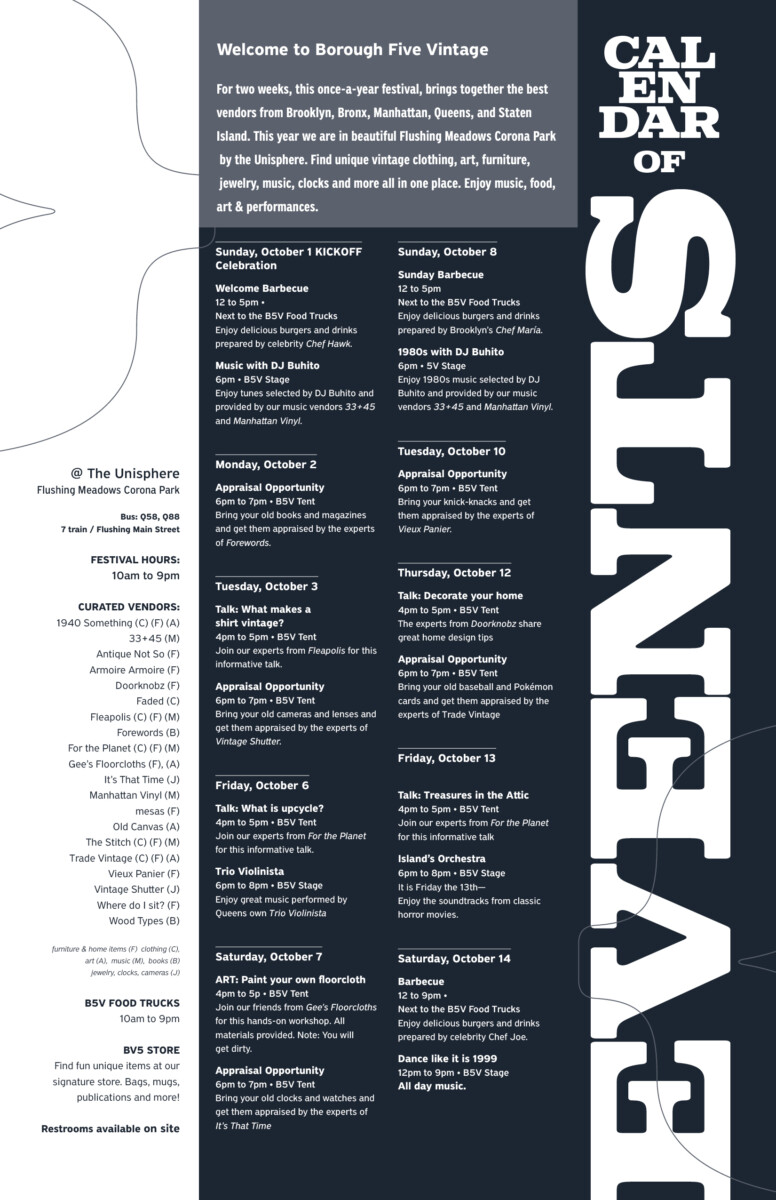
Calendar of Events (2 sided printed version)
Include all text provided Festival’s vendors, events, dates and times (cannot be edited)

This will also serve as a commemorative poster of the festival

During Class:

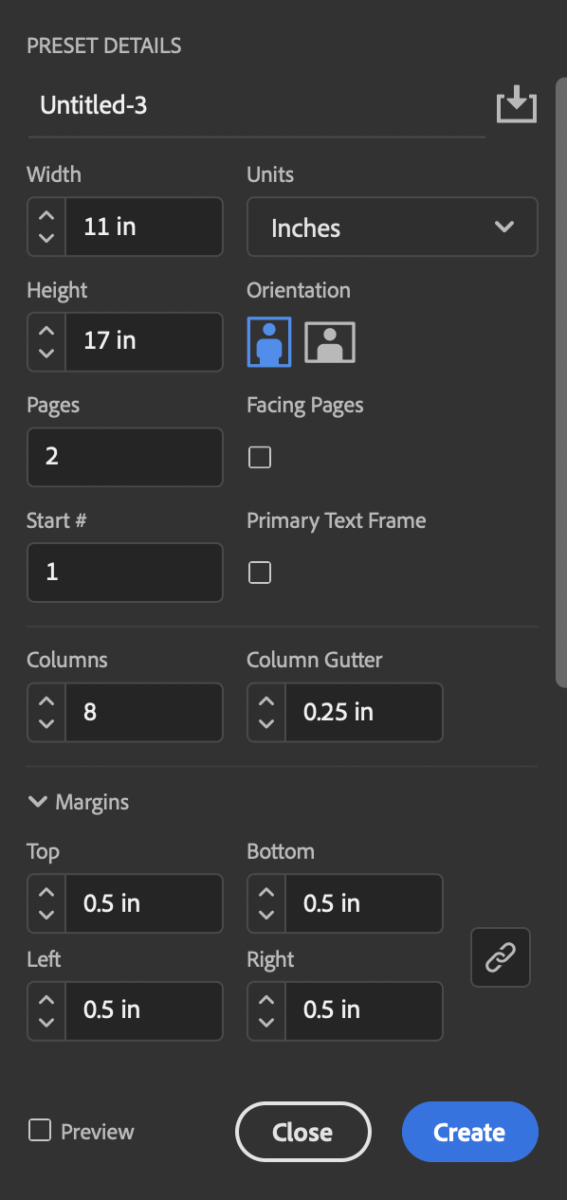
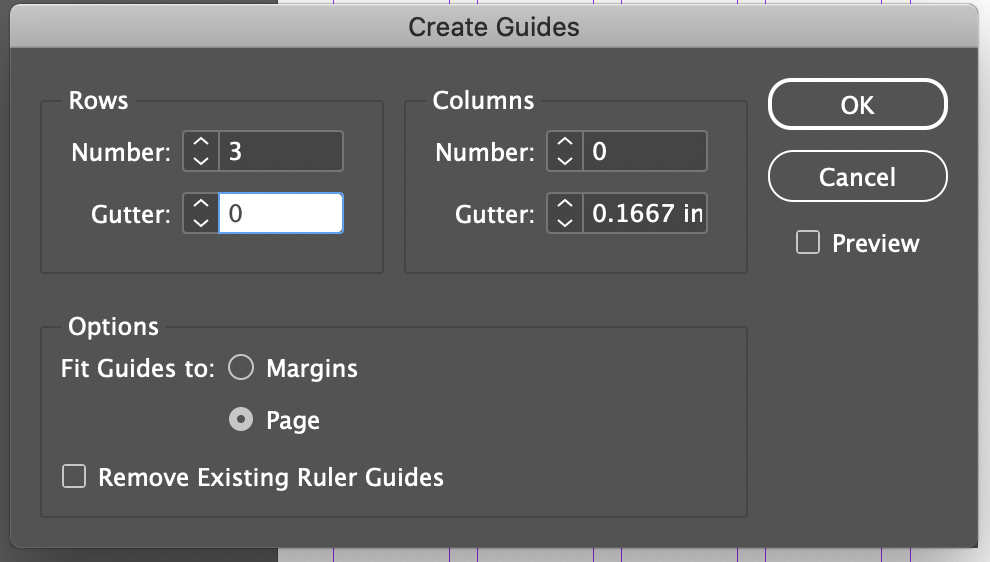
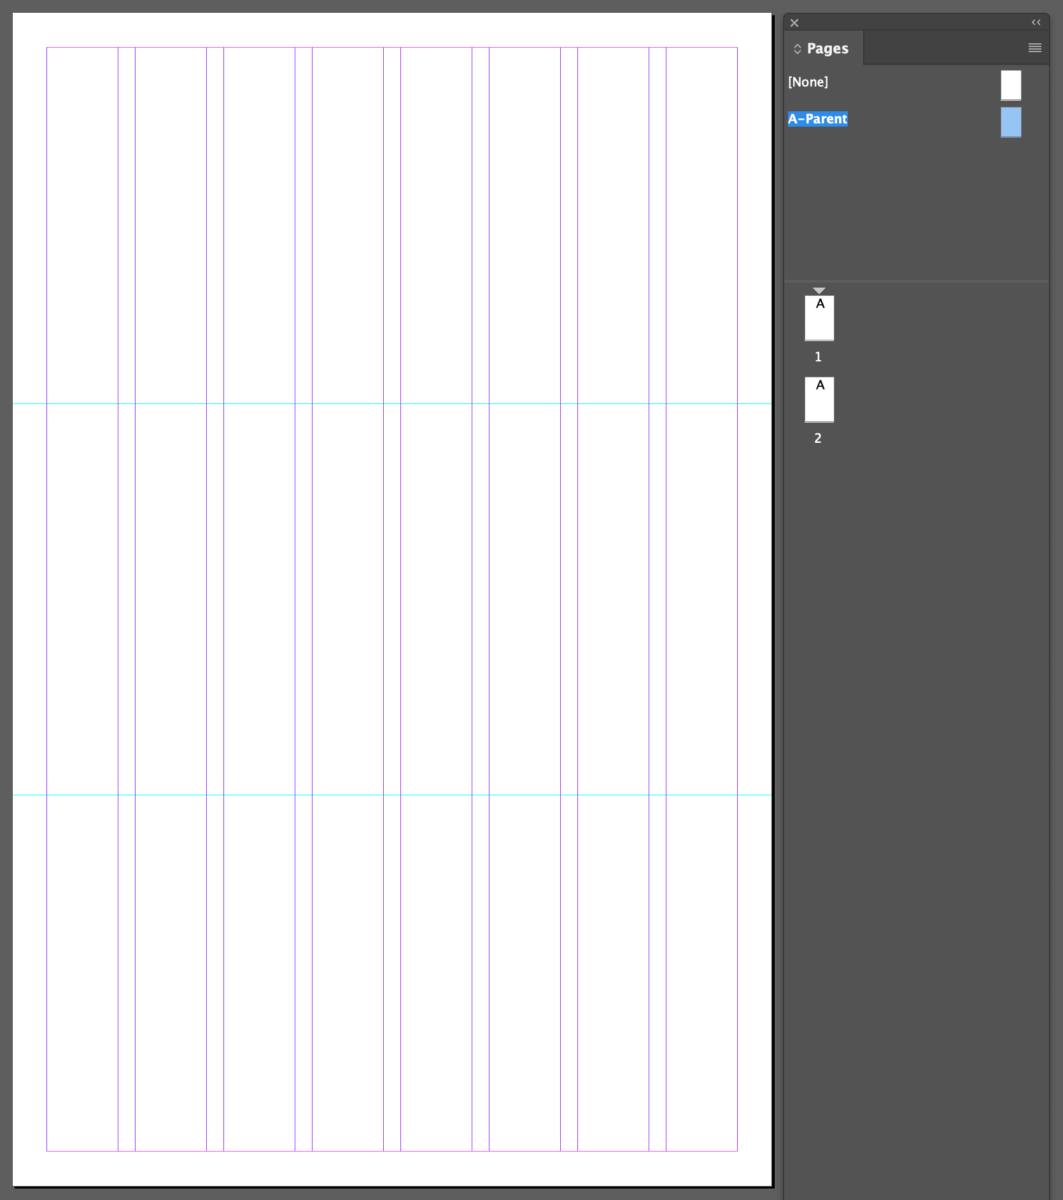
Create a document for B5V-Calendar of Events

  • Specs:
    11″ x 17″ document
    Margins: .5 inches all around
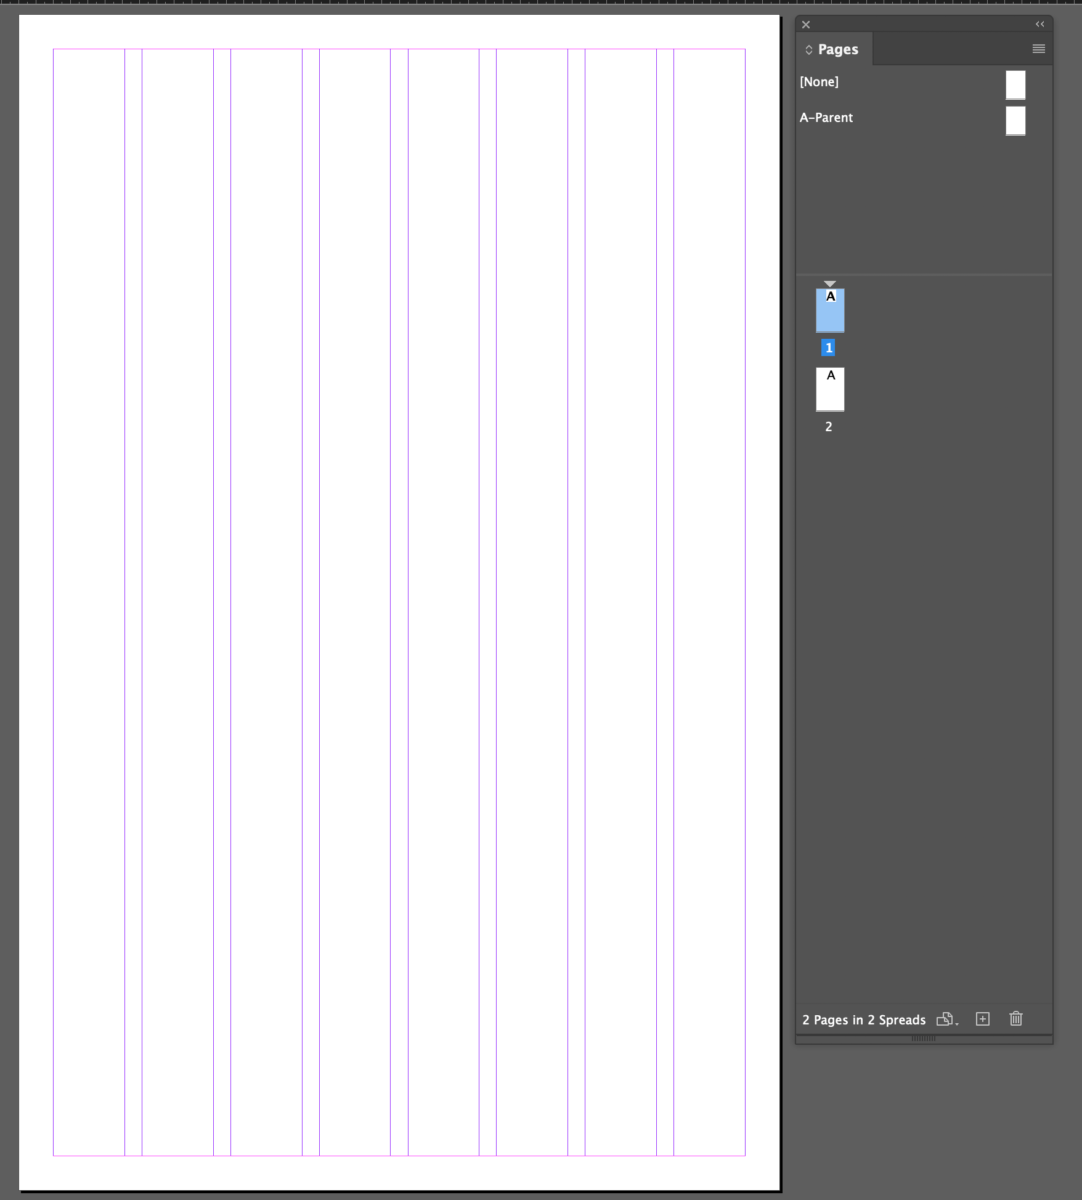
    8 columns with .25″ gutter (add rows if you want them to be part of your grid)
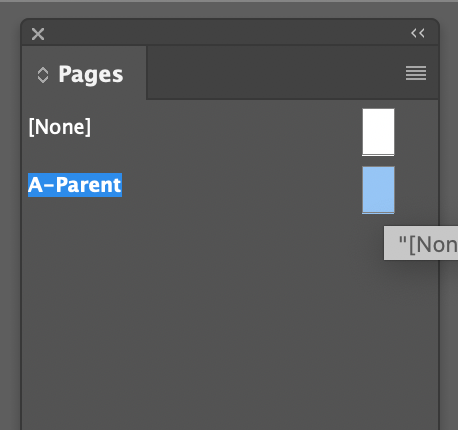
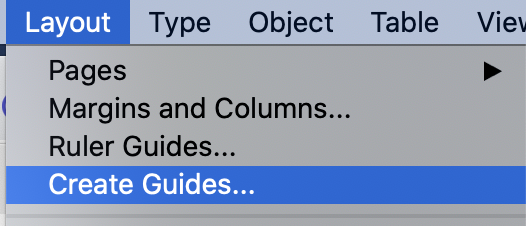
    2 pages / NO FACING PAGES
  • Must place guides on Parent Page A
  • 1 color only (to resemble offset printing)
  • Image is optional
  • Logotype must be included
  • One side will include all the typographical information of the calendar
  • The other side will serve as a commemorative poster (do not repeat your other posters), vary the look
  • Once our grid is completed, place the actual text
  • (this text must STRICTLY follow the grid)
  • All the text must remain linked at all times

______________________________________________________________________________________

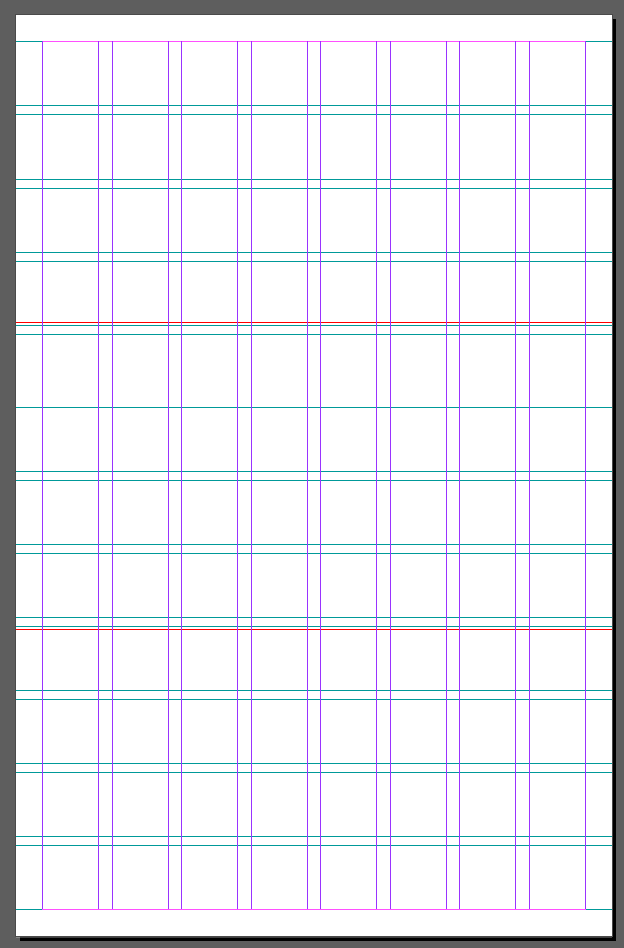
Here are a few of my examples. Please create your own. Your calendar should not look like this. I started by dissecting the information and determining hierarchy within the grid.
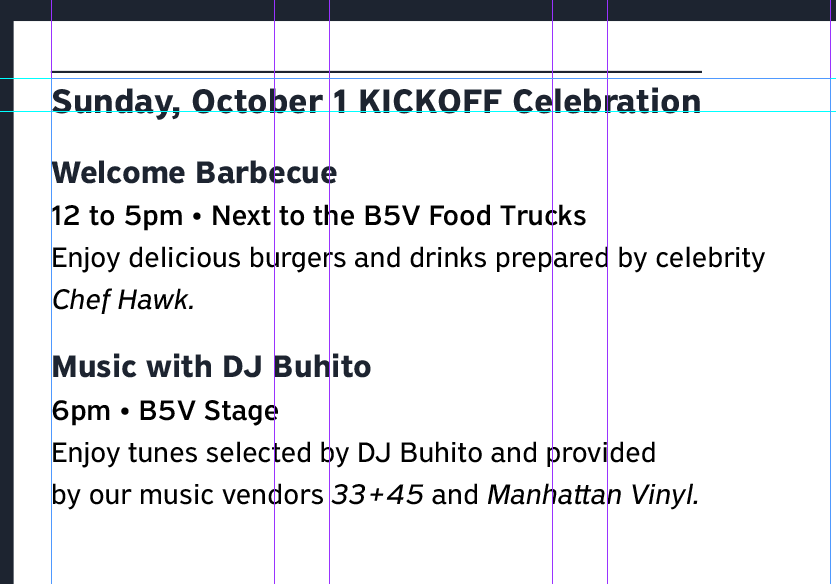
WE WILL PRINT TODAY during class, so you can appreciate the size of your type

Due next class

COMPLETED Calendar of Events

This will be graded.

Moving forward you will strive for a solid and complete design.
____________________________________________________________________


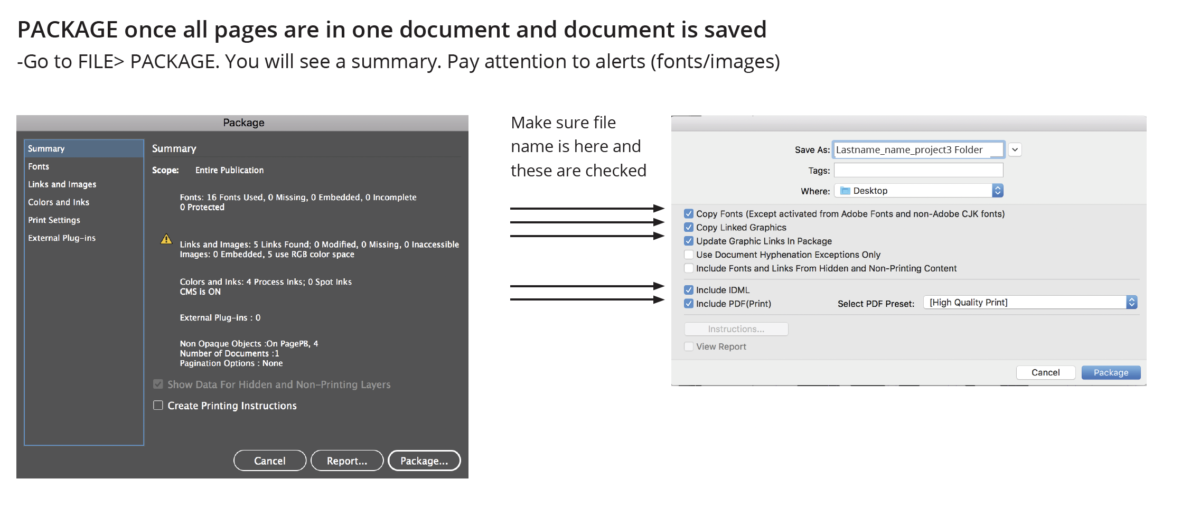
Save your InDesign File & Package IT

I will collect a folder (packaged folder) that will include: InDesign native file, PDF, IDML file and typefaces and links to the main file

lastname_Calendar_finished

Place in Dropbox
DROPBOX COMD3527 Spring 24

How to package review:

______________________________

Print will follow printer’s spreads, rather than logical order of reading

CLASS Last day remarks 🙂

by Prof G

NOTE:
Graphic Assignments are always due the day before class at 11:30 pm, and must be placed in class DROPBOX drive unless indicated otherwise. Assignments done or uploaded during class time on the day that they are due are marked as late.

Participation Activities are due during class and are named and posted as indicated by instructor.

Class 7 – FALL 2024

Class Info

  • Date: Oct 31, 2024
  • Meeting Info: 2:15 to 5:35
    P 114

Topic

Midterms grades and Vendor posters grades are in. Today is the last day to review menus. We will review your 3 totes printed and pick one for final next week.
New project use class 6 to make a after effects design.

Adjust typographics (correct tracking/leading/others)
Edit Speed
Edit Color and foreground and background relationship, so that the typography reads well.
————-

Continued Uniformity with Design

  • The Typographic Grid
    • Why do we use a grid?
    • Columns, Rows, Modules and Zones
  • Style Sheets
    • Why do we do style sheets?
    • The difference between paragraph and character style sheets

Participation Activity

2nd part of class- use class 6 to make a after effects animation. Practice in class, when finished place file in your folder- do this during class.

SKIP THIS—-In InDesign

Create a a new document
11″ x 17″ document

Margins: .5 inches all around

8 columns
.25 gutter

2 pages

NO FACING PAGES

set document

Should look like

Select Parent PAGE
Go to Layout CREATE GUIDES
Enter info as shown. Sometimes you need guides from the top (edge) and sometimes from the margin

Should look like this

You should add additional rows (with gutters) if you are working with zones and modules)

A more complex grid will give you more possibilities

THEN

Start placing this for position only copy. Start to think of hierarchy, placement, use of negative space (within the page). Create a good and attractive typographic composition!

We will review how to maintain copy together (linked), rather than copy and pasting pieces of the copy, and how to place accurately to the grid.

Once you have a good typographical composition.

Take a screenshot

PA_lastname_march14_grid_indesign.jpeg

PLACE in DROPbox (not Open Lab)

Due next class

Print out 1 tote bag for final review, hang up in class and place a jpeg in your folder.

Place 1 Animation made with after effects in your folder. Use steps from class 7.

Make a shake station 1080×1080 social media ad.

Use copy: For you SEAFOOD lovers! FISH FILLET. Come try our new menu.

Design this with type, color and logo. Use your style guide.

Compressed version as specified class 6.

lastname_firstname_animationposter_final.mov

______________________________

Print will follow printer’s spreads, rather than logical order of reading

CLASS Last day remarks 🙂

by Prof G

NOTE:
Graphic Assignments are always due the day before class at 11:30 pm, and must be placed in class DROPBOX drive unless indicated otherwise. Assignments done or uploaded during class time on the day that they are due are marked as late.

Participation Activities are due during class and are named and posted as indicated by instructor.

Class 6 – FALL 24

Class Info

  • Date: October 24, 2024
  • Meeting Info: 2:15 to 5:35
    P 114

Homework: Tote Bag- 3 differnt designs

One side of bag- use copy: GRILLED IS OUR FAVORITE FLAVOR and logo.
OPTION: can do a 2 sided bag- logo on one side and copy on another.

3 differnt art directions. Use style guide but can add some new artwork to the tote bag that can work with the style guide or support your idea.

I have a psd mock up for you to use, please print out all 3 and review in class, also place pdfs of 3 in your folder so I can grade them.

https://www.mockupworld.co/free/tote-bag-mockup

Topics

  • Banners – Class critique and edits
  • Basic Motion


Participation activity> During Class

After Effects: First Looks at type in motion

1. After Effects Basics TRANSFORM tools

Position/Scale/Opacity/Rotation/Anchor Point

New Composition in After Effects: 1080 x 1080 pixels. Enter: Duration 0;00;05;00 (this is 5 seconds). Add a background color.
Go to LAYER>NEW>TEXT> Add a word
again
Go to LAYER>NEW>TEXT> Add a second word
Make sure that you have two layers

I have two layers (COMD3505 and TUESDAY. Select Typeface, size, variable such as weight or posture)

NOTE: THE ANCHOR POINT determines where things move from. By default it is placed lower left of the layer.

If you need to move your anchor point to the center. Click on the layer hold command and double click on the pan behind icon

Select one of your layers and open Transform> This will show you the basic TRANSFORM tools of After Effects.
Move the time indicator on the timeline. Hit the Stopwatch to create a keyframe for Scale and Opacity. This is showing that on the 7th second of the animation. COMD3505 will be at 100% size and 100% opacity
Move the time indicator back. make changes to Scale and Opacity. This is showing that on second .5– COMD3505 will be at 0% size and 0% opacity.

No need to upload. I’ll go around the classroom check for completion.

Homework: Vendor poster> NEXT STEPS

POSTER in Motion

We will create an animated version of our poster.

Let’s first go to Illustrator and collect our assets. Create a PNG (with transparent bkgd of your logotype. You can create a white only version too (see my example).

You can also bring photographs or QR codes if necessary

There are ways to bring the entire composition from Illustrator to After Effects, but for this one, we will create our type directly in AE. Know the typefaces of your posters as you will use again.

Create new COMPOSITION

GOOD typography is the most important element. Pay attention to details.

This will be a companion poster for our printed versions. It will be heavily influenced by it but not exactly the same. Work on a simpler version, since it will be animated, we will not list the the vendors

In addition to all typographic and design consideration (grid/alignment/hierarchy/ contrast/kerning/tracking, case, others), you must also think of legibility as it relates to time

Include the following:

  • headline: Come to the shake station Food Festival
  • Logotype
  • Oct 1 to 14
  • At Willamsburg, Brooklyn
  •  Body copy: More info on Vendors participating.
  • Art work if necessary
  • Use the same fonts/colors from poster.

Size is 1080 x 1920 pixels

At least 2 transformations

Length:10 seconds max

full or limited colors

1080 x 1920 // 10 seconds
Drag assets into top left panel
Create layers for text

Place assets and text layers into the timeline. Now we will transform using the timeline and keyframes. Similar to DEMO

_________________________________________________________________________________

My example….Some edits are still necessary: spacing and kerning in terms of type, and some speed chages in terms of animation

How to render:

Composition> Add to Render QUEUE
Click over Go to lossless (Output Module Settings)
Format Quicktime and HIT FORMAT OPTIONS

Under CODEC: Apple Pro Res 422, hit ok
Under Output To: Name your File and saving location
Then hit RENDER. This will generate a .MOV file. It will likely be be large

To make a compressed version. Open in QUICKTIME

Once in QuickTime go file Export as 1080. This will be a compressed version of the .MOV (This is the one that you will give me as assignment)

Due next class

Make an animation(qicktime) for your Vendor poster and update any edits for the menu, prinout and hand in next class.

These will be graded. Adjust to make more typographical

Place quicktime movie in your folder on dropbox for me to grade.

lastname_banners_final

AND

Compressed animated poster (see above info on how to render and compressed

lastname_compressed_poster1.mov

Place in Dropbox

______________________________

Print will follow printer’s spreads, rather than logical order of reading

CLASS Last day remarks 🙂

by Prof G

NOTE:
Graphic Assignments are always due the day before class at 11:30 pm, and must be placed in class DROPBOX drive unless indicated otherwise. Assignments done or uploaded during class time on the day that they are due are marked as late.

Participation Activities are due during class and are named and posted as indicated by instructor.

« Older posts Newer posts »