Breakout! – In Class Presentation Mockup – King

After demonstration of the in-class assignment (sheet layout), the class will divide up into 5 break out rooms of 4 students each.  Complete the following in class exercise to work on your sheet layout and your PowerPoint

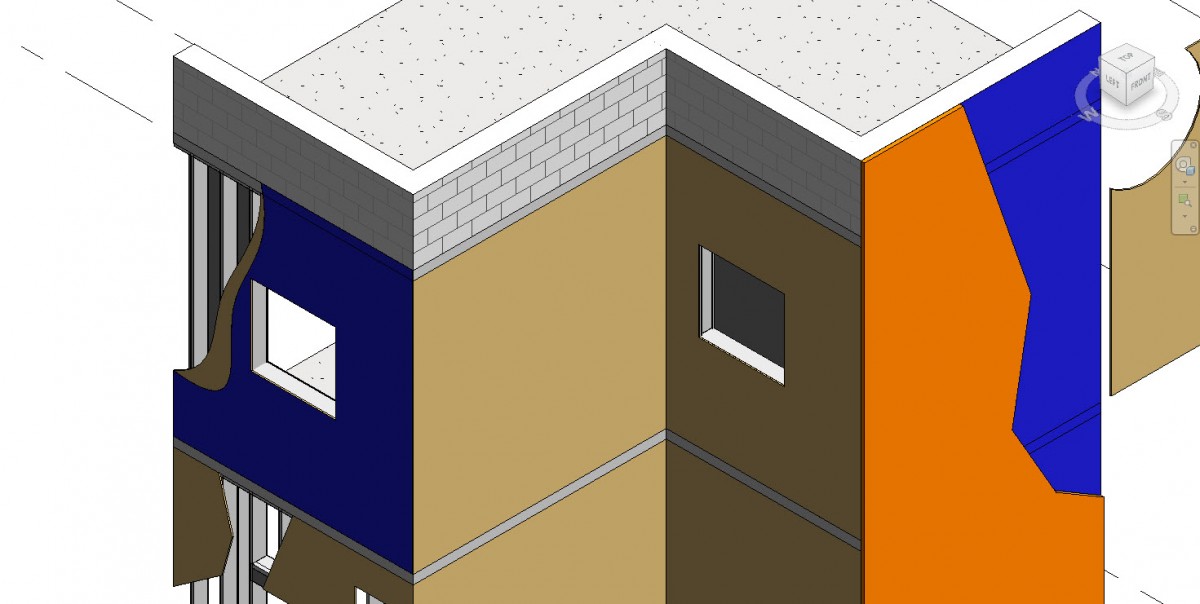
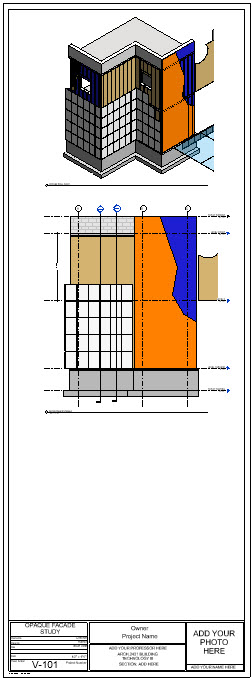
For the Opaque facade study create the following views
      • Full Plan, Front Elevation & Isometric
      • Wall Section at 3/4″
      • Wall Section at 1 1/2″ (cropped views) that show from top to bottom – Parapet – Top of Wall at Roof Slab – Top of Window – Bottom of Window – Slab at Level 2 – Base Condition at Level 1 – Footing Condition.
      • Wall  Section Details at 3″ – Coping or other details that need to be larger
    1. Enlarged Plan Details that show
      1. Inside and Outside Corner Conditions
      2. Middle and End Condition (new)
      3. Window Condition each edge side
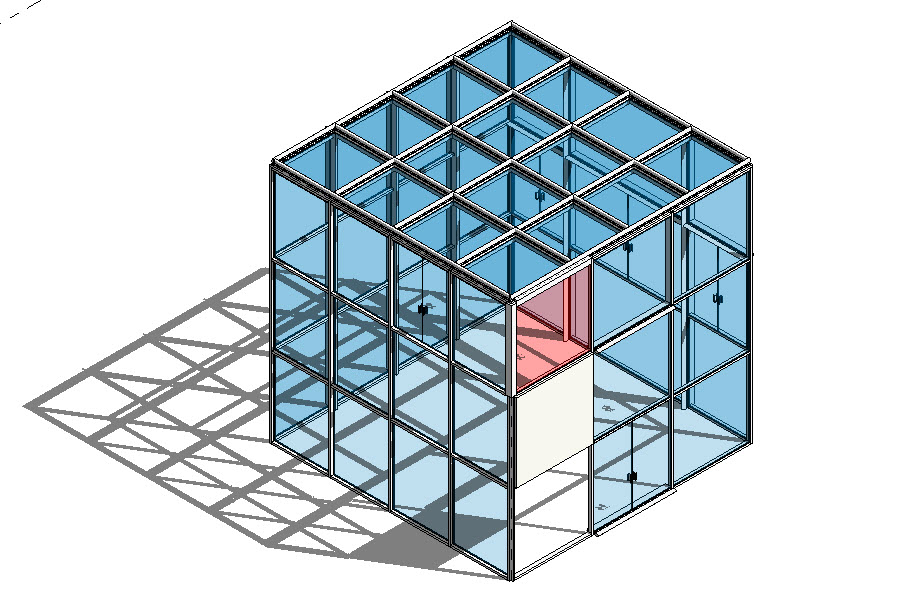
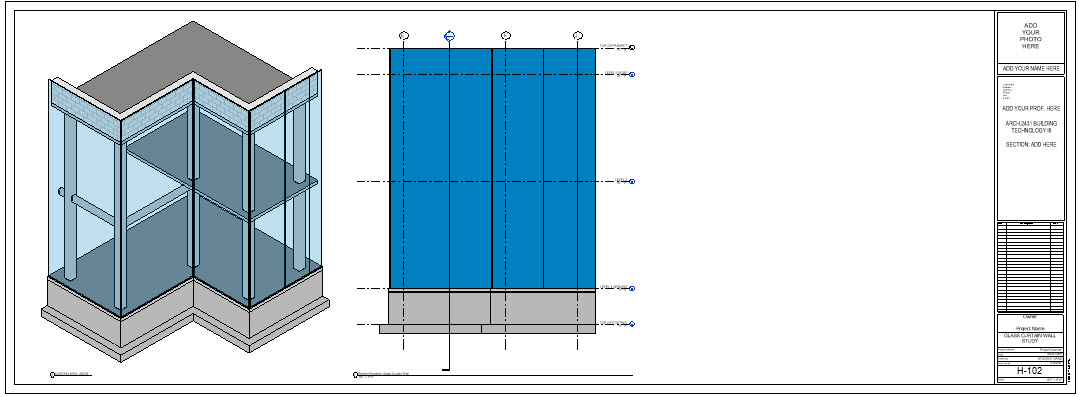
For the Glass Curtain Wall facade Study
  1. Full Plan, Front Elevation & Isometric
  2. Wall Sections at 3/4″, 1 1/2″ and 3″
  3. Parapet condition — how does the curtain wall meet the roof?
  4. Plan Details – Inside Corner, Outside Corner , Middle condition
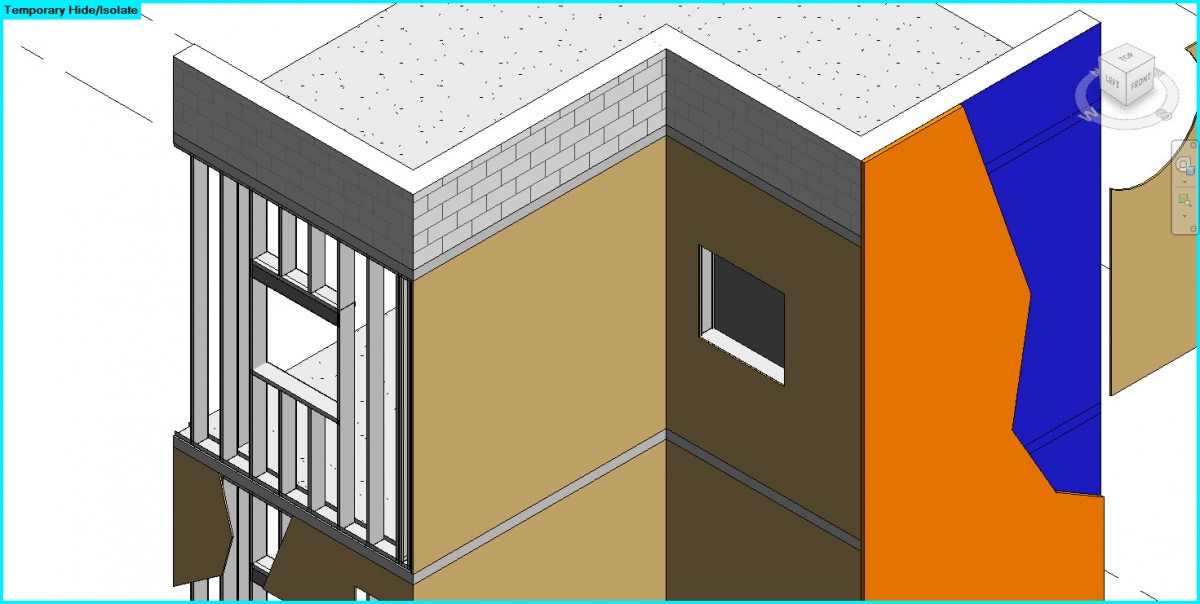
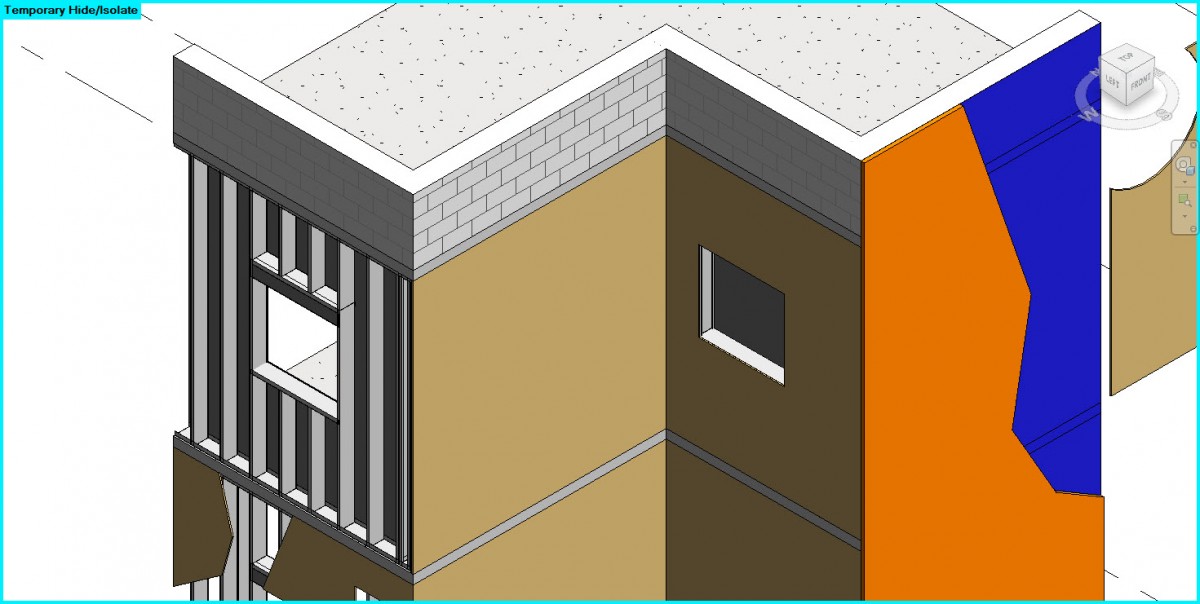
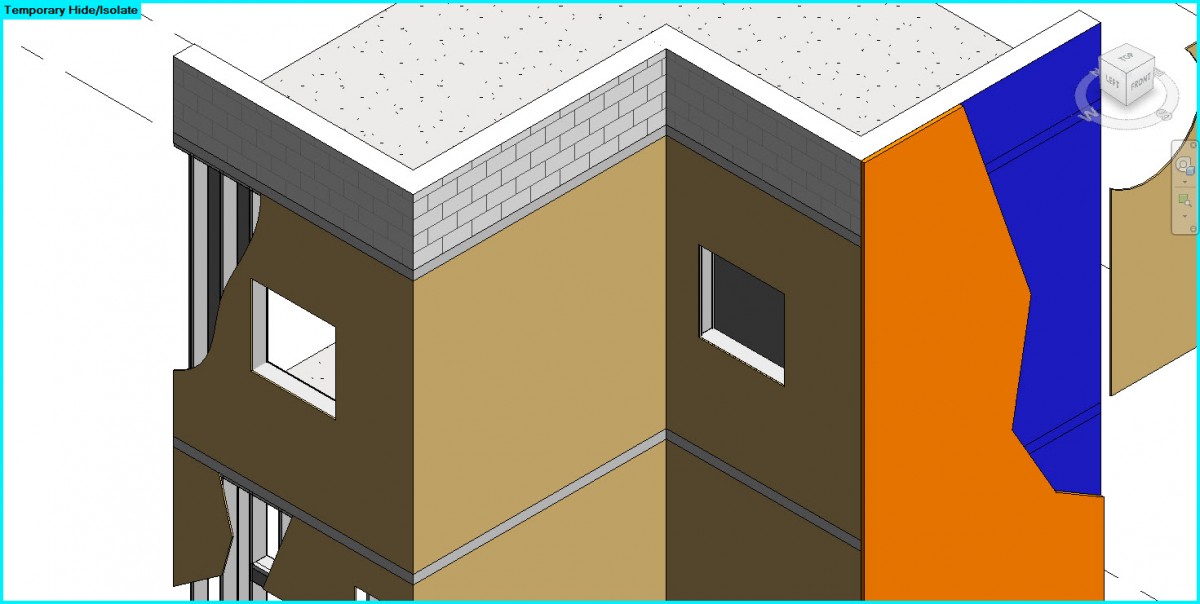
PowerPoint Fixed Animation

Some stages of assembly

King – Due for Thursdays class – April 22nd

Assignment Review (all students)

  • Work on building families for both opaque wall and glass curtain wall
  • Work to develop sheet layout‐ adding additional views including
    • Wall Section at ½” or ¾”, Cropped wall section details at 1 ½”, larger details at 3” for coping
    • Wall section should show, parapet & roof slab, top of window, sill of window, level 2 slab connection, base condition @level 1, footing.
    • Plan details and coordinated elevation views of the following –
      • Inside corner, outside corner, window
          • Next class will be one‐on‐one critiques in break out rooms.
          • Next Tuesday April 28 we will have a graded pinup

Breakout! – In Class Cube Curtain Wall Assignment – King

After demonstration of the in-class assignment (27′ glass curtain wall cube), the class will divide up into 5 break out rooms of 4 students each.  Complete the following in class exercise as a means to mastering Revit’s curtain wall commands while your professor visits each group.  Steps below…

    1. New Project > Architectural Template
      • Set Level 2 elevation at 27 feet
    2. Level 1 Plan View > Draw (Curtain Wall 1 type) – 27′ x 27′
    3. Divide up the facade into panels by defining grid- design is flexible
      • single grid line, grid line segment, all grid lines
      • Load all panel types (Insert > Family > Curtain Wall Panels)
      • Use both Glazed Panel, Empty Panel, Solid Panel
      • Copy Glazed Panel Type > Duplicate > Set it to red
        • Edit Materials > Glass > Duplicated Color > Set it to Red
      • Load door tops and replace panel with door
    4. Add Mullions –
      • Select mullion types as you please
      • Create Custom Mullion – from new profile
        • Family > Profile-Mullion
          • Basic Mullion Rectangle
          • Create custom fancy Mullion – ie. Sunscreen Device
    5. Glass Roof –
      • Control Slope- create flat roof – use Curtain Wall 1 type

Kalzip FC rainscreebn System and Curtain wall installation

Kalzip FC rainscreen system – Louisiana Superdome, New Orleans
https://youtu.be/fTxb2fhDKr0

0:29- 1:40 manufacturing

2:22 overview of façade system

2:30- 2:51 installation sequence

  • Clips secured to wall,
  • “L” profile is attached to clips
  • Mullion Bar is attached to “L” profile
  • Retainer clips installed in mullion
  • siding is clipped in position

3:00- 5:30 Installation

  • L profile installation to adjustable bracket
  • Mullion bar clamped to L profile
  • Alignment of sub-framing
  • Mullion bar fastened to L profile
  • Trimming of panel ends
  • Panel installation

unitized curtain wall installation https://youtu.be/KYXpMkujo_8

0:36 Bracket Installation

0:57 Panel Installation

Videos Installation – Estarlin De La Rosa

Equitone Installation


0:00 Explanation               0:26 Tools          3:27 Luko     4:25 Drilling Equitone

5:11 Equitone on a metal frame            5:46 Visible rivet fixing

6:34 Fixed point- griping point          7:50 Sequence for mounting the panel

10:01 Equitone Natura, Natura pro, picture textural

13:05 Equitone fixed on timber              13:49 Equitone Natura and textural

14:21 Equitone Natura pro and pictura               14:42 Equitone tectiva

15:28 Horizontal joint profile             16:19 Invisible adhesive fixing

16:50 Tergo secret fix        17:43 Hanging hook           18:07 Supporting frames

Unitized Curtainwall

0:14  Surveying       0:48   Unloading      1:28 loading       2:08 Inspection

2:58  Installing the rail       3:00 Sealant       4:05 Seatting of chicken head

4:21  Alignment       4:53  Installation      7:40  Spider crane       8:14  Setting

EQUITONE Facade Panel Installation – Unitized Curtain Wall Installation

  • 0:07 EQUITONE panels visible installation system with rivet or screw
  • 0:09 Invisible fixing method with adhesive
  • 5:13 – 5:28 How rivet works
  • 6:09 The position of the rivet holes on the panel
  • 6:57 Panels on metal supporting frame with fixed and gliding points
  • 7:21 location of fixed points
  • 7:45 Rivet with sleeve for fixed points and without sleeve for gliding points
  • 7:55 Supporting metal frame with anchor points
  • 9:25 Measurement of panel placement
  • 11: 31 Foam  tape on the metal frame
  • 15: The position of horizontal aluminium joint profile
  • 16:43 Invisible adhesive fixing of panels ( supporting frame with foam and adhesive)
  • 17:28 Tergo secret fixing method (Half drilled panel with anchor, metal hook, washer and bolt)
  • 17:44 Hanging Hook system ( hanging hooks on the back of the panel)
  • 18:00 Adjustable top hanging hook


  • 2:14 lifted up curtain wall unit ready to be placed into the installed curtain wall frame


King – Sample Fixed Animation

This is from today’s class.  Included are the still screen captures – the original PowerPoint and the PowerPoint as a PDF file.  Remember to view it correctly you need to be in full screen mode in PowerPoint or PDF – for the PDF you must download the file first to view it properly.


  1. Still Animation Sample – PowerPoint
  2. Still Animation Sample – PDF
  3. Still Images

Prof. King – Assignments Due for Thursday

Please complete the following for Thursday

    1. Email me the email address you use for your zoom login so I can put you into groups for next class.
    2. Document (2) two materials videos based on the assigned list.
      • Link the assigned video into your post.
      • Set the start time for the video
      • (when you are viewing the video on YouTube – move to the start point you want then select the “share button” at the bottom – then select “start at” and then copy the link)
      • Document the timeline – see samples online
      • For category select your name and select “Watchlist > Technical”
    3. Keep your eye out for any Revit tutorials you find helpful – we will be documenting these later on in a similar fashion.
        • When you document these for category select your name and “Watchlist > Revit”
        • This is not due for Thursday
    4. 3D families for your facade materials
          • Begin to model your families and look to assemble these in the template provided.
          • Pay attention to the proper orientation of the family
          • Assign proper materials (remember you need to import materials the first time – Revit > Manage >Transfer Project Standards
          • In the Family set “Family Category and Parameters” – this determines where it shows in the family list in the project browser – there should be no generic families in your finished project
          • Create parameters as needed so your families can be modified – but be careful that some family items will have no parameters- for example a special clip of a certain size or a spider clamp for a glass curtain wall
    5. Assemble your families in the template file
      1. Rename the file using ProfessorName StudentFirst Last Name etc.
      2. Repeat the process of creating the following wall types by making a copy of a generic wall – prefix each with your Initials.   My initials are PK
        1. PK Backup Wall – 9 3/8″
          • 5/8″ GWB
          • 8″ Metal Stud Layer
          • 3/4″ Plywood Sheathing
        2. PK Backup Wall – GWB 5/8″
          • 5/8″ GWB
          • 8″ Metal Stud Layer
          • 3/4″ Plywood Sheathing
        3. PK Backup Wall – Plywood Sheathing 3/4″
          • 3/4″ Plywood Sheathing
        4. PK Backup Wall – Waterproofing 1/16″
          • 1/16″ Waterproofing
    • Consider Using the Same Method for Rigid Insulation
    • Place the various walls parallel to the metal stud frame for each layer
    • Play with the option to edit the profile of the different walls to peel them back to make a more illustrative isometric
    • To shorten the walls to match the bottom of the slab – select the top slab – select “edit boundary” then select the green check.  When prompted “Would you like walls that go up to this floor’s level to attach to its bottom?” Select “YES”