Prof. King – Final Upload for Grading to Blackboard

Hi everyone, we made it through and you all should be proud of what you have accomplished. To finish out the semester please be sure to complete the following tasks:

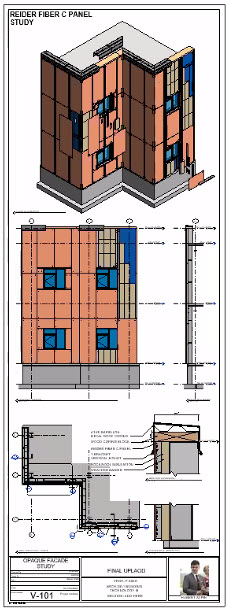
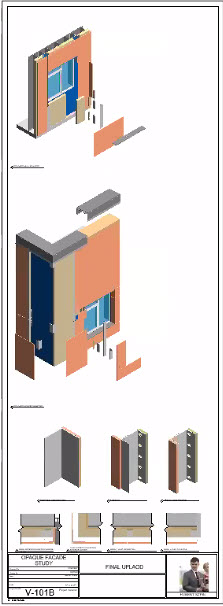
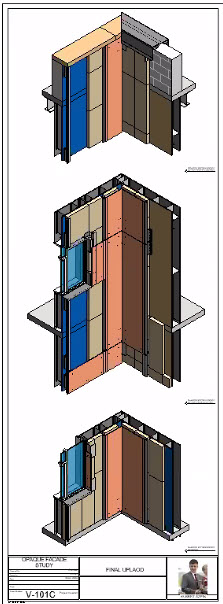
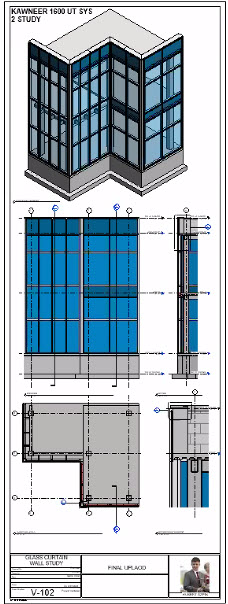
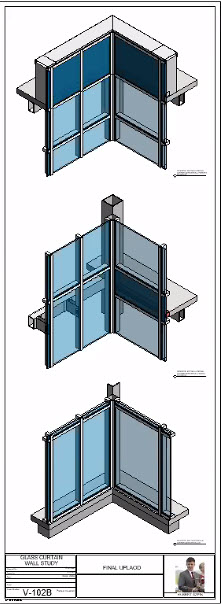
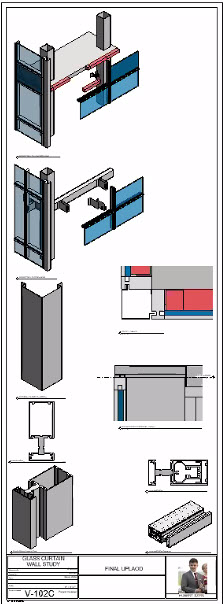
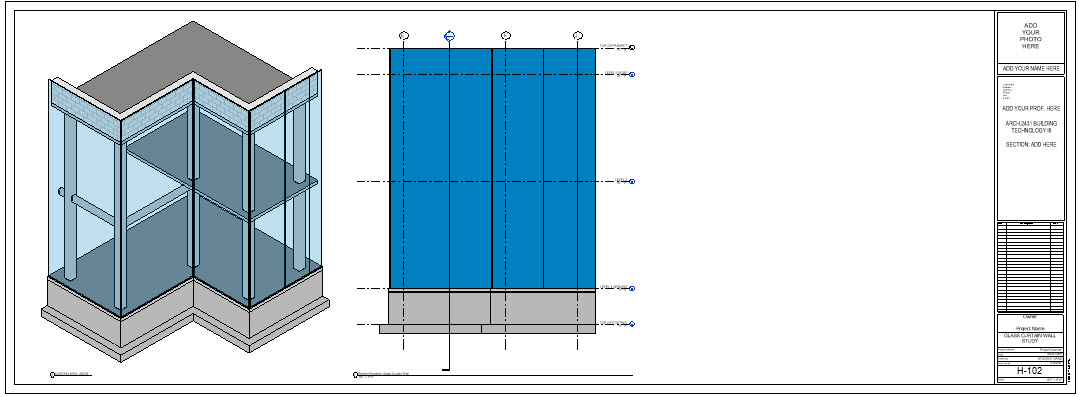
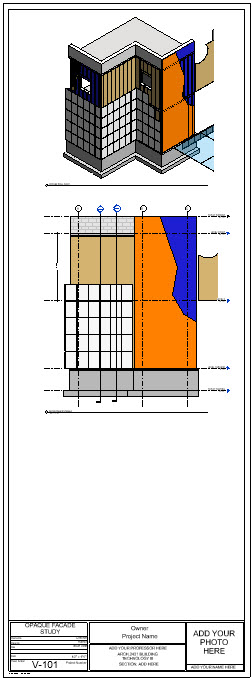
  • Upload your presentation from Tuesday/Thursday to OpenLab so everyone can see them.  I prefer images of your sheets and not PDF’s as they can be seen in the post.  For the powerpoint you can upload this as a PDF.  Be sure to categorize it under .Final Presentations > Prof. King plus your name.
  • Email be both of your Jury sheets from this week.  This counts as class participation and I like to take your comments and grading into account before handing out final grades.

The final submission to be posted on Blackboard is due by Sunday May 24th at Midnight.  This should include your PDF/Still animation, a PDF of all your plotted sheets and any files you used to create the final work including your Revit or Powerpoint files.  Your families are embedded inside your Revit files so they do not need to be uploaded separately.

It took a while but the last video from Thursdays class is now uploaded in our dropbox folder.  It is available for your viewing.

Good luck to everyone.

Prof. King

Please Post Final Presentations Here

Please post your final presentations here on OpenLab by 2 pm today for Tuesdays group and 2 pm Thursday for that days presentations.  You will all have an opportunity to make minor changes and post your final work for grading to blackboard by Friday May 22nd midnight.

To present today you will likely have two PDF files – one for your sheets and one for the Fixed Animation PowerPoint.  I ask that here you post the plotted sheets as individual  images so they are visible.  The PowerPoint can be one file with a link.

Please select the Category .Final Presentations > Prof. King & Select yourself as a category as well.

Presentation order as follows:

Presentation Date Name
Tuesday (2:30-2:45) 5/19/2020 Williams,Alana
Tuesday 5/19/2020 Ulerio,Rangel
Tuesday (2:45-3:00) 5/19/2020 Tan,Jun Hao
Tuesday (3:00-3:15) 5/19/2020 Szpin,Hubert
Tuesday (3:15-3:30) 5/19/2020 Rodriguez,Joshua L
Tuesday (3:30-4:00) 5/19/2020 Kuang,Mei Fen
Tuesday (4:00-4:15) 5/19/2020 Khabelashvili,Tea
Tuesday (4:15-4:30) 5/19/2020 Dirsio,Juan
Tuesday (4:30-4:45) 5/19/2020 De La Rosa,Estarlin J
Tuesday (4:45-5:00) 5/19/2020 Casseb,Raphael A
 Thursday (2:30-2:45) 5/21/2020 Perez,Daniel
Thursday (2:45-3:00) 5/21/2020 Ortiz,Ashley
Thursday (3:00-3:15) 5/21/2020 Mendoza,Carrie
Thursday (3:15-3:30) 5/21/2020 Manrique,Brian
Thursday (3:30-4:00) 5/21/2020 Lee,Richard
Thursday (4:00-4:15) 5/21/2020 Jablonski,Dominik
Thursday (4:15-4:30) 5/21/2020 Hamdan,SaJida
Thursday(4:30-4:45) 5/21/2020 Estevez,Emmanuel
Thursday (4:45-5:00) 5/21/2020 Centeno,Victor
Thursday (5:00-5:15) 5/21/2020 Ahmed,Faizan


Prof. King – Presentation Schedule Dates

Presentation Date Name
Thursday 5/21/2020 Ahmed,Faizan
Tuesday 5/19/2020 Casseb,Raphael A
Thursday 5/21/2020 Centeno,Victor
Tuesday 5/19/2020 De La Rosa,Estarlin J
Tuesday 5/19/2020 Dirsio,Juan
Thursday 5/21/2020 Estevez,Emmanuel
Thursday 5/21/2020 Hamdan,SaJida
Thursday 5/21/2020 Jablonski,Dominik
Tuesday 5/19/2020 Khabelashvili,Tea
Tuesday 5/19/2020 Kuang,Mei Fen
Thursday 5/21/2020 Lee,Richard
Thursday 5/21/2020 Manrique,Brian
Thursday 5/21/2020 Mendoza,Carrie
Thursday 5/21/2020 Ortiz,Ashley
Thursday 5/21/2020 Perez,Daniel
Tuesday 5/19/2020 Rodriguez,Joshua L
Tuesday 5/19/2020 Szpin,Hubert
Tuesday 5/19/2020 Tan,Jun Hao
Tuesday 5/19/2020 Ulerio,Rangel
Tuesday 5/19/2020 Williams,Alana

Extended Student Trial Software – Snagit Screen Capture

We have arranged for students to be granted an extended free license of Snagit screen capture software.  This is the best and fasted method of creating the fixed image animations.

Windows: http://discover.techsmith.com/software-access/clkn/https/download.techsmith.com/snagit/releases/ExtendedTrial/snagit.exe

Mac: https://download.techsmith.com/snagitmac/releases/ExtendedTrial/snagit.dmg

Tuesday Presentation Deadline! – King

Now is the time to push yourself.  The harder you work from today until the Tuesday the easier the rest of the semester will be.  If anyone wants a one-on-one crit this weekend or Monday please email me.  Good luck!

For Tuesday we will have a graded preliminary pinup presentation.  You need to complete the layout of both your opaque wall and your glass curtain wall as well as develop “still image” animations showing assembly in PowerPoint.

For this presentation you should evaluate both horizontal and vertical formatting for your sheets.  Please refer to the previous post on the breakout assignment from Thursday. Here is a suggested methodology.

  1. In your project file choose the vertical format.

    • Create the necessary views for both the opaque and glass facades and arrange these images on the sheets.  You are likely to need to sheets for each.  Pay attention to the appropriate scale and the need to have coordinated plan, section, elevation and isometric views.
    • Save your file.
  2. Make a copy of your project file using “Save_as” or by copying the file.

    • In the copy switch the sheet types from Vertical to Horizontal.  Next re-arrange the same views on the Horizontal sheets.

If when you are attempting a layout you realize that is may not work well you can show images running slightly off the sheet or somewhat incomplete.

Your Presentation Includes

  • 4 sheets in vertical format (2 opaque/2 glass)
  • 4 sheets in horizontal format (2 opaque/2 glass)
  • PowerPoint Presentation with “still image animations”
    • One for Opaque
    • One for Glass Curtain Wall

Please remember to post your virtual  presentation on OpenLab

Select Category for your name, and under Presentations select Facade Preliminary


Breakout! – In Class Presentation Mockup – King

After demonstration of the in-class assignment (sheet layout), the class will divide up into 5 break out rooms of 4 students each.  Complete the following in class exercise to work on your sheet layout and your PowerPoint

For the Opaque facade study create the following views
      • Full Plan, Front Elevation & Isometric
      • Wall Section at 3/4″
      • Wall Section at 1 1/2″ (cropped views) that show from top to bottom – Parapet – Top of Wall at Roof Slab – Top of Window – Bottom of Window – Slab at Level 2 – Base Condition at Level 1 – Footing Condition.
      • Wall  Section Details at 3″ – Coping or other details that need to be larger
    1. Enlarged Plan Details that show
      1. Inside and Outside Corner Conditions
      2. Middle and End Condition (new)
      3. Window Condition each edge side
For the Glass Curtain Wall facade Study
  1. Full Plan, Front Elevation & Isometric
  2. Wall Sections at 3/4″, 1 1/2″ and 3″
  3. Parapet condition — how does the curtain wall meet the roof?
  4. Plan Details – Inside Corner, Outside Corner , Middle condition
PowerPoint Fixed Animation

Some stages of assembly

King – Due for Thursdays class – April 22nd

Assignment Review (all students)

  • Work on building families for both opaque wall and glass curtain wall
  • Work to develop sheet layout‐ adding additional views including
    • Wall Section at ½” or ¾”, Cropped wall section details at 1 ½”, larger details at 3” for coping
    • Wall section should show, parapet & roof slab, top of window, sill of window, level 2 slab connection, base condition @level 1, footing.
    • Plan details and coordinated elevation views of the following –
      • Inside corner, outside corner, window
          • Next class will be one‐on‐one critiques in break out rooms.
          • Next Tuesday April 28 we will have a graded pinup

Breakout! – In Class Cube Curtain Wall Assignment – King

After demonstration of the in-class assignment (27′ glass curtain wall cube), the class will divide up into 5 break out rooms of 4 students each.  Complete the following in class exercise as a means to mastering Revit’s curtain wall commands while your professor visits each group.  Steps below…

    1. New Project > Architectural Template
      • Set Level 2 elevation at 27 feet
    2. Level 1 Plan View > Draw (Curtain Wall 1 type) – 27′ x 27′
    3. Divide up the facade into panels by defining grid- design is flexible
      • single grid line, grid line segment, all grid lines
      • Load all panel types (Insert > Family > Curtain Wall Panels)
      • Use both Glazed Panel, Empty Panel, Solid Panel
      • Copy Glazed Panel Type > Duplicate > Set it to red
        • Edit Materials > Glass > Duplicated Color > Set it to Red
      • Load door tops and replace panel with door
    4. Add Mullions –
      • Select mullion types as you please
      • Create Custom Mullion – from new profile
        • Family > Profile-Mullion
          • Basic Mullion Rectangle
          • Create custom fancy Mullion – ie. Sunscreen Device
    5. Glass Roof –
      • Control Slope- create flat roof – use Curtain Wall 1 type