Author: Prof. Paul King
King – Sample Fixed Animation
This is from today’s class. Included are the still screen captures – the original PowerPoint and the PowerPoint as a PDF file. Remember to view it correctly you need to be in full screen mode in PowerPoint or PDF – for the PDF you must download the file first to view it properly.

Prof. King – Assignments Due for Thursday
Please complete the following for Thursday
-
-
Email me the email address you use for your zoom login so I can put you into groups for next class.
-
Document (2) two materials videos based on the assigned list.
- Link the assigned video into your post.
- Set the start time for the video
- (when you are viewing the video on YouTube – move to the start point you want then select the “share button” at the bottom – then select “start at” and then copy the link)
- Document the timeline – see samples online
- For category select your name and select “Watchlist > Technical”
-
Keep your eye out for any Revit tutorials you find helpful – we will be documenting these later on in a similar fashion.
-
- When you document these for category select your name and “Watchlist > Revit”
- This is not due for Thursday
-
-
3D families for your facade materials
-
-
- Begin to model your families and look to assemble these in the template provided.
- Pay attention to the proper orientation of the family
- Assign proper materials (remember you need to import materials the first time – Revit > Manage >Transfer Project Standards
- In the Family set “Family Category and Parameters” – this determines where it shows in the family list in the project browser – there should be no generic families in your finished project
- Create parameters as needed so your families can be modified – but be careful that some family items will have no parameters- for example a special clip of a certain size or a spider clamp for a glass curtain wall
-
-
-
Assemble your families in the template file
-
-
-
- Rename the file using ProfessorName StudentFirst Last Name etc.
- Repeat the process of creating the following wall types by making a copy of a generic wall – prefix each with your Initials. My initials are PK
-
PK Backup Wall – 9 3/8″
- 5/8″ GWB
- 8″ Metal Stud Layer
- 3/4″ Plywood Sheathing
-
PK Backup Wall – GWB 5/8″
- 5/8″ GWB
- 8″ Metal Stud Layer
- 3/4″ Plywood Sheathing
-
PK Backup Wall – Plywood Sheathing 3/4″
- 3/4″ Plywood Sheathing
-
PK Backup Wall – Waterproofing 1/16″
- 1/16″ Waterproofing
-
- Consider Using the Same Method for Rigid Insulation
- Place the various walls parallel to the metal stud frame for each layer
- Play with the option to edit the profile of the different walls to peel them back to make a more illustrative isometric
- To shorten the walls to match the bottom of the slab – select the top slab – select “edit boundary” then select the green check. When prompted “Would you like walls that go up to this floor’s level to attach to its bottom?” Select “YES”
-
Prof King – Video Research Assignment
Revit – Spider Curtain Wall
Revit – Perforated Ventilated Facade
Prof. King Class Meeting Tuesday April 14th Schedule
We will have a full class meeting with everyone together.
We will do teams on Thursday…
Join Zoom Meeting
https://zoom.us/j/930068136?pwd=d1k1RHczWUJuNDAyY1lDWG9YSGdXZz09
Meeting ID: 930 068 136
Password: 867550
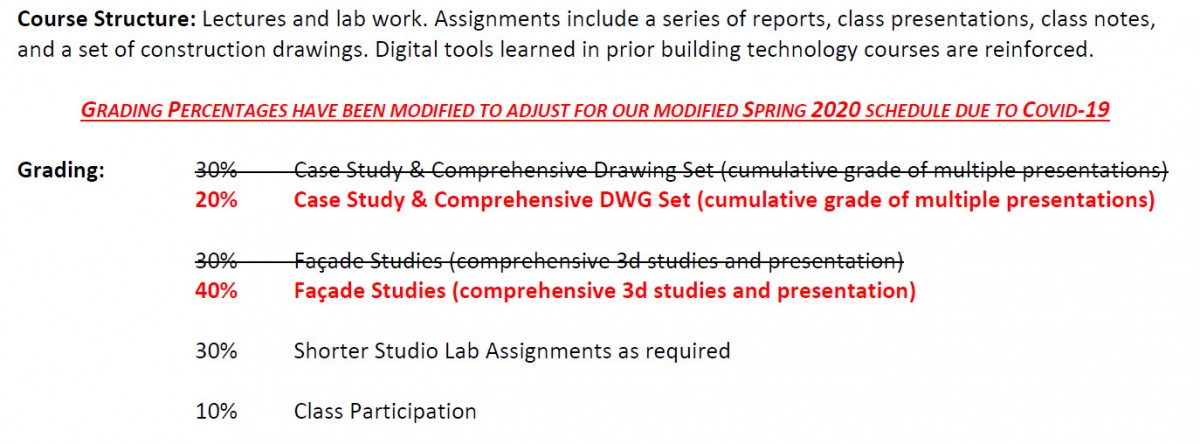
Modified Grading Percentages & Class Schedule – All sections
To accommodate the loss of time and the modified schedule for the Spring of 2020 we have updated the grading percentages for the various projects assigned this semester. We will spend the rest of the semester focused on the two 3D model assemblies (Opaque & Glass Curtain Wall).
We will not go back to working on the Revit drawing set. Each professor will notify you about any additional collection dates for this drawing set.
| Updated Schedule | |||
| WK | Topic | Tuesday | Thursday |
| Week 1 | Exterior Backup Wall | 14-Apr | 16-Apr |
| Week 2 | Curtain Wall Systems Overview | 21-Apr | 23-Apr |
| Week 3 | Structural Glazed Curtain Wall | 28-Apr | 30-Apr |
| Week 4 | Parapets & Footings | 5-May | 7-May |
| Week 5 | Windows & Doors | 12-May | 14-May |
| Week 6 | Final Presentations | 19-May | 21-May |
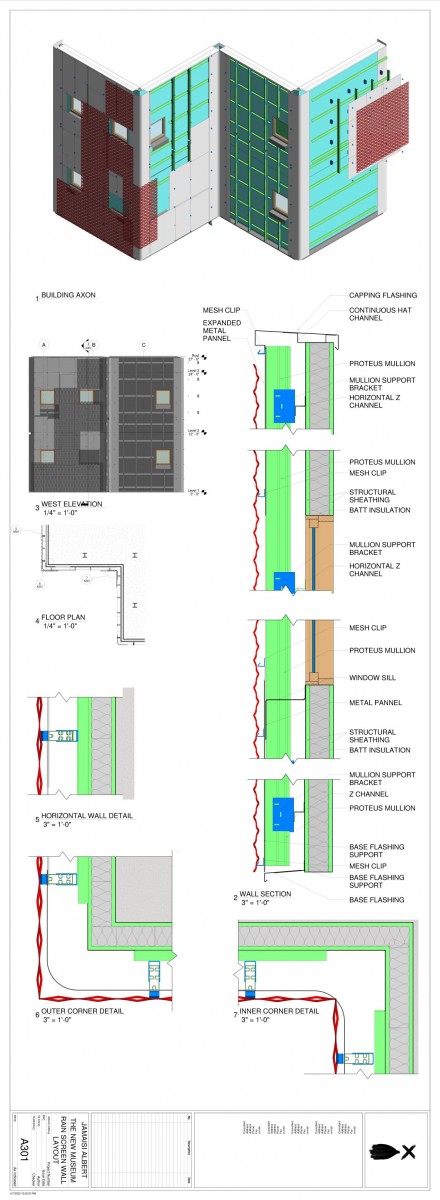
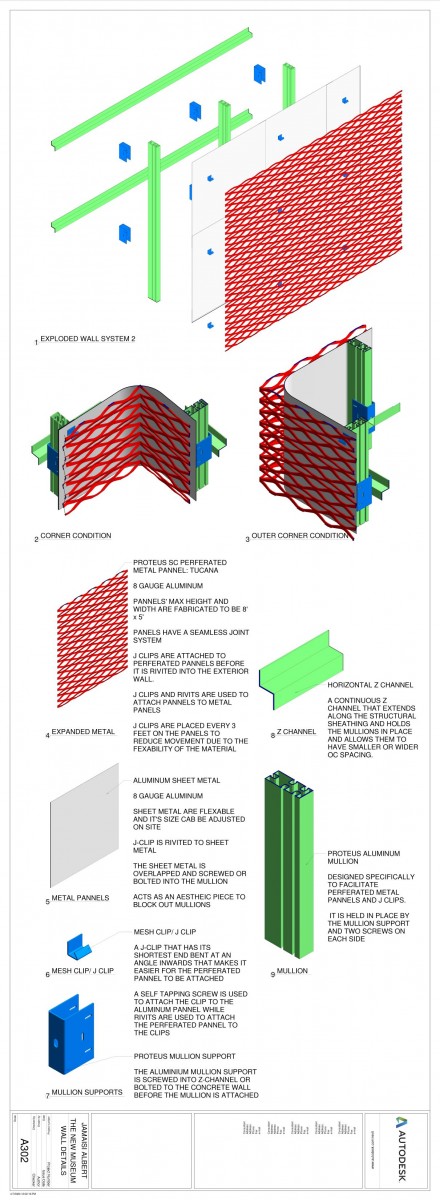
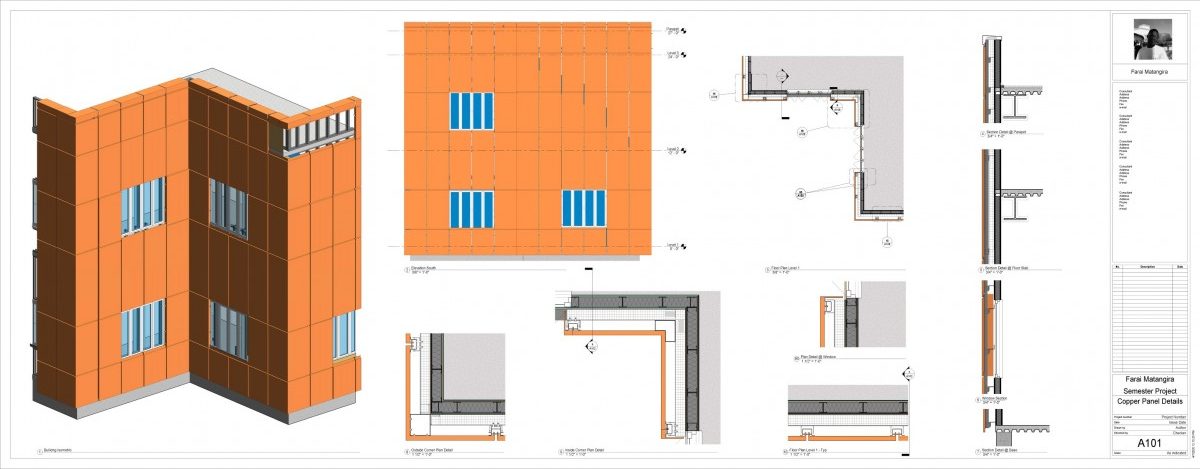
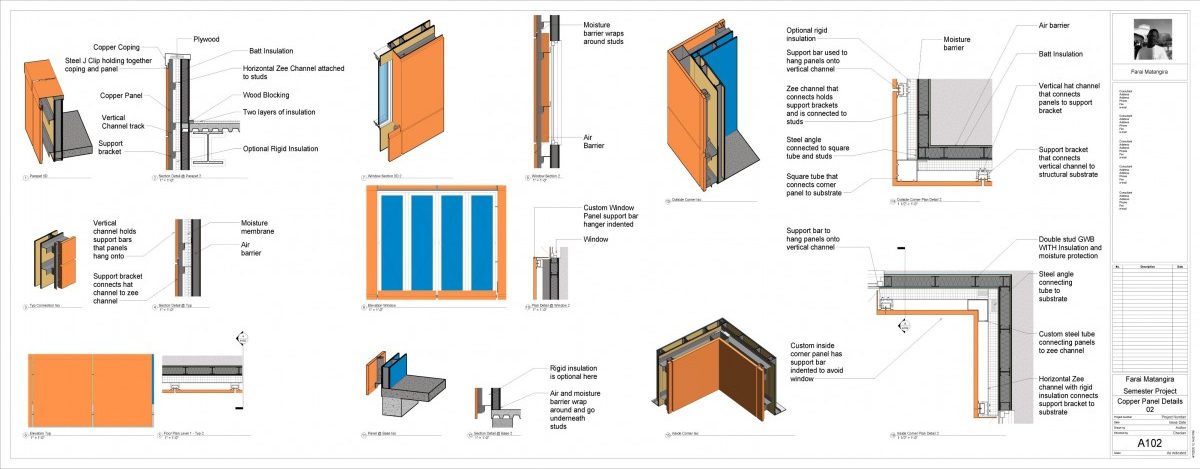
Final Presentation Requirements & Samples from Fall 2020
Final Presentations:
Presentations will consist of 22″ x 60″ sheets plotted to PDF and a matching PowerPoint/PDF presentation. Both will be posted both on Blackboard and on OpenLab. We will make use of Blackboard for final presentations.
Revit 22 x 60 sheets
You will need a separate 22 x 60 sheet for the Opaque Material and the Glass Curtain Wall. You will each be provided with a Revit template project file which will have two base models – one for the Opaque Model and a second for the Glass Curtain Wall. Here you will assemble your 3D families.
The template will contain two title-block choices – 22 x 60 horizontal or 22 x 60 vertical format. Each student should choose one option for both presentations. You should expect it to require 2 sheets for each category (Opaque and Glass) – meaning you will have up to 4 sheets in total – more is OK if needed and 2 total sheets (one for each) is the minimum requirement for a passing grade on this assignment. I have seen a successful single sheet presentation for a structural glass curtain wall.
PowerPoint Presentations
Each student is required to make an oral presentation using a PowerPoint /PDF. This will will be built upon the research presentations that are already created by each of you. While you may include sample details which you obtained from the manufacturer of the systems you are featuring, you should rely primarily on the details you created yourself using Revit. During this presentation your goal is to show that you fully understand the system that you have modeled.
It is critical that you provide a citation for any information you include which you did not create yourself – otherwise your presentation is considered plagiarism which can cause you to fail the course. The citation should include a URL link to the source and these should be included on the same slide as the image not just at the end of the presentation.
It helps if you consider developing an outline of what you wish to communicate before you begin this presentation. You need to show a clear understanding of the following four (4) strategies of your systems.
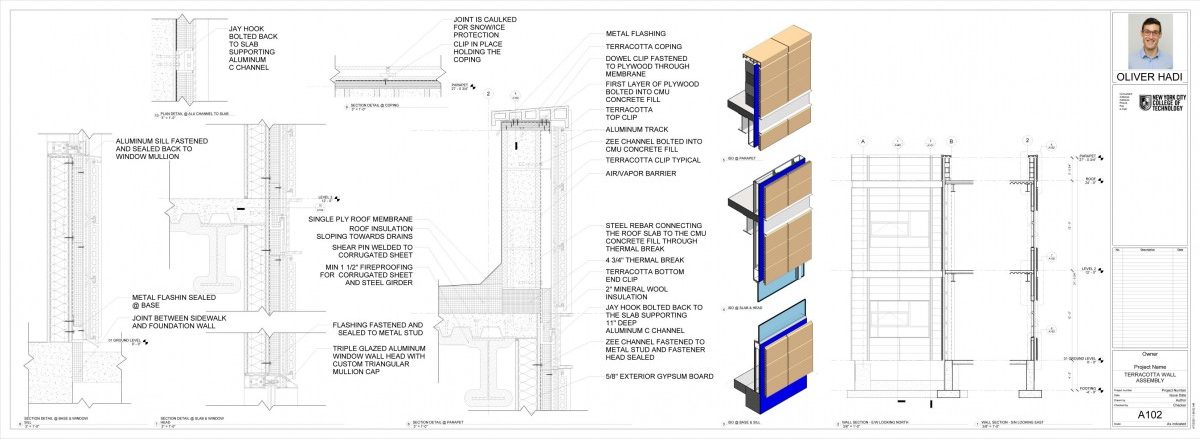
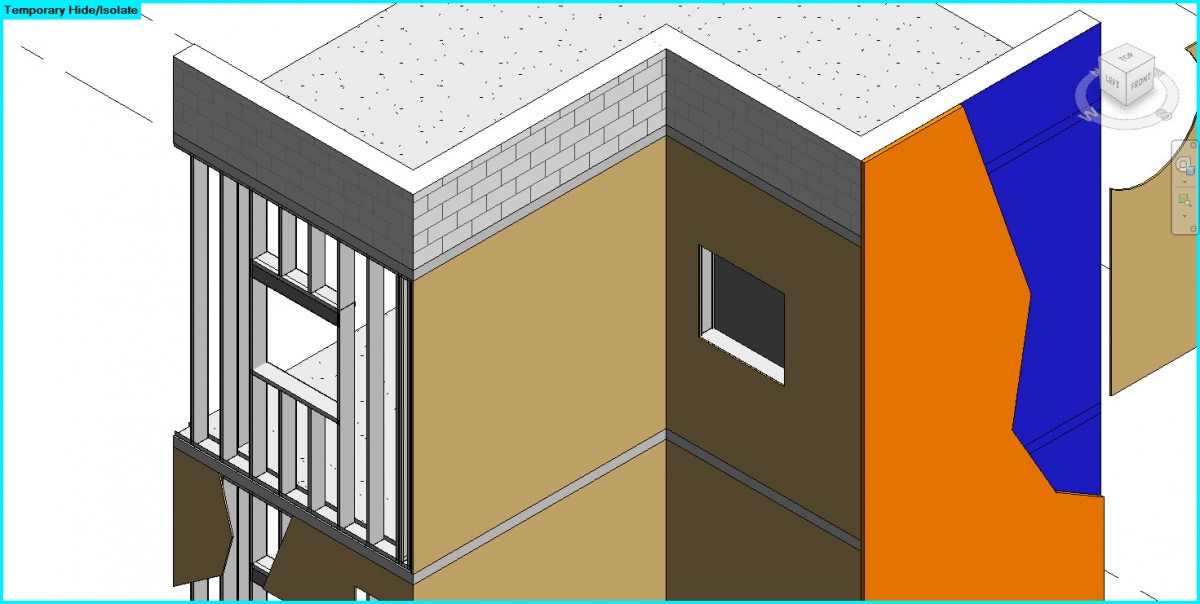
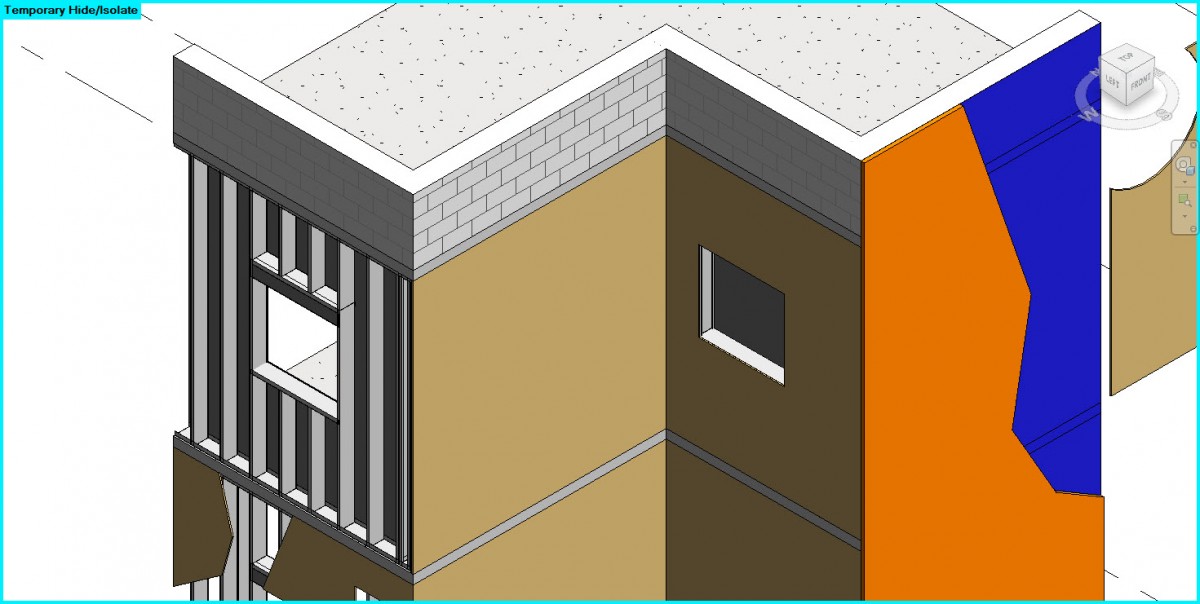
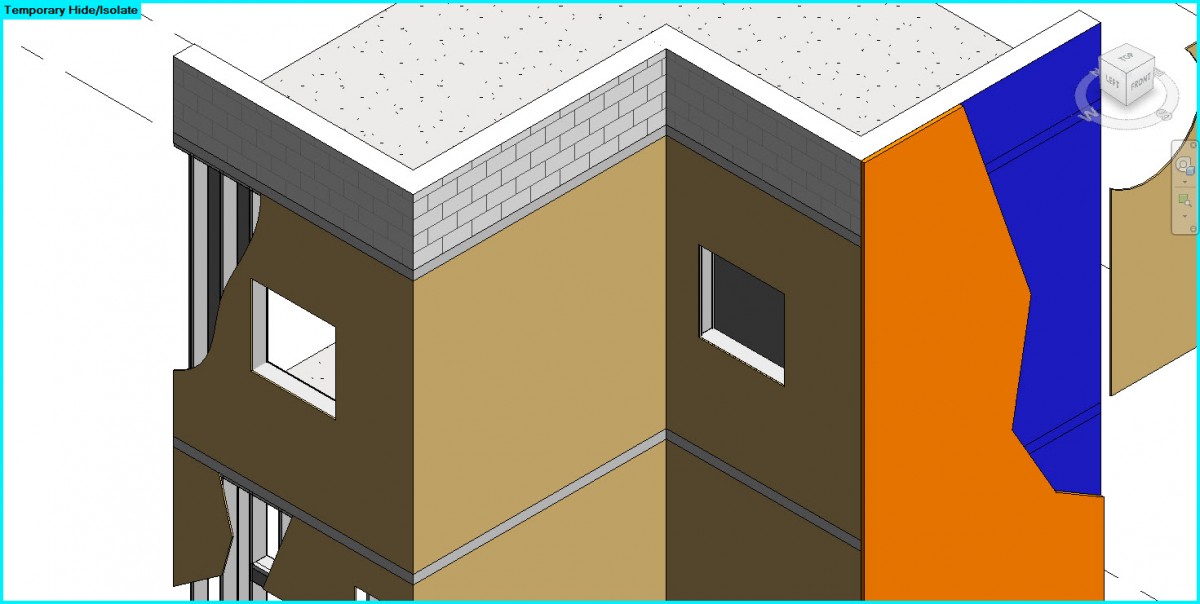
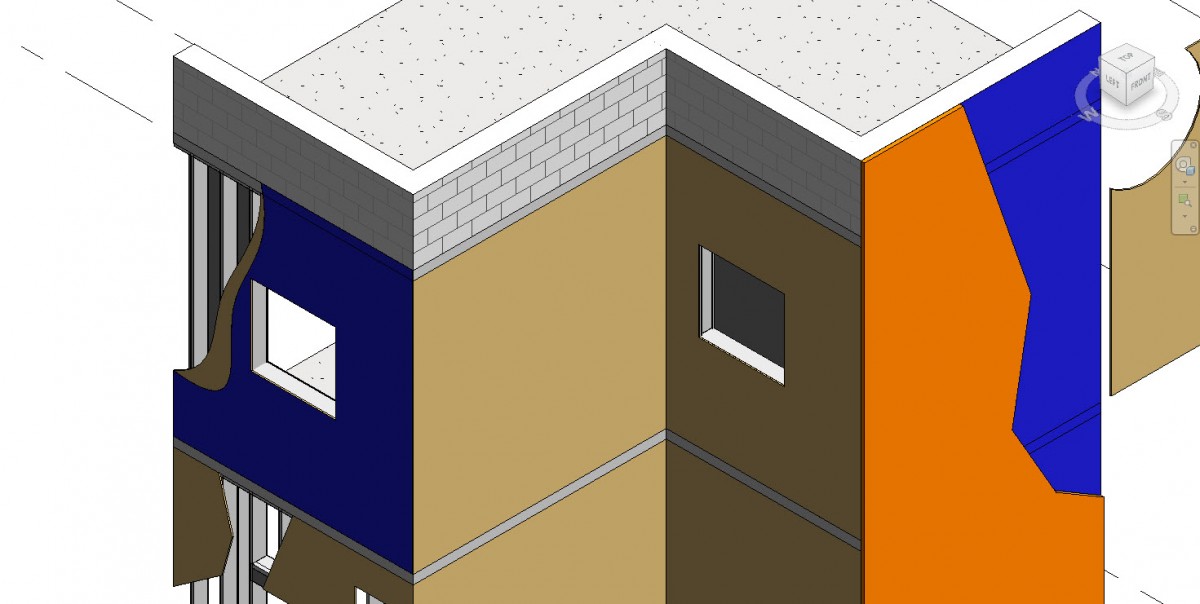
Structure – *Grey colors
This shows the structural components of the building – the columns, beams and concrete slab on metal deck. You also need to illustrate how your facade system is held up or stabilized. Diagram this on a section view.
Waterproofing – *Blue color
What is the strategy for waterproofing the facade, the roof and the foundation? There should be an unbroken “blue” line added to a section view that shows where this occurs. Your details from the roof down the facade to the footing including an intermediate window are all part of your waterproofing solution. Research and identify the specific materials or products (manufacturers)
Thermal – *Orange Color
What is the thermal strategy for your facade, the roof and foundation? Similar to the waterproofing there should be an unbroken “orange” line shown to illustrate where the thermal resistance occurs. Remember that sometimes parts of your details serve more than once purpose – for example the glass waterproofs the building but also acts as a thermal barrier – multiple panes of glass increase the effectiveness of this barrier. Research and identify the specific materials for the Roof, the Parapet, your facade and the windows.
Fire Proofing – *Red and Yellow Color – Red for fire stopping and Yellow for Smoke Seal
The fire proofing and smoke barrier strategy is intended to prevent the spread of fire and smoke from one floor to another vertically up a building. The spread of smoke and fire can occur when there are gaps between the edge of a floor slab and a glass curtain wall. How does your detail prevent the spread of fire and smoke?
General Comments
While the plotted sheets are best for showing a more complete composition of related large scale details, the PowerPoint allows the creation of “still or stepped image animations” that explain the process of installation of the wall system.
Be aware that many of the manufacturers may have 3D families available. While you may look at and review how these are made – YOU MUST MAKE YOUR OWN FAMILIES – as these are typically too complex for our purposes. The same is true for manufactures 2D families – MAKE YOUR OWN –
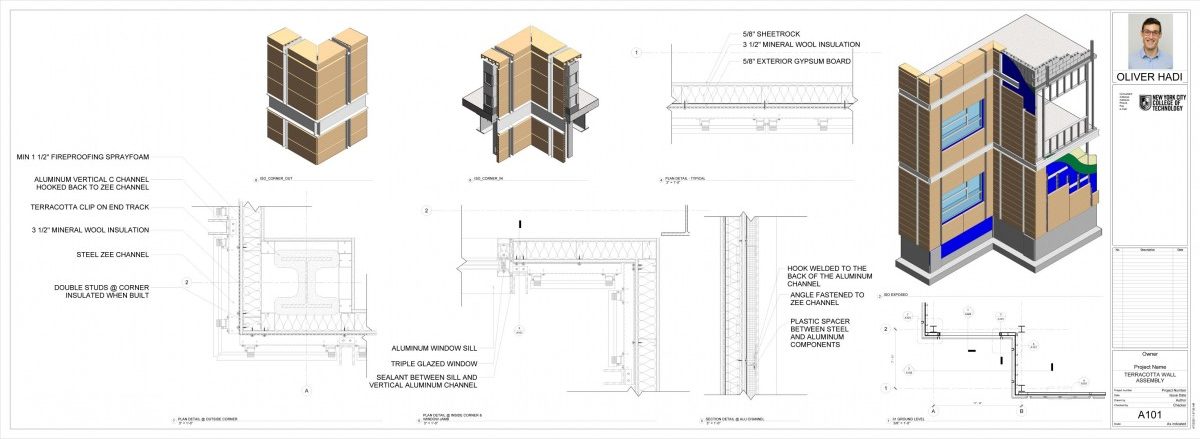
Each of you will be creating your own custom 3D families similar to what we did for the connections assignment. Be certain to prefix each of your own families with your own initials. Your families should include material assignments so that color will help to make your details more readable. You will see in the attached samples that details with color are easier to read.
Your section and plan details should be augmented through the use of 2D detail items – some of these will be standard Revit items and some of these should be detail items you have created for your system – remember to prefix these with your initials.
Remember that most details are not complete unless they include annotation/notes with leaders and dimensions. Some details may be used to key other details and may not have notes or dimensions. Proper scales for the large details are 3/4″, 1 1/2″ and 3″ – it is when you attempt to add annotations that you will be able to evaluate the proper scale.
Student Work Samples
The following 3 samples of student work are from Prof. King’s class from the fall of 2020. Samples of their PowerPoint presentations will be posted separately.