Zoom Revit Workshop Schedule

Good Afternoon,

Thank you all of being present to the recent workshops. Feel free to email me any questions you have concerning your assignments. Also I have attached the Posters for the Revit workshops.

Wer will be continuing the Revit workshops digitally.

Encourage your classmates to also attend and be added to this email listing to receive the extra support in both Building Tech 3 and 4

You can also sign up for workshops and fill out the survey @NYCCTFAB

Revit Workshop is inviting you to a scheduled Zoom meeting.
Topic: Revit Workshops 6pm-8pm
Time: Mar 23, 2020 06:00 PM Eastern Time (US and Canada)
        Every week on Mon, Wed, until May 11, 2020, 15 occurrence(s)
        Mar 23, 2020 06:00 PM
        Mar 25, 2020 06:00 PM
        Mar 30, 2020 06:00 PM
        Apr 1, 2020 06:00 PM
        Apr 6, 2020 06:00 PM
        Apr 8, 2020 06:00 PM
        Apr 13, 2020 06:00 PM
        Apr 15, 2020 06:00 PM
        Apr 20, 2020 06:00 PM
        Apr 22, 2020 06:00 PM
        Apr 27, 2020 06:00 PM
        Apr 29, 2020 06:00 PM
        May 4, 2020 06:00 PM
        May 6, 2020 06:00 PM
        May 11, 2020 06:00 PM
Please download and import the following iCalendar (.ics) files to your calendar system.
Weekly: https://zoom.us/meeting/tZEtf-CorjsjUzrcoaUVNESuNl6zl1cXkQ/ics?icsToken=98tyKuGtrjMjGtSVuV3td7IvW6_ibPHyiERUuKBSnSrTLQVgdy36YPhOY7FHG-mB
Join Zoom Meeting
https://zoom.us/j/850890009?pwd=WDJDTFBYWTR3N1M3aENrZ0R2UnhjUT09
Meeting ID: 850 890 009
Password: 152566
One tap mobile
,,850890009# US Toll
Dial by your location
         US Toll
Meeting ID: 850 890 009
Find your local number: https://zoom.us/u/ad9lxyI1ot

Due for Next Tuesday – Graded Submission

  • Cover Sheet
    • Drawings Lists for Arch & Struct – 3d Image
  • A-100 Architectural Plans (basement to roof)
  • A-200 Architectural RCP Plans (basement to top floor)
  • A-300 Architectural Exterior Elevations and Whole Building Sections (two)
  • A-400 Architectural Details – Building Wall Sections, Plan Details, Partition Types
  • S-100 Structural Framing Plans (Footing Plan & Typical Floor)
  • S-200 Structural Sections (match  your two architectural sections)
The drawings that will be the most complete will be the cover sheet, typical floor plan and the structural drawings.  The rest of the sheets should be laid out properly.
  • Floor Plan should include
    • Exterior Wall
    • Interior Walls
    • Indicate location for core elevators and stairs
        • (do not draw stairs or elevators)
    • Room Numbers/Names
    • Doors and Door Number Tags
    • RCP Plan should include walls and Room Tags
  • Structural Drawings should include
    • All structural elements
      • Columns
      • Beams with Tags
      • Shaft Openings
      • Slabs
    • No Architectural Elements (non structural walls)


  • All drawings to include
    • Structural Grid
    • Grid Dimensions for all Structural and Typical Architectural Plan
    • Titleblock with student name and photo
    • Titleblock with proper name, etc.

Due for Next Class – Floor Plan & Wall Type Detail

  • Floor Plan – (pick only  floor)
  • Show the following
    • Interior Walls
    • Interior Doors
    • Room Labels (Remember to define the room first)
    • Door Tags
    • Make sure the layout is roughly correct and we will finalize dimensions in next class
  • Wall Type Detail (create one to begin with)
    • 1 Layer 5/8″ Firecode GYP Wall Board on each side of 3 5/8″ Metal Stud Frame
      • The detail should have 4 views – in order from top to bottom
        • Top (Section)
        • Ceiling (Section)
        • Plan (Plan View)
        • Base (Section)
      • Add notes and annotation
      • Add Detail items for studs, GWB, etc.
      • We will eventually create at least the following
        • Unrated Interior Partition
        • 1 Hour Rated Interior Partition
        • 2 Hour Rated Interior Partition
        • Shaft Wall
        • Chase Wall
    • Post your revit file and a pdf before next class – by midnight

Due for next class

  • Complete the structural portions of your building
    • Concrete
      • Foundation Wall and Footing (basement to level 1)
      • Isolated concrete footings and column (below slab to slab)
      • Foundation Slab
    • Steel
      • Interior Columns – Basement to roof (have a joint 3 feet above level 2)
      • Perimeter Columns – Start at Level 1 to roof
      • Steel Columns (level 1 to roof) Remember to set -5″ Z height
      • Show column tags
    • Floors
      • 3″ LW concrete on 2″ metal deck (level 1 to roof)
    • Exterior Wall
      • Add a placeholder wall – Level 1 to Parapet
    • Plan development – study your entry level plan.  Work out the dimensions of the different walls and be prepared to draw in class.

Grading Statistics for Connections Assignment

All the grades are posted.  I am awaiting the posting from 1 student.

In addition to the class pinup grading included a review of your Revit files and families.  In this review I looked for proper naming of families, correct use of reference planes and parameters that controlled the model.  I also looked for sheet layout and development of details including the views shown and the inclusion of notes, hatch, dimensions etc.
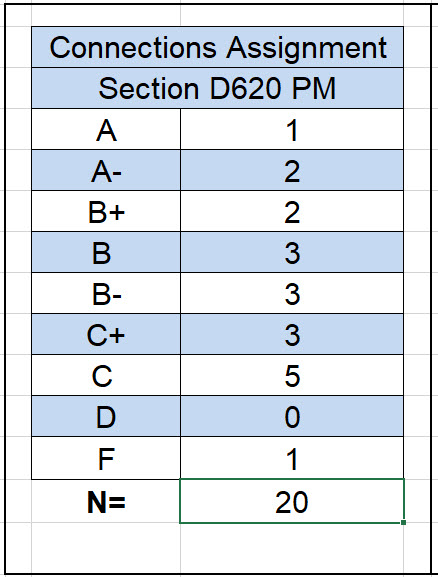
Current Assignment – Case Study Building – Posting for Monday by Midnight

Complete the following for Monday evening

  • Create a new project file – give it a good name
    • Should include your name, the semester & course, your building, your professor
  • Create all necessary Levels – and set their heights –
    • If your building does not have a basement level please add one
  • Add your grids
    • You should have a minimum of two intersecting grids (1,2,3 & A,B,C)
    • If your building has the same layout of grids on every floor make certain your grids show on every level
    • If your grids are complex and change on different levels complete at least the first level (entry level)
    • Add dimensions for all your grid lines – do this only on Level 1
  • Sheet and Scale
    • Set the scale of your plans to 1/8″=1′-0″
    • Using 1/8″ scale attempt to format the grids on a 22 x 34 scale. If it does not fit then try larger sheets (30×24, 24×44) but do not adjust the scale.
    • Do not delete any attempts to layout the sheet from your file.
    • If it still does not fit just let it run off and bring it to class.
    • Modify the titleblock to include your photo and name, list your team mates for the project, name of the project, course, semester, professor
  • Post on Blackboard (by end of day Monday)
    • Revit file
    • Plotted PDF – this would be for your sheets.  If you lay out your project on different sheets then they would all be included in the PDF – a single PDF please.

First Progress Individual Submission – Building Case Study

Upload your Revit file and the latest PDF of your sheets to Blackboard.

For this submission you will need to complete the following:

  • This is not a team submission – each student must complete this work
  • Create a new project file (give it a proper name)
  • Add Levels & Grids as necessary for your building
  • You do not need to complete this for class but you must show that you have given it some effort.