Professor Lara Antal | COMD1123, D038 | Fall 2023

Author: Lara Antal (Page 3 of 5)

5. Simple Forms with Value

Drawing Assignment - Week 5


IN CLASS:
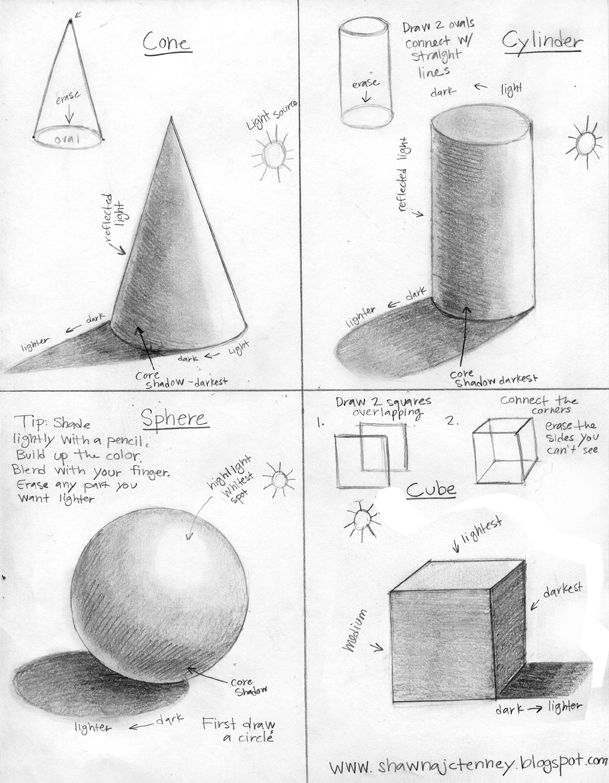
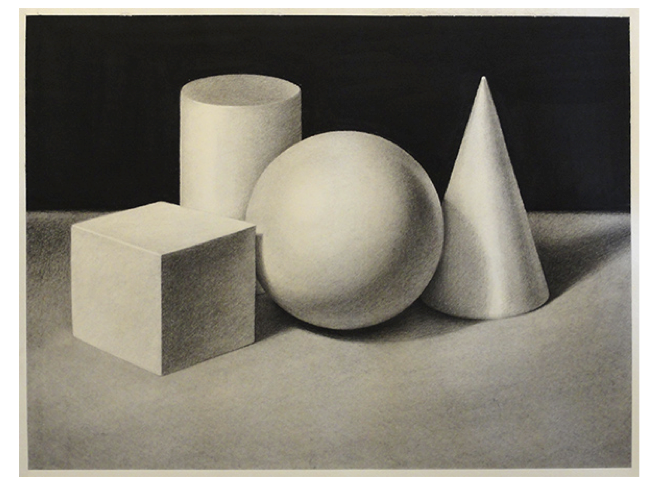
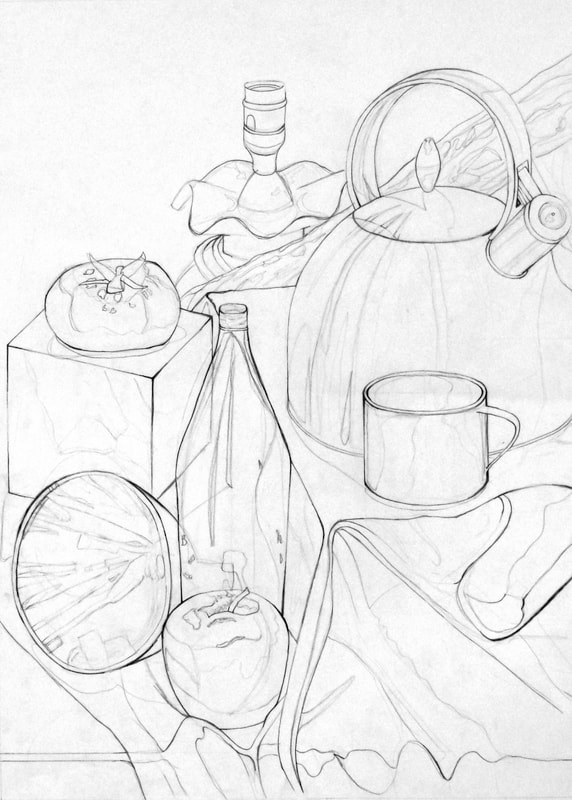
Set up a still life using the simple forms in the drawing classroom. Give them a light source.

While in class, create two sets of thumbnails and notes in your sketchbook. These will serve as your reference for your assignment.

  1. Composition: lay out the shapes and negative space of the drawing.
  2. Shadows & Light: Indicate where the shadow and light hit the forms. BE SPECIFIC, since these qualities will change in relationship to each other.


HOMEWORK:

Use 18″x 24″ drawing pad and charcoal.

This drawing should encompass a full range of values: from light to dark. Reference the value scale you made in class.

Render composition of simple forms, with a distinct light source. Include the background and surface they are sitting on, taking advantage of negative and positive space.

TIPS:

  • Try Lightly TONING your drawing paper before beginning your drawing to a middle value.
  • SPRAY the 2 drawings with Workable Fixatiff Spray when complete so they don’t smudge!

Warm-ups & Simple Forms

In-class exercises based on Simple Forms post.

  1. Draw from the shoulder.
    Grab your pencil and do some circles with your arm, pivoting from the shoulder. Get a feel for it.
Shoulder Rotation

2. Lines

  • Start by drawing a series of parallel lines equally spaced. Draw from your shoulder, and don’t focus on the line as you make it, focus on the motion.
  • Next, draw a group of offset parallel lines. Draw about four or five parallel lines, then draw another grouping rotated in a random direction. Then do it again. Keep the offset groupings close to one another, touching if possible.
  • The final variation is an unbroken, looping line. As you draw, alter the trajectory of the line while maintaining regular loops. Try and think about the line as an object that exists in three-dimensional space.

3. Circles

  • Try to produce a curve that is completely equidistant from an imagined center point at the heart of the circle. You may be tempted to draw quickly, which is fine. However, you might find it beneficial to actually slow down and make your mark more deliberately. Don’t worry if your circle isn’t perfect.
  • Next, draw many circles of vastly different sizes. It’s fine if they overlap. You may notice that by jumping at random between drawing small circles and large ones that your control of the motion increases over time
  • Finally, try drawing concentric circles. You’ve already practiced size control so your focus should be on equal spacing between the layers of circles as you draw. Don’t get discouraged if you have difficulty- it’s a challenging exercise!
Warm-up Exercise 2: Circles

4. Ovals
 Drawing an oval is just like drawing a circle except you make two “sides” closer in distance to the imagined center. It’s best that you think of ovals as circles rotated in space.

  • Draw multiple ovals of varying sizes and widths. Bisect your circle between it’s thinnest and thickest axes. This will show you the center point and the change in spacing as the far edge of the circle recedes in space.
  • You can also try drawing squares in space, bisect them, and draw ellipses.
Warm-up Exercise 3: Ovals

5. Cylinders

  • Begin by drawing an oval (the thickness of the oval is up to you). This is the end of the cylinder that faces you. Like a can of soup!
  • Next, add two lines for the sides of the cylinder.
  • The lines of the “can” will not be parallel unless you are looking directly from the side. The more extreme the pitch of the can away from you, the sharper the angle of the lines that form the sides of the can.
  • The last element is a curve that terminates the other end of the cylinder.
  • Practice drawing many cylinders of varying sizes. Change the pitch of the can by changing the appearance of the facing side (oval width).
Warm-up 4: Cylinders

6. Cubes

  •  Start by drawing a square turned away from you in space. Regardless of the angle of the side, one edge will be closer to you than the rest. Use that as your starting point.
  • Draw the remaining four edges that form the square and remember that parallel lines actually appear to converge on an imaginary point in the background. Edges that are farther away from you will appear smaller than edges that are closer to you.
Warm-up 5: Cubes

7. Compound Objects
Draw several groupings of basic shapes that relate to one another in space. Whereas in previous exercises it was fine to draw through your sketches, try to avoid doing so now (it defeats the purpose).

Choose a variety of shapes- spheres, cubes, cylinders- and rotate them various ways before drawing them in overlapping positions. Be deliberate and remember that as objects recede from you they get smaller. More than anything this is a thinking exercise.

Warm-up 6: Compound Objects

4. Take-Home Quiz

This “quiz” is really a packet of work you are responsible for doing in your sketchbooks by October 5th.  

You will not have to do your sketchbook pages for the next two weeks.  If you are behind in your sketchbook… NOW is a good time to catch up!

Read the whole packet.  Do Projects 1 A – 1 F in your sketchbook. Fill out the SELF assessment page.

You will hand in your sketchbook to me for grading on October 5th.

You have a printed packet, but below is the PDF as well.

4th Week | SEPT 21

BRING TO CLASS:
Assignment 3 - Positive & Negative Plants | Sketchbook 3 - Close-up Comps

Measuring & Proportions

WARM UP: Morning Still Life

SKETCHBOOK 3 CRIT: Close-up Comps
Break into groups and review pages. Identify a single composition from each of your classmates and copy (and label!) this design into your own sketchbook. Use simple shapes — it’s not about replicating, this is a schematic for a good layout.

ACTIVITY: Eye Exam Drawings

  • Blind contour drawing of a classmate
  • Continuous contour drawing of the same classmate
  • Contour drawing of classmate’s eye, just one! Be as accurate as possible.

ASSIGNMENT 3 CRIT: Positive & Negative Plants

15 min break

Lecture: The 5 Perceptual Skills of Drawing: Perception of Relationships

Activity: Sighting

  • Viewfinder Grid
  • Find midpoint
  • Plumb & Level
  • Measurement:
    – Using your thumb and your pencil, choose a basic unit for your composition. Now sketch your composition, using this basic unit as your frame of reference for relative size.

DUE NEXT WEEK:


EXTRA CREDIT:

Yoshitaka Amano  - The Birth of Myth | 神話誕生 
Lomex Gallery
86 Walker, 3rd Floor | 89 Walker, #2R

Check out this exhibition before it closes on October 28th.

Bring your sketchbook and take notes on various things we discussed in class. Examples:

  • Sketch out composotions that you feel are strong.
  • Make contour drawings of the artworks, either the whole piece or various details.
  • Write your thoughts on spacial relations, use of perspective, etc.

Share what you observed with the class!

4. Self-Portrait Through Objects

Drawing Assignment - Week 4

Use 18″x 24″ drawing pad and charcoal.

Create a drawing with a thoughtful composition of carefully chosen objects that represent you.

  • Frame your composition.  
  • Decide on a unit of measurement on which to base the proportions in the drawing.
  • Compose the page.  
  • Consider the compositional concepts such as Balance, Rhythm, Symmetry, and Asymmetry. 
  • Use a variety of line weights to describe the forms.  
  • Consider how the forms interact with each other in space – overlap, foreshortening, and perspective.

This drawing should try to incorporate all the lessons we’ve discussed!

3. Positive & Negative Plants

Drawing Assignment - Week 3

Use 18″x 24″ drawing pad and charcoal.

Draw from life a plant, either in a vase, potted, or wild. Create a composition that is split into BOTH negative and positive spaces.

TIPS:

  • Design your overall composition first, then decide where to place the “negative/positive” divide
  • Hone in on delicate details and bold shapes! Show off the interesting shapes plants make.
  • Feel free to include a pot or vase to help ground the shape.
Negative Space Drawing Plants
flower positive and negative drawing - costaricapackageswithairfareq1
Painting and Drawing-Positive and Negative Space: Tempera – Mrs. Cassidy's  Art Class
Positive Negative Space Study - RISD Pre-College on Behance

3. Close-up Comps

Sketchbook - Week 3

4 pages, at least 8 compositions.

Frame each thumbnail in a bounding box.

Draw a cropped/focused/isolated part of this object.

Focus on interesting details, on the unique contours, or simplify shapes to abstract the form.

Use the object as inspiration for creating well-thought-out compositional use of space.

3rd Week | SEPT 14

BRING TO CLASS: 
Assignment 2 - Contour Hands| Sketchbook 2 - Very Boring Things

Space, Depth & Composition

WARM UP: Morning Still Life

Discuss: Last week’s Blind, Continous, and Contour shoe drawings.

SKETCHBOOK CRIT: Very Boring Things
Break into groups, review each other’s sketchbook, share one page

  • What details did you find you hadn’t noticed, or found surprising?
  • What were some ways you tried to make the boring object more interesting?

Discuss: READING Learning to See Left Brain vs. Right Brain
Sharing our right & left brain activities, upside-down drawings.

ASSIGNMENT 2 CRIT: Contour Drawing of Hands

Lecture: The 5 Perceptual Skills of Drawing: Perception of Spaces

Video: Surface & Depth

ACTIVITY: Make a View Finder
ACTIVITY: Traced Contour Drawing using Plexi Glass

Lecture: Composition

Video: Rule of Thirds

ACTIVITY: Frame a composition

Use your View Finder to frame a composition. Carefully consider your picture plane. Look at your view from multiple points of view. Be the composer of a unique composition that you find visually compelling.

DUE NEXT WEEK:

2nd Week | SEPT 7

BRING TO CLASS: 
Assignment 1 - Baseline Drawing | Sketchbook 1 - Meet the Artist

Contour and Perception: Edge Recognition, Contour Drawing, and Line Texture and Line Weight.

Check-in: Questions or issues

ACTIVITY: Still Life / 3x – 1 Minute / 1x – 5 Min

SKETCHBOOK CRIT: Meet the Artist pages

  • What is something you have in common with your classmates?  
  • What do you find interesting or unexpected about your classmate?

Discuss: READING Learning to See Left Brain vs. Right Brain
Sharing our right & left brain activities

ACTIVITY: Vases vs. FACES
Discuss successful strategies to solve this drawing problem:

  • Comparison
  • Focusing on one area at a time
  • Measuring

ASSIGNMENT 1 CRIT: House from Memory vs. House from Observation
Drawing as an Exercise in Perception:  

  • How accurate were you?  
  • Which drawing feels more like where you live?

Lecture: The 5 Perceptual Skills of Drawing: Perception of Edges

ACTIVITY: Contour Line Studies – Shoes off!

  • Blind Contour Drawing
  • Continuous Contour
  • Contour Drawing

Lecture: Line Quality

ACTIVITY: Three Approaches to Line Weight

Vocabulary:

Contour line:

  1. An outline that defines the edges of a form or shape.
  2. A line drawn on a topographic map to indicate ground elevation or depression.

DUE NEXT WEEK:

« Older posts Newer posts »

© 2024 Foundation Drawing

Theme by Anders NorenUp ↑