Expectations

Expectations

Eagle portion is worth 25%

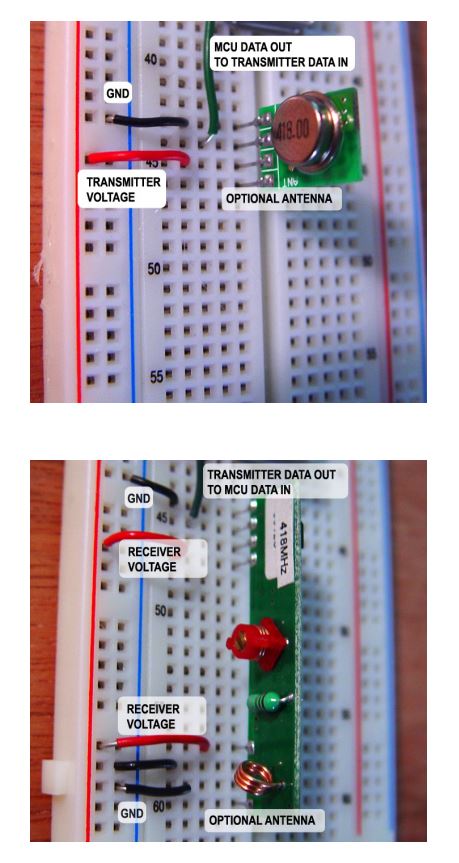
  • Simple schematic and part label parts


To achieve the 15% points for final project

5% Documentation of project

5% Wired Parts and Code

5% Finished project


Things you need to have:

Documentation of working parts:

  • Images and video
  • Code
  • Diagram

Show 3D or laser cut parts

  • Files
  • Diagram how parts work together


To get full 15%

  • User can use and interact with your project
  • Project is enclosed
    • Document laser cut or 3D printed pieces
  • Be able to illustrate how each component would work in sync
    • Diagram


To get 10%

  • Collection of wired parts
  • Working show working code of each wired component
  • Be able to illustrate how each component would work in sync
    • Diagram
  • Document laser cut or 3D printed pieces

To get 5%

  • Collection of wired parts
  • Partial code (must explain how parts would get coded- pseudo code)
  • Be able to illustrate how each component would work in sync
    • Diagram
  • Document laser cut or 3D printed pieces


To get 0%

  • Collection of wired parts incorrectly
    • ie switches and leds
  • No laser cut or 3D printed parts
  • No Documentation

Code Plan

Code Plan

  • Explain basic interaction
  • List Components
  • How each part is going to operate in your project
    • Be precise

Examples

Explanation

User presses the button and cycles through 3 different patterns

Patterns:

  • Blink – 500ms  second delay
  • Fade up then Fade down
  • Off

Components

  • Push Button
  • LED


Pseudocode

Push Button

  • Read Button
    • Increase counter
      • Register click on change from high to low


Patterns:

Blink

    • Turn LED On
    • Delay
    • Turn LED OFF
    • Delay

Fade up then Fade down

    • Loop increase LED analogwrite by 1 till 255
      • small delay after each increase
    • Loop decrease LED analogwrite by 1 from 255 to 0

OFF


Working with simple rf radios

rf reciever – https://www.sparkfun.com/products/10533

rf transmitter – https://www.sparkfun.com/products/10535

A good tutorial on the rf radios.


rfradio

These radios operate at a lower baud rate then what we are used to. Normally these radios will operate safely around 1200 bps.

Examples

SimpleRftransmit – Send and Receive an integer. (This examples contains 2 files, the main: simpleRFTransmit and writeRead which contains several functions)

Advanced_receiver and Advanced_transmitter –  This example uses the RadioHead Library. It allows more complex messages to be sent with these transmitters.

How to install Arduino Libraries.

  1. Download the library
  2. Open Arduino
  3. Select Sketch -> Import Library -> Add Library
  4. Select the library zip file


Tutorial

DUE April 29

You have to write a tutorial based of a component you are going to use in your project.

  1. Image of component
  2. What does the component do?
  3. How the sensor works?
  4. Diagram of connecting to Arduino
  5. Getting started program
  6. Any Issues or quirks with the sensor


Examples

http://oddgui.com/working-with-rotary-encoders/

https://learn.sparkfun.com/tutorials/how-to-use-a-breadboard

https://learn.adafruit.com/


Laser Cutting Notes

CityTech Laser Cutting Info

http://www.nycctfab.com/#!equipmentlaser-cutting/c1120

Cut (Blue), Score (Green), Etch (Red), Raster Engrave (Orange)

Remember to double check with the CLT about which materials are safe to use or visit the website

Printing a tongue and groove box

http://boxmaker.connectionlab.org/

Printing gears

https://woodgears.ca/gear_cutting/template.html

Using gears in Inkscape

Extensions > Render > Gear

Adjusting the number of teeth will make your gear ration larger or smaller.

Adjust the Circular Pitch and Pressure Angle changes the teeth profile. When you are designing your gears keep these settings the same to make sure your gears fit together.


Project Guide

Guidelines for project:

  1. Report 2 Page
    1. Who is it for?
      1. Age, Demographics
        1. What design choices or usability choice did you make for your project based on Demographics?
    2. What is it for?
      1. Teaching, Tool, Entertainment
        1. How are you going access if it is fun or a good teaching tool?
    3. Why does this need to exist?
      1. What goals will your project achieve
    4. When will it be used?
      1. Time, Place, Location
        1. Explain how Time, Place, Location, etc affect how your project is being used?
        2. Explain how specifically your project is affect by Time, Place, etc
          1. ie. Materials Used
          2. Sensors
    5. How Does it work? (Diagram)
  2. Present a 3D model of project
    1. top
    2. left
    3. bottom
    4. perspective
  3. Parts list
    1. Senors
    2. Components – Resistors, Capacitors, Transistors, etc
  4. Materials List
    1. Wood, ABS, PLA, etc
    2. Fastening
      1. Screw types – Size
      2. Glues
  5. Sketches/Mood Board