During the process of my culmination project, I took numerous pictures from start to finish. The link shown below will show all of my work in progress pictures.
Application: The flats lab was a lab that focused heavily on the construction and assembly of flats in the theater. This was a lab that I was very familiar with. Working on many different shows I have built, assembled, disassembled and cut many different flats. But this lab helped me learn a lot of new things about flat construction, as well as figuring out problems that might come up during a show. Such as what happens if the two flats you try to put together don’t have holes in the right spot, or the one I struggled to understand at first. What happens if you need to have 2 flats from a right angle, but one of the flats does not have the support to connect the bolt. As it would just tear through the ¼” skin. Well starting off with the first question, once the flats are out together, and are leveled out, you could use a driver drill with a bit that can help form the hole for your bolts to be inserted through. Next, when faced with the situation of not having a 1×3 support on the back of the flat for a right angle. One solution would be to quickly cut a 1×3 scrap piece and install it where you need the piece to go, or even using c-clamps to attach to the stiles for a stronger connection.
Application: The lab overall was very helpful in gaining new knowledge about flats. As mentioned the previous problems that came up, I feel that because I was able to go through these problems step by step while in school. It was easier to understand and keep in my head, so if a similar situation rises up while I’m working, I would be able to go through the many options that I have learned and solve it in a timely manner. For example, when working on a job about a month ago, I was faced with an issue where I had to connect flats for a show that has been used many times, however there were some new flats that replaced the previous ones, therefore the pre-drilled holes for the bolts were not present. So I had to make the holes myself so that the connection could be made and I could quickly move on. The lab helped me understand this problem and I was able to quickly get the tools that I needed once I found out the bolt size and move into the next piece of work.
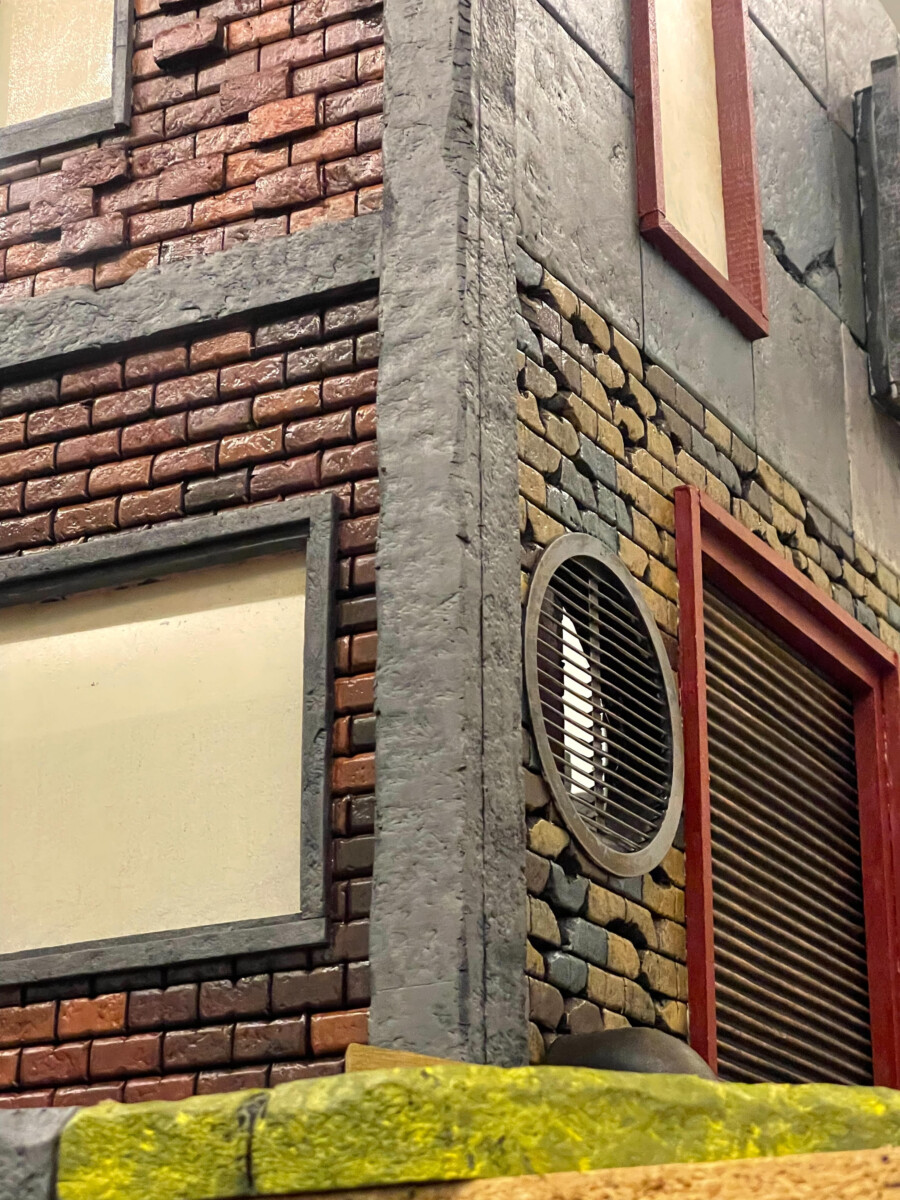
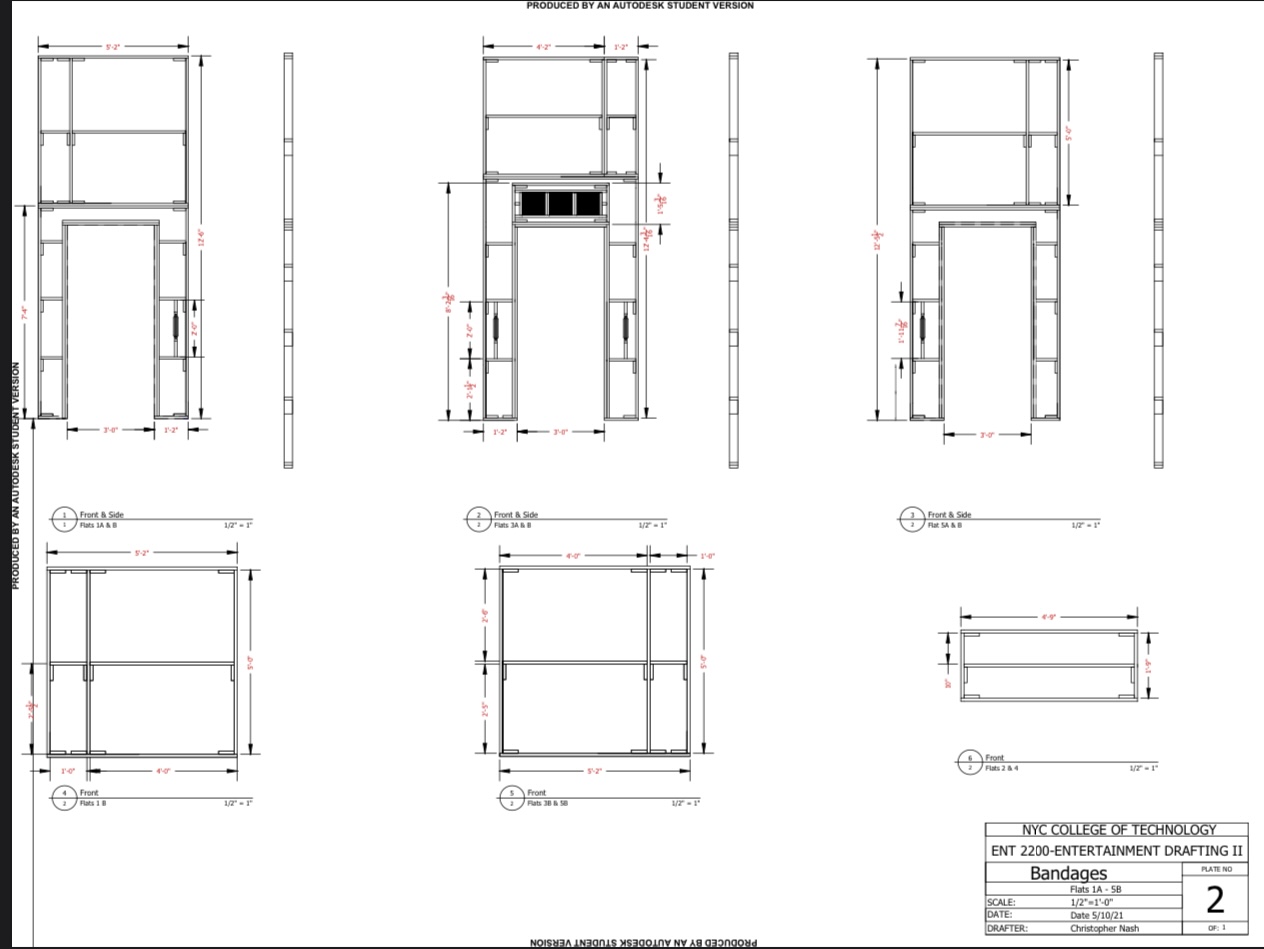
Analysis:Working on Team Projects 1 & 2, a project where a group of 3 have to break down a show, and create ground plans, budgeting, calendars, and load in/strike plans for the show. This was a great experience for me because not only was I understanding the importance of communication and understanding the roles of each member. But, using auto cad in a group environment, rather than by myself. This was new to me because when using auto cad in my previous 3 years, I was able to work at my own pace and not have to worry about anything except the due date. On the other hand, when in a group environment, all my previous habits have to change. As my work was crucial to other parts of the project such as budgeting and planning. But one of the most crucial lessons that I learned from this assignment was keeping the “consideration of the worker who is building it in mind”. Meaning when I am drawing out how two flats go together, make sure that there is enough room for a worker to be able to get the bolts and tools in there to fasten the flats. This came after an issue with my drawing, that there was a gap which was 6 inches wide and was where I had planned on putting a bolt. The small gap would make it difficult for a worker to hit their hands and tools into that spot. After some planning, I was able to not only change the gap, but completely get rid of it in the form of a much smoother flat that is easy for a stagehand to quickly assemble and disassemble. The challenge was more of me not realizing that the flats are being built to what I want them to be, and even though I can be creative with my ideas, it’s important to keep the little details in mind. As it can not only be easier for the build, but the workers as well.
Application: after completing the team projects. I feel that I am more comfortable using auto cad in a more group effort. Even though I could still freshen up on my auto cad skills, which will be much easier with my new computer I just purchased. I still feel that I could still be an asset to a group. For example, I am currently in the works on 2 brand new projects. 1 being a model, and another being a tool shed for the Apollo theater. The lessons I learned from this project will help me in completing the drawings because for one, I will be able to communicate what is in the drawings to my boss, partners or my clients. In addition, I will also be able to see the drawings I do much differently and take into account how a worker would be able to put this together. Such as my model, I placed 0’-1” magnets in specific locations to help keep the entire model stable and easy to build. However, some magnets may interfere with each other because they are so close, the connections that are typically stronger are now weaker because there is another force pushing back against the other 2 magnets. Keeping the idea in my head while drawing will help me not make extra cuts when building and I will be able to get work done at a much faster rate.
Analysis: Working on the load-in lab was a good refresher on what to do when working on a show, but with some extra steps. Usually for me I am a stage hand and focus on getting everything built and following plans. However, this lab gave me the opportunity to take up more of a leadership role, as I focused on gathering the right tools and hardware that is needed for completing the job. This is where my challenge had appeared, as I was making my hardware and tools a list, I understood what I wanted in my head. But was not able to translate it properly to the list. Which would lead to a confusion and items that I technically didn’t ask for. For example, writing down that we needed “clamps” we were given spring clamps. When I however needed “10’ c-clamps”. Luckily I was able to learn this while in school and not on a job site, even as it may seem like a small error. If not done properly can really be detrimental to a job. Leading to more hours and money being spent on trying to correct a wrong that I made.
Application: In order for me to not make this same mistake again, I must be more thorough when it comes down to making a tools list. A good way for me to do this is by understanding what I would be using if I were to be setting the flats up, taking into account every little detail, from the size ladder I use, to the nut and bolt size I use to fasten the flats together. In addition, taking time and not rushing, as I may miss a few steps and forget some tools. I was able to prove this as after the lab had concluded, I was put in a similar leadership position at my job. Where I was tasked with getting the tools, and hardware needed to build a new desk. Using the previous steps mentioned, and remembering that precision is key. I was not only able to come up with a proper tools and hardware list, but even able to not be present for the purchase, and everything I had asked for was there.
The next project that came up was the joinery project. Now I have used power tools before, but never with such precise cuts like this. The joinery project was a project where we used a number of different joint methods to build 2 different frames. One small and one large. Of the tools we used I was very familiar with the table and compound miter saw, the band saw I have used before and also is very similar to a personal tool that I own for cutting foam, however the one saw that I had frequent trouble with was the Dato saw. This tool was a struggle for me to learn mainly due to the fact of me not fully understanding how to use the tool. I am used to quickly ripping through with my cuts, however the Dato does not work that way. It is designed to slowly cut into a piece, but can’t cut all the way through. If trying to cut straight through, or cutting too quickly would cause your piece to be pulled back into the blade, forcing you to stop the Dato and remove the piece. This happened to me 3 times, however I soon learned that going slow would create easier and cleaner cuts, but by putting an additional piece in front of the guard and your cutting piece, it helps prevent anything from being pulled back by the blade. Once learned, my cuts went much smoother and more precise. Furthermore, this project also helped me learn how to build multiple joints. I learned about them last semester but I was never able to properly make one due to school restrictions. However being able to get into the shop and construct the joints helped me learn a new trait, but also tools that I would be able to use out on the field such as a Dato saw for example. The main takeaway from this lab would have to be patience. As stated previously, I was not patient when it came to me using the Dato saw, which led to me on multiple occasions getting the piece jammed or messed up all together. But after taking my time I was able to get more clean and provide cuts. This can be applied to my mode, where in the beginning I would try to make cuts as quick as I can because I want to see how the end product will look. However, while moving quickly I ended up tearing the foam rather than cutting it. Not having clean cuts and lines sometimes wouldn’t even be straight. But recently I have been much more patient with my cuts, and it has paid off, helping me make straight and crisp cuts that can then be modified for details later.
The first project worked on in technical production was the mounding project. Being the first time I came back to school and being a couple months since I even touched a power tool, it was definitely a challenge dusting off the cob webs. For example, I made the mistake of cutting the top mould on the wrong side of my marked line, leaving a ⅛” gap on the left side of my piece. Although that mistake was made very early on, the rest of the process after that came easier as I started to get the hang of it once again. By the end of the project, I had completed all other parts of the project, and came out of it learning how to set up moulding correctly, and is a trait that I can now proudly add to my resume. The hardest part during this project would be dusting off the cob webs, and trying to remember everything I had learned from the year prior which was the last time I was actually in the shop. However, that challenge would soon be overcome because once I got back in the groove and became more comfortable, the project became much simpler and easy to complete. In the end, I was able to gain a new skill when working molding. However, the use of miter cuts will help me in creating seamless transitions between two pieces of wood or even foam. For example, I make mine rather models for action figure collectors, and precociously, I would use the ends of two foam boards to magnetize them together. But this idea would limit me in a small way, as the detail in the walls don’t flow as smoothly between each other. But, by using the miter cut, I will be able to not only create seamless walls, but I could also increase the realism of each diorama I make. In addition, I also was able to create molding or frames for miniature doors by using the exact same steps I took when doing this lab. As shown in the image below, where I create a billboard using ¼” squared wooden dowels by using a 45 degree miter cut to have a more seamless and clean finish.
This is the first post on your Learning Blog. Edit or delete it, then start blogging!
The ePortfolio is both a Learning Blog and an Academic Career Portfolio. Use the Learning Blog to document your learning experiences and class assignments each semester. As time goes by, add content to the Academics and Career sections to show your department, graduate institutions, or future employers how well prepared you are for your chosen career.
NOTE: Remember to add appropriate Categories and Tags to your posts. This will help your professors and other visitors find the content they are looking for. The Categories “Coursework” and “Field Trips” and the Tags “OpenLab” and “City Tech” have already been applied to this post. Feel free to make changes!