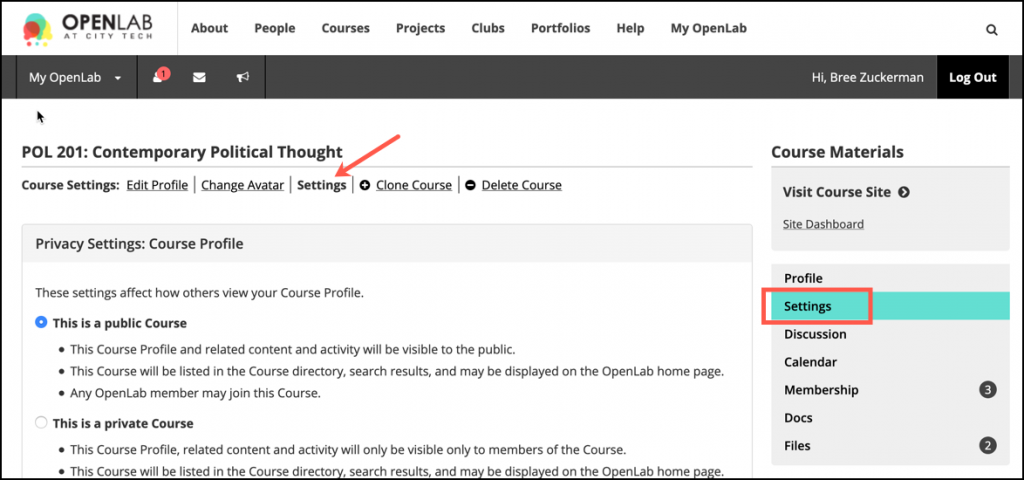
Changing privacy and other settings
1. To change privacy and other settings for a course, project, or club, log in and go to the Profile of your course, project or club.
2. In the right-hand menu, (a) click Course, Project, or Club Settings, and then in the Settings menu, (b) click Settings.
Privacy Settings
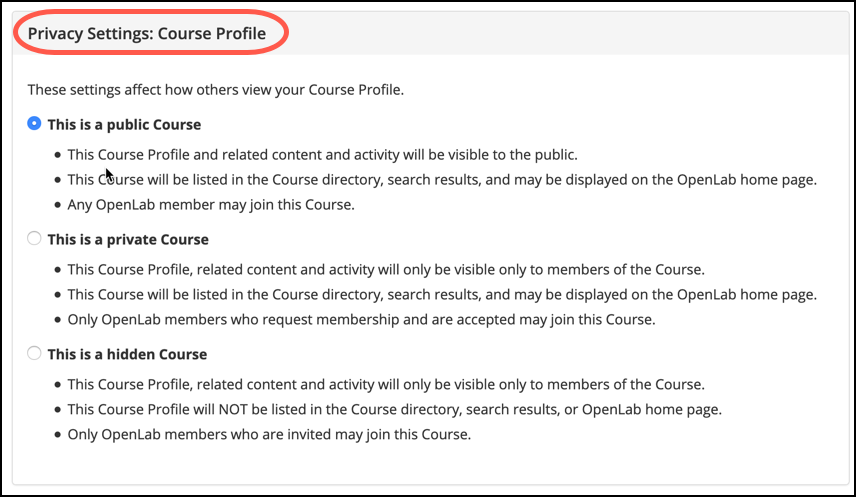
1. Profile privacy settings allow you to change how OpenLab members can join your Course, Project or Club, and whether non-members can see Discussion, Docs, and Files content on the Profile. Site privacy settings are separate and can be changed just beneath Profile privacy settings. These settings determine who can see the Course, Project, or Club Site.
Profile privacy settings
This is a public course, project, or club:
- The course, project, or club profile and related content and activity will be visible to anyone, whether or not they are members of the OpenLab.
- The course, project, or club profile will be listed in OpenLab directories and search results.
- Any OpenLab member may join this course, project, or club.
This is a private course, project, or club:
- The course, project, or club profile and related content and activity will only be visible to members.
- The course, project, or club profile will be listed in OpenLab directories and search results.
- Only OpenLab members who request membership and are accepted by an administrator may join this course.
This is a hidden course, project, or club:
- The course, project, or club profile, related content, and activity will only be visible only to members.
- The course, project, or club profile will NOT be listed in the OpenLab directories and search results.
- Only OpenLab members who are invited may join this course, project, or club.
2. Once you’ve selected the best option for you, click Save Changes at the bottom of the page.
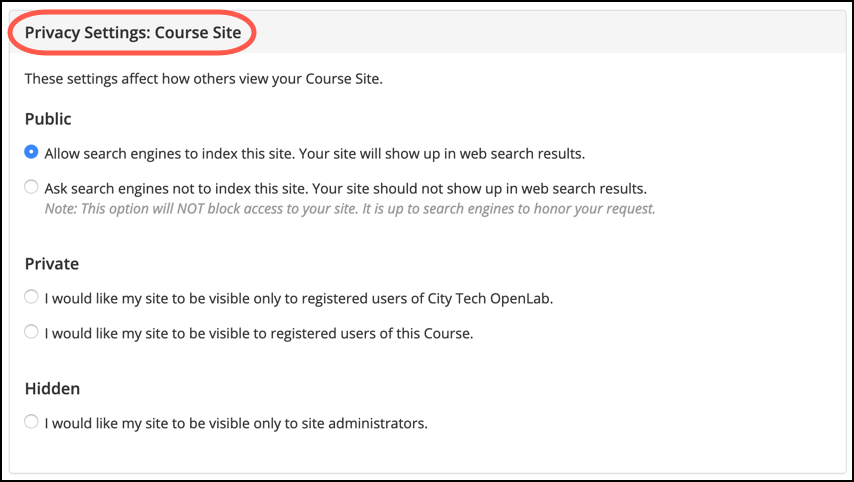
Site Privacy Settings
3. Site privacy settings are just beneath Profile privacy settings.
Public
Allow search engines to index this site:
- Anyone can visit your site without needing a password.
- Search engines will index all pages and posts, meaning your site will show up in search results on Google and others.
- Choose this option for maximum public visibility.
Ask search engines not to index this site:
- Visitors do not need a password to see your site if they know the URL or are linked from elsewhere, but Google and other search engines should not index your posts and pages. (Please note: it is up to search engines to honor your request.)
- Choose this option if you want to be able to show the site to people who are not members of the OpenLab, but you don’t want people to stumble upon it via search engines.
Private
I would like my site to be visible only to registered users of City Tech OpenLab:
- Anyone who is signed into the OpenLab can see this site.
- Choose this option if you’d only like the OpenLab community to be able to see the site.
I would like my site to be visible to registered users I add:
- Choose this option if you only want members of your course, project, or club to be able to see the site.
Hidden
I would like my site to be visible only to me:
- No one except site admins can see the site.
- You may choose this option if you are in the process of creating your course site, but it would rarely be useful for an active course, project, or club.
4. Once you’ve selected the best option for you, click Save Changes at the bottom of the page.
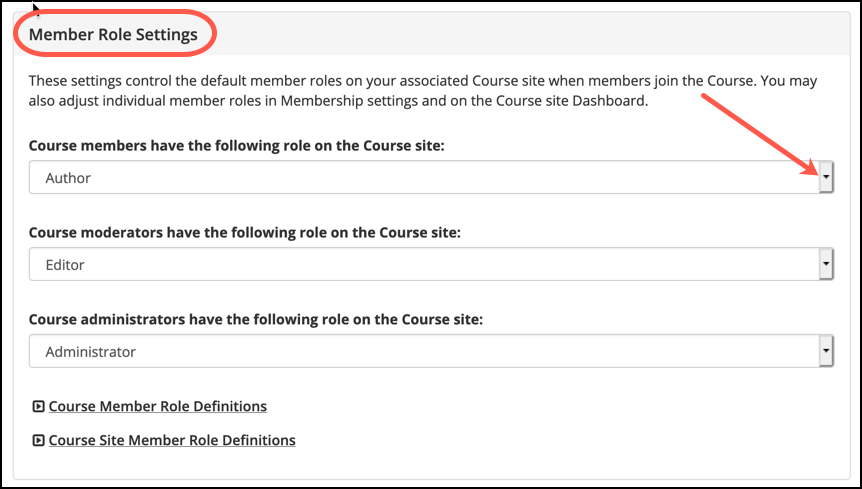
Member Role Settings
These settings determine what roles members will have on the Site associated with your group, when new members join.
For most groups, you will want to leave the settings as they are, but there may be cases, for example as we’ve done on the OpenLab’s Open Road site, where you might want members to have Subscriber roles on the site, where they can join and receive notifications but not post on the site. You can also make changes to individual member roles in Membership settings and on the Site Dashboard.
To change the role associated with a member, moderator, or administrator, choose the site role you want from the associated dropdown. You can find out more about each type of role by clicking on the Member Role and Site Member Role Definitions links. Click Save Changes at the bottom of the page.
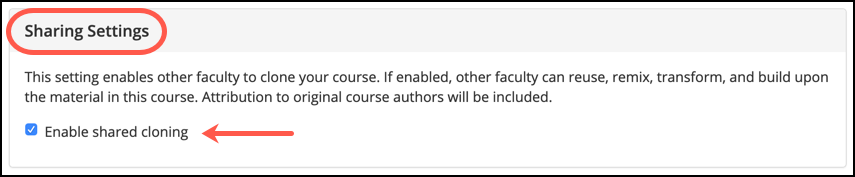
Sharing Settings (for Courses only)
This setting is only available for courses, and when enabled, allows other faculty to clone your course. This means that other faculty can reuse, remix, transform, and build upon the material in the course. Attribution to original course authors will be included on the new course.
To enable shared cloning, check the box and click Save Changes at the bottom of the page.
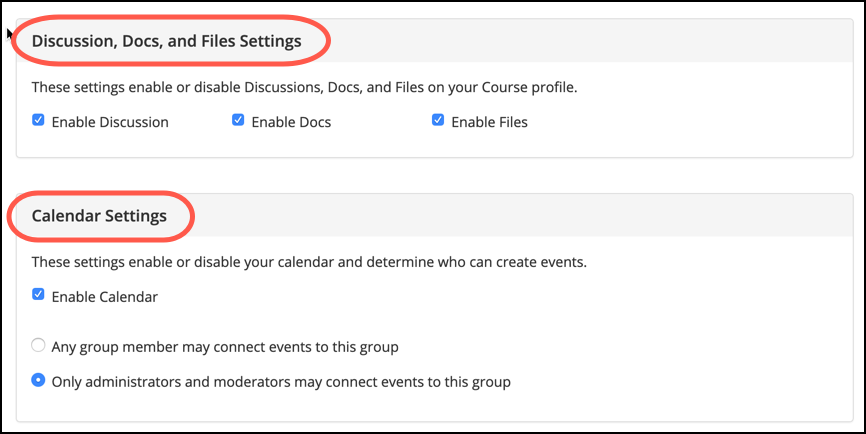
Discussion, Docs, Files, and Calendar Settings
1. The checkboxes in the disable or enable the Discussion forum, Docs, Files, or Calendar tools on a group’s Profile. These are enabled by default, but you can uncheck the boxes to disable. You can reenable at any time.
2. In the Calendar Settings section, you can also choose who is allowed to create events in the group calendar: any group member, or just admins and moderators.
3. When you’re finished, click Save Changes at the bottom of the page.
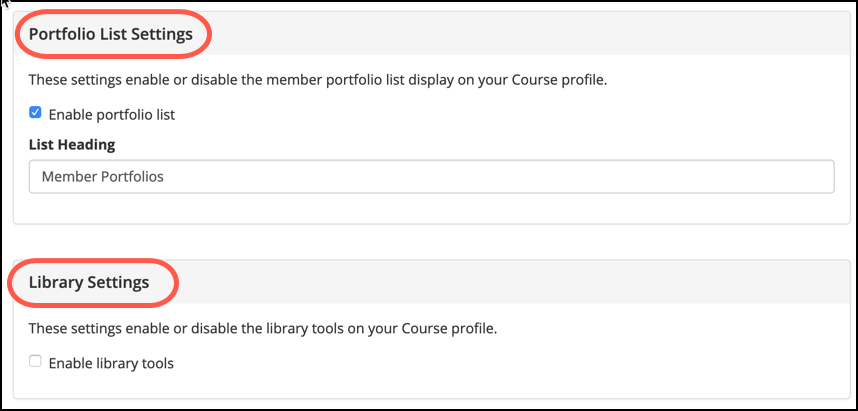
Portfolio List and Library Settings
The Portfolio List Settings allow you to display a list of members’ Portfolios in the right-hand sidebar of your group Course, Project, or Club Profile.
1. To show a list of member Portfolios, click the checkbox for Enable portfolio list. Beneath that, you can change the heading for the list if you wish.
2. The Library Settings enable or disable the library tools, which appear in the right-hand sidebar of your group profile. These tools include a search for library materials and information about the library location, with a link to their website.
3. When you’re finished, click Save Changes at the bottom of the page.
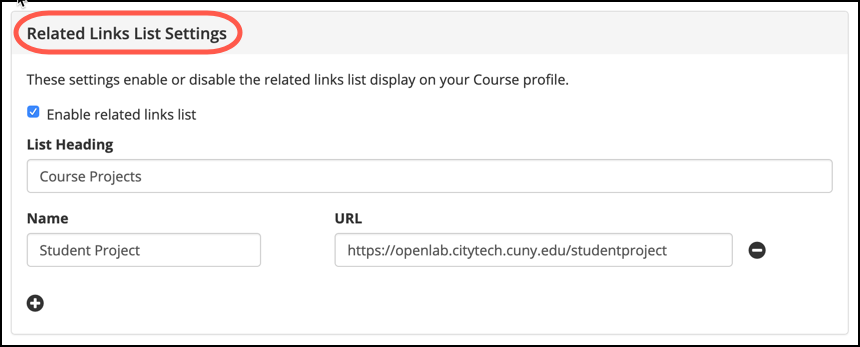
Related Links List Settings
Beneath Discussion settings, you’ll find the Related Links List Settings, which allow you to display a list of links related to your Course, Project, or Club in the right-hand menu beneath the link to the Site. These links can be anything, for example, course projects, related projects, or a club’s Facebook or Twitter page.
1. To show the Related Links list, click the checkbox for Enable related groups list. Beneath that, you can choose the heading for the list.
2. Add a name and URL for each link you want to display. To add an additional link, click the “+” button. To delete a link, click the “-” button.
3. When you’re finished, click Save Changes at the bottom of the page.
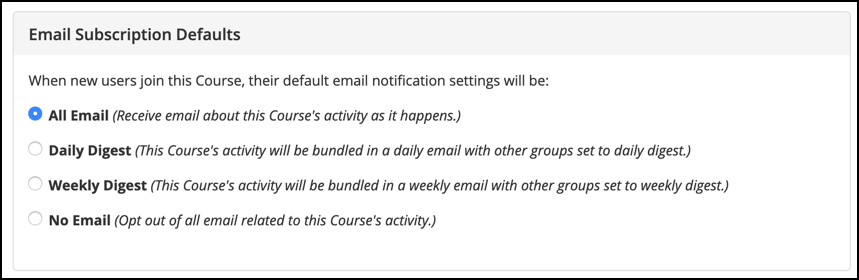
Email Subscription Defaults
1. These settings control the default email settings for new members of your course, project, or club. Individual members may change their own settings at any time, but these settings set the automatic standard for anyone who signs up.
No Email
- Members will not receive emails when there’s activity in Discussion, Docs, or Files.
- This is good for large courses, projects, or clubs where there’s a lot of activity and daily emails might be too much.
Weekly Summary Email
- Members will receive a weekly summary of all activity.
- This is good for large courses, projects, or clubs where there’s a lot of activity and daily emails might be too much, but you want members to receive some notification.
Daily Digest Email
- Members receive an email once per day that summarizes all activity for that day.
- This is good for medium size courses, projects, or clubs.
New Topics Email
- Members receive emails every time a new topic begins, but will not receive emails notifying them of replies to that topic.
- This might be good for small courses, projects, or clubs, but will still generate a lot of email for larger groups.
All Email
- Members receive an email any time there is activity in the course, project, or club.
- This is recommended for smaller courses, projects, or clubs where the emails won’t be overwhelming, or where it’s important that members are notified of all activity as it happens.
2. Once you’ve selected the best option for you, click Save Changes at the bottom of the page.
Post or Page Privacy Settings
Privacy settings for individual posts and pages need to be changed on your Site Dashboard.
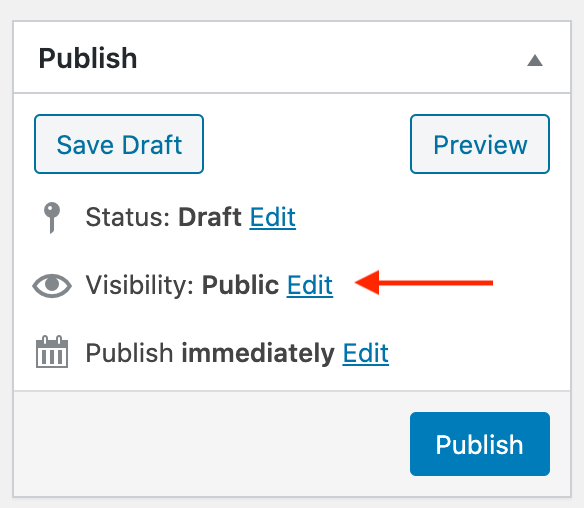
1. On the right side of the post or page editor screen, there is a box with Publish options.
2. Next to Visibility: Public click Edit.
Classic editor privacy settings 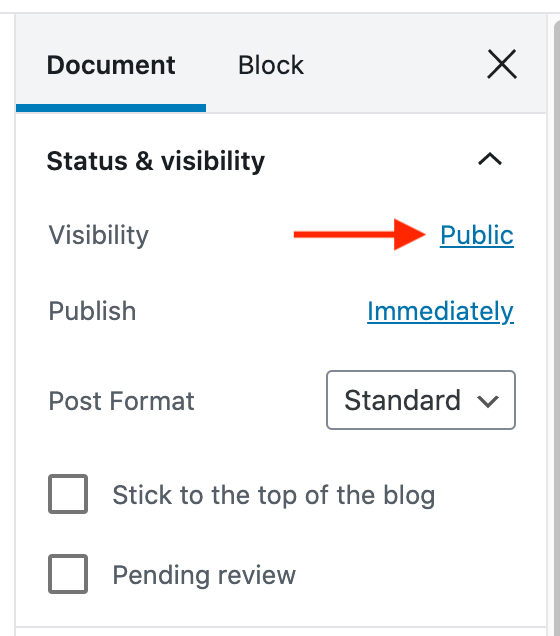
Block editor privacy settings
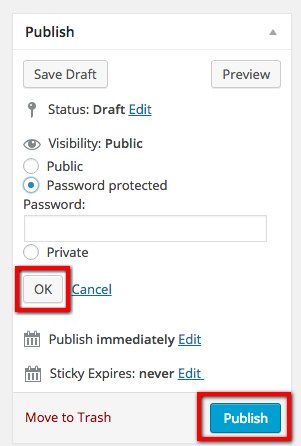
In the expanded view, you have three options:
A. Public
This is the standard setting and makes the post or page visible to anyone who can visit the site. Under Public, you can also opt to Stick this post to the front page. This keeps the site post at the top of the site’s home page, even as newer items are posted.
B. Password Protected
Choose this option if you want to control who can view the post or page and who cannot. Once you click the button it will ask you to create a password specific to that post or page. Only people who enter the password can view the post or page.
C. Private
This makes it so the post or page is only visible to the its author and site administrators. This option may be useful in a course site if you are having students post assignments to the site and you do not want them to be visible to the entire class.
3. Click OK to save when you are done and then Publish when you are ready, or Update if the post is already published.
Classic editor privacy settings 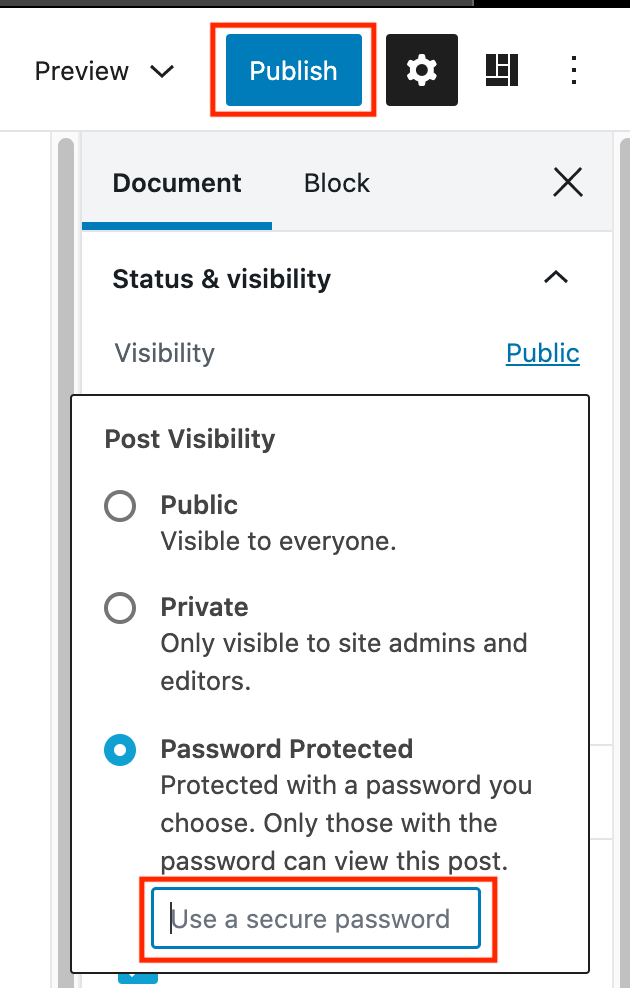
Block editor privacy settings
Please note: Students should check with their professors before making a post password protected or private.
Help information on site privacy courtesy of Blogs@Baruch at Baruch College, CUNY.


