Table of Contents
Detection of Carbohydrates (Reducing Sugars)
Overview
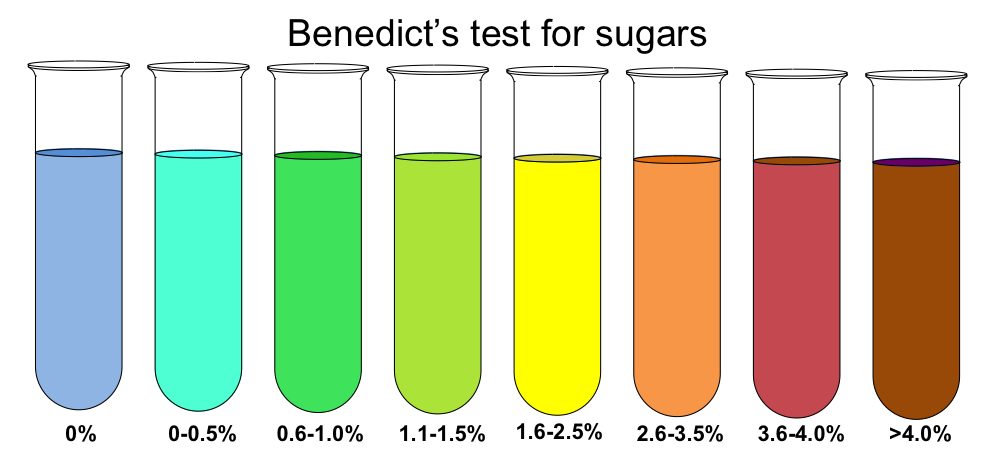
In this activity, you will test a variety of samples to see if they contain reducing sugars. You can review reducing sugars here. Benedict’s reagent changes color in the presence of reducing sugars. Large amounts of reducing sugar will change the reagent from blue to brick red. Smaller amounts of reducing sugar will produce a range of colors from green to orange.
In this lab, you will answer the following questions:
- Are there simple reducing sugars in my juice?
- Are there simple reducing sugars in my urine?
Diabetes mellitus is a disease that refers to the inability of the cells to take in glucose. The word diabetes refers to urination and mellitus refers to sweetness. Since the cells of diabetics cannot remove glucose from the blood, there is an excess of glucose circulating that is eliminated in the urine. The traditional method of diagnosing someone with diabetes mellitus was to taste the sweetness of the patient’s urine. Let’s use Benedict’s test for the detection process instead of the unhygienic alternative.
Make a hypothesis and ask what we would predict from a Benedict’s test if testing a urine sample of someone with diabetes mellitus.
Materials
Each lab group will need the following materials:
- reducing sugar solution
- glucose solution
- sucrose solution
- starch solution
- distilled water
- potato juice
- apple juice
- urine sample 1
- urine sample 2
- Benedict’s reagent
- 9 test tubes
- test tube rack
- hot plate
- large beaker filled with water
- test tube clamp
- wax pencil
Before You Begin
Keep these tips in mind before you begin this experiment:
- Use your senses and previous observations/experiences about the qualities of the experimental solutions.
- Formulate some hypotheses about the carbohydrate content of the experimental solutions or unknowns.
- Identify if the sample is experimental or a control before making your hypothesis
Method
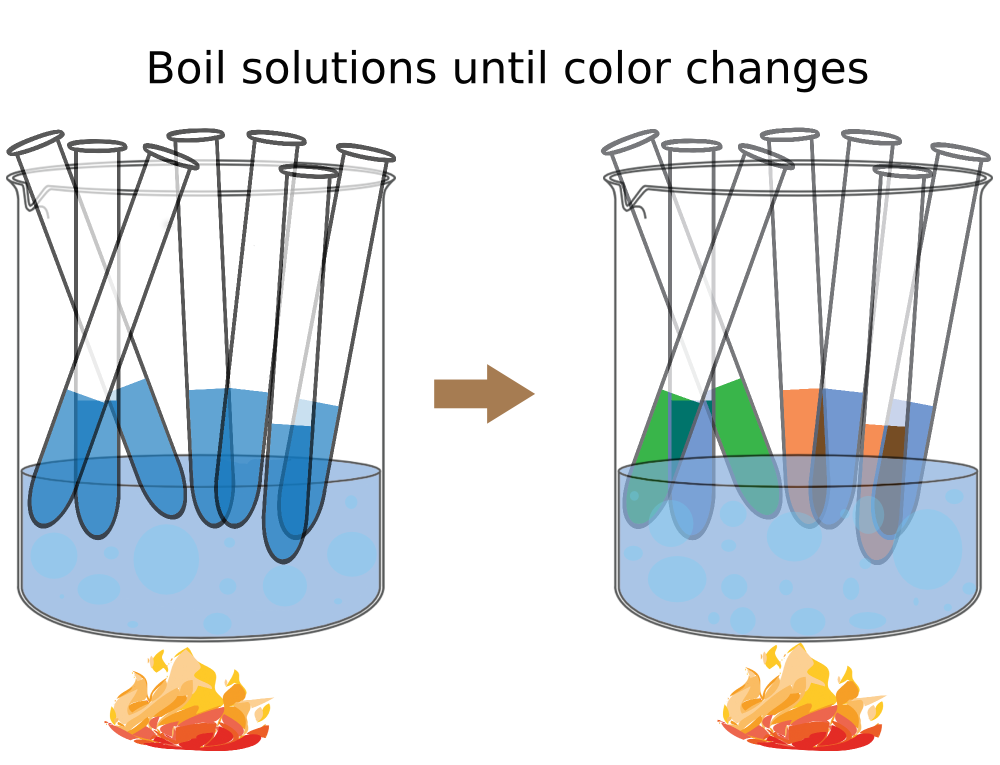
- Place the large beaker filled with water on the hot plate and turn the hot plate on.
- You will need this water to reach a boil to complete the experiment.
- Obtain 9 test tubes and number them 1-9 with the wax pencil.
- Use the information in the table below to fill each test tube with the sample solutions.
- Your instructor may ask you to test some additional materials. If so, include additional numbered test tubes.
- Indicate in the table below whether the the sample you are testing is a positive control, a negative control, or an unknown.
- Before you begin the heating of the samples, predict the color change (if any) for each sample (use the sample type to aid in your prediction).
- Add 40 drops (or 2 ml) Benedict’s solution to each tube.
- Place all of the tubes in a boiling water bath for 3 min or until a noticeable color change occurs and observe colors during this time.
- After 3 min, remove the tubes from the water bath and let them cool to room temperature.
- Record the color of their contents in the table below.

Note: You will need these results for Lab 5.
Print this page