King – Due for Thursdays class – April 22nd

Assignment Review (all students)

  • Work on building families for both opaque wall and glass curtain wall
  • Work to develop sheet layout‐ adding additional views including
    • Wall Section at ½” or ¾”, Cropped wall section details at 1 ½”, larger details at 3” for coping
    • Wall section should show, parapet & roof slab, top of window, sill of window, level 2 slab connection, base condition @level 1, footing.
    • Plan details and coordinated elevation views of the following –
      • Inside corner, outside corner, window
          • Next class will be one‐on‐one critiques in break out rooms.
          • Next Tuesday April 28 we will have a graded pinup

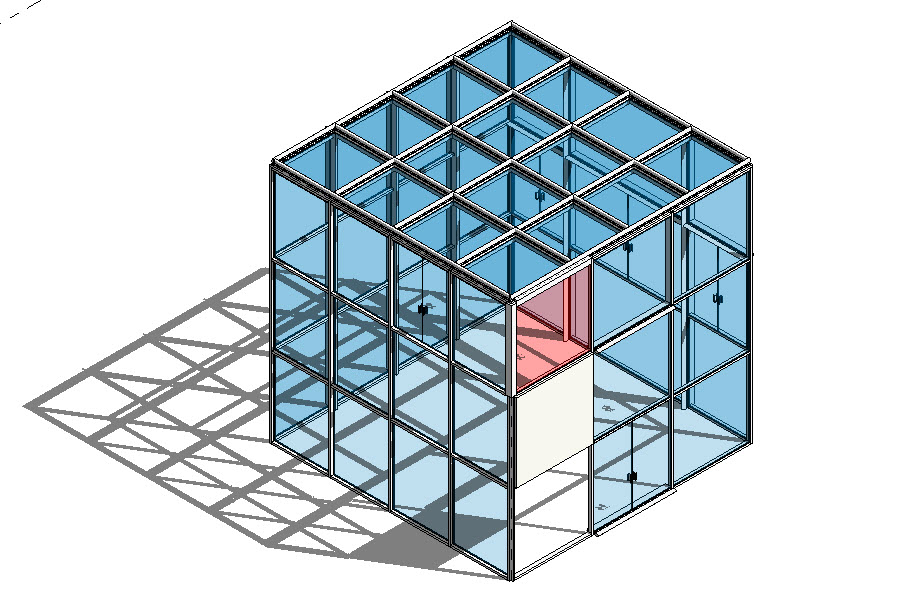
Breakout! – In Class Cube Curtain Wall Assignment – King

After demonstration of the in-class assignment (27′ glass curtain wall cube), the class will divide up into 5 break out rooms of 4 students each.  Complete the following in class exercise as a means to mastering Revit’s curtain wall commands while your professor visits each group.  Steps below…

    1. New Project > Architectural Template
      • Set Level 2 elevation at 27 feet
    2. Level 1 Plan View > Draw (Curtain Wall 1 type) – 27′ x 27′
    3. Divide up the facade into panels by defining grid- design is flexible
      • single grid line, grid line segment, all grid lines
      • Load all panel types (Insert > Family > Curtain Wall Panels)
      • Use both Glazed Panel, Empty Panel, Solid Panel
      • Copy Glazed Panel Type > Duplicate > Set it to red
        • Edit Materials > Glass > Duplicated Color > Set it to Red
      • Load door tops and replace panel with door
    4. Add Mullions –
      • Select mullion types as you please
      • Create Custom Mullion – from new profile
        • Family > Profile-Mullion
          • Basic Mullion Rectangle
          • Create custom fancy Mullion – ie. Sunscreen Device
    5. Glass Roof –
      • Control Slope- create flat roof – use Curtain Wall 1 type

INSTALLATION VIDEOS-TENLY LAW

TIME STAMPS:

0:03-0:12 SPIDER CLIP ASSEMBLY

0:16-0:26 GLASS PANEL ASSEMBLY

0:28-0:53 GLASS PANEL AND SPIDER INSTALLATION ASSEMBLY

TIME STAMPS:

1:36-2:35 STEEL FRAME INSTALLATION

2:42-2:53 LOWER STEEL WALL INSTALLATION

2:55-3:15 MORE STEEL FRAME INSTALLATION

3:17-6:06 REPITITION OF STEEL FRAME AND STEEL WALL PANEL INSTALLATION

Video Research – VMZINC (DRI-DESIGN) AND 1600SS CURTAIN WALL (KAWNEER) – DOLMA TSERING

VMZINC (DRI-DESIGN)

1:18 – BRACKETS INSTALLATION

1:28 – RAFTERS FIXED TO BRACKETS

1:33 – PERFORATED BASE TRIM INSTALLATION

1:51 – INSTALLATION OF INTERLOCKING PANELS

2:30 – INSTALLATION OF SPLICE PLATE

3:13 – FLASHING INSTALLATION

1600SS CURTAIN WALL (KAWNEER)

2:58 – INSTALLATION OF RAIL

3:04 – APPLYING SEALANT

4:14 – SETTING CHICKEN HEAD

4:59 – INSTALLING ANCHOR

6:19 – INSTALLATION OF CRITICAL SEAL

9:04 – SETTING THE UNITIZED PANEL


Kalzip FC rainscreebn System and Curtain wall installation

Kalzip FC rainscreen system – Louisiana Superdome, New Orleans
https://youtu.be/fTxb2fhDKr0

0:29- 1:40 manufacturing

2:22 overview of façade system

2:30- 2:51 installation sequence

  • Clips secured to wall,
  • “L” profile is attached to clips
  • Mullion Bar is attached to “L” profile
  • Retainer clips installed in mullion
  • siding is clipped in position

3:00- 5:30 Installation

  • L profile installation to adjustable bracket
  • Mullion bar clamped to L profile
  • Alignment of sub-framing
  • Mullion bar fastened to L profile
  • Trimming of panel ends
  • Panel installation

unitized curtain wall installation https://youtu.be/KYXpMkujo_8

0:36 Bracket Installation

0:57 Panel Installation

Videos Installation – Estarlin De La Rosa

Equitone Installation


0:00 Explanation               0:26 Tools          3:27 Luko     4:25 Drilling Equitone

5:11 Equitone on a metal frame            5:46 Visible rivet fixing

6:34 Fixed point- griping point          7:50 Sequence for mounting the panel

10:01 Equitone Natura, Natura pro, picture textural

13:05 Equitone fixed on timber              13:49 Equitone Natura and textural

14:21 Equitone Natura pro and pictura               14:42 Equitone tectiva

15:28 Horizontal joint profile             16:19 Invisible adhesive fixing

16:50 Tergo secret fix        17:43 Hanging hook           18:07 Supporting frames

Unitized Curtainwall

0:14  Surveying       0:48   Unloading      1:28 loading       2:08 Inspection

2:58  Installing the rail       3:00 Sealant       4:05 Seatting of chicken head

4:21  Alignment       4:53  Installation      7:40  Spider crane       8:14  Setting

EQUITONE Facade Panel Installation – Unitized Curtain Wall Installation

  • 0:07 EQUITONE panels visible installation system with rivet or screw
  • 0:09 Invisible fixing method with adhesive
  • 5:13 – 5:28 How rivet works
  • 6:09 The position of the rivet holes on the panel
  • 6:57 Panels on metal supporting frame with fixed and gliding points
  • 7:21 location of fixed points
  • 7:45 Rivet with sleeve for fixed points and without sleeve for gliding points
  • 7:55 Supporting metal frame with anchor points
  • 9:25 Measurement of panel placement
  • 11: 31 Foam  tape on the metal frame
  • 15: The position of horizontal aluminium joint profile
  • 16:43 Invisible adhesive fixing of panels ( supporting frame with foam and adhesive)
  • 17:28 Tergo secret fixing method (Half drilled panel with anchor, metal hook, washer and bolt)
  • 17:44 Hanging Hook system ( hanging hooks on the back of the panel)
  • 18:00 Adjustable top hanging hook


  • 2:14 lifted up curtain wall unit ready to be placed into the installed curtain wall frame