AutoCAD Day!

Notes- AutoCAD day

Today class was held in the light lab where we reviewed some techniques for drafting in AutoCAD

Topics Reviewed:
Printing drawings/ plating
Dimensions
3D to 2D
Personal Template

Basics to Remember

  • Draw everything full scale in model space
  • Draw things specifically where they go and only once
  • Helps with lining up objects (bolts, holes…)
  • Makes sure you didn’t copy something incorrectly
  • Helps with 3D (you want to see how pieces will relate together in real space)


Templates are your friend, create as many as you feel will help you! (for specific venues, types of projects…)

Posted in Uncategorized | Leave a comment

Dykes Estimate

I separated the orders by group and what you asked me to get. Lumber is per foot and sheets come in 4×8.

Group: Shannon, Irene, Vin, Marcelo

1×3- Clear 68cents per foot

1/4″ wiggle Luan- they only have 3/8 $45 per 4×8 sheet

3/4″ ply CDX 4×8 38.40 per sheet

1/4″ Luan 4×8  16.64

Group: Mike Jose

1/8″ wiggle Luan- they only have 3/8 4×8 sheet $45

3/4″ CDX 4×8 38.40

2x4x8- they sell this by foot in 16 foot lengths 52cents per foot.

1×3 pine clear 68cents per foot

3/4×3 1/2 Flexible stock – $8 per foot

Oak Board- 3/4×5 1/2″ $2.75 per foot

Oak Board- 3/4×91/4″ $4.75 per foot

Oak Board- $1×4 1.85

Group: Shara Sergio Laura

5/4×3 Pine 68 cents per foot

Wiggle Luan 3/8th 45$

1/4 Luan 4×8 16.64

3/4 plywood CDX $38.40

Molding Prices: the numbers can be referenced in Dykes Catalog

this is a link to the PDF:

http://www.dykeslumber.com/wp-content/themes/dykeslumber/Dykes%20Moulding%20Catalog%202012.pdf

****ALL PRICES ARE PER FOOT!!!!!

282- 86cents

293- $1.75

555- $3,60

144- poplar $1.10

93- pop $0.80

94- pop $1.25

95- Pop $1.85

321- $0.60

82- $0.34

**If you want anything is flex mold add $5.00 to that price per foot.**

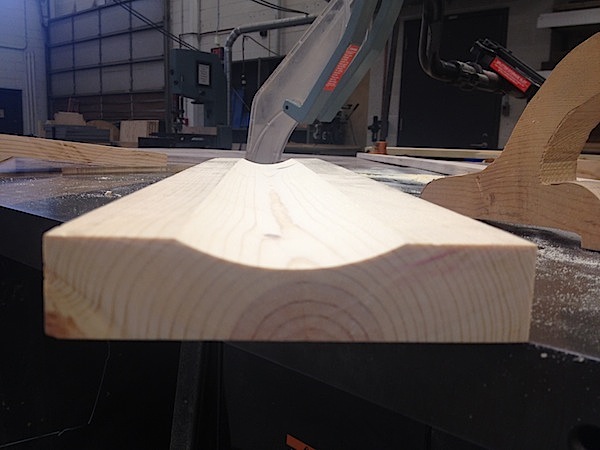
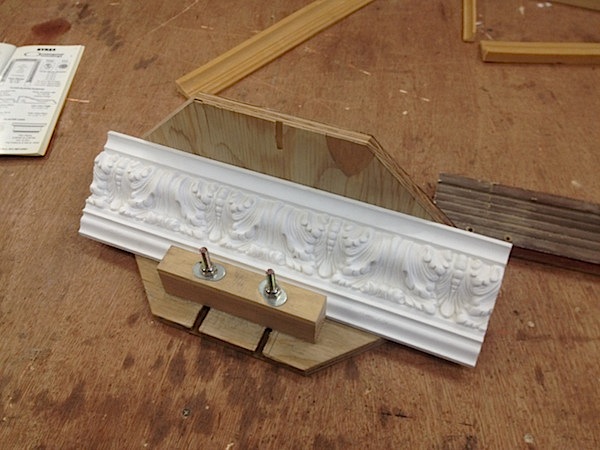
So the 555 Base Cap molding that John specked in the section view is actually oak. You would not order this unless you are planning to stain the wood. Peter, the nice man on the phone, gave me a price for Prime pine at $1.85 and MDF $1.20 per foot. So this is what you would want unless you are staining wood. Lumber comes in different lengths 8 16 24 but is sold by the foot and you need to specify the length you want when you order it.

If you want anything in Flex you need to plan at least 3 weeks in advanced. Dykes has to send away for it and then get it, then custom make it for you, so it takes time. so if you plan on doing a lot of flex then plan 3 or 4 weeks in advanced to place the order then build time and it is expensive.

John asked me to add a few things I learned during this time. I learned that when your calling a company you have to know exactly what you want and how much you want of it and grade that you want, or they will get frustrated. Rosebrand doesn’t get as frustrated as Dykes though… Anyway I also learned I need to think of the bigger picture not only the small details, for example how is the molding going to attach to the wall unit if I have all this foam inside rather than a solid molding. Try asking for prices not a quote of the material you need so someone doesn’t go to that effort to make the quote when your not buying it.  Just keep constant communication with your group always know how your building your project so you can discuss it with others, especially John. I am hoping to learn more during this project. Hope this estimate will help. If you have a question about anything you can comment on the post, text me or email me.


Posted in Uncategorized | 1 Comment

Class 03/13/14 – Moulding

Today’s class was dedicated to moulding types and concepts. At the very beginning we quickly discussed how productive was each group’s time spent on the project last week, and how do we manage our time and set up priorities in general.

Then we moved to the shop, where Mike demonstrated how to make cove moulding on the table saw. He set up diagonal fence, and then controlled the cove height by adjusting the height of the blade, cove width – by varying fence angle, and cove asymmetry – by tilting the blade. Here is the setup:

cm_setup

The process:

And final product:

finalMike explained that wood knots are really hard to get through when doing cove moulding. Another drawback is excessive dust that can probably damage internal parts of the saw. Then he demonstrated special adjustable jig that one can use when a large amount of cove moulding is needed:

cove jig  Also, he brought samples of flexible moulding, made of some sort of resin, that can be used for curved walls.

After Mike’s demo, Sergio did a demonstration of different types of moulding used in interior design. He built a very cool wall model, and explained where each moulding is going and how it is called:

sil

Elements are as follows:mt_r  Square corner blocks that are sometimes used on the upper edges of the door(window) casing are called the rosettes. Poplar is one of the most popular moulding materials, but is kind of ugly, and often requires additional treatment. Also, Sergio showed sample moulding made of polyester, which is lightweight and probably good for scenery.

After Sergio’s presentation John showed us ‘Vin’s jig’ – adjustable jig for crown coping. This jig duplicates the intersection of the wall and the ceiling. The base of the jig represents the ceiling, while the side represents the wall. With this device one can easily determine the angle of crown at corner joint.

vin's jig

Then we discussed the ways to make curved moulding. The most interesting, though time consuming method was to put moulding into steam tube, leave it there for a while, and then bend it. Other ways were to use styrofoam, or to combine different materials.

Posted in Uncategorized | 5 Comments

recap

o recap last class we went over where each group stand on problem 3 and whether or not each team understands what the problem is in this project. We then discussed what each teams strategy was for the problem of the curved flats and molding and skin that has to go on the curved flats. A couple of methods were discussed.

We discussed: moistening lauan and skinning them that way
Using wiggle wood to skin them
Using foam for the curved molding
Ultimately we all said that that rubber molding which can bend would be the best way.
There was also mention of attaching the masking wall to the door flat and then bracing the masking wall because of the small area between the masking flat and the door flat.
Lthe last bit of informatin that we discussed is what we all thought we learned in the class since the semester started. Everyone had their own thing to say but common amongst the various lessons we all learned was that everyone noticed that we needed to pay closer attention to detail and better communication of our ideas so others can understand. Thats it.

Posted in Uncategorized | Leave a comment

What!! Cove molding on a table saw?

for anyone, including myself, who didn’t understand what the hell i drew on the board to explain this process., here are some videos that do a good job explaining this technique, plus where to buy the actual jig.

first, kinda long, but he does a great job explaining the theory behind the process, using visual aids.
https://www.youtube.com/watch?v=YlTLpXzTja8

second,even longer video, but this is where i first saw the idea, and this guy also has a lot more interesting videos.
https://www.youtube.com/watch?v=iKiwTkX4EhE

third, is a store boought jig from rockler.
http://www.rockler.com/cove-cutting-table-saw-jig

fourth, is an article from my favorite Canadian woodworker.
http://woodgears.ca/cove/
plus his youtube channel with a whole bunch a shop made tools and jigs.
https://www.youtube.com/channel/UCckETVOT59aYw80B36aP9vw

Posted in Uncategorized | 1 Comment

Problem #2 Deck

Round two for presentations at the T.D’s table this a.m was filled with many of answered, questions, and suggestions.

WE discussed:

  • Identifying the problem within all of our issues/hindrances
  • utilizing resources In a timely fashion 
  • Paying attention to details and catering to  specifics when need be
  • Importance of legible drawings(well communicated)
  • Quoting and Expirations on potential proposals

It all came down to PAPERWORK,COMMUNICATION,RESEARCH and identifying strengths and weaknesses within ourselves and the team. GREAT  JOB GUYS …ONE STEP CLOSER TO GREATNESS!!!

Posted in Uncategorized | Leave a comment

Notes 2/18/14

Today in class we discussed the step units from the project. We found that there were an infinite number of ways to do it and we were all wrong. Mike had several ideas about building them using small platforms. We learned that our key factors were stability, aesthetics, time and skill level. We learned that we need to be very specific when dealing with giving instructions to someone. Also we learned that we need to try and assess all methods of construction before choosing one. We learned that we need to communicate the correct process properly and be VERY SPECIFIC.

Posted in Uncategorized | Tagged | Comments Off on Notes 2/18/14

Class 02/11/2014

Today we learned a few tricks on excel to make budgeting, calculating and presentation easier.

Some of the things we learned were:


  • dates, times, number input
  • formulas and how they work with each other
  • how to dress for interviews (one step up of the position your applying for)
  • inserting autocad drawings, logo’s
  • making things look cleaner

Reminders

  • portfolio your project documents once the project is over, just to make it simpler on yourself, and not leaving everything for last minute
  • Marcelo’s project (extea credit)- talk to John if your interested and what is your interest.
Posted in Uncategorized | Leave a comment

Tuesday 02/11 Class

So here goes a little summery from yesterday’s class:


Yesterday we had a quick presentation from each group of how we (each group) are solving the “problem” number 2.

We talked about how each one of the groups is addressing each task, like labor, time and schedule as well as choices of materials.

For example: Laura, Steve and Yaro’ s group are going to build 4 X 8 platforms and they going to use MDF to cover the Logo on the floor for the talent show.

Sergio, Michael and Shannon are going to use triscuits and stud walls and they also going to use MDF for the floor.

Sarah, Vincent, Jose and myself are going to use triscuits as well but we are going to cover the floor with Marley.

While discussing the front stairs, it was mentioned that a staircase needs support in every 2’ to 3’.

We also talked about the paper work that we need for problem number 2 like, build drawings, installation drawings, calendar, budget etc.


For tomorrow’s class bring a flash drive, because we are going to meet in the light lab for an Excel class.

And next Tuesday we are going to talk about the front platforms for this project, so if you have the Stock Scenery Construction Handbook by Bill
Raoul, bring it with you.

Posted in Uncategorized | Tagged , , , | Leave a comment

Excel Practice

In anticipation of our Excel practice, I’ve found some online Excel tutorial material that you can look at before you come in or use for reference after the fact.

Here is the beginning of a youtube excel tutorial that is pretty good. (The first part is good, anyway)

This is an About.com tutorial. Seems fine, but I haven’t looked at it too deeply.

Microsoft’s actual support and tutorial page is here.

If anyone has useful Excel reference material, post it in the comments.

Posted in Uncategorized | Leave a comment