Final Portfolio

The portfolio details have been added to the site here.

Posted in Uncategorized | Leave a comment

Updated Syllabus

Syllabus has been updated here and I will hand out new paper copies of the class schedule in class today.

Posted in Uncategorized | Leave a comment

Gravesend Inn Flat Pictures

AG Scenery Corner HW

Posted in Uncategorized | Leave a comment

HAUNTED HOTEL – ANGLE PICS – SANDRA MEJIAS

SANDRA MEJIAS – ANGLE PICS

Posted in Uncategorized | Leave a comment


The conservatory room is just different flats connected together with hex bolts,nuts and washers.these two flats are in angle with 3 hex bolts connecting both flats.the ceiling of this room is each flat at an estimated 45 degree angle connected just using loose pin wire and hinges

Posted in Uncategorized | Leave a comment

class notes 10-17-18

Hex Bolts have hexagonal heads and are for general purpose applications with a socket type installation tool or standard wrench. The standard bolt is compatible with standard nuts and washers of the same thread pitch, grade, and finish. Grade-8 bolts have a higher strength and are to be used with Grade-8 nuts. An alternative for using Hex Bolts without nuts is to place them directly into a compatible female threaded receptacle. They require a pre drilled hole or pre-taped hole with compatible female thread. Available in various materials, grades, and finishes.

Ratchet goes both ways, it rotates. combination wrenches and box wrench are same size just box wrench box on one side.Tnut goes into wood,drill the hole inside the wood then you hammer it down.

Carriage Bolt features a smooth, rounded head with no external drive for appearance, safety and security. The square shank under the head pulls into the material as nuts are tightened and prevents the bolt from turning once completely installed. Common applications for this bolt include deck building, fence construction and outdoor furniture. They are generally pushed into a pre-drilled hole and then tightened in place with hex nuts and flat or lock washer

Posted in Uncategorized | Leave a comment

Homework Due 10/22

Before class on October 22nd, walk through the Haunted Hotel and find examples of the following things:

  • an outside corner
  • an inside corner
  • an corner with an angle other than 90 degrees

Take a picture of each joint (front and back), and make a post with your pictures that describes the joints, identifies where they are in the Hotel, and how they are joined (screws, bolts, etc).

Posted in Uncategorized | Leave a comment

8-29-18 Pneumatic Tools & Fasteners Notes

Pneumatic Tools

  • Pneumatic tools were originated to help with the building of wooden airplanes.
  • The tool works by using pistons in the inner workings and compressed air that is attached via hose on the bottom of the tool.
  • To load in the fasteners, there is a button or a lever to pull out the magazine of the tool to reload or load the tool. Simply push in the magazine and the tool is ready to use.
  • Best to use this tool on material that has no knots or leftover fasteners.
  • In regards to safety, never hold the trigger of the tool when not in use. In addition to that making sure that you keep the tool facing down so you’re not potentially shooting any fasteners at anyone.
  • With working with the tool, best to work more slowly rather than quickly even if you know the PSI of the tool. Reason being is that some of the fasteners would stick up and not fully penetrate the wood.

Fasteners

  • Narrow Crown staples are more suitable for fine woodwork
  • Medium Crown staples are suitable for framing when building flats.
  • Finishing Nails are used to holding the project and are able to be puttied over.
  • Corrugated Nails are serrated and are primarily used for wood joinery

What to look for in regards to fasteners

  • leg length
  • gauge (thickness)
  • crown width

*important note*

  • always use the correct fastener for the particular pneumatic tool you’re going to use.
  • to determine the correct length of fastener to use, the total length of the leg should be three times the length of the thinner material no longer than your total width of the material.


Posted in Uncategorized | 1 Comment

Class Note 9/24/18

BEFORE beginning any kind of project you must remember the 5 P’s

Prior Planning Prevents Poor Performance

Think about the whole project before you starting doing anything and ask yourself these questions

What are you building?

What materials will you be using?

What tools do you need?

Do you need to make any miter cuts?

How many are you building?

Be sure to check the drawings and spot out anything that may not be clear to you, also take the time to read all notes and make you you understand whats being asked of you.


Drop saw
Used to make accurate cross cuts
And miter cuts

Miter and trim

Fast and precise cuts
Faster than circular
Small and portable
Material would be held within the fence
Miter index (shows angles)
Some models have a laser guide
Have self retracting blade guard
Dust bag
24 in size of the fence
Low chance of wood being able to kick back
Wear safety googles wood chips prone to flying everywhere
600-800 dollars
bosch brand
Check reviews
Made of metal for durability
Minimum specifications

45 degree angles in both directions
Be able to cut 3 1/2 inches (higher the better)
Fences should be adjustable
Make sure there is holes for accessories

Replacement parts (depends on manufactures) the better the name brand the more likely to get replacement parts for the saw

Circular saw

Circ saw
There is a guard on top
Swivel guard on the bottom of the blade
As you move forward the guard will move to allow you to cut whatever you are cutting
Depends on the type of blade to cut wood or metal
There is also a gas powered one used for subway maintenance work

7 1/4 maximun
5 1/2 inched smallest

When purchasing make sure you have a guide
Can be used for angle cuts
Cutting custom sheet goods.
Not recommended to stack pieces together when cutting , one at a time

When finishing a job be sure to pull out and let the blade stop spinning and also let the guard slide back to place.

Don’t leave it to plugged in and un-attended

Must wear safety goggles, ear protection
Direct drive circular saw
Blade is connected to the motor
Can be left or right side

Worm drive saws are more expensive since there is more moving parts

Cost around 75-100 dollars

Higher end are much more

Posted in Uncategorized | Leave a comment

Class Notes 10/1/18

Flat construction:

  • You have to call a lumber yards for custom size pieces. Home Depot is good for stock sizes.
  • 4×8 isn’t the only stock size (longest 6×16)
  • Pg. 105-118 in Stock Scenery Handbook shows how to join pieces together.
  • Pre-drilling/bolting is best for doing pieces together.

Moulding:

  • Moulding shows audience room type/time period. Audience has basic knowledge of scenery setting based on scenery construction.
  • Backstage Handbook (pg. 233) shows types of moulding.

Balustrade- Entire stair unit.

Balusters- Made with a rectangular bit and a decorative bit. Has to be cut to a custom size depending on the size of the railing/stairs. 2 per step is common. Extra pieces will probably be necessary for construction.

Handrail – Joint is hidden between handrail and baluster.

Newel post – 6″ x 6″ sq. Can be bought or built. Hollow or solid. Usually decorative and have a topper. Traditionally, topper is removed when the house is paid off.

Nosing- Tread extends past stairs with a rounded shape. Most staircases have it (with the exception of industrial stairs). Wooden stairs have it in homes.

Thicker moulding = fancier. Thinner = more common.

For buying moulding, MDF is cheapest and pressed into shape. All decorative and prone to water damage. Brittle, comes primed so you can’t paint it.

Finger-Jointed Pine (FJ or PFJ) – Pine boards joined together end-to-end. Same cost as MDF mostly, and brittle. Not good for bending. Also can’t be stained.

Soft wood or hard wood. Pine (SW, weaker), Poplar (HW, stronger, used for windows), Oak. One is cheapest, Oak is most expensive.

Foam – Foam comes in solid (cheaper than wood) and flexible (more expensive than wood, used for archways). Light-weight is easier for carving. Flexible foam is custom-ordered.

Shapes:

Shapes come in many varieties. Doors/windows have a specific casing shape.

    • Broadway designers specify moulding type from Dyke’s catalogue.
    • They look for size/dimensions and shadows.
    • More lines = fancier, fewer is plainer.
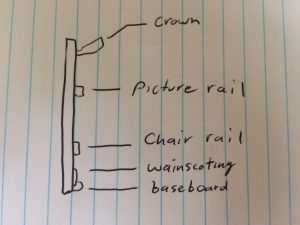
    • Chair-rail- protects plaster walls from damage from chairs.
    • Picture rail – moulding used to hang pictures on so as not to damage plaster walls. (Don’t use hooks to hang pictures anymore)
    • Moulding is bought is a bigger amount than you’ll need. Baseboards need to be big, same with crown moulding.
    • Crown moulding is hard to cut for dimensions larger than 6″ x 9″. Bandsaw can be used to cut if a large blade is used. Also, a handsaw can be used.
    • Brad nails and narrow crown staples are best used to attach moulding. Can be attached to flat individually in the shop, or at load-in, but that takes up time and can be harder to do on stage.


Posted in Uncategorized | Leave a comment