
Exploring the Cube from within
Design skills: Learning about the significance of ordering and proportion systems in design. Exploring the relationship between interior and exterior space, shaping the experiential quality of void space.
Practical Skills: The students will generate a series of grids to establish order, rhythm and proportion in a 2-D abstract field. Once the grids are established, they will be manipulated to create 3-D space within a given volume.
CLASS DISCUSSION
- Architectural design and ordering using rhythm and Proportion
- Cube – understanding + representing a volume in 2D
- Solid and Void (creating space through process of removal/carving)
2.1 Sectional Studies
The first part will focus on the investigation of space-making though sectional studies and building models in both physical and digital form.
A) Grid creation and sectional investigations
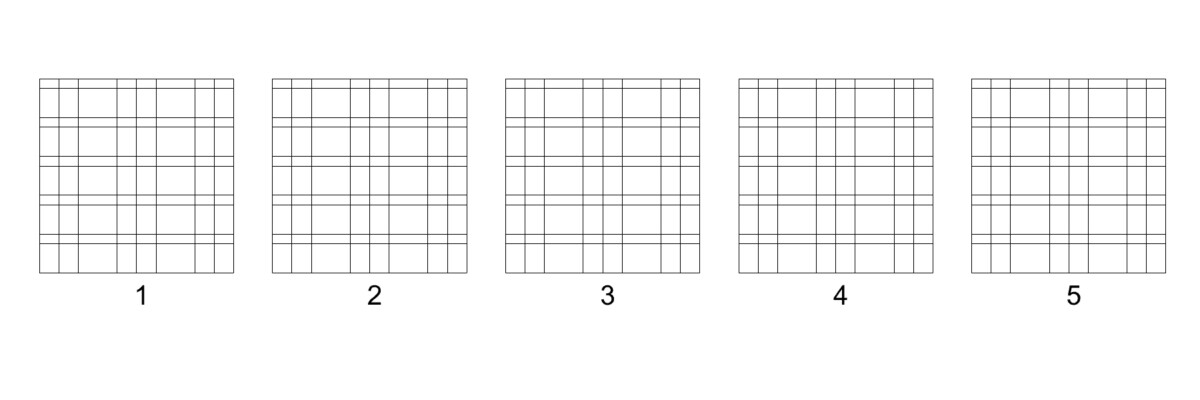
- Section Drawings: In Rhino create a series of five squares 5”x 5” sq. each of these squares will represent a consecutive sectional cut 1” deep that will ultimately be layered and assembled to create a 5”x5”x5”
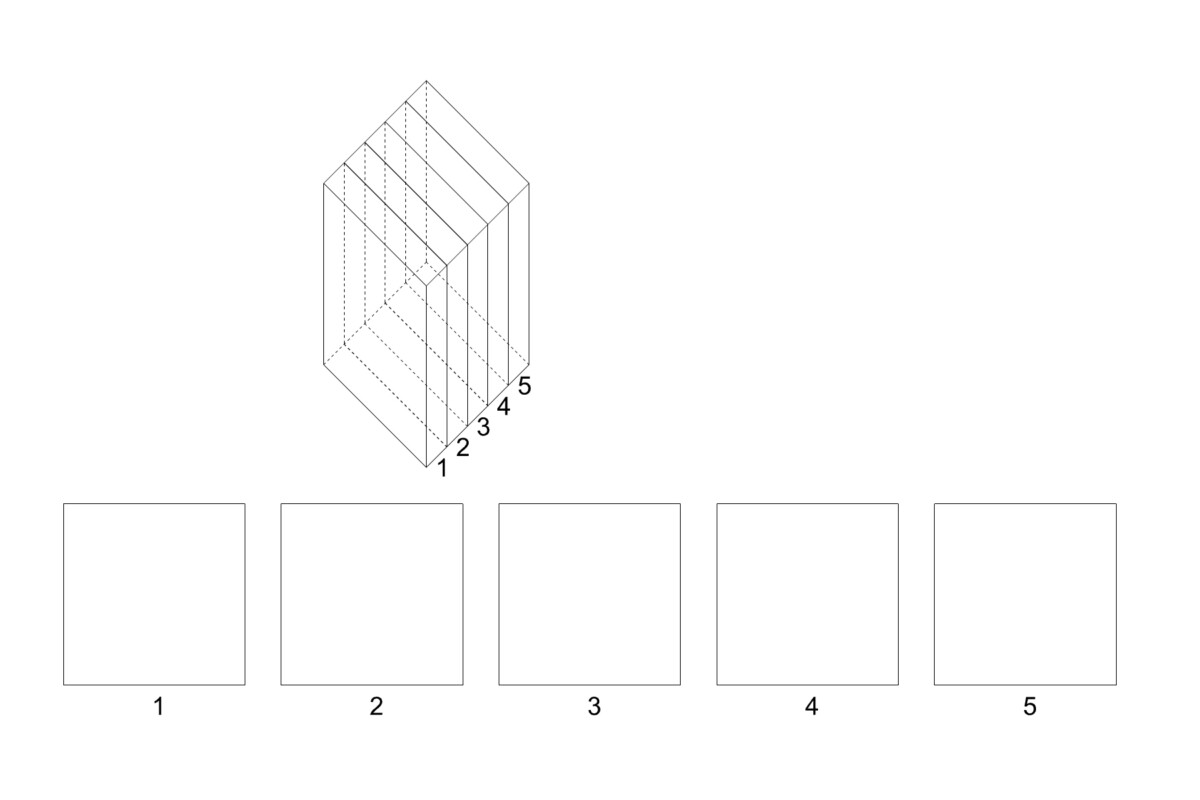
- Establishing ordering systems: Create a grid within the first square investigating different proportional systems or rhythms. Some examples: a-a-a-a- or a-2a-a-2a-a- or 1-1-2-3-5-8 (remember this one?) Explore multiple possibilities for patterns. Once you have established a grid/rhythm, apply it to all five squares.
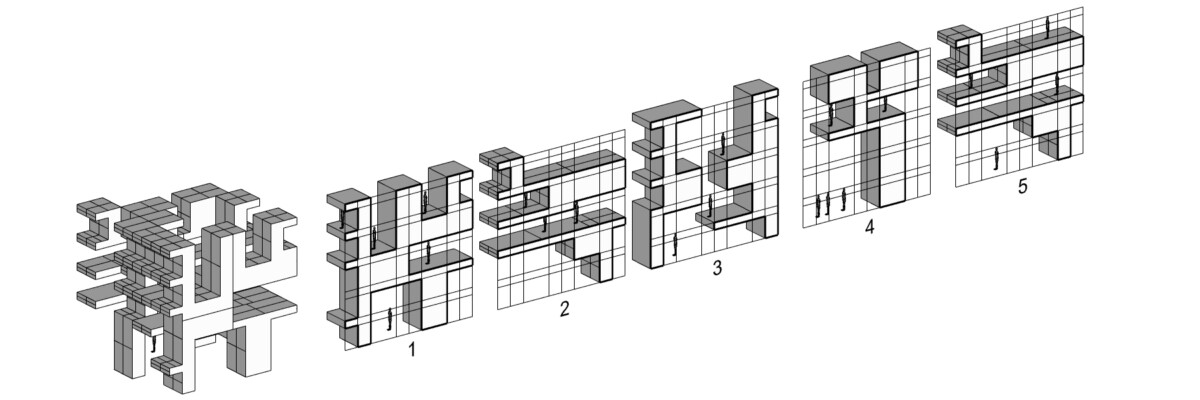
- Mapping space (VOIDS): Negotiating solid + void: How can the space between solid and void be activated? For each sequential cut (squares 1-5) map a potential section instance using the grid to constrain the shape. Consider the relationship of the body to the space. Insert a scale figure to help you visualize this. What are the visual and proportional connections both in horizontal and vertical directions? Make sure to include at least one space that cuts through the entire volume horizontally (see fig. 2 below) and one vertically (see figure 3 below)

4. Test your diagram in 3-D. Through this process you will discover that often complex three-dimensional composition and systems of organization are difficult to understand in a two-dimensional world. How does a drawing communicate the relationships and influences between each section within the object? How do they relate? To test this in Rhino extrude each section 1” in depth and assemble them to create a 5”x 5” x 5″ cube.
5. Examine the results. Ask:
- How the proportions of space and the relationships between sides are performing.
- Are the voids relating as you predicted?
- Does the cube retain its “cube-ness?” If not, maybe too much exterior material has been removed…
- Place the scale figure everywhere, and examine the spaces relative to the figure. What kind of atmosphere does each void create? Is it an interior or exterior space? For how many people? Are the different spaces connected through a passageway? What are the different light qualities of the different spaces?
- How can you make changes to the model to develop a more spatially rich experience?
DELIVERABLES (start in-class)
- Solid/void diagram (creating space through process of removal/carving). Using Boolean difference command in rhino, explore negative space. Reference:
- Section in axonometric (clipping plane command)
B) Ground Conditions
Ask: How does your cube meet the ground Create your own imaginary topography. The cube must not rest on a horizontal plane – instead it should actively engage the context.
DELIVERABLES
2.2 Orthographic Projections
Elevations + Sections
- Draft a series of 3 elevations (N, S, E, W) including entourage, shade/shadow + graphic scale
- Draft 2 orthographic sections with scale figures on an imaginary ground plane.
Explore the poche in detail. Ask:
How do people circulate? How do people enter/exit? Where are the openings? How does air and light travel though space?
REFERENCES
Photoshop tutorial: How to shade your elevations and sections
2.3 Experiential views
Assign scale 1/8″ = 1’=0″ (total cube height is 48ft) insert scale figures into your rhino model. Explore your cube from within. Thoughtfully frame your views in eye-level perspective. Edit in photoshop to create a coordinated set of images.
In Photoshop, apply shade/shadow to the elevations. Review video tutorial
DELIVERABLES
- min. 1 exterior perspective
- min. 3 interior perspectives
2.4 Physical Model making
- Build a Final Physical Model. Using cork or Corrugated cardboard build a physical model of your final composition.
- Thoughtfully Photograph your model. Using a black or white background document your work. In addition to taking photos of the overall composition, remember to zoom in and also capture specific moments that exemplify the spatial qualities you orchestrate.
- Post your model photos to the Miro Board
GRADING PARAMETERS

