
- Hilto HAC Edge Start t=0 watch to 5:30
-
- 0 View of Edge Bracket Assembly
- 17 Bracket with top J-plate
- 24 Corner bracket
- 29 Adjustable bracket
- 36 View of connection to Modular Unitized Curtain wall
- 42 View of Edge Bracket Channel
- 49 Bracket to connect Edge plate w/rebars to Channel Bracket
- 59 Distance from edge is adjustable
- 105 Slotted head bolts rotated and bolted to angles
- 107 Stress of tightening of bolt can crack and weaken edge of slab
- 125 Horizontal Rebar helps to redirect stress away from edge
- 144 Edge Plate attached to rebars prevents edge of slab from cracking
- 205 Edge plate and rebars work together
- 211 Graph showing stress comparison
- 220 Installation on wood formwork – shows slab reinforcing
- 230 Concrete is poured
- 235 Use of Brackets in corner condition
-
Category: Prof. King
Scans of Sketches from Tuesday Desk Crits
Allface RainScreen Cladding System
- Allface System F1.10 (Rainscreen Cladding) Start t=110 watch to 5:30
-
- 38 Drawing showing layout of wall connectors
- 110 Straight Level Line to locate angles
- 112 Anchor Positions
- 118 Pre-Drill Holes using Masonry Drill Bit
- 142 Installation of 2 bolt aluminum angles
- 150 Installation of 1 bolt aluminum angles
- 205 Shows installed angles
- 210 Installation of Mineral Wool “Rockwool” “Roxul” insulation with fasterners
- 250 Installation of vertical “T” channels – angle clips allow for adjustment
- 258 Screws into holes for fixed connection to T
- 310 Screws into slotted connections for moveable connection to T – allows for movement due to expansion & contraction
- 325 Note “Black” material between aluminum angle and concrete as a thermal break
- 340 Next set of vertical “T” channels installed. Note space to allow for expansion and contraction.
- 420 Installation of Panels
- 436 Spacers to maintain equal joints between panels
- 443 Location of connection points on panels – note fixed positions vs moveable
- 445 Pre-drilled holes in panels are visible
- 450 Drill holes in aluminum T aligned with panel holes
- 457 Installation of Blind Rivets –
- 528 Diagram showing fixed and moveable rivet locations
- 533 Shows how adjustable faster works – hole is bigger than Rivet
- 550 Stop video here
-
HALFEN – Fixing Systems – Curtain Wall to Concrete
- halfen.com website fixing-systems
- PDF Catalog -Review Pages 11-13, 17, 43-44, 68, 71-72, 74, 76, 79-80
- hcw-curtain-wall-system edge of slab connector
- HALFEN Curtain Wall Connector Edge of Slab Start t=28 watch to 1:32
-
- 28 View of Wood formwork for Concrete Slab
- 35 Channel nailed to wood formwork
- 40 Reinforcing rebars for slab and pouring of concrete
- 48 Form work removed & styrofoam removed from channel
- 53 Parallelogram headed bolts inserted – rotate as tightened
- 57 Paired aluminum angles w/slots for vertical & horizontal motion
- 107 Square washer & bolt
- 110 Vertical mullion of curtain wall
- 112 Bolting of mullion to edge of slab angles
- 120 Overall view of curtain wall system
- 126 Halfen Edge of Slab Assembly
-
- HALFEN Curtain Wall Connector Top of Slab Start t=25 watch to 2:08
-
- 25 Setting Form work with channel
- 45 Pouring Concrete Slab
- 100 Shows recess in slab after formwork is removed
- 114 Shows J-connector Plate bolted to channel
- 125 Shows Curtain Wall Connected to J-Connector Plate
- 148 Show installation of Fire Safing/Stopping
- 154 Show application of Smoke Seal (Red)
- 208 Stop watching here
-
- HALFEN Curtain Wall Connector Top of Slab Start t=20 watch to 2:15
Shows Unitized Curtain Wall Installation using Top Connector
-
- 20 Setting the channel in the formwork – flush to top of slab
- 25 Pouring Concrete Slab
- 111 Shows J-connector Plate bolted to channel
- 123 Unitized Curtainwall panels lowered into place
- 145 Panel Hook connected to J-Plate
- 156 Next Panel lowered and connected to previous panel
- 215 Stop watching here
-
How to Set a YouTube Video to start at a specific time ?t=35
-
- In this example I added the following to the end of the YouTube Link ?t=35
This will cause the video to start 35 seconds after the beginning
- In this example I added the following to the end of the YouTube Link ?t=35
(https://youtu.be/ZUBLdZ74zY8?t=35)
- Please do this for links where you are highlighting a portion of the video. See an example of how to title your video
- HALFEN Curtain Wall Connector HTA Channel Start at t=35 watch to 1:32
Thursday Presentation Clarification – Prof. King’s Class
I met with many of you today to discuss your research projects. I may not have been clear with everyone –
WE WILL HAVE PRESENTATIONS ON THURSDAY –
That being said – RELAX! – the goal is to be able to start to build a Revit model of your exterior wall systems – so focus on identifying the information you need to start building your family components.
AND YES IT WILL GET A GRADE! – but 90% of you are in good shape based on what I have already reviewed.
Some of you have enough into to begin your Revit models – and others are still conducting research. Everyone will proceed at a slightly different rate.
Prof. King – Class Meeting Schedule for Thursday March 26th
The same Zoom link is used for all class meetings.
For Thursday’s Class – please select Join Zoom Meeting – starting at 230.
https://zoom.us/j/930068136
Meeting ID: 930 068 136
Tuesday March 24th (done)
Please be on time for your session. I recommend you login 5 minutes prior and wait for your session to begin. Please feel free to watch any of the critiques of any of the groups – all are welcome. Sometimes watching another group helps you to understand the assignment better.
| Jablonski,Dominik | 1 | Lan Handling Tech. Offices | 1 | 2:30 PM – 2:45 PM |
| Manrique,Brian | ||||
| Szpin,Hubert | ||||
| Centeno,Victor | 2 | Elmhurst Library | 2 | 2:45 PM – 3:00 PM |
| De La Rosa,Estarlin J | ||||
| Lee,Richard | ||||
| Mendoza,Carrie | 3 | Morgan Library | 3 | 3:00 PM – 3:15 PM |
| Williams,Alana | ||||
| Casseb,Raphael A | 7 | The Heights – BIG | 4 | 3:15 PM – 3:30 PM |
| Ortiz,Ashley | ||||
| FULL CLASS SESSION | 3:30 PM – 4:30 PM | |||
| Dirsio,Juan | 4 | New Museum | 5 | 4:30 PM – 4:50 PM |
| Perez,Daniel | ||||
| Rodriguez,Joshua L | ||||
| Ahmed,Faizan | 5 | Rollux Showroom | 6 | 4:50 PM – 5:10 PM |
| Estevez,Emmanuel | ||||
| Tan,Jun Hao | ||||
| Ulerio,Rangel | ||||
| Hamdan,SaJida | 6 | Citadel University Campus | 7 | 5:10 PM – 5:30 PM |
| Khabelashvili,Tea | ||||
| Kuang,Mei Fen | ||||
For Thursdays Class – Preliminary Facade Materials Presentation
Please begin to develop a PowerPoint/PDF of your Exterior Facade Presentation and post this online for Thursday. This is a rough draft preliminary presentation – complete as much as you can.
Create another post on Openlab to submit it and remember to select yourself for the category.
Outline of slides: Each slide listed should be the title slide of a group – the number of actual slides will depend upon your selections.
- Slide1 -Credit Slide
- Your name, Course Name, Professor Name, Semester Name
- Also include in smaller type the members of your team
- Slide2 -Opaque Material – Case Study
- Show the case study first that features the use of your facade material choice. Focus on the images that feature the material – you are not looking to explain the building so much as you are looking to feature the material.
- Slide3 -Opaque Material – Detail information
- Show the details you are able to find – in an organized manner. Remember that we are looking to understand structure, thermal and waterproofing.
- For structure this type of material typically connects directly to a solid wall behind.
- Plan details should show inner corner/outer corner, middle and end conditions.
- Section details should show top/bottom/middle conditions.
- Window details – look for details that explain how a window integrates with your system
- Roof details – look for details that explains how the your system meets the roof and parapet.
- Slide4 -Opaque Material – YouTube or other videos
- If you are able to find them include a link to a video featuring the system
- Slide5 -Glass Curtain Wall Material – Case Study
- Show the case study first that features the use of your glass curtain wall. Again remember to focus on the images that feature the material – you are not looking to explain the building.
- Slide6 -Glass Curtain Wall Material -Detail information
- Show the details you are able to find – in an organized manner. Remember that we are looking to understand structure, thermal and waterproofing.
- Your glass curtain wall will either have mullions or may be butt glazed. Make sure you can identify your system type.
- Butt glazed system may us structural glass fins or rely on a truss or cable system or on backup steel columns and beams for support.
- For types with mullions your system will either be stick construction (assembled as a set of separate pieces) or Unitized (the glass and mullions are a single pre-assembled piece) that are lifted into place and typically run from floor to floor.
- For structure on a curtain wall remember that you are typically looking for how it connects to the edge of the slab at each floor. If the floor to floor is very far apart a glass curtain wall may need intermediate supports using steel columns or beams.
- Plan details should show inner corner/outer corner, middle and end conditions.
- Section details should show top/bottom/middle conditions.
- Operable windows (if there are any) for curtain walls are typically integrated into the system.
- Roof details – look for details that explains how the your system meets the roof and parapet. The glass curtain wall may either stop before the roof and parapet and transition to a different type of construction or it may continue in front of the parapet using spandrel panels with a cap at the roof.
- Slide7 -Glass Curtain Wall Material – YouTube or other videos
- If you are able to find them include a link to a video featuring the system
Please Join our Openlab Site
We ask that students in the morning and evening sections join our class openlab site. Please follow these instructions. We also ask that you create a new post and provide links to your research assignment for your professor to review on Tuesday.
Login to OpenLab (Create an account if you do not have one)
Search for Professor King under category PEOPLE

Look for the Blue Shirt – Select Prof. King
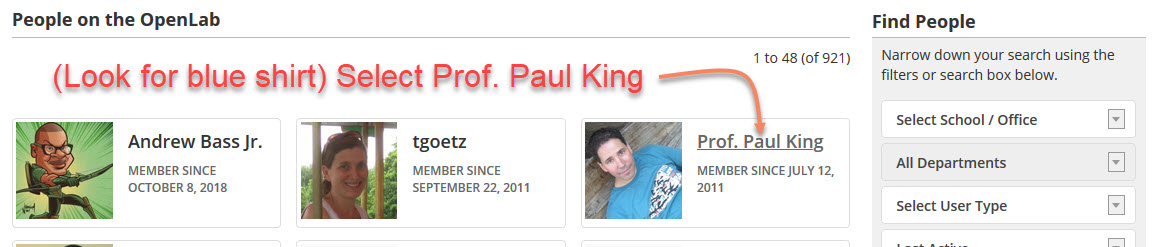
Select ARCH.2431 SP2020
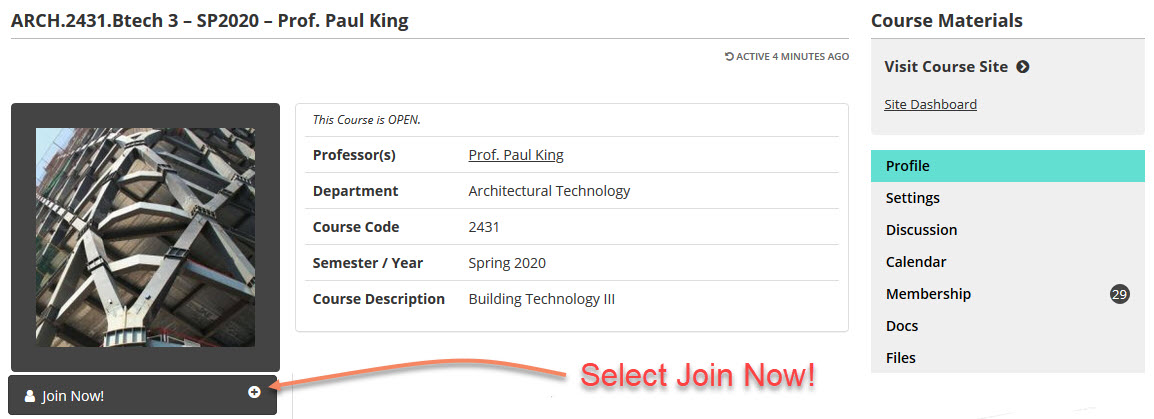
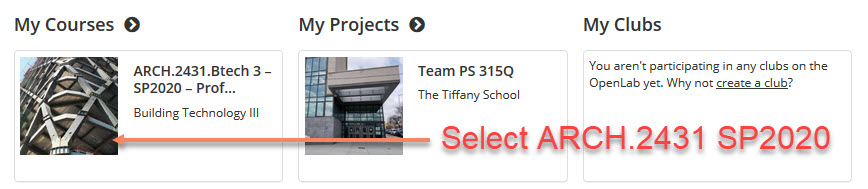 Join the Class Site
Select Visit Course Site
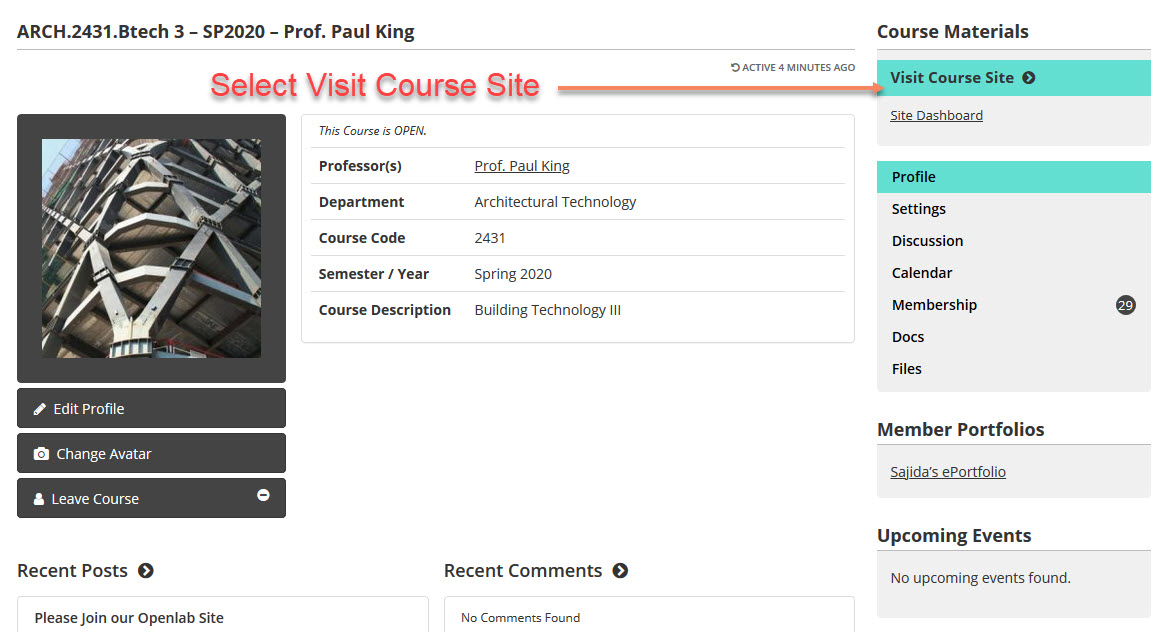
Add a Post with your Case Study Research – you may not be able to complete these two steps until one of the professors accepts you into the site.
Select + and then POST
 Create your post for your research – Assign the correct category – Publish

Class Meeting Times
| Name | Group # | Building Selection | Critique Order | Time Slot |
| Jablonski,Dominik | 1 | Lan Handling Tech. Offices | 1 | 2:30 PM – 2:45 PM |
| Manrique,Brian | ||||
| Szpin,Hubert | ||||
| Centeno,Victor | 2 | Elmhurst Library | 2 | 2:45 PM – 3:00 PM |
| De La Rosa,Estarlin J | ||||
| Lee,Richard | ||||
| Mendoza,Carrie | 3 | Morgan Library | 3 | 3:00 PM – 3:15 PM |
| Williams,Alana | ||||
| Casseb,Raphael A | 7 | The Heights – BIG | 4 | 3:15 PM – 3:30 PM |
| Ortiz,Ashley | ||||
| FULL CLASS SESSION | 3:30 – 4:30 PM | |||
| Dirsio,Juan | 4 | New Museum | 5 | 4:30 PM – 4:50 PM |
| Perez,Daniel | ||||
| Rodriguez,Joshua L | ||||
| Ahmed,Faizan | 5 | Rollux Showroom | 6 | 4:50 PM – 5:10 PM |
| Estevez,Emmanuel | ||||
| Tan,Jun Hao | ||||
| Ulerio,Rangel | ||||
| Hamdan,SaJida | 6 | Citadel University Campus | 7 | 5:10 PM – 5:30 PM |
| Khabelashvili,Tea | ||||
| Kuang,Mei Fen | ||||

