Tuesday Presentation Deadline! – King

Now is the time to push yourself.  The harder you work from today until the Tuesday the easier the rest of the semester will be.  If anyone wants a one-on-one crit this weekend or Monday please email me.  Good luck!

For Tuesday we will have a graded preliminary pinup presentation.  You need to complete the layout of both your opaque wall and your glass curtain wall as well as develop “still image” animations showing assembly in PowerPoint.

For this presentation you should evaluate both horizontal and vertical formatting for your sheets.  Please refer to the previous post on the breakout assignment from Thursday. Here is a suggested methodology.

  1. In your project file choose the vertical format.

    • Create the necessary views for both the opaque and glass facades and arrange these images on the sheets.  You are likely to need to sheets for each.  Pay attention to the appropriate scale and the need to have coordinated plan, section, elevation and isometric views.
    • Save your file.
  2. Make a copy of your project file using “Save_as” or by copying the file.

    • In the copy switch the sheet types from Vertical to Horizontal.  Next re-arrange the same views on the Horizontal sheets.

If when you are attempting a layout you realize that is may not work well you can show images running slightly off the sheet or somewhat incomplete.

Your Presentation Includes

  • 4 sheets in vertical format (2 opaque/2 glass)
  • 4 sheets in horizontal format (2 opaque/2 glass)
  • PowerPoint Presentation with “still image animations”
    • One for Opaque
    • One for Glass Curtain Wall

Please remember to post your virtual  presentation on OpenLab

Select Category for your name, and under Presentations select Facade Preliminary


Breakout! – In Class Presentation Mockup – King

After demonstration of the in-class assignment (sheet layout), the class will divide up into 5 break out rooms of 4 students each.  Complete the following in class exercise to work on your sheet layout and your PowerPoint

For the Opaque facade study create the following views
      • Full Plan, Front Elevation & Isometric
      • Wall Section at 3/4″
      • Wall Section at 1 1/2″ (cropped views) that show from top to bottom – Parapet – Top of Wall at Roof Slab – Top of Window – Bottom of Window – Slab at Level 2 – Base Condition at Level 1 – Footing Condition.
      • Wall  Section Details at 3″ – Coping or other details that need to be larger
    1. Enlarged Plan Details that show
      1. Inside and Outside Corner Conditions
      2. Middle and End Condition (new)
      3. Window Condition each edge side
For the Glass Curtain Wall facade Study
  1. Full Plan, Front Elevation & Isometric
  2. Wall Sections at 3/4″, 1 1/2″ and 3″
  3. Parapet condition — how does the curtain wall meet the roof?
  4. Plan Details – Inside Corner, Outside Corner , Middle condition
PowerPoint Fixed Animation

Some stages of assembly

King – Due for Thursdays class – April 22nd

Assignment Review (all students)

  • Work on building families for both opaque wall and glass curtain wall
  • Work to develop sheet layout‐ adding additional views including
    • Wall Section at ½” or ¾”, Cropped wall section details at 1 ½”, larger details at 3” for coping
    • Wall section should show, parapet & roof slab, top of window, sill of window, level 2 slab connection, base condition @level 1, footing.
    • Plan details and coordinated elevation views of the following –
      • Inside corner, outside corner, window
          • Next class will be one‐on‐one critiques in break out rooms.
          • Next Tuesday April 28 we will have a graded pinup

Breakout! – In Class Cube Curtain Wall Assignment – King

After demonstration of the in-class assignment (27′ glass curtain wall cube), the class will divide up into 5 break out rooms of 4 students each.  Complete the following in class exercise as a means to mastering Revit’s curtain wall commands while your professor visits each group.  Steps below…

    1. New Project > Architectural Template
      • Set Level 2 elevation at 27 feet
    2. Level 1 Plan View > Draw (Curtain Wall 1 type) – 27′ x 27′
    3. Divide up the facade into panels by defining grid- design is flexible
      • single grid line, grid line segment, all grid lines
      • Load all panel types (Insert > Family > Curtain Wall Panels)
      • Use both Glazed Panel, Empty Panel, Solid Panel
      • Copy Glazed Panel Type > Duplicate > Set it to red
        • Edit Materials > Glass > Duplicated Color > Set it to Red
      • Load door tops and replace panel with door
    4. Add Mullions –
      • Select mullion types as you please
      • Create Custom Mullion – from new profile
        • Family > Profile-Mullion
          • Basic Mullion Rectangle
          • Create custom fancy Mullion – ie. Sunscreen Device
    5. Glass Roof –
      • Control Slope- create flat roof – use Curtain Wall 1 type

Prof. King – Assignments Due for Thursday

Please complete the following for Thursday

    1. Email me the email address you use for your zoom login so I can put you into groups for next class.
    2. Document (2) two materials videos based on the assigned list.
      • Link the assigned video into your post.
      • Set the start time for the video
      • (when you are viewing the video on YouTube – move to the start point you want then select the “share button” at the bottom – then select “start at” and then copy the link)
      • Document the timeline – see samples online
      • For category select your name and select “Watchlist > Technical”
    3. Keep your eye out for any Revit tutorials you find helpful – we will be documenting these later on in a similar fashion.
        • When you document these for category select your name and “Watchlist > Revit”
        • This is not due for Thursday
    4. 3D families for your facade materials
          • Begin to model your families and look to assemble these in the template provided.
          • Pay attention to the proper orientation of the family
          • Assign proper materials (remember you need to import materials the first time – Revit > Manage >Transfer Project Standards
          • In the Family set “Family Category and Parameters” – this determines where it shows in the family list in the project browser – there should be no generic families in your finished project
          • Create parameters as needed so your families can be modified – but be careful that some family items will have no parameters- for example a special clip of a certain size or a spider clamp for a glass curtain wall
    5. Assemble your families in the template file
      1. Rename the file using ProfessorName StudentFirst Last Name etc.
      2. Repeat the process of creating the following wall types by making a copy of a generic wall – prefix each with your Initials.   My initials are PK
        1. PK Backup Wall – 9 3/8″
          • 5/8″ GWB
          • 8″ Metal Stud Layer
          • 3/4″ Plywood Sheathing
        2. PK Backup Wall – GWB 5/8″
          • 5/8″ GWB
          • 8″ Metal Stud Layer
          • 3/4″ Plywood Sheathing
        3. PK Backup Wall – Plywood Sheathing 3/4″
          • 3/4″ Plywood Sheathing
        4. PK Backup Wall – Waterproofing 1/16″
          • 1/16″ Waterproofing
    • Consider Using the Same Method for Rigid Insulation
    • Place the various walls parallel to the metal stud frame for each layer
    • Play with the option to edit the profile of the different walls to peel them back to make a more illustrative isometric
    • To shorten the walls to match the bottom of the slab – select the top slab – select “edit boundary” then select the green check.  When prompted “Would you like walls that go up to this floor’s level to attach to its bottom?” Select “YES”

Thursday Presentation Clarification – Prof. King’s Class

I met with many of you today to discuss your research projects.  I may not have been clear with everyone –

WE WILL HAVE PRESENTATIONS ON THURSDAY –

That being said –   RELAX!   – the goal is to be able to start to build a Revit model of your exterior wall systems – so focus on identifying the information you need to start building your family components.

AND  YES IT WILL GET A GRADE! – but 90% of you are in good shape based on what I have already reviewed.

Some of you have enough into to begin your Revit models – and others are still conducting research.  Everyone will proceed at a slightly different rate.

For Thursdays Class – Preliminary Facade Materials Presentation

Please begin to develop a PowerPoint/PDF of your Exterior Facade Presentation and post this online for Thursday.  This is a rough draft preliminary presentation – complete as much as you can.

Create another post on Openlab to submit it and remember to select yourself for the category.

Outline of slides:  Each slide listed should be the title slide of a group – the number of actual slides will depend upon your selections.

  • Slide1 -Credit Slide
    • Your name, Course Name, Professor Name, Semester Name
    • Also include in smaller type the members of your team
  • Slide2 -Opaque Material – Case Study
    • Show the case study first that features the use of your facade material choice.  Focus on the images that feature the material – you are not looking to explain the building so much as you are looking to feature the material.
  • Slide3 -Opaque Material  – Detail information
    • Show the details you are able to find – in an organized manner.  Remember that we are looking to understand structure, thermal and waterproofing.
    • For structure this type of material typically connects directly to a solid wall behind.
    • Plan details should show inner corner/outer corner, middle and end conditions.
    • Section details should show top/bottom/middle conditions.
    • Window details – look for details that explain how a window integrates with your system
    • Roof details – look for details that explains how the your system meets the roof and parapet.
  • Slide4 -Opaque Material – YouTube or other videos
    • If you are able to find them include a link to a video featuring the system
  • Slide5 -Glass Curtain Wall Material – Case Study
    • Show the case study first that features the use of your glass curtain wall.  Again remember to focus on the images that feature the material – you are not looking to explain the building.
  • Slide6 -Glass Curtain Wall Material -Detail information
    • Show the details you are able to find – in an organized manner.  Remember that we are looking to understand structure, thermal and waterproofing.
    • Your glass curtain wall will either have mullions or may be butt glazed.  Make sure you can identify your system type.
      • Butt glazed system may us structural glass fins or rely on a truss or cable system or on backup steel columns and beams for support.
      • For types with mullions your system will either be stick construction (assembled as a set of separate pieces) or Unitized (the glass and mullions are a single pre-assembled piece) that are lifted into place and typically run from floor to floor.
    • For structure on a curtain wall remember that you are typically looking for how it connects to the edge of the slab at each floor.  If the floor to floor is very far apart a glass curtain wall may need intermediate supports using steel columns or beams.
    • Plan details should show inner corner/outer corner, middle and end conditions.
    • Section details should show top/bottom/middle conditions.
    • Operable windows (if there are any) for curtain walls are typically integrated into the system.
    • Roof details – look for details that explains how the your system meets the roof and parapet.  The glass curtain wall may either stop before the roof and parapet and transition to a different type of construction or it may continue in front of the parapet using spandrel panels with a cap at the roof.
  • Slide7 -Glass Curtain Wall Material – YouTube or other videos
    • If you are able to find them include a link to a video featuring the system


Description of Case Study Assignment – Due for Tuesday March 24

We will now use this website for all three building technology III sections. For the purpose of this assignment we will conduct reviews in groups.  Each professor will both email you and post a schedule online here.

Assignment Description:

Research two (2) exterior wall materials types.  One type from the Opaque category and a second type from the Glass curtain wall category.  For Tuesday please identify 2 options for each for a total of 4.  After Tuesdays class we will select one from each category.

You can begin with the choices posted for you but you may expand this list and identify and research additional options.   All selection will be reviewed and approved by your professor.

Research Goals & Questions:

When researching a system we will primarily focus on answering three questions:

  • How does it function structurally?  or how does it attach to the building?
  • How does it provide thermal resistance?  or how is it insulated?  where do we see thermal bridges or thermal breaks?
  • How does it waterproof the building?  To fully waterproof a building we must look at the roof, the facade & windows & the foundation – all sides of the building.

Case Study Requirement:

For each facade material type you choose you must identify a building and conduct a case study of its use.   This means you will complete two case studies.  It is most likely this means you are choosing two different buildings.  If the two materials are found in a single building then you can use this choice for both case studies.  Remember in the case study you are looking to answer the 3 primary research questions. (structure/thermal/waterproofing)
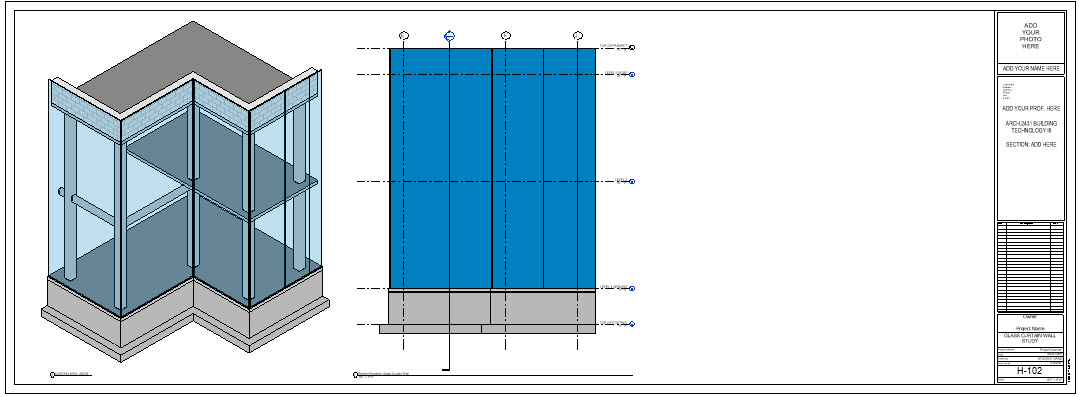
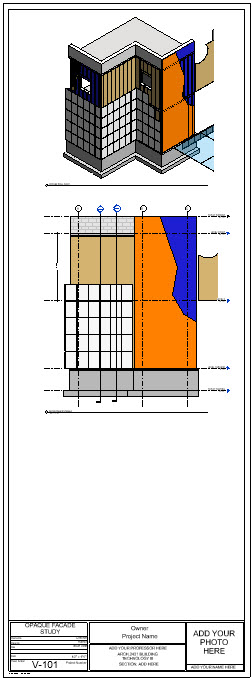
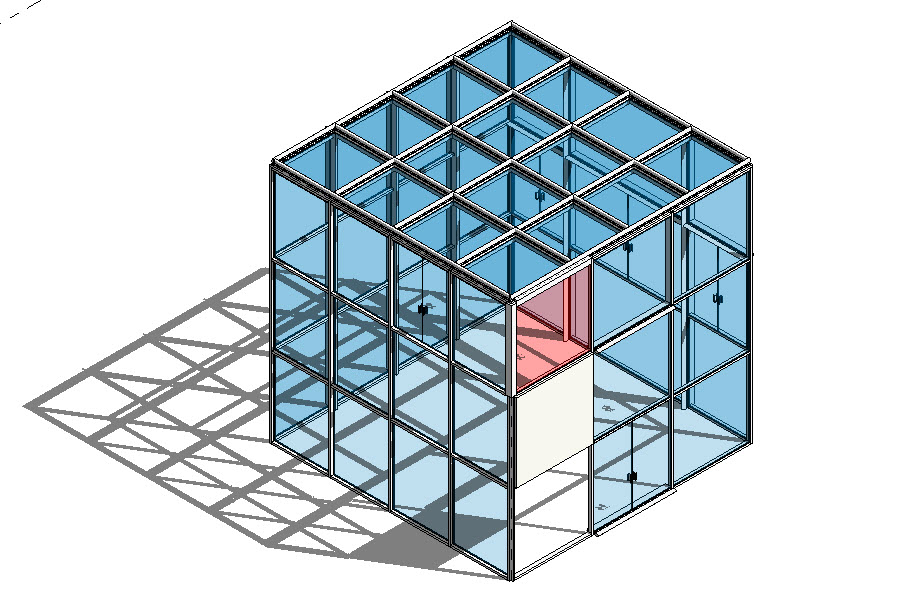
Modeling Component:

As you did with the connections assignment each of you will be producing your own 3D model with your own families to illustrate your chosen systems.  This work will begin after the research has started.  We will provide you with a starter file that will contain a section of the building and two options for sheet layout – one vertical and one horizontal.  You will choose from one of these options. 

Final submission will be your Revit model and sheets plotted to PDF.  This typically requires 2-3 sheets.  These images are to make use of color for clarity.

Oral Student  Presentation /PowerPoint or PDF:

Each student will be required to conduct an oral presentation of their final work.  This presentation will again address the three primary research questions (structure/thermal/waterproofing).  You will make use of images from your Revit file and add additional notes as needed to clarify your understanding.  This oral presentation is the primary means by which we can evaluate your understanding of the work and drawings you have produced.

What is due for next Tuesday’s class:

For next Tuesday you need to make your selection of materials.  We ask that each of you make two selections in each of the two categories for discussion.  At the end of the group critique one of these choices will be assigned to you.

Create an OpenLAB Post before Tuesdays Class (Midnight Monday)

  • Each of you must create a post in this open lab site.  In this post collect all the materials (by including links) you are able to locate.  This will include duplicates of the links we have provided you in the Opaque materials and Glass Curtain Wall postings.
  • Assign categories – For you post be certain to assign it to the category for your name – this should assign it to be part of your class meeting time.   (830-1130-Kurasek, 230-530-King, 6-9-Sherman)  – If your category does not yet exist then select your meeting time.
  • What to look for when doing your research.
    • PDF brochures of the system that show how the system works.
    • Details of the assembly.  You are likely only to find plans or sections.
    • Look on Youtube and search for information on the system.
    • Identify a case study for each material type.  Look for these on the manufacturers website.

Due for Next Tuesday – Graded Submission

  • Cover Sheet
    • Drawings Lists for Arch & Struct – 3d Image
  • A-100 Architectural Plans (basement to roof)
  • A-200 Architectural RCP Plans (basement to top floor)
  • A-300 Architectural Exterior Elevations and Whole Building Sections (two)
  • A-400 Architectural Details – Building Wall Sections, Plan Details, Partition Types
  • S-100 Structural Framing Plans (Footing Plan & Typical Floor)
  • S-200 Structural Sections (match  your two architectural sections)
The drawings that will be the most complete will be the cover sheet, typical floor plan and the structural drawings.  The rest of the sheets should be laid out properly.
  • Floor Plan should include
    • Exterior Wall
    • Interior Walls
    • Indicate location for core elevators and stairs
        • (do not draw stairs or elevators)
    • Room Numbers/Names
    • Doors and Door Number Tags
    • RCP Plan should include walls and Room Tags
  • Structural Drawings should include
    • All structural elements
      • Columns
      • Beams with Tags
      • Shaft Openings
      • Slabs
    • No Architectural Elements (non structural walls)


  • All drawings to include
    • Structural Grid
    • Grid Dimensions for all Structural and Typical Architectural Plan
    • Titleblock with student name and photo
    • Titleblock with proper name, etc.