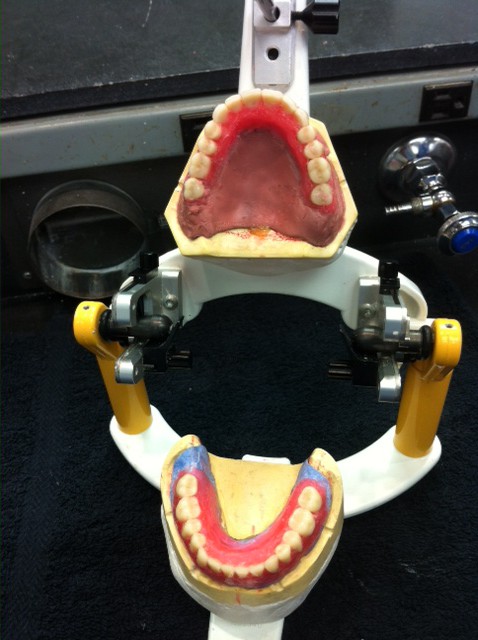
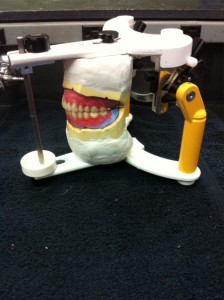
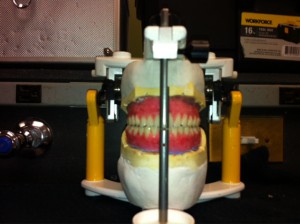
- I open the articulator and draw the line of crest of the mandibular ridge that is dictated by the most position for posterior denture teeth in the mandibular arch as a landmark for setting teeth.
- I attach some pieces of softened wax and place the left 1st molar on the mandibular record base. In my lab, I see that the mesiolingual cusp of the maxillary 1st molar seats in the central fossa of the mandibular 1st molar. And the triangular ridge of the mesiobuccal cusp of the upper 1st molar rests in the buccal development groove of the mandibular 1st molar. Therefore, the lower 1st molar fills the lingual embrasure between the maxillary 2nd premolar and the 1st molar.
- I move the upper member movement on the articulator to find the left side of the mandibular molar as the working side. I check the distal cusp ridge of the mandibular 2nd premolar’s buccal cusp contacts the mesial cusp ridge of the maxillary 2nd premolar’s buccal cusp. Certainly, the mesial cusp ridge of the mandibular’s buccal cusp contacts the distal cusp ridge of the maxillary 1st premolar’s buccal cusp. Therefore, the mandibular 2nd premolar moves into the embrasure between the maxillary 1st and 2nd premolars. The adjacent marginal ridges of the maxillary premolar must be at the same level for the lower 2nd premolar in order to properly engage them.
- I also move the upper member movement to find the balancing side. The mesial incline of the mandibular 2nd premolar’s buccal cusp triangular ridge contacts the lingual cusp of the upper 1st premolar. I check the lingual centric occlusion. I make sure that the lingual cusp of maxillary 1st premolar occludes properly with the distal marginal ridge of the mandibular 1st premolar and the mesial marginal ridge of the mandibular 2nd premolar.
- I position the mandibular 2nd molar now in centric occlusion. I must get attention on inappropriate positioning and angulation of the mandibular 2nd molar that can cause destabilization or dislodgemtnt.
- I continue to follow the same direction for setting the mandibular right 1st molar and establish balancing contact and working position, then I place the right 1st molar, the right 2nd premolar, the right 1st premolar, and then the right 2nd molar.
- After the right and left first molars are placed, the working occlusion, balancing occlusion and protrusive occlusion are all set to match the rises. Now I begin to set the mandibular central incisors. The mesial surfaces of the mandibular central incisors should be on the midline. The labial surface of the mandibular incisors should be perpendicular to the occlusal plane. I set the mandibular anterior teeth with a 1 mm overbite and a 1mm overjet. Once two mandibular central incisors have been set, I set the mandibular lateral incisors and canines. The mandibular lateral incisors follow the curvature of the maxillary anterior teeth and height of the mandibular central incisors, maintainging a 1mm overbite and overjet. Finally I have to follow the rules of curve of wilson and curve of Spee to check the case in centric occlusion.
Category Archives: Uncategorized
Arrangement of Maxillary Posterior Teeth
There are five steps below:
1. Before I start setting the maxillary posterior denture teeth, I first place the reference marks as guides on the right and left crests of the maxillary and mandibular residual ridges. I must form the compensating curve patter for the maxillary posteriors in 30 degree.
2. I make a 0.5mm space between the distal surface of the maxillary canine and the mesial of the 1st premolar. Then 1st and 2nd premolar are now set up with their long axis perpendicular to the occlusal plane. Their lingual cup tips should touch the occlusal plane, and the buccal cusps are raised 0.5 mm. Whatever, I arrange 1st and 2nd premolar are on the same level of the adjacent marginal ridges.
3. I arrange the mesiolingual cusp of the 1st molar to touch the occusal plane, and the mesiobuccal cusp is raised 0.5mm out of contact, forming an angle of about 6 degree with the occlusal plane. The distolingual cusp is raised 0.5mm, and the distobuccal cusp is 1 mm off the plane. The compensating curve begins at the 1st molar.
4. The mesiolingual cusp of the 2nd molar is 0.75mm off the occlusal plane, and the mesiobuccal cusp is 1.25 mm raised out of contact. The distolingual cusp is 1 mm off, and the distobuccal cusp is raised 1.5mm.The compensating curve is elevated by the 2nd molar off the occlusal plane.
Fixed Prosthodontics: The Metal Inlay And The Metal Crown
There are eight steps below:
- After receiving the final impression, I begin to disinfect all materials from the dental office. I mark down to frabricate two dies( No.12 and No.15) on two master casts. The mxillary cast for preparing the dies should be 10mm high from the bottom of the base to the gingival margin of the tooth. And The mandibular cast should be 15mm from the bottom of the base to the gingival margin of the tooth.
- The two models are trimmed , pindexed, inserted the pins to be parallel.
- I prepare for the base mold construction and cutting the dies. Then I check two models by the registation bite .
- I mount the maxillary and mandibular cast in an articulator.I make sure that two models must be in the right centric contact and eccentric movement relationship. Then I apply the sticky wax to hold two models in position.
- I use the red pencil to identify the margin on two dies to trim and ditch them. I place the thin coat of die hardener 2 mm extension below the marginand add1 2 thin coat of die spacer about 1mm above the margin. Finally, I apply for the the separator first and later wax up by free hands.
- I spru,invest and cast the wax pattern.
- I place the cast ring into the oven in 2 hours.Accoding to the wax pattern’s weight and determine the amount of metal required for the casting, I ight up the torch to adjust the torch flame and insert the ring into the machine with the sprue hole and let the alloy into the mold cavity where is ready to make the casting. I break the investment and clean the casting. I polish the castings and adjusting the proximal contacts, occlusion contact on the dies.
- I clean the the metal inlay and the metal crown again before I ship back to the dental office.
Setting Maxillary Anterior Denture Teeth
There are four steps to follow as:
- I use the midline and upper hip line guidance first, then I find the collective width of the six maxillary anterior teeth and measure 8mm the height.
- I heat up No.7A carver to cut out of the wax, then I place the mesial surface of the right and left central incisors on the midline, the long axis to the distal slightly tilt. Both the neck of the central incisors are depressed.
- I set the long axis of the lateral tooth at an angle that is more distal to the perpendicular than the central incisor. Both of the right and left lateral incisal edges should be shorter 1mm than the central incisors. Also, the necks of lateral incisors are more depressed than the necks of the central incisors.
- I use the occlusion plane for assistance and let the incisal tip of the canines to be seated on the plane. The long axis is set up more distal to the perpendicular than the central incisor, but not as much as the lateral incisor. Both the canine teeth are usually located at the corner of the arch and conform to the curve of the anterior teeth. The canines are positioned next to the lateral incisors, and they are on the corresponding opposite side and be followed the contour of the occlusion rim.
SEMIADJUSTABLE ARTICULATOR
- By using the incisal guide pin and rubber band as a guide , I find the midline mark of the maxillary and mandibular occlusion rim. Then I use the knife to draw the midline and lip line on both waxes and the record bases. Also, I am sure the extension pin is still on the red marker, and the incisal guide pin is still touching or setting on the incisal guide table. It is helpful to set the incisal guide table and its wings at 0 degrees, and I set the horizontal condylar guidance at 30 degrees on the horizontal scale later.
- I carefully seat the maxillary cast with wax in its record base. And the mandibular cast does do the same. In my lab class, I start to mount the mandibular cast first. By using the plaster, let the mandibular cast attach to the lower mounting ring with a slurry accelerated accelerated mix of dental stone( the plaster). Certainly the incisal guide pin must be in contact with the incisal guide table.Let the mandibular cast stand until the plaster hardens.
- When I am waiting for the mandibular cast to be stabilized and dry, the professor gives me an actual centric relation and occlusal vertical dimension jaw relationship record. He heats sticky wax to attach both occlusion rims together.
- Now I am mounting the maxillary cast. When the maxillary cast is mounted, I carefully seat the cast in the record base and find the midline to hold it in the right position. I attach the cast to the upper mount plane/ring with a slurry accelerated mix of dental stone(the plaster). By the time, I use the plaster spatula to smooth up to remove all excess mixture.
- I smooth the mounting the casts with wet/dry sandpaper and clean up the articulator.

Occlusion Rims
Four Steps of Occlusion Rims Fabrication as below:
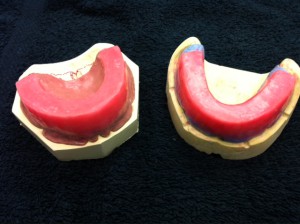
First of all, I find the midlines are the center of both maxillary teeth and mandible teeth in order to setting up the occlusion rims in the dynastic (record base )model later.
Second, occlusion rims can be made by hands or a device like a horseshoe shape. I frame the pink wax which can be heated and fold it over 3 or 4 times by using my thumb and middle fingers . I form the pink wax into a horseshoe shape and strengthen it as I want.Then I mount the wax on the record base.
Again, the occlusion wax rim must be centered of the maxillary teeth or mandible teeth over the crest of the residual ridge and sealed to the diagnostic recording base with hard acrylic resin or the shellac baseplate in my lab class.
Third, I start to make the mandibular occlusion rim first. The anterior height of the mandible rim measures 18mm from the labial to the occlusal plane. The anterior width of the rim is 8mm, and the posterior width of the rim is 10mm wide on the residual ridge.
Then make the maxillary rim. The anterior height for the maxillary occlusion rim measures 22 mm in the labial flange. The posterior height of the rim is 18mm from the deepest point on the buccal flange. And the anterior width of the rim is 8mm, and the posterior width of the rim is 10mm at the residual ridge as well.
Fourth, I melt the wax on a large spatula-#31to carry the wax from a bunsen burner. I contour the facial and lingual surfaces of the rim according the previous measurement. Surely, I am making both of mandible and maxillary occlusion rims in a straight line because they guide me at the patient’s occlusal vertical dimension and in centric relation.

