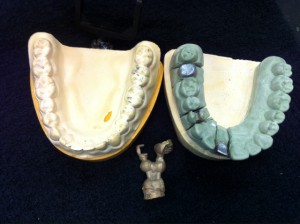
There are eight steps below:
- After receiving the final impression, I begin to disinfect all materials from the dental office. I mark down to frabricate two dies( No.12 and No.15) on two master casts. The mxillary cast for preparing the dies should be 10mm high from the bottom of the base to the gingival margin of the tooth. And The mandibular cast should be 15mm from the bottom of the base to the gingival margin of the tooth.
- The two models are trimmed , pindexed, inserted the pins to be parallel.
- I prepare for the base mold construction and cutting the dies. Then I check two models by the registation bite .
- I mount the maxillary and mandibular cast in an articulator.I make sure that two models must be in the right centric contact and eccentric movement relationship. Then I apply the sticky wax to hold two models in position.
- I use the red pencil to identify the margin on two dies to trim and ditch them. I place the thin coat of die hardener 2 mm extension below the marginand add1 2 thin coat of die spacer about 1mm above the margin. Finally, I apply for the the separator first and later wax up by free hands.
- I spru,invest and cast the wax pattern.
- I place the cast ring into the oven in 2 hours.Accoding to the wax pattern’s weight and determine the amount of metal required for the casting, I ight up the torch to adjust the torch flame and insert the ring into the machine with the sprue hole and let the alloy into the mold cavity where is ready to make the casting. I break the investment and clean the casting. I polish the castings and adjusting the proximal contacts, occlusion contact on the dies.
- I clean the the metal inlay and the metal crown again before I ship back to the dental office.


