Week 5: Project 1 Presentations, HTML5 Drawing App Demo

Topics:

  • Project 1 Presentations
  • HTML5 Drawing App

HTML5 Drawing App Demo

References used in adapting this demo:

Like with the Actionscript method, to create a drawing application with HTML5 and CSS you must react to mouse events. There is also an event listener you can invoke on the canvas element.

Adding event listeners with Javascript

Here are the mouse events that you can listen for:

  • mousedown
  • mouseup
  • dblclick
  • mousemove
  • mouseover
  • mouseout

And this is the format for adding the event listener:

element.addEventListener('event', eventhandler, useCapture);

The last parameter, useCapture, is complicated and for this application you don’t need to do anything more than set it to false.

The other thing that you need to add to our previous HTML5 drawing is being able to calculate the current position of the mouse. This is a little more complicated when you are talking about an html document than it was for a flash movie because you have to first figure out where the canvas element is in relation to the browser window, and add an offset to compensate for it.

Homework

Find an example of an online photo or image gallery that implements an unusual or unique user interface. This example should be something that you aspire to build or could inspire a project of your own. It can be Flash or Javascript.


Posted in Lesson | 5 Comments

Week 4: Quiz #1, Project #1 Code Jam

Topics:

  • In Class Quiz
  • Homework Review – Interface Design
  • How to use Components in Flash
    • Sliders
    • Drop downs
  • Adding Color and Alpha Settings to Your Drawing App

In Class Quiz #1

Awesome Color Picker tutorial on Flash and Math!


Posted in Lesson | Leave a comment

Week 3: Drawing Application Part 3

Topics:

  • Homework Review and Troubleshooting
  • Programming Fundamentals:
    • Conditional Statements
    • Comparison Operators
    • Numerical Data Types
    • Mathematical Operators
  • Actionscript Fundamentals: Working with Dynamic Text
  • Drawing Application Part 3: Adding Clear and Line Thickness Settings

Programming Fundamentals

Before we go on to the next step of the Drawing Application, there’s a few basic programming concept we need to review.

Conditional Statements

If you took logic back in high school, these might ring a distant bell. The most basic conditional statement is an if statement, which runs code only if a certain condition is met:

if (something is true)
{ do something }

If you want to have other code run in the case that the condition isn’t true, you add an else statement:

if (something if true) { do something }
else { do something else }

To build your conditions, you are going to need …

Comparison Operators

Also from the pages of your high school text book, these symbols allow you to compare two values.

  • Less than
  • Greater than
  • <= Less than or equal to
  • >= Greater than or equal to
  • == Equality
  • != Inequality
  • === Strict equality
  • !== Strict inequality

The operators are used to compare the values of the expressions to the left and right of them. Take note of the difference between the assignment operator (=) and the equality operator (==). = is used to assign the value of the expression on the right to the left. == is used to compare the equality of two values. When you are comparing two things, never use =

So, if you want to see if one value is equal to another, use a comparison operator in a conditional statement like so:

if (value1 == value2) {
do something
}

Numerical Data Types

There are several different types that you can define as variables built into Flash.

  • Number – holds any numerical value, positive or negative, whole or decimal
  • int – positive or negative whole numbers
  • uint – unsigned whole numbers
You define a variable with a numerical data type like this:
var myNum:Number;

You can assign a value to the number at any point in your script:

myNum = 10;

You can also define the variable and assign a value at the same time:

var myNum:Number = 10;

Mathematical Operators

Once you start working with numerical values, you might need to do some math on them. You can use standard math operators to do this:

x+y;

You’ll need to capture this new value somewhere though, so you can assign the value of the mathematical operation to another variable:

z = x+y;

Just remember that the variable that you are assigning the value to needs to be on the left side of the equals sign:

x+y = z <--- wrong!

Other arithmetic operators:

  • –  Subtraction
  • *  Multiplication
  •  Division
  • % Modulo

Most of these whould be self explanatory, but the modulo operator may be new. This operator returns the remainder after the second operand has been divided by the first. For example, 4 goes into 10 twice with 2 left over – 10 % 4 = 2.

Actionscript Fundamentals: Working with Dynamic Text

Any text field on the stage can be altered with code if it is set to be one of the dynamic text types. For classic text this is the “dynamic” and “input” fields. When using TLF text, any of the types are re-writable with code.

First you need to give the Text Field an instance name in the properties panel.

Then, to change the value of the text, it’s a simple matter of accessing the text property of the field:

myTextField.text = "Some Text";

In-Class Exercise – Drawing Application Part 3: Adding Clear and Line Thickness Settings

All the above is going to help us do the next step in our drawing application project. This week we are going to add a button to clear the drawing from the screen and buttons to make the line thicker or thinner.

Homework

1. Take what you learned today about changing the line thickness, and add the ability to change the line color.

2. Based on your wireframes, create the interface design for your drawing application. Once again consider who you are making the application for. The type, size and placement of controls, instructions, icon style should be designed for your target user. Next week, bring a flash file that contains all the elements of your interface design ready to start coding!

Posted in Lesson | Leave a comment

Week 2: Mouse Events, Drawing Part 2, Wireframes

Topics:

  • Homework Review: Self-Portrait
  • In-class exercise: Drawing with the HTML5 Canvas
  • Event Listeners and Event Handlers
  • Tracking and Reacting to Mouse Events
    • Creating a custom cursor with Actionscript
    • Drawing with the Mouse
  • Project 1: Drawing Application – Creating Wireframes

In-class Exericse: Drawing with the HTML5 Canvas

We’re going to pick up where we left off last week, and now learn how to draw with the canvas element and javascript. We’ll spend 20-30 minutes in class duplicating the self-portrait you created in Flash.

Event Listeners and Event Handlers

Both Actionscript and Javascript rely on Events to react to user input (like a mouse click) or other changes in the status of a page or application (like a certain time interval passing).

When you are writing code that creates behavior in reaction to an event, there are two parts to it: and event listener, and an event handler.

An Event Listener  is a piece of code that is constantly checking to see if a specified event has occurred. When the event does occur, the listener triggers the Event Handler.

An Event Handler is a piece of code that runs when a specified event happens. Usually, this will be in the form of a function, which is a reusable piece of code that performs a set of actions. We’ve already been using some built-in functions (also called methods) of Actionscript and Javascript in our drawing exercises.

Today we are going to at how to listen for and handle events with Actionscript. Next week we’ll look at the same thing with Javascript.

Tracking and Reacting to Mouse Events with Actionscript

One of the most basic event tracking tasks in an application is detecting Mouse inputs – when the user moves, clicks, or double-clicks the mouse.

Today we are going to learn how to replace the standard cursor with a custom cursor using Mouse events. Then we are going to learn now to use Mouse events to enable a user to draw with the Mouse.

Creating a Custom Cursor

There may be cases in a application where you want to display a different cursor icon than the standard arrow or hand that your computer usually uses. In flash, this icon is a property of the Mouse object. In order to replaced it, we hide the standard cursor, and then tie the movement of the mouse to a custom symbol from the library.

Step 1: Create a a new blank symbol:

Insert > New Symbol (Command + F8)

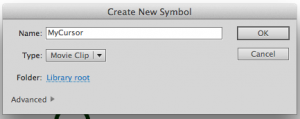
Make sure that you choose a unique name for your symbol, and “MovieClip” as the symbol type.

Next, click the “Advanced” tab.

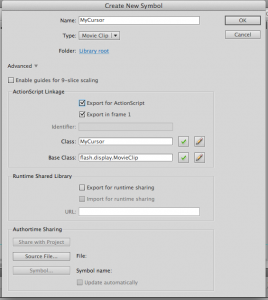
Check the “Export to Actionscript” box, and, to make it easy to remember, make sure that the Symbol name at the top and the Class name in the advanced settings are the same.

Hit OK.

Step 2: Draw something in that symbol to serve as the new cursor

Step 3: Open the Actions Panel, and Hide the Mouse

To hide the mouse is a simple method of the Mouse object:

Mouse.hide();

This should be the first line of code in frame one of your “Actions” layer.

Step 4: Create a new instance of your cursor symbol and add it to the Display List

Last week we created an instance of an empty Sprite object to draw into. You can go through the same steps to dynamically create an instance of any symbol in your library, as long as it is set to “Export for Actionscript”.

var cursor:MyCursor = new MyCursor();

Make sure that the class name (after the colon and new) is the same as what you named the symbol in your library.

Next, add the symbol to the display list:

addChild(myCursor);

 Step 5: Pin the Mouse X/Y to the Symbol X/Y

The mouse object in Actionscript has two properties that hold the current position of the mouse:

  • mouseX
  • mouseY

We can set the X and Y properties of the cursor instance to the mouseX and mouseY properties like this:

myCursor.x = mouseX;
myCursor.y = mouseY

This is all fine if we just want that cursor to show up at the initial mouse position, but what we really want it to do is follow the mouse position every time it moves. So, we need to add an an event listener and handler to react to the movement of the mouse.

Step 6: Add the Event Listener for the Mouse Movement

addEventListener(MouseEvent.MOUSE_MOVE,onCursorMove);

An event listener needs the type of event (MouseEvent) and the specific event to be tracked (MOUSE_MOVE) and then a function to run when the event is detected (onCursorMove)

To remove the same event listener:

removeEventListener(MouseEvent.MOUSE_MOVE,onCursorMove);

Step 7: Create the Event Handler

function onCursorMove(e:MouseEvent) {
myCursor.x = mouseX;
myCursor.y = mouseY;
e.updateAfterEvent();
}

For this to work, the function name (right after the word function) must be exactly the same as what you defined in the event listener.

The last line ensures that the cursor movement will be smooth by forcing it to move the cursor after the event is triggered instead of the frame rate of the movie.

Other Mouse Events:

These are the AS 3.0 Mouse Events that you can set up a listener for:

  • CLICK
  • DOUBLE_CLICK
  • MOUSE_DOWN
  • MOUSE_MOVE
  • MOUSE_OUT
  • MOUSE_OVER
  • MOUSE_UP
  • MOUSE_WHEEL
  • ROLL_OUT
  • ROLL_OVER

 In Class-Exercise: Simple Flash Drawing Application

Combining the cursor code above with what we learned about the Flash Drawing API last week, create a simple application that allows a user to draw a black line with the mouse. I’m going to give you the skeleton of the code to get you started:

//create a canvas object to draw on
var canvas:Sprite = new Sprite();

//add it to the stage
addChild(canvas);

//fill the canvas with a white background
canvas.graphics.beginFill(0xFFFFFF);
canvas.graphics.drawRect(0, 0, stage.stageWidth, stage.stageHeight);
canvas.graphics.endFill();   

//set a basic line style.
canvas.graphics.lineStyle(2,0x000000);

//add the event listeners for drawing actions
canvas.addEventListener(MouseEvent.MOUSE_DOWN, onCanvasMouseDown);
canvas.addEventListener(MouseEvent.MOUSE_UP, onCanvasMouseUp);

//on mouse down, begin drawing at cursor location
function onCanvasMouseDown(event:MouseEvent):void {
//move the pen to current mouse location

//add mouse move event listeners

}

function onCanvasMouseMove(event:MouseEvent):void {
//on mouse move, if mouse is down, draw line to current mouse x/y

}

//on mouse up, stop drawing
function onCanvasMouseUp(event:MouseEvent):void {

            //remove mouse move event listener

}

 Project 1 – Drawing Application

For the next three weeks you are each going to work on developing your own drawing applications. In addition to the mouse drawing functionality that we explored today, the user of the application should, at minimum, be able to do the following:

  • Set the line thickness
  • Set the color of the line
  • Set the opacity of the line
  • Clear the canvas

Step 1 – Wireframing Your Application

When you are creating a complex interface, it’s a good idea to map out the elements of the application and their functionality. We do this by creating a wireframe of the interface. The wireframe serves the same purpose for an application or Web site that a blueprint does for a building. Wireframes are generally black and white, simple renderings of all the functional elements of an interface, plus notes to explain how those elements will behave. You can create your wireframe in any program that you are comfortable with, or you can draw it on a piece of paper. Here’s an few places where you can find good examples of wireframes:

http://speckyboy.com/2011/05/29/20-effective-examples-of-web-and-mobile-wireframe-sketches/

http://webdesignledger.com/inspiration/18-great-examples-of-sketched-ui-wireframes-and-mockups

Homework

1. If you didn’t already, finish the HTML5 version of your self-portrait

2. Finish the Flash simple drawing application we started in class today.

3. Create a wireframe or wireframes for your drawing application. Consider who you are making this application for. Are you designing something for a small child or a professional artist? Even at this stage, you should consider the end user of the application and design for them.


Posted in Lesson | Leave a comment

Week 1: Drawing With Code

Topics:

  • Skills Survey
  • Flash/Actionscript vs. HTML5/Javascript
  • Drawing with Code
    • Basic Concepts
      • Coordinates
      • Lines
      • Fills
      • Shapes
    • Method 1: Flash and Actionscript
      • Dynamic Display Objects
      • The Sprite Class
      • The Flash Drawing API
    • Method 2: HTML5 and Javascript
      • The Canvas Element
      • Drawing With Javascript

Skills Survey

Please click the link about and fill out the survey so I can get an general idea of where the class is at in terms of technical knowledge and skills.

Flash/Actionscript vs. HTML5/Javascript

As you might be aware, major mobile device manufacturers like Apple and Microsoft have decided not to support the Flash Player browser plug-in for the mobile browsers of their smart phones and tablets. This, along with the enhanced features of HTML5, has put the future of Flash and Actionscript into question.

In the past, the class has focused exclusively on the use of Flash and Actionscript for the development of rich media interfaces. Recognizing the shift in support for this platform, and the fact that Javascript and Actionscript share the same foundation, this semester we are going to look at how to create complex interfaces in both Flash/Actionscript 3 and HTML5/Javascript.

Drawing with Code – Basic Concepts

When you are creating graphics entirely with code, instead of using the tools provided by a program like Illustrator or the Flash IDE, we write out a set of instructions for the program to follow.

Coordinates

In both Actionscript and Javascript, the area of your virtual canvas is expressed as a grid that is described in X and Y coordinates.

  • The X coordinates describe the horizontal axis of the grid
  • The Y coordinates describe the vertical axis of the grid

Colors

Colors are expressed as hexidecimal codes (white is #FFFFFF) or as RGB values (white is 255,255,255)

Lines

Lines connect two x,y coordinates. You can set line color, alpha value and thickness.

Curves

Lines that have additional coordinates that act as control points of a curve.

Fills

Color fields that fill the space in between lines, curves or shapes. You can set the color and alpha values.

Shapes

Primitive shapes that are comprised of starting coordinates and height, width, and/or radius parameters.


Method 1: Flash and Actionscript

To use the Actionscript drawing methods, you first need to create a canvas on which to draw. The drawing methods are all part of the graphics class, but you can’t directly create a graphics object to draw in. So we’ll use a simple display object called a Sprite. A Sprite has all the properties of a MovieClip, but without a timeline. You can learn more about the Sprite class here:

Sprite Class

We can’t create a sprite directly on the Flash Stage, so we have to create it and add it to the display with Actionscript. There are two steps to do this with Actionscript 3. First we create the Sprite, which we are going to call “canvas”:

var canvas:Sprite = new Sprite();

Next, we add our Sprite to the stage:

addChild(canvas);

The next thing we’re going to do is position the canvas in the center of the stage:

drawing.x = stage.stageWidth / 2;
drawing.y = stage.stageHeight / 2;

The graphics class that is associated with this object is called, handily enough, “graphics”. To draw in it, we reference it using the name of the parent Sprite, using dot notation:

canvas.graphics

You can learn more about the Graphics class here:

Graphics Class

SETTING A LINE STYLE

The graphics.lineStyle method takes three arguments – thicknesscolor, and alpha:

graphics.lineStyle(1);

DRAWING STRAIGHT LINES

To draw a straight line from the last point that the “pen” landed, use lineTo, which takes two arguments, x and y coordinates.

graphics.lineTo(50,0);

MOVING THE PEN

To move the pen position without drawing a line, use moveTo, which also takes x,y coordinates.

graphics.moveTo (-50,50);

DRAWING CURVED LINES

A curved line requires four points of reference – controlx, controy, anchorx, anchory

graphics.curveTo(0,-50,0,0);

PRIMITIVE SHAPES

There are built in methods for creating circles, ellipses, rectangles and rounded rectangles in ActionScript 3.0. They take various arguments depending on the shape:

  • drawCircle(x:Number, y:Number, radius:Number)
  • drawEllipse(x:Number, y:Number, width:Number, height:Number)
  • drawRect(x:Number, y:Number, width:Number, height:Number)
  • drawRoundRect(x:Number, y:Number, width:Number, height:Number, ellipseWidth:Number, ellipseHeight:Number)

FILLS

To fill in lines or shapes created with the drawing API, you define a fill style with beginFill, which takes two arguments, color and alpha:

graphics.beginFill(0xFFFF00,1);

All shapes will be filled with this style until you invoke the endFill method:

graphics.endFill();

 Method 2: HTML5 and Javascript

The Canvas Element

This is a new element in HTML5 that allows you to directly create graphics and animations in your html document without a plug-in. You create an empty canvas element like so:

<canvas id="myCanvas"></canvas>

This is it as far as the html is concerned, everything else is handled by javascript. However, it’s a good idea to put some text in between the canvas tags in case someone is viewing the page with a browser that doesn’t support the canvas element:

<canvas id="myCanvas">Hey, you really ought to upgrade your browser!</canvas>

The Javascript

Next, add some script tags to contain the Javascript:

<script type="text/javascript">
// script goes here
</script>

Now, you need to tell the javascript what element in the page you want to draw in:

var c=document.getElementById("myCanvas");

Then, you need to define the context of the canvas. This just means you are either defining it as a 2d or 3d space. We are going to stick with 2d:

var ctx=c.getContext("2d");

Now you are set up to draw! Here are the drawing methods for the canvas element. You will see they are pretty similar to Actionscript:

Canvas 2D Drawing Methods

Homework:

1. Weigh in on the Flash / HTML5 Divide by writing a short essay as a post on this site. Find at least 3 articles online discussing the issue – One from Apple or Microsoft explaining their position, one from Adobe explaining theirs, and one from an objective third party. Cite the URLs of these source in your response. Briefly discuss the key issues, the pros and cons of each technology, and where you fall in the debate.

2. Create a self-portrait using the two code drawing techniques we covered today. The two portraits do not need to be identical, or even in the same style, but they can be the same or similar if you wish. Bring the files to class next week and we’ll review them.

Posted in Lesson | 1 Comment