Topics:
- Homework Review: Self-Portrait
- In-class exercise: Drawing with the HTML5 Canvas
- Event Listeners and Event Handlers
- Tracking and Reacting to Mouse Events
- Creating a custom cursor with Actionscript
- Drawing with the Mouse
- Project 1: Drawing Application – Creating Wireframes
In-class Exericse: Drawing with the HTML5 Canvas
Drawing with Code Method 2: HTML5 and Javascript
The Canvas Element
This is a new element in HTML5 that allows you to directly create graphics and animations in your html document without a plug-in. You create an empty canvas element like so:
<canvas id="myCanvas"></canvas>
This is it as far as the html is concerned, everything else is handled by javascript. However, it’s a good idea to put some text in between the canvas tags in case someone is viewing the page with a browser that doesn’t support the canvas element:
<canvas id="myCanvas">Hey, you really ought to upgrade your browser!</canvas>
The Javascript
Next, add some script tags to contain the Javascript:
<script type="text/javascript">
// script goes here
</script>
Now, you need to tell the javascript what element in the page you want to draw in:
var c=document.getElementById("myCanvas");
Then, you need to define the context of the canvas. This just means you are either defining it as a 2d or 3d space. We are going to stick with 2d:
var ctx=c.getContext("2d");
Now you are set up to draw! Here are the drawing methods for the canvas element. You will see they are pretty similar to Actionscript:
Event Listeners and Event Handlers
Both Actionscript and Javascript rely on Events to react to user input (like a mouse click) or other changes in the status of a page or application (like a certain time interval passing).
When you are writing code that creates behavior in reaction to an event, there are two parts to it: and event listener, and an event handler.
An Event Listener is a piece of code that is constantly checking to see if a specified event has occurred. When the event does occur, the listener triggers the Event Handler.
An Event Handler is a piece of code that runs when a specified event happens. Usually, this will be in the form of a function, which is a reusable piece of code that performs a set of actions. We’ve already been using some built-in functions (also called methods) of Actionscript and Javascript in our drawing exercises.
Today we are going to at how to listen for and handle events with Actionscript. Next week we’ll look at the same thing with Javascript.
Tracking and Reacting to Mouse Events with Actionscript
One of the most basic event tracking tasks in an application is detecting Mouse inputs – when the user moves, clicks, or double-clicks the mouse.
Today we are going to learn how to replace the standard cursor with a custom cursor using Mouse events. Then we are going to learn now to use Mouse events to enable a user to draw with the Mouse.
Creating a Custom Cursor
There may be cases in a application where you want to display a different cursor icon than the standard arrow or hand that your computer usually uses. In flash, this icon is a property of the Mouse object. In order to replaced it, we hide the standard cursor, and then tie the movement of the mouse to a custom symbol from the library.
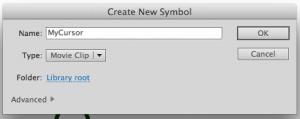
Step 1: Create a a new blank symbol:
Insert > New Symbol (Command + F8)
 Make sure that you choose a unique name for your symbol, and “MovieClip” as the symbol type.
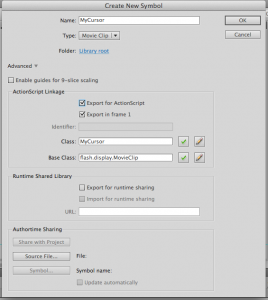
Next, click the “Advanced” tab.
 Check the “Export to Actionscript” box, and, to make it easy to remember, make sure that the Symbol name at the top and the Class name in the advanced settings are the same.
Hit OK.
Step 2: Draw something in that symbol to serve as the new cursor
Step 3: Open the Actions Panel, and Hide the Mouse
To hide the mouse is a simple method of the Mouse object:
Mouse.hide();
This should be the first line of code in frame one of your “Actions” layer.
Step 4: Create a new instance of your cursor symbol and add it to the Display List
Last week we created an instance of an empty Sprite object to draw into. You can go through the same steps to dynamically create an instance of any symbol in your library, as long as it is set to “Export for Actionscript”.
var cursor:MyCursor = new MyCursor();
Make sure that the class name (after the colon and new) is the same as what you named the symbol in your library.
Next, add the symbol to the display list:
addChild(myCursor);
Step 5: Pin the Mouse X/Y to the Symbol X/Y
The mouse object in Actionscript has two properties that hold the current position of the mouse:
- mouseX
- mouseY
We can set the X and Y properties of the cursor instance to the mouseX and mouseY properties like this:
myCursor.x = mouseX;
myCursor.y = mouseY
This is all fine if we just want that cursor to show up at the initial mouse position, but what we really want it to do is follow the mouse position every time it moves. So, we need to add an an event listener and handler to react to the movement of the mouse.
Step 6: Add the Event Listener for the Mouse Movement
addEventListener(MouseEvent.MOUSE_MOVE,onCursorMove);
An event listener needs the type of event (MouseEvent) and the specific event to be tracked (MOUSE_MOVE) and then a function to run when the event is detected (onCursorMove)
To remove the same event listener:
removeEventListener(MouseEvent.MOUSE_MOVE,onCursorMove);
Step 7: Create the Event Handler
function onCursorMove(e:MouseEvent) {
myCursor.x = mouseX;
myCursor.y = mouseY;
e.updateAfterEvent();
}
For this to work, the function name (right after the word function) must be exactly the same as what you defined in the event listener.
The last line ensures that the cursor movement will be smooth by forcing it to move the cursor after the event is triggered instead of the frame rate of the movie.
Other Mouse Events:
These are the AS 3.0 Mouse Events that you can set up a listener for:
- CLICK
- DOUBLE_CLICK
- MOUSE_DOWN
- MOUSE_MOVE
- MOUSE_OUT
- MOUSE_OVER
- MOUSE_UP
- MOUSE_WHEEL
- ROLL_OUT
- ROLL_OVER
In Class-Exercise: Simple Flash Drawing Application
Combining the cursor code above with what we learned about the Flash Drawing API last week, create a simple application that allows a user to draw a black line with the mouse. I’m going to give you the skeleton of the code to get you started:
//create a canvas object to draw on
var canvas:Sprite = new Sprite();

//add it to the stage
addChild(canvas);

//fill the canvas with a white background
canvas.graphics.beginFill(0xFFFFFF);
canvas.graphics.drawRect(0, 0, stage.stageWidth, stage.stageHeight);
canvas.graphics.endFill();

//set a basic line style.
canvas.graphics.lineStyle(2,0x000000);

//add the event listeners for drawing actions
canvas.addEventListener(MouseEvent.MOUSE_DOWN, onCanvasMouseDown);
canvas.addEventListener(MouseEvent.MOUSE_UP, onCanvasMouseUp);

//on mouse down, begin drawing at cursor location
function onCanvasMouseDown(event:MouseEvent):void {
//move the pen to current mouse location

//add mouse move event listeners

}

function onCanvasMouseMove(event:MouseEvent):void {
//on mouse move, if mouse is down, draw line to current mouse x/y

}

//on mouse up, stop drawing
function onCanvasMouseUp(event:MouseEvent):void {

            //remove mouse move event listener

}
Project 1 – Drawing Application
For the next three weeks you are each going to work on developing your own drawing applications. In addition to the mouse drawing functionality that we explored today, the user of the application should, at minimum, be able to do the following:
- Set the line thickness
- Set the color of the line
- Set the opacity of the line
- Clear the canvas
Step 1 – Wireframing Your Application
When you are creating a complex interface, it’s a good idea to map out the elements of the application and their functionality. We do this by creating a wireframe of the interface. The wireframe serves the same purpose for an application or Web site that a blueprint does for a building. Wireframes are generally black and white, simple renderings of all the functional elements of an interface, plus notes to explain how those elements will behave. You can create your wireframe in any program that you are comfortable with, or you can draw it on a piece of paper. Here’s an few places where you can find good examples of wireframes:
http://speckyboy.com/2011/05/29/20-effective-examples-of-web-and-mobile-wireframe-sketches/
http://webdesignledger.com/inspiration/18-great-examples-of-sketched-ui-wireframes-and-mockups
Homework
1. If you didn’t finish this already, finish the HTML5 version of your self-portrait
2. Finish the Flash simple drawing application we started in class today.
3. Create a wireframe or wireframes for your drawing application. Consider who you are making this application for. Are you designing something for a small child or a professional artist? Even at this stage, you should consider the end user of the application and design for them.


