Marketing’s Four P’s from Purdue Extension
Leave a reply


Today, we formed into teams and selected each team’s product or service to use for the final deliverables in the class. You used Google Drive to collect your files and to begin collaborative writing.
The final deliverables include:
| Collaboration: Seven-to-Ten-Minute Oral Presentation to Sell a Product or Service | As a team, select one member’s product/service proposal as the basis for your team’s presentation. Collaboratively, your team will create and deliver a seven- to ten-minute oral presentation designed to sell a product or service to an audience of potential customers that demonstrates: 1. knowledge of oral presentation techniques and conventions. 2. the ability to organize a presentation effectively. 3. the ability to incorporate various media into the presentation, including appropriate computer software. 4. knowledge of the product or service offered, of pertinent market forces, and of the potential customer base. 5. the ability to communicate the value of the product or service in clear, spoken English. 6. the ability to answer audience questions. 7. the ability to collaborate productively with a partner or partners. A presentation script and PowerPoint visual presentation are required and will be submitted as part of the assignment. | 10% |
| Collaboration: Website Advertising a Product or Service | To support your team’s collaborative presentation, your team will create a web page advertising a product or service that demonstrates: 1. knowledge of the product or service offered, of pertinent market forces, and of the potential customer base. 2. basic knowledge of web page design and composition, including appropriate software. The website will be based on your presentation and it is encouraged to be integrated into your presentation (perhaps to demonstrate how your team is promoting your product or service). All graphics, logos, design, and text must be created by your team. | 10% |
| Collaboration: Report on Collaboration | Each team will write an informal report on their group’s progress with the oral product service proposal or oral analytical research report that demonstrates: 1. the division of labor among group members. 2. the adequate progress of each group member. 3. the group’s adequate cooperation. 4. an awareness of a supervisory audience. It is each team’s responsibility to track your progress and keep notes that can be integrated into this report. | 10% |
For your website, you are required to have 10 cited sources with some of them coming from the library databases or other vetted sources.
The presentation must include all team members with speaking parts in the presentation.
It is recommended that you use the website as a part of your presentation.
Remember, you are marketing the product or service that your team has selected. Some of the proposal material may be incorporated into your marketing material and presentation, but the proposal may not be used wholesale or without understanding that the purpose of these final deliverables are not to propose but to market something that you imagine has been approved and made.
If you need professional help with immigration law issues, make an appointment immediately with CUNY Citizenship Now.
Adding to your Introduction, Current Situation, and Qualifications sections due today, you will want to focus on the Project Plan and Methodology and Conclusion/Cost-Benefit Analysis.
The Project Plan is written out in sentences and paragraphs. It creates a narrative for how the proposal will be realized into a real project or service. You will explain what is step one, what does it require to be done, and how will you know that step one is completed. Then, you do the same with step two, three, etc. until you arrive at a testing methodology for ensuring your prototype works/solves the problem. Finally, you explain how you take what was learned in the testing methodology to produce your proposed service or product.
The Conclusion should explain what costs there are to the company or investors to create the product or service, and what benefits there are to the company or investors from creating the product or service. To be convincing, you will need to explain how the benefits outweigh the costs.
The final layout of your document should take this form:
Use headings and subheadings as you see fit to make your document easier to read and follow. Remember to begin with a cover page.
At the beginning of our next class, turn in a printed copy of your complete proposal document. Each student will have an opportunity to give a 60 second pitch of his or her proposal to the class. After all students complete their pitches, you will have a chance to form teams around a proposal selected from your team members to complete the next deliverables in the class.
The pitch is your chance to sell your idea and yourself in a single moment. As you can imagine, many opportunities might begin by happenstance. Having a pitch always at the ready might open a door for you that you will only get that one chance to realize because your pitch is ready to deliver at the right time, to the right person, in the right way (briefly and to the point).
Your pitch should include these things:
You can find some examples of elevator pitches here, here, and here.
Bottom line: practice your pitch before coming into class!

 Today, we are beginning the project that will set the stage for everything we do in the last part of the semester. It is the 1500-2000-word formal product or service proposal. According to the syllabus, this project involves these things:
A 1500-2000-word formal product or service proposal that demonstrates: 1. knowledge of the product or service offered, of pertinent market forces, and of the potential customer base. 2. the proposer’s qualifications to deliver the product or service described. 3. knowledge of research methodology and the ability to describe that methodology. 4. proper proposal format. At least six library-sourced citations must be included (non-library-sourced citations are encouraged, but they do not count toward the six library-sourced sources). Any outside sources cited should be documented according to APA format.
In this project, you will think of a product or service that you would like to make a reality if given the time, personnel, and material resources. This project requires a little creativity on your part to imagine a product or service that you would like to build or offer. Your proposal should address all of the components listed above, but in particular, you have to include research on the current state of the market you would be entering, who are the intended users/customers, and how you qualify to propose and lead this project that you propose (ethos). Research on your part will inform questions about the product/service, the market for it, and the intended users. You must describe a research methodology as a part of your proposal–it could R&D to create the final product, it could be UX testing, etc.–you think what kind of research methodology applies to the successful implementation of your plan and describe it in your proposal.
Use Dr. Richard Johnson-Sheehan’s “Planning and Organizing Proposals and Technical Reports” on the Purdue OWL website as a guide in planning and executing your proposal.
We will use today’s class to begin brainstorming your topic and conducting your background research.
During today’s class, brainstorm what you want to propose. It should be within the realm of possibility, but it can take technology into new directions. Write a memo to Professor Ellis that includes these things: 2-3 sentences describing your proposed product or service, and 3 URLs to similar/competing/inspiring technologies (each link should begin with the technology’s name and the name of the company producing/offering it).
Due at the beginning of our next class is a printed copy of these sections of your proposal: Introduction, Current Situation, and Qualifications.
During today’s class, exchange your instruction manual (printed or online) with one other person in class for a round of user experience (UX) testing.
Carefully read over the instruction or training manual that you receive.
Write a memo addressed to the designer of the manual that is at least 500 words long.
Your memo should include one paragraph responding to these:
Email your memo in Word docx format to the author of the manual and carbon copy (cc) Professor Ellis on that email (jellis@citytech.cuny.edu).
You may quote some material from the manual in your memo, but excessive quoting should not be used as a strategy to avoid writing 500 words of your own responses.
Take the feedback offered in the memo to revise your draft manual for the final deliverable due at the beginning of our next class on November 3.
Final revision checklist:
You should have your general list of instructions with you in class today.
Now, considering the balance of showing and telling. I want you to write a memo that states your plan of action to create your instruction manual.
Its introduction should state what exactly–use precise language–you are creating instructions to do.
In the next part, explain how you plan to instruct/guide your reader to accomplishing the task or learning a procedure. Will you use a list of instructions, a diagram, screenshots, photos, text boxes, appendix, etc.? For each of these things, you will want to say how you will use each element to support your audience.
Finally, write a short section that lays out your plan for what order you plan to complete your instruction manual. Will you test your written instructions that you brought to class today? After finalizing your written instructions, will you take screenshots or photos of each step? Will you add a layer of contextual information for your manual–in text boxes or an appendix?
You have 45 minutes to write this and send to me via email as a DOCX or PDF file–no invitations to edit on Google Docs, please!
For our next class: Bring one printed draft of your instruction/training manual. Focus on your instructions and visual aids (diagrams, photos, screenshots). We will use these during the first part of class to do UX testing. If the object of your manual is unavailable in our classroom, we will pair off and have you walk through the document with a peer. If you can arrange for the object to be in class, please feel free to do so, because this would of course make for a stronger UX test. The remainder of time in our next class will be on the other elements of the instruction manual (layout, TOC, introduction, contextual info and in-text definitions, glossary, citations). The project will be due in its final form on November 3.
Individually, you will write a 1500-2000-word instructional or training manual that demonstrates: 1. ability to explain a task/process in clear, concise language. 2. selection and definition of appropriate terminology and concepts. 3. awareness of the intended user/audience. 4. knowledge of instructional manual format. All diagrams, illustrations, or photos must be created by the student and integrated into his or her manual. Any outside sources cited should be documented according to APA format.
Instructional or Training Manual
Let’s look at some examples (use Google, the terms below, and “filetype:pdf” modifier).
Find your own examples for ideas and inspiration. The reading for this section of the class has to do with your own research into what instruction manuals look like.
Think about what you know enough about that you can teach it to someone else and it is something that you want to include in your professional portfolio.
Of course, choose a task or process that you have realistic access to the hardware, software, etc. that you will need for creating your instruction manual.
During today’s class, we held peer review on your 750-word expanded definition drafts. If you did not receive feedback, you will want to reach out to your contacts in class or enlist friends to help you. Focus on the strategic issues (1. correct memo format, 2. discussion of etymology and history of the term, 3. example definitions and contextual sentences, 4. discussion of those in the appropriate section, 5. use and citation of sources–appropriate sources, and 6. addressing the appropriate, professional audience), and tactical issues (diction, syntax, grammar). Reverse reading is a good technique to help with the tactical issues (reading one sentence at a time from the end of the document to the beginning).
After you are satisfied with the writing, then you may turn to the final polishing touches on your document. Make sure your font (since these documents will be printed, use a serif font like Times New Roman) and heading use is consistent (For heading information in APA format, refer to the Purdue OWL website). You may include photos that are of your own creation or that are available from a source that is either public domain or Creative-Commons Licensed (search for some here). Any image that you did not make/take/create must be cited in your list of references.
One more thing…
After reading your 500-word article summary assignments, I want to give everyone another shot at perfection. Each student should review his or her 500-word document and the previous OpenLab entry for the assignment that discusses layout of the document. Make sure everything about your assignment passes muster. Are you using a single font and size throughout? Are you using the APA format correctly? Are you actually discussing the article in your summary, or are you discussing around the topic of the article without demonstrating that you have actually read it? Finally, read it aloud to yourself and correct the diction, spelling, syntax, and grammar of your writing, too.
Your revised 500-word summary and final 750-word expanded definition are due on Wednesday, October 10.
Visual examples of the two documents are included here: example-750 500-example.
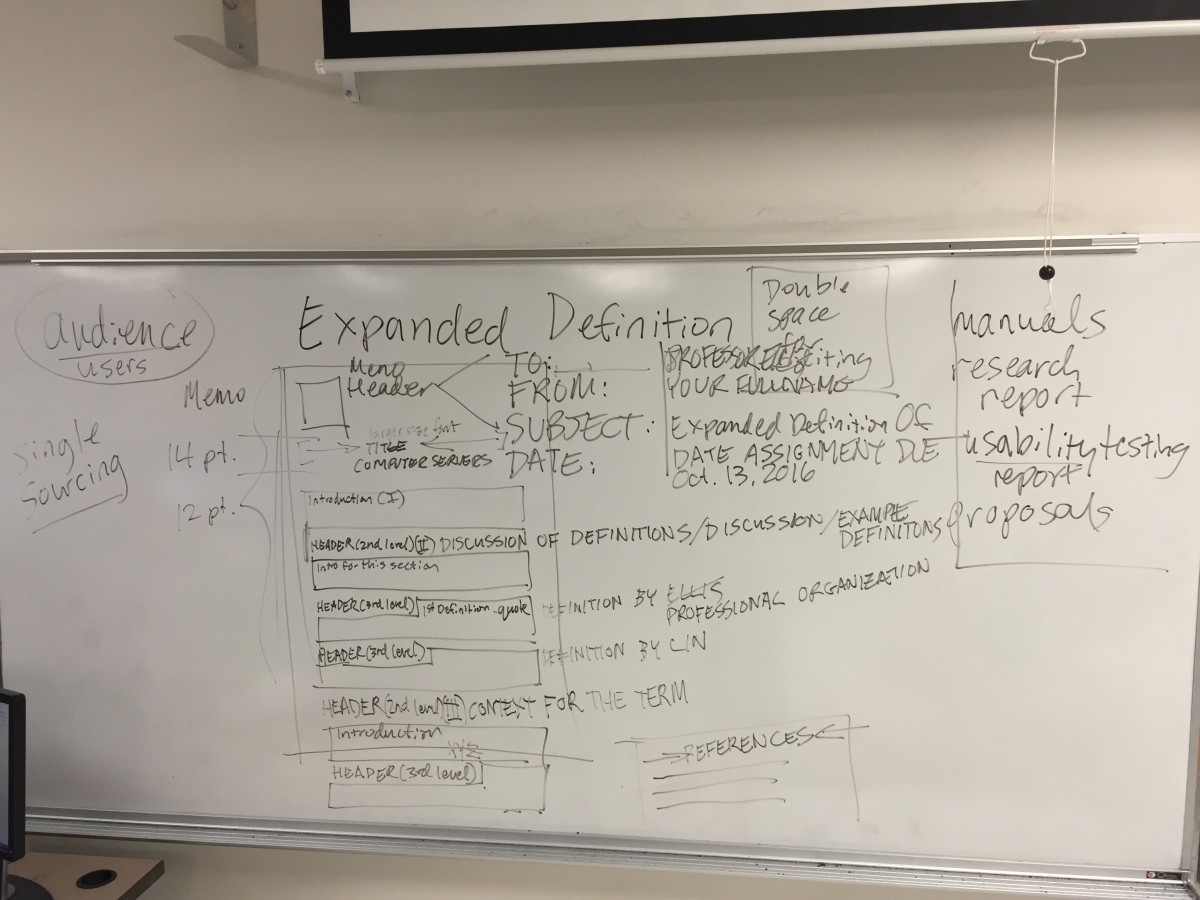
During today’s class, we discussed the overall format of your expanded definition memo. The above images show the overall layout of your memo document using the research that you found (definitions and context-specific sentences). Everything that you quote must be cited using APA formatting and you must include a list of REFERENCES for all sources quoted.
NB: The introduction does not require a heading. It should include a reference to the term being defined, a formal definition of the term in your own words, the etymology of your term, a reference to the audience this document is intended for, and finally, an overview or roadmap of the contents in the document.
For our next class, bring three printed drafts of your memo to class for peer review. During our next class, we will perform peer review and discuss ways of making your memo visually impressive and informationally rich.
The OpenLab is an open-source, digital platform designed to support teaching and learning at City Tech (New York City College of Technology), and to promote student and faculty engagement in the intellectual and social life of the college community.

