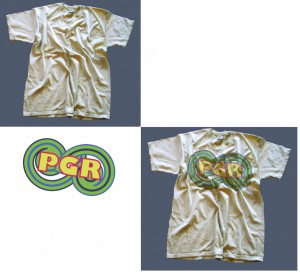
Displacement Map and guide Prof. Rosenblatt
Placing your LOGO Design on a shirt so it looks realistic! As though it was printed on the shirt. This is called a DISPLACEMENT MAP. Once you learn this, you can put any graphic on a surface, a face, hands, shirts, the side of a barn – anything!
For this exercise you will create a simple logo of your initials in Illustrator and place it on a shirt. Create a background for it also .Do a good job with up to 4 colors. Use a minimum of black. Think color! Use what you’ve learned in color. Please be creative. Do a job for legibility. appeal and impact.
1- Get the files named Shirt and the one named Cup from the email sent to you. Put it on your desktop and rename it (save as) with your last name again and the number 1, 2 or 3 to the desktop.
2- Design a logo of your initials with a graphic design, in Illustrator. Make it bold. Be sure to set all color preferences to RGB. [File – Document Color Mode- RGB] and in the layers palette select RGB as well. When done, save it with the name Logo with your initials. If you are doing this with type, save this and save a copy. Change the type in the copy file to outlines when satisfied.
3- In Photoshop, open the Shirt file that is on your desktop. Be sure it has a resolution of 150 dpi. [Image – Image size]
Apply a Gaussian blur of one pixel.
[Menu – Filter – Blur – Gaussian blur]
4- Select the layer. (![]() A), copy it (
A), copy it ( ![]() C), set a new file window (
C), set a new file window (![]() N), and paste (
N), and paste (![]() V).
V).
5- Desaturate the color in this layer completely and save as: DISPLACEMENT MAP to your desktop. If it is in layers flatten the layers to one beginning with the top layer. Repeat this command until all layers are one
(![]() E).
E).
6- Open the original Shirt file that was emailed to you. It should be on your desktop.
7- Open the Illustrator file in the Photoshop file. Do not use the place command. You can move the image onto the shirt file with the V command tool. That is the move tool (solid arrow)
8- If you have followed instruction in #7, you can correct the angle of the position at this time. Then go to Layer – Smart Objects – Convert to Smart Object. (Logo layer)
9- Then go to Filter – Distort – Displace. A window will give you the coordinates for the distortion. (10 x 10). Click OK.
10- Find the Displacement Map you have named and click on it. And Voila! Your Logo will map to the folds of the shirt.
11- One or two more steps! In the Layers palette select Multiply and change the fill slider to a percentage of about 85% for greater realistic effect.
see sample Shirt below
THERE ARE MANY MORE FILTERS YOU CAN APPLY AND MASKING IMAGES ALSO, BUT THAT CAN BE FOR A LATER LESSON.


