Tonal Contrast / Shape and Form 

In black and white photography, contrast is measured high, normal or low. A high contrast photograph comprises primarily of white and black with few or no middle gray tones. Lets take a white policeman in a black uniform against a dark background is an example of high contrast. A low contrast scene has colors or tones, which highlight shadows, have very little difference. In other words all colors within the scene have similar appearance. A white sailor in a white uniform against a white background is a prime example of low contrast. Most scenes people photograph have normal contrast. Of course there will be elements within the scene that are very light or very dark and many tones that reproduce various tones of gray.

In black and white photography, high contrast expresses a sense of hardness and is a characteristic of strength and power. Low contrast conveys a sense of softness and is a characteristic of gentleness and mildness.

Shape and form are two very important visual elements. Every object in a photograph has both shape and form. Shape is how the subject appears in two dimensions. A silhouette is an example of a shape in a photo.

Form is how the subject looks in three dimensions. Photos are two dimensional and photographers have the challenge of depicting three dimensional objects (their subjects) in a two dimensional form (the photo).

Black and white photos draw the attention to the shadows and flowing lines that portray form. A key tip to make your subject look three dimensional is the lighting. Side lighting reveals form by casting shadows on the subject. Front and backlighting obscure it.

When looking for a good shot, look beyond the colors in a scene and instead focus your attention on the shapes. Arrange them in a way that emphasizes the most interesting aspect of the shape, or creates an intriguing composition of different shapes. I hope this post series has helped you gain some knowledge on black and white photography. Now go get your camera and start shooting!

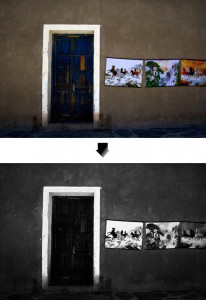
The photo above uses tonal contrast to create a dramatic scene. The light tones of the door frame and the paintings have created an impressive image.


If you still want to learn more tips on how to create a stunning black and white photo, here is a youtube link to learn more. How to edit great black and white photos
Texture

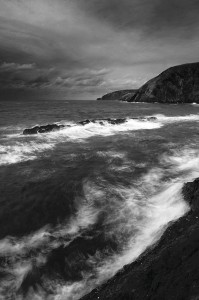
Envision rusty metal, the wall of an old brick building or weathered wood. Anything that is aged has plenty of texture, which is great for black and white photography. More examples of objects with great texture are weather-beaten stone, foliage or clouds. The fine detail cracks of weather-beaten stone and the shapes of clouds will give your black and white photo depth and interest.

The picture above is an example of how the clouds and ocean give great texture in a black and white photo.

Texture is affected by lighting conditions. Low light, preferably around sunrise and sunset makes texture stand out sharply. Strong side lighting is essential for bringing out the texture in any subject. You can use strong natural light, or get creative with flash to create side lighting on the subject. The soft light of an overcast day can also bring out texture. The secret to lighting is making sure the light suits the subject. Midday light, for example, can be great for architecture but poor for portraits. An overcast day is ideal for taking portraits, but poor for landscapes.

Tips on enhancing the texture for your photos

–       For DSLR camera users, always shoot your photos in RAW format. It is the best color to black and white conversion.

–       Banish dark shadows. Make sure the lighting for the background of a photo is bright and the lighting on the subject is diffused.

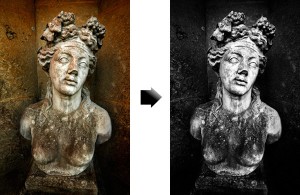
In the photo above there was a soft lighting in the picture. The contrast was brought up thru photoshop in the black and white photo next to it in order to increase the texture.

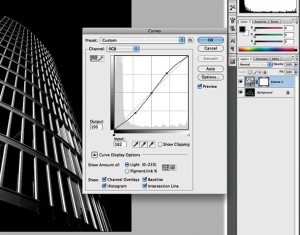
–       Boost contrast on Adobe Photoshop. Use the curves tool to achieve that.

Photo above is showing how the curves tool can boost or decrease contrast.

Understanding Black and White Photography

“The key to successful black and white photography is learning to see the world in monochrome.” (Gibson, par. 1) It is imperative to understand that not all photos are black and white material.  There are certain types of photos that are only meant to be for color impact.

As you can see with the photo above, there is a lot of color which makes the photograph powerful. The contrast between the ground and the sky. The different shades in the clouds, the color of the trees, the sheep and the sheep herder are all different colors. The lighting in the picture is very high, there is not enough shadowing to make it into an interesting black and white photograph. Making this photo black and white would not be a smart decision because of all the different things going on in this picture. You would lose the feel of the picture.

As you’re evaluating your subject, try and imagine how it will look in black and white. Visualize how a shot’s shapes, textures and tones will be recorded.

The success of your black-and-white photos depend on several different factors, but the main focus to look out for is a main subject that will appear in a significantly different shade of grey to the background. Then look out for subtleties of tone and texture that will add depth to your images.

In the next parts of this 3 blog series I will go in more depth on texture of the photo, tonal contrast and shape and form of a photograph. 

Where the quote is from

My goal for this blog is to expose as much graphic design work as possible. Share new ideas, new visions and new perspectives of design to my fellow colleagues. Show the world what potential is out there.